Table of Contents
Advertisement
Advertisement
Table of Contents

Related Manuals for Apogee Element 46


Summary of Contents for Apogee Element 46
- Page 1 Apogee Element Series User’s Guide v1.0 October, 2016 ...
-
Page 2: Table Of Contents
Apogee Element Series User’s Guide Contents Overview Introduction Package Contents Element 24 Panel Tour Element 46 Panel Tour Element 88 Panel Tour Setup System Requirements Download & Install Element Software package Connect Element to Your Computer If connecting a Second Element Update Element’s Firmware... -
Page 3: Overview
Legendary Sound Quality. The Power of Thunderbolt. Elegant Simplicity. Apogee’s Element 24, 46 and 88 are Thunderbolt audio I/O boxes for Mac. The Element Series takes the best of cutting-edge Apogee gear like Symphony I/O Mk II, Ensemble Thunderbolt and Groove and puts it into simple form factors. With streamlined hardware features and advanced software control, the Element series delivers ultimate recording quality and performance at unprecedented prices. -
Page 4: Package Contents
Quick Start Guide Warranty Booklet Register your product ● Access Apogee’s expert Technical Support for free ● Receive important product update information by email ● Take the Customer Satisfaction Survey for a chance to win Apogee gear! Register Now: w ww.apogeedigital.com/support/register... -
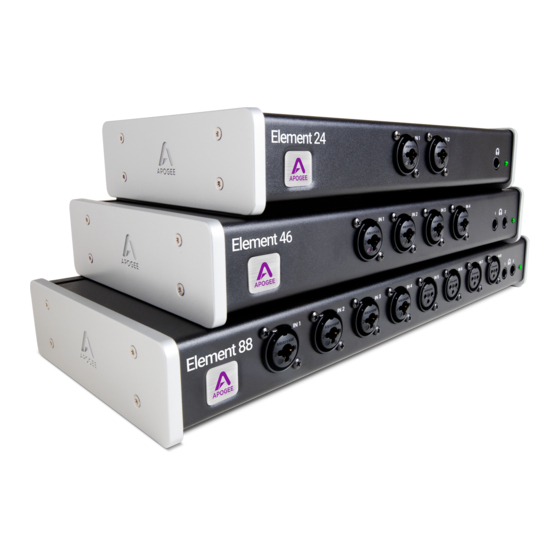
Page 5: Element 24 Panel Tour
Apogee Element Series User’s Guide Element 24 Panel Tour Element 46 Panel Tour Element 88 Panel Tour... -
Page 6: Setup
Apogee Element Series User’s Guide Setup System Requirements ● Mac OS X 10.10 or greater ● Thunderbolt™-equipped Mac ● 4GB minimum RAM, 8GB Recommended Download & Install Element Software package Before Element will work with the computer, special software must be installed. Always get the latest version of the software from the apogee website: www.apogeedigital.com/support/element... -
Page 7: Connect Element To Your Computer
Apogee Element Series User’s Guide Connect Element to Your Computer Connect the Power Supply to Element. Connect Element to your Mac using a Thunderbolt cable. If connecting a Second Element Connect the Power Supply to Element Connect Element to a second Thunderbolt port on your Mac. -
Page 8: Update Element's Firmware
Apogee Element Series User’s Guide Update Element’s Firmware When first connecting Element to your computer, you may be prompted to update the Firmware: Click Update, or manually open the Element Make sure only one Element is connected to the Firmware Updater.app from your computer’s Mac. -
Page 9: Element Control
Apogee Element Series User’s Guide Element Control Control of your Apogee Element Thunderbolt interface is available through a Mac software app, or an iOS control app. Each provides it’s own unique set of controls and features. Element Control Mac Software When Element Control for Mac software is opened, you are presented with a Snapshot Template chooser. -
Page 10: Essentials Window
This window provides simple and compact controls for Input Channels and Outputs. It’s orientation can be changed between vertical and horizontal so that it can be placed to the side or end of your recording software. System Status Display - This displays the status of the connected Apogee Element hardware. ●... -
Page 11: Toolbar
Apogee Element Series User’s Guide Tool Bar The Tool Bar is always visible at the top of the Primary window. It provides the ability to show/hide the System Sidebar, Device Sidebar, Essentials window, Remote window and Hover-Help window. It also has buttons for Clear Meters and Mute All outputs. -
Page 12: Device Sidebar
Optical outputs. On Element 24, signal only appears on ADAT output 1-2. On Element 46, signal only appears on ADAT output 1-4. On Element 88, signal appears on all ADAT output channels. Note: When Optical Out Format is set to SPDIF, only inputs 1-2 are transmitted to the optical output 1-2. -
Page 13: Channel Section
Apogee Element Series User’s Guide Channel Section This portion of the Primary Window displays Channels for Analog input, Digital input, and Playback from audio software. Channel Top Label - Indicates the channels source. Can be renamed by clicking the label and typing a user-customized label. - Page 14 Apogee Element Series User’s Guide Input Settings - Provides options for the various inputs: ● : Use this button to enable 48 volt phantom power on the corresponding Analog In channel. Condenser mics require 48 volt phantom power to operate.
-
Page 15: Mixer Section
*Note: Element 24 = 2 mixers available Element 46 = 3 mixers available Element 88 = 4 mixers available FX Send - Signal from each channels can be sent through this mixer by raising the individual FX Send Channel Fader. -
Page 16: Monitor/Output Section
Apogee Element Series User’s Guide Channel Solo button - Mute all channels that do not have this solo button engaged in this mixer. Command-click to solo all channels. Note: Engage Solo-Safe mode on a channel by Control-Clicking the Solo button on a channel. This prevents this channel from being muted when another channel in the mixer has solo engaged. -
Page 17: Hover Help
Apogee Element Series User’s Guide Hover Help For specific information about Element Control’s features, open the Help window and hover your Mac’s pointer above each setting to see a helpful summary. Menu Bar Menus Element Control Menu About Element Control - Choose this menu item to display version information for all hardware connected and software elements installed on your Mac. -
Page 18: View Menu
Selecting an item in the W indow Menu switches to a view of that selection. Help Menu Use the S earch Field to search for a specific menu item. Element Support Online - Select this menu item to be taken to the Apogee website’s Support page for Element. -
Page 19: Apogee Control Ios App
Apogee Element Series User’s Guide Apogee Control iOS App Many of the features and settings of the Apogee Element Thunderbolt interface can be controlled by the free Apogee Control iOS app. Here’s how it works: Open the App Store app on your iPad, iPhone, or iPod Touch and search for Apogee Control. -
Page 20: Ios App Toolbar
Mute All Outputs - Engages Mute on all speaker and headphones outputs. These mutes must be manually disengaged. Analog Input Settings Provides options and controls related to the analog inputs of your Apogee Element Thunderbolt Interface Input Source - Mic - XLR input is sent through the microphone preamp - Instrument... -
Page 21: Monitor Output Settings
Apogee Element Series User’s Guide Monitor Output Settings Provides option and controls related to the Main and Headphones outputs of your Apogee Element Thunderbolt interface. Output Source Selector - Selects the sound source for this output. The options are: Playback - Sends a playback channel stereo signal directly to this output, bypassing all mixers. -
Page 22: Snapshots & Examples
Apogee Element Series User’s Guide Snapshots & Examples When Element Control software is first opened, you are presented with a Snapshot Template chooser. The following section will explain and explore these default Snapshot Templates in depth, with use-cases demonstrating how... -
Page 23: Getting Started Snapshot Template
Apogee Element Series User’s Guide Getting Started Snapshot Template This Snapshot Template provides simple input settings in the Input Channel section, a single stereo playback channel for audio playing from audio software such as iTunes or your DAW, and output settings for dealing with your speaker and headphone outputs. -
Page 24: How Element Control Input Channels Appear In Your Recording Program
In this example Logic Pro X project, four audio tracks have been created with each track set to Input 1, 2, 3, and 4 respectively. In this way, each Element 46 interface audio Input Channel corresponds with the four tracks created in Logic Pro X. -
Page 25: How Element Control Outputs Work With Your Recording Program
Apogee Element Series User’s Guide How Element Control Outputs work with your Recording Program: Signal from the Stereo Output of Logic Pro X appears in Element Control’s Playback 1-2 channel. This Playback 1-2 signal will flow to the Element interface’s outputs... -
Page 26: How To Get A Separate Mix To The Headphones Than From The Speaker Outputs
Apogee Element Series User’s Guide How to get a separate mix to the headphones than from the speaker outputs: To do this, you first have to create an aux mix in your Recording Program. In Logic, create a Send to a Bus on one of your... - Page 27 Apogee Element Series User’s Guide Set the Headphones output to Playback 3-4 to send this signal to your headphones output. The Main monitor outputs are still set to Playback 1-2 and play audio from Logic’s Stereo Out master track.
-
Page 28: Essentials Snapshot Template
Apogee Element Series User’s Guide Essentials Snapshot Template This Snapshot Template is the same as the Getting Started Snapshot Template but only the Essentials Window is displayed. This represents the simplest layout of the Element Control software. It provides controls for only Inputs and Outputs. All other settings are disabled or hidden: All Analog Input Channels and Monitor output controls are represented in the Essentials bar. -
Page 29: Direct Monitoring Snapshot Template
Apogee Element Series User’s Guide Direct Monitoring Snapshot Template This Snapshot Template is perfect for users who do not want to open a DAW in order to listen to their inputs. It does this by setting the headphones and speaker outputs to “Mix 1”. In this way, any channel that has the Mixer 1 fader raised will be heard. - Page 30 Apogee Element Series User’s Guide Lets analyze the signal flow: Any signal from the Input Channel Section must go through the Mixer 1 fader before it will be heard in the outputs that are set to “Mix 1”. This has a few benefits: ●...
-
Page 31: Using The Direct Monitor Snapshot Template With Your Recording Program
Apogee Element Series User’s Guide Using the Direct Monitor Snapshot Template with your Recording Program Setup an audio track in Logic. Make sure input monitoring on that track is turned off because you are direct monitoring through Element Control instead. -
Page 32: Full Functionality Snapshot Template
Apogee Element Series User’s Guide Full Functionality Snapshot Template For the user that wants a “god-view”, this Snapshot Template has all side-panels, mixers, and channels visible. Note: All outputs are set to “Mix 1” in this Snapshot like the Direct Monitoring Snapshot Template. Therefore you must raise... -
Page 33: Vocal Overdub Snapshot Template
Apogee Element Series User’s Guide Vocal Overdub Snapshot Template This Snapshot Template is conceived for an overdubbing recording session. At this stage in the recording process, a recording project is typically full of tracks and plugins which may require your I/O Buffer to be set to a large size. Because software input monitoring with such a large buffer would result in too much latency, this snapshot is designed for Direct Monitoring a single input, but using Element Control’s FX Send to apply your DAW’s reverb to the Low Latency (Direct Monitoring) mixer inputs. - Page 34 Apogee Element Series User’s Guide Setup a standard reverb send and return for this audio track: In the “Sends” section of the Audio track, create a Bus send. Set the Bus level to 0.0dB. When you create the Bus send, Logic will automatically create an Aux track with that bus selected as the input.
- Page 35 Apogee Element Series User’s Guide In the mixer view’s Option’s menu, create a New Set this new Aux 2 channel’s input to the FX Send Auxiliary Channel Strip. L/R (Input 15-16 in this example) Set the Aux 2 channel to “No Output” (or lower the fader), and create a bus send to the s ame bus as the Audio track.
- Page 36 Apogee Element Series User’s Guide At the end, your Logic Project will look like this: This creates a dual-path signal flow: ● Path 1 happens when Recording ● Path 2 happens when Playing back that recording Path 1: Audio from Element Control Analog 1 input is sent to Logic’s Audio 1 track for recording.
-
Page 37: A/D Expander Snapshot Template
Element 24 - Analog input 1 - 2 > ADAT output ch 1 - 2 ● Element 46 - Analog input 1 - 4 > ADAT output ch 1 - 4 ● Element 88 - Analog input 1 - 8 > ADAT output ch 1 - 8... -
Page 38: Working With A Multiple Element Interface Setup
Apogee Element Series User’s Guide Working with a Multiple Element Interface Setup The connection of any two Element Series interfaces is supported in any desired order, for a system with up to 16 analog inputs, 8 line outputs, and 4 headphone outputs. -
Page 39: The Multiple Element Interface System In Use
To change the Master device, open the System sidebar, then change the designated interface in the Master Device dropdown. Inputs and outputs of the two Element interfaces are aggregated in the Apogee Thunderbolt driver, so that both interfaces appear as one audio device named A pogee Thunderbolt in your DAW or in OS X System Sound Preferences. To distinguish inputs for each interface, Master input labels include the prefix ... -
Page 40: Additional Support
Apogee Element Series User’s Guide Additional Support For more information ● Apogee KnowledgeBase and FAQs ● Informational Videos ● Apogee Product Registration ● How to contact Apogee Technical Support Please visit: www.apogeedigital.com/support...
Need help?
Do you have a question about the Element 46 and is the answer not in the manual?
Questions and answers