Table of Contents
Advertisement
This Manual Copyright © 2012 by Hygiena LLC
All rights reserved. No part of this manual may be reproduced,
stored in a retrieval system, or transmitted, by any means or in any
form, without the prior permission of Hygiena LLC.
The information contained in this manual is subject to change
without notice. Hygiena LLC assumes no responsibility for any errors
that may appear in this document.
This manual will describe the specifications and general operations
of the SystemSURE Plus v2 and EnSURE v2 luminometers.
For older luminometers refer to the operators manual that shipped
with the luminometer for specific operations.
Document: SystemSURE Operators Manual V3.0. 2013
Copyrights and Trademarks
Worldwide Patents Pending.
Hygiena, EnSURE, SystemSURE Plus, SystemSURE I I,
Ultrasnap, SureTrend and dataSURE II are trademarks of
Hygiena LLC.
Operating Precautions and Limitations of Use
Hygiena's products are designed and constructed to be safe
and without risk to health when properly used in accordance
with the supplied documentation and when the operating
precautions outlined in this manual are fully observed.
It is essential that the user of this manual is aware of the
potential hazards associated with the unit and its accessories
All operators should be familiar with the safety precautions
and warnings given in this manual before attempting to
If the unit is used in a manner which is not specified by the
manufacturer, the protection provided by the equipment may
Please read this manual in its entirety and the "Operating
Precautions and Limitations of Use" at the end of the manual
The following symbol is used in this manual:
IMPORTANT
operate the unit.
be impaired.
before using the Luminometer.
Description: CAUTION / WARNING
I
Advertisement
Table of Contents

Summary of Contents for Hygiena SystemSURE Plus v2
- Page 1 Hygiena LLC. The information contained in this manual is subject to change without notice. Hygiena LLC assumes no responsibility for any errors that may appear in this document. This manual will describe the specifications and general operations of the SystemSURE Plus v2 and EnSURE v2 luminometers.
-
Page 2: Table Of Contents
Table of Contents 1. INTRODUCTION _____________________________________________________ 1 1.1 W ATP? _____________________________________________________ 2 HAT IS 1.2 H ? ____________________________________ 2 OES THE UMINOMETER 1.3 W RLU? __________________________________________________ 2 HAT IS AN 1.4 T _________________________________________ 3 EVICES AND CCESSORIES 2. LUMINOMETER DESCRIPTION _________________________________________ 4 2.1 K ___________________________________________________ 4 EYPAD... - Page 3 5.4 U ______________________________________ 20 SING THE REND OFTWARE 5.5 I USB S ________________________________ 21 NSTALLING THE MART ABLE RIVER 5.6 C PC ________________________________ 22 ONNECTING THE UMINOMETER TO THE 6. OPERATOR MAINTENANCE ___________________________________________ 22 6.1 C ______________________________________ 22 LEANING THE UMINOMETER 6.2 R ____________________________________________ 22...
-
Page 4: Introduction
System intended to detect ATP found in organic matter and microorganisms. The Hygiena luminometer, in conjunction with Hygiena’s ATP and Micro-snap test devices, measures levels of contamination on surfaces, water and product samples. Remove swab from test tube and collect sample. Refer to instructions included with testing device. -
Page 5: What Is Atp
The luminometer detects ATP using a chemical reaction. Luciferin/Luciferase + ATP = Light A sample is collected using a Hygiena ATP device (see section 1.4). Surface tests come with a buffer moistened swab bud that aids in the removal of any biological material (ATP) on either a wet or dry surface. -
Page 6: Test Devices And Accessories
Positive and negative rod for validating luminometer calibration CK25 25 vials of freeze-dried ATP to verify ATP Positive efficacy of ATP test devices Control Kit See the Hygiena website for a complete list of test devices, accessories, and other products. www.hygiena.com... -
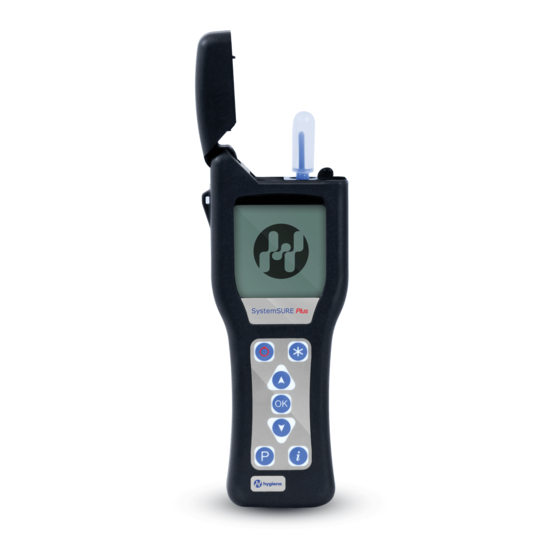
Page 7: Luminometer Description
2. Luminometer Description Luminometer components: 2.1 Keypad Symbols The keypad is arranged with the following buttons: Power on/off button Menu select and Exit button Up/increase button Start/accept button Down/decrease button Program select button Statistics shortcut button The functions of the keypad are explained in detail in the following sections of this manual. -
Page 8: Installing Batteries
Opening the lid reveals the following internal features: RS232 connector cover Protective pocket and sample insertion port For details on the RS232/USB connector and protective pocket, refer to sections respectively. 2.2 Installing Batteries The unit is designed to operate from both non-rechargeable alkaline batteries and rechargeable Nickel Metal Hydride (NiMH) or Nickel Cadmium (NiCD) batteries: Battery... -
Page 9: Turning The Luminometer On And Off
CAUTION: Take care not to insert the batteries in the wrong direction, as this may cause permanent damage to the unit’s internal electronics. When the batteries are inserted correctly, the unit will automatically turn on and enter the clock set-up mode. (see section 3.8). 2.3 Turning the Luminometer On and Off To turn the unit on, press the button. -
Page 10: Display Layout And Icons
2.4 Display Layout and Icons The liquid crystal display (LCD) has the following layout. The upper half of the display contains the status icons and the large RLU result digits. The following is a list of icons and their definitions. Low battery warning icon Lid icon - flashes when the lid needs to be closed, or the RS232 connector cover needs to be properly tucked under... -
Page 11: Power Saving Standby Mode
2.6 Power Saving Standby Mode If the luminometer is on but has not been used for 19 minutes, it will beep every 10 seconds for 1 minute, and then turn off. If any key is pressed during that time the luminometer will reset the Standby Mode countdown. -
Page 12: Set-Up Menu Options
3. Set-up Menu Options With the luminometer turned on, the Set-up Menu can be accessed by pressing the button. Use the buttons to scroll through the menu list, and then press the button to select the required menu option, or the button the exit the menu. -
Page 13: User Id
ATP, food residue, and microorganism samples. To receive the report or more information on setting up pass/fail thresholds contact Hygiena or visit our Question and Answer section at www.hygiena.com. To set the Program result thresholds on the luminometer, first select the PROGRAM menu option by pressing . -
Page 14: Test Plans
Prog: Next use the buttons to first change the value of the upper threshold (), followed by the button; to select the lower threshold use ( ). Use the buttons to change the lower value, followed by the button to store the new values: upper threshold () lower threshold ( ... -
Page 15: Establishing Atp Pass/Fail Limits
3.4 Establishing ATP Pass/Fail Limits For instructions on establishing Pass/Fail limits, refer to the implementation guide included with your system, or visit the resources available on www.hygiena.com. 3.5 Viewing Stored Test Results The luminometer can store a maximum of 2000 test results in its internal memory, even when the batteries are low or removed. -
Page 16: Erasing The Test Results Memory
3.7 Erasing the Test Results Memory WARNING: Once the test results have been erased from memory they are permanently deleted and can no longer be viewed or uploaded to SureTrend. NOTE: Once started, the erase function cannot be stopped, and will take about 30 seconds to erase a full 2000 results. -
Page 17: Adjusting The Lcd Contrast
3.9 Adjusting the LCD Contrast The contrast of the LCD screen is factory set at its optimum level for normal operating conditions. However, in extremes of temperature the display may appear too dark or light. This setting can be manually adjusted by selecting the LCD CONTRAST menu option by pressing the button. -
Page 18: Bold Text
If the bell icon is enabled the luminometer will begin beeping every 10 seconds for 1 minute as a warning before turning off. For example, if the Standby Mode time is set to 20, then if the luminometer is not used for 19 minutes it will start to beep every 10 seconds for 1 minute. - Page 19 In some cases, such as training, calibration checks, etc. users may want to discard test results. If Save Test is set to OFF, all tests taken in this mode will not be recorded. NOTE: The Save Tests mode will be set back to ON when the luminometer is turned off and back on again.
-
Page 20: Sample Measurements And Test Results
4. Sample Measurements and Test Results With the luminometer turned on, and having completed its internal calibration self-checks, it is ready to perform a new sample measurement, and the display shows the following details: Various keypad options are now available, as detailed in each of the following sections: Button Action... -
Page 21: Taking A Sample Measurement
WARNING: Always ensure that the exterior of the testing device is clean and dry before inserting it into the luminometer. Never insert anything other than a Hygiena testing device into the luminometer. Never insert a device into the luminometer when the protective pocket is removed (see section 6.3). -
Page 22: Performing A Retest
CD with the luminometer. 5.1 Conditions of Use As Hygiena LLC has no control over the specification, state or use of any computer equipment on which this software is installed or used, the following Conditions of Use apply. -
Page 23: Hardware And Software Requirements
The software is provided “as is” without warranties of any kind either expressed or implied including warranties of merchantability or fitness for a particular purpose. Hygiena LLC shall not be liable for any loss of profit, loss of use, loss of... -
Page 24: Installing The Usb Smart Cable Driver
5.5 Installing the USB Smart Cable Driver If your luminometer came with a USB to RS232 cable you need to install the SystemSURE USB Smart Cable device driver. The device driver should be installed when you install the SureTrend software. (see section 5.3). -
Page 25: Connecting The Luminometer To The Pc
5.6 Connecting the Luminometer to the PC Now connect the serial interface cable (as supplied with the luminometer) between the luminometer and one of the RS232 or USB ports on your PC: Step 1 Step 2 Step 3 Fold back rubber Insert small RJ10 plug Connect other end to cover to access... -
Page 26: Cleaning And Replacing The Protective Pocket
6.3 Cleaning and Replacing the Protective Pocket WARNING: Always turn off the luminometer before removing the protective pocket. The luminometer is designed with a special protective pocket, which can be removed for cleaning or replacement if required. To remove the protective pocket, open the luminometer’s lid, tightly grasp the finger grip of the pocket, gently pull the pocket upwards, and remove it from the luminometer. -
Page 27: Troubleshooting
7. Troubleshooting This section lists typical problems that might be encountered when using the luminometer, and the possible causes and remedies. Some problems can be rectified by the operator, and others may require technical assistance: Severity Action Required This indicates a cause which can be rectified by the operator. ... - Page 28 The following table lists typical symptoms and their possible causes. Symptom Possible Causes Batteries are low Luminometer will not Batteries are the wrong type turn on when the Batteries incorrectly inserted button is pressed Luminometer or keypad damaged or faulty ...
-
Page 29: Luminometer Error Codes
7.3 Luminometer Error Codes During normal operation, the luminometer performs various self-checks on its internal components. If a problem is detected, the display will show an error number: Error Code Possible Causes Not applicable on the luminometer The luminometer is being used outside of the specified operating temperature range (see Temperature out section 10) -
Page 30: Unit Warranty And Returns
8.1 Warranty Duration This warranty is provided to the original purchaser for one year from the date of purchase. In no event will Hygiena be liable for indirect, incidental or consequential damages; the original user’s remedies being limited to repair or replacement of the unit at the manufacturer’s option. -
Page 31: Technical Specification
10. Technical Specification General Unit dimensions (W x H x D) 72mm x 191mm x 32mm Unit weight (including batteries) approx. 260g Operating temperature range 5°C to 40°C Relative humidity range 20% to 85% non-condensing Storage temperature range -10°C to 40°C Relative humidity Range 20% to 95% non-condensing Unit Details... -
Page 32: Cautions And Warnings
11. Cautions and Warnings Operating Environment and Electrostatic Precautions WARNING: Do not use the unit in any area which has been, or is thought to have been, exposed to explosive or flammable gases or vapours. CAUTION: Avoid operating the unit in direct sunlight. Never leave the unit in direct sunlight, even when turned off. - Page 33 WEEE Directive Compliance The luminometer should be disposed of in accordance with the European Union WEEE Directive 2002/96/EC, on Waste Electrical and Electronic Equipment. WARNING: Do not dispose of this product into unsorted municipal waste or a public landfill. Please contact your local distributor for details of how to correctly dispose of this product.
Need help?
Do you have a question about the SystemSURE Plus v2 and is the answer not in the manual?
Questions and answers