Advertisement
Quick Links
1
important notes
Please take a few minutes to read this user guide.
Lay the parts out on the floor and compare to the parts checklist (below). Do not discard any
packaging until you are sure that you have all the parts.
Because of its weight and bulk, this product requires two people to build it safely.
This furniture is provided with an anti-topple device for securing to a wall. Failure to use this could
result in the furniture toppling onto the child.
Por favor, tómese unos minutos en leer esta guía de usuario.
Desembale cuidadosamente su producto en el suelo y familiarícese con las piezas, comparándolas
con el catálogo de piezas que sigue. No tire el embalaje hasta que esté seguro de que tiene todas las
piezas.
Está proveído un aparato anti-volcar con este mueble para asegurarlo a un muro. El dejar de utilizarlo
puede resultar en el mueble caéndose en el niño.
parts checklist
2
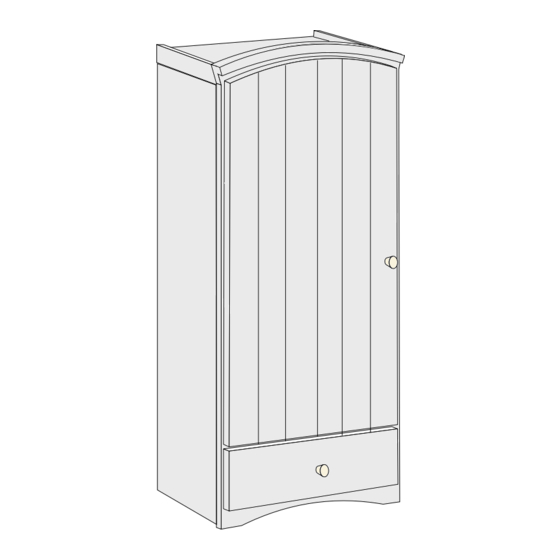
Door
Puerta
Left side
Right side
Lado izqo.
Lado dcho.
Plinth
Plinto
1 Hanging rail
Lower shelf
1 Rascón
Estante inferior
1 Wall strap
1 Correa
Middle shelf
Estante intermedio
Top
2 Washers
Parte superior
2 Arandelas
2
notas importantes
catálogo de piezas
6 Large cams
6 Levas grandes
6 Cam pins
6 Chavetas
2 Back panels
8 Screw bolts
2 tableros para
8 Pernos como tornillos
el fondo
2 Flat head screw bolts
2 Pernos como tornillos
Back brace
cabeza plana
Abrazadera
26 Short screws (16mm)
para el fondo
26 Tornillos cortos (16mm)
6 Short screws (9.5mm)
6 Tornillos cortos (9.5mm)
2 Hanging rail brackets
2 Soportes para el rascón
2 Knobs and bolts (30mm)
2 Tiradores y pernos (30mm)
3 Hinge sets
3 Juguetes de
4 Shelf supports
4 Soportes para estantes
1 Llave Allen
Strap screw
Tornillo
You will also need a screwdriver.
También se va a necesitar un destornillador.
3
prepare the drawer sides
10
assemble the drawer
11
6 Dowels
6 Clavijas
attach the knob
12
insert the drawer
13
gozne
the middle shelf
14
1 Allen key
assembly
montaje
Insert 2 small cams into the holes near the front
Front
of both sides.
Frente
Introduzca 2 levas pequeñas en los agujeros
cerca del borde delantero de los lados.
Attach the back (groove inwards) to the sides,
the dowels entering the holes in the sides. Fix
with a screw bolt into each side. Place the
drawer bottom in the groove in the drawer front
and slide the back and sides assembly over it
until the cam pins enter their correct holes.
Tighten the cams.
Monte el fondo, ranura hacia adentro, a los
lados, las clavijas se introducen en los
agujeros de los lados. Apriete con un perno
como tornillo en cada lado. Monte el fondo en
la ranura del frontal, y deslice la ensamblaje de
parte trasera y lados por sus bordes y hasta
que entrén las clavijas en sus agujeros
apropiados. Apriete las levas.
Attach the knob, as shown, using the 30mm
bolt.
Monte el tirador, tal como se indica, utlizando
el perno de 30mm
Hook the wheels on each side of the back of
the drawer over the wheels of the runners
attached to the carcase sides. Check that the
drawer closes and opens again smoothly.
Enganche las ruedas al fondo de cajón en las
ruedas de las correderas encontradas en los
lados internos de la cómoda. Asegúrese de
que se cierre y se abra suavemente.
Insert the 4 shelf supports, at the same level, in
the array of holes above the lower shelf. The
middle shelf has small cutouts on the
underside that coincide with them.
Introduzca los 4 soportes para el estante, al
mismo nivel, en los agujeros arriba del estante
inferior. El estante mediano tiene recortes en
su superficie inferior que coinciden con ellos.
prepare los lados de cajón
monte el cajón
monte el tirador
introduzca el cajón
el estante mediano
7
Advertisement

Related Manuals for mothercare Newbury Wardrobe


Summary of Contents for mothercare Newbury Wardrobe
- Page 1 assembly montaje important notes notas importantes prepare the drawer sides prepare los lados de cajón Please take a few minutes to read this user guide. Insert 2 small cams into the holes near the front Lay the parts out on the floor and compare to the parts checklist (below). Do not discard any Front of both sides.
- Page 2 assembly montaje assembly montaje attach the plinth monte el plinto insert the back introduzca el fondo Cam pin Chaveta Arrow Flecha Introduzca los dos tableros para el fondo, tal Insert the 2 back panels as shown, longest edge into the side’s groove and white face towards the como se indica, el borde más largo entra en la ranura del lado y la superficie blanca hacia la front of the wardrobe.
- Page 3 assembly montaje parts checklist catálogo de piezas attach the top monte la parte superior 4 Cam pins Stand the wardrobe up. Insert the 4 Chavetas other flat headed screw bolt near the Drawer front Drawer back rear of the side that had been on the Frontal de cajón Parte trasera de cajón 4 Small cams...
- Page 4 Si surgiera algún problema con este producto o si necesita piezas de recambio, sirvase ponerse en contacto con el almacén Mothercare más próximo o llamar a la línea de Atención al Cliente de Mothercare número (+44) 1923 210 210 user guide guía para el usuario...
Need help?
Do you have a question about the Newbury Wardrobe and is the answer not in the manual?
Questions and answers