
Related Manuals for Health Mark IVO18680

Summary of Contents for Health Mark IVO18680
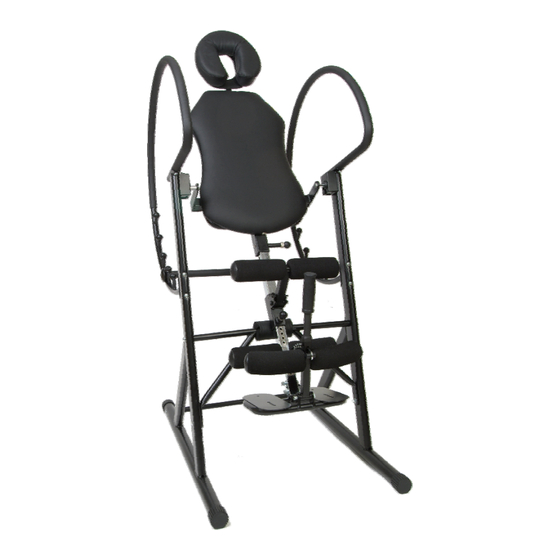
- Page 1 PRO MAX INVERSION TABLE NO. IVO18680 HEALTH MARK, INC. 322 NORTHPOINT PARKWAY SUITE J ACWORTH, GA 30102 1-888-829-1688...
- Page 2 WARRANTY Health Mark, Inc. and the manufacturer warrants to the original purchaser that this product is free from defects in material and workmanship when used for it’s intended purpose, and under the condition that it has been assembled and operated in accordance with The Health Mark’s Owner’s Manual.
- Page 3 GENERAL PRECAUTIONS It is recommended that you read this entire manual prior to using this product. Ensure that this product is in the fully opened position prior to mounting SAFETY PRECAUTIONS Always use this piece of equipment on a clear, level, and carpeted surface. Keep children away from this piece of equipment during at all times.
- Page 4 STEEL ROD STEEL ROD HANDLE BAR BEARING INTERNAL SPRING POST ADJUSTMENT LEVER HEADREST SUPPORT SPRING PIN PIVOT BEARING COVER...
- Page 6 ASSEMBLY OVERVIEWS...
- Page 7 FRAME ASSEMBLY Base Connect Tube Right/Left Main Frame Base Connect #2 / #3 Frame #5 1. Insert Base Connect Tube (1) into 2. Secure each Base Connect Tube using each end of the Right and Left Main bolts (60) and washers (67). Frame (2,3).
- Page 8 HANDLE BAR ATTACHMENT Handle Bar x 2 Upper Arm Lower Arm 1. Place each Handle Bar (4) into place and secure using bolts (61) to attach the upper arm, and Bolts (56) and nuts (70) to attach the lower arm.
- Page 9 LEG BOOM A SSEMBLY Adjustable Boom Foam Pad x 6 Leg Positioning Ankle Bracket Bracket Adjustment Lever (comes assembled) #8,#9,#10 Plastic Slot Bracket #12 Cover (41) 1. Attach and sec ure the Foot P late (11) to the Foot Plate #11 Slot A Adjustable Boom (7) using bolt s (52), washers (67),...
- Page 10 LEG BOOM A SSEMBLY 2 Adjustable Boom Foam Pad x 6 Leg Positioning Bracket Ankle Bracket (comes assembled) Adjustment Lever #8,#9,#10 Plastic Cover Slot Bracket #12 (41) Foot Plate #11 Slot A 5. Pull out on the pop pin on th e Leg Positioning Bracket and slide the assembly down the top of the Adjustable Boom (7)
- Page 11 BED INSTALATION Back Rest Pivot Bearing Bearing Cover Bearing Cradle 1. Attach the Back Rest (25) by inserting the Pivot Bearing into the Bearing Cradles on the inside of each Main Frame. Push the Pivot Bearings all the way in, and then push down to lock into place.
- Page 12 LEG BOOM INSTALATION 1. Pull out on the pop pin on the bed frame and insert the Leg Boom Assembly. HEAD REST INSTALATION Head Rest Support #14/#27 Foam Head Rest Attach the Head Rest Support to the Back Rest. Attach the Foam Head Rest to the Support.
- Page 13 ANGLE ADJUSTMENT BEAM Angle Adjustment Beam Plastic Cover Allen Bolt 1. Attach the Plastic Covers (41) to the ends of the Angle Adjustment Beam (17). ALWAYS ENSURE THAT THE ANGLE ADJUSTMENT BEAM IS IN PLACE PRIOR TO INVERTING...
- Page 14 INVERSION TECHNIQUES PRO MAX INVERSION TABLE OVERVIEW Inversion therapy has long been used for the decompression of the spine and cervical spine in order to relieve such conditions as pinched nerves along the spinal column, muscle spasms, cervical headaches, back pain, stretching and strengthening of tendons and ligaments, and fluid circulation conditions.
- Page 15 LEG POSITIONING BRACKET Prior to mounting your unit you will need make your adjustment to the height of the Angle Positioning Bracket. This must be done while you are off of the machine because your weight will prevent any adjustments once you are mounted.
- Page 16 PRIOR TO USING ALWAYS CHECK THE CONDITION OF YOUR UNIT. ALSO ENSURE THE FOLLOWING: 1. THE ANGLE ADJUSTMENT BAR IS 2. THE OUTER COVER OF THE ANGLE ADJUSTMENT BAR IS SECURED IN PLACE OUTSIDE OF THE ANGLE KNOBS. YOU MAY NEED TO PINCH THE HANDLE BARS IN SLIGHTY, AND THEN RELEASE.
- Page 17 FACE-UP OPERATION Step 5. Use Lever B to lock your ankles into the Ankle Bracket Step 6. If inverting face-up, reach around the handle bars and push yourself slowly backwards into position (figure A). In order to return to the upright position reach up around the handle bars and pull yourself gently up (figure B).
- Page 18 FACE-DOWN OPERATION Step 6. If inverting face-down, reach around the handle bars and slowly pull yourself down into position (A). In order to return to the upright position reach back up around the handle bars and gently push yourself back up (B). Step 5.
- Page 19 FREQUENTLY ASKED QUESTIONS How long should I invert? One of the most important skills for everyone to learn, especially when dealing with fitness regimens, is to learn to listen to your body. Many people who are new to inversion may feel some initial discomfort, and in almost all cases it is due to inverting too quickly, too far, and for too long.
- Page 20 THE INFORMATION IN THIS MANUAL HAS BEEN ASSIMILATED BY HEALTH MARK SPOKESMAN AND FITNESS EXPERT KEVIN WINCE. FOR MORE INFORMATION ON INVERSION THERAPY AND TECHNIQUES, PLEASE CONTACT HEALTH MARK INC. OR E-MAIL ME DIRECTLY AT KKAIWYN@JUNO.COM...
Need help?
Do you have a question about the IVO18680 and is the answer not in the manual?
Questions and answers