Table of Contents
Advertisement
Quick Links
Advertisement
Table of Contents

Related Manuals for X-Rite MA94


Summary of Contents for X-Rite MA94
- Page 1 Multi-Angle Spectrophotometer (Covers models: MA94, MA96, and MA98) User Guide...
- Page 3 Cet appareil numérique de la classe A est conforme à la norme NMB-003 du Canada. Equipment Information Use of this equipment in a manner other than that specified by X-Rite, Incorporated may compromise design integrity and become unsafe. WARNING: This instrument is not for use in explosive environments.
- Page 4 M U L T I - A N G L E S P E C T R O P H O T O M E T E R If your device is equipped with a Bluetooth wireless transmitter, it contains the following module.
-
Page 5: Warranty Information
X-Rite, Incorporated. Patents: www.xrite.com/ip “© 2018, X-Rite, Incorporated. All rights reserved” X-Rite® is a registered trademark of X-Rite, Incorporated. All other logos, brand names, and product names mentioned are the properties of their respective holders. Warranty Information X-Rite warrants this Product against defects in material and workmanship for a period of twelve (12) months from the date of shipment from X-Rite’s facility, unless mandatory law provides for... - Page 6 S P E C T R O P H O T O M E T E R WARRANTIES OF MERCHANTABILITY, FITNESS FOR A PARTICULAR PURPOSE OR APPLICATION, AND NON-INFRINGEMENT. NO EMPLOYEE OR AGENT OF X-RITE, OTHER THAN AN OFFICER OF X-RITE, IS AUTHORIZED TO MAKE ANY WARRANTY IN ADDITION TO THE FOREGOING.
-
Page 7: Table Of Contents
M U L T I - A N G L E S P E C T R O P H O T O M E T E R Table of Contents Introduction and Setup How to Use this Manual Packaging Installing the Battery Pack Turning the Instrument On and Off Power Down Mode... - Page 8 M U L T I - A N G L E S P E C T R O P H O T O M E T E R Instrument Orientation Clear All Samples Load Defaults Calibration Mode Positioning the Instrument on the Black Trap Positioning the Instrument on the Calibration Reference Calibrating the Instrument Measure Mode...
-
Page 9: Introduction And Setup
Specific software application information is available in the software help system. Packaging Your instrument packaging should contain all the items listed below. If any of these items are missing or damaged, contact X-Rite or your Authorized Representative. • Multi-angle instrument •... -
Page 10: Installing The Battery Pack
M U L T I - A N G L E S P E C T R O P H O T O M E T E R Installing the Battery Pack Your new instrument is shipped from the factory with the battery pack removed. Two battery packs (one is a spare) are located in the instrument case and should be charged before use. -
Page 11: Power Down Mode
M U L T I - A N G L E S P E C T R O P H O T O M E T E R Power Down Mode The instrument utilizes two power down modes to conserve battery life during nonuse times. The power down mode is preset in the Configuration Mode. -
Page 12: Using The Charging Station
M U L T I - A N G L E S P E C T R O P H O T O M E T E R Using the Charging Station The charging station has a separate indicator LED for each charging position. The LEDs illuminate “red”... -
Page 13: Connecting The Ac Adapter
NOTE: The instrument can operate from the AC adapter only. The battery pack does not need to be installed. The AC adapter (X-Rite P/N SE30-277) overrides any charge condition of the battery pack in the instrument. Measurements can be taken even with a very low battery condition when using the AC adapter. -
Page 14: Attaching The Safety Strap
M U L T I - A N G L E S P E C T R O P H O T O M E T E R Attaching the Safety Strap A safety strap is included with your instrument. The strap attaches to the back of the instrument and around your wrist. -
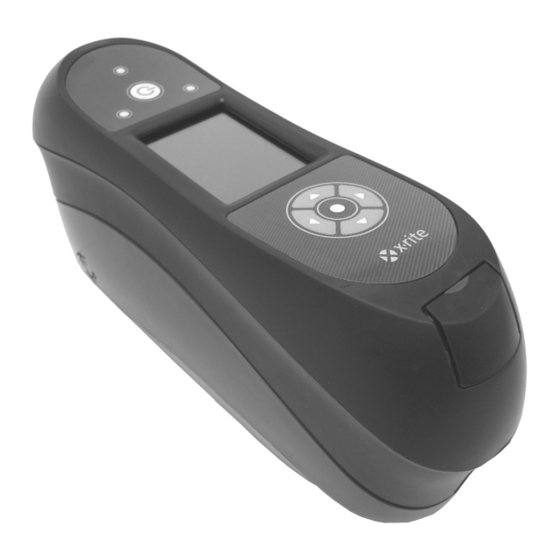
Page 15: User Interface
M U L T I - A N G L E S P E C T R O P H O T O M E T E R USER INTERFACE Instrument Controls The instrument controls are used to navigate the screen, configure options, and perform measurements. -
Page 16: Pressure Sensors And Indicator Leds
M U L T I - A N G L E S P E C T R O P H O T O M E T E R Pressure Sensors and Indicator LEDs To aid in proper positioning and ensure repeatability of sample measurements, the instrument incorporates three pressure sensors that are integrated into the measurement port. -
Page 17: Instrument Positioning
M U L T I - A N G L E S P E C T R O P H O T O M E T E R Instrument Positioning In order for the instrument to obtain accurate and repeatable measurements, the bottom of the measurement port must be flat with the sample surface to be measured. -
Page 18: Main Screen Menu
M U L T I - A N G L E S P E C T R O P H O T O M E T E R Main Screen Menu When the instrument is powered-up, the main (top level) screen appears after the diagnostics test is complete. -
Page 19: Header Bar
M U L T I - A N G L E S P E C T R O P H O T O M E T E R Header Bar The header bar at the top displays the sample storage locations remaining, lamp configuration, measurement trigger method, USB connection, and battery gauge. -
Page 20: Content Area
M U L T I - A N G L E S P E C T R O P H O T O M E T E R Content Area The content area displays the data, steps, and graphs for the currently selected option. Progress Column The progress column displays icons used to activate a step sequence, delete samples, page through stored samples, and toggle between color space options and graph view. -
Page 21: Configuration Mode
M U L T I - A N G L E S P E C T R O P H O T O M E T E R CONFIGURATION MODE Configuration mode is used to adjust and view the instrument’s settings. You should set the configuration options before using the instrument for the first time. -
Page 22: Lamp Selection (Ma98 Only)
M U L T I - A N G L E S P E C T R O P H O T O M E T E R Exiting Configuration Mode After configuring options, use the Left navigation button to move the highlight focus to the Main screen icon in the Main column and press the Select button to exit. -
Page 23: Averaging
M U L T I - A N G L E S P E C T R O P H O T O M E T E R Averaging This option is used to set the number of measurements required for calculating a single measurement. -
Page 24: Standard Creation
M U L T I - A N G L E S P E C T R O P H O T O M E T E R Standard Creation This option is used to enable or disable (default) the ability to create standards in the Measure mode. -
Page 25: Display And Power Down Time
M U L T I - A N G L E S P E C T R O P H O T O M E T E R Display and Power Down Time This option is used to set the desired display and power down time. The available settings are Disabled, Long, Medium (default), and Short. -
Page 26: Calibration Mode
M U L T I - A N G L E S P E C T R O P H O T O M E T E R CALIBRATION MODE The instrument comes with a calibration reference and black trap. A calibration should be performed when called for by the instrument or when desired. -
Page 27: Positioning The Instrument On The Calibration Reference
M U L T I - A N G L E S P E C T R O P H O T O M E T E R Positioning the Instrument on the Calibration Reference The calibration reference is designed to keep the white plaque free of dust and debris. The white plaque is concealed in a case that has a hinged cover. - Page 28 M U L T I - A N G L E S P E C T R O P H O T O M E T E R 3. Use the Right navigation button to move the highlight focus to the Progress column. Use the Down navigation button to highlight the Next arrow icon (→) if not highlighted and press the Select button.
-
Page 29: Measure Mode
M U L T I - A N G L E S P E C T R O P H O T O M E T E R MEASURE MODE The measure mode is the main operation mode of the instrument used to analyze and collect sample data. -
Page 30: Selecting A Group
M U L T I - A N G L E S P E C T R O P H O T O M E T E R Pages through the list of color spaces allowed in the Configuration mode. Access graph view screen. -
Page 31: Manually Selecting A Standard
M U L T I - A N G L E S P E C T R O P H O T O M E T E R 3. Use the Up or Down navigation buttons to move the highlight focus to the desired group and press the Select button. -
Page 32: Selecting A Color Space
M U L T I - A N G L E S P E C T R O P H O T O M E T E R 3. Use the Up or Down navigation buttons to move the highlight focus to the desired standard and press the Select button. -
Page 33: Selecting Illuminant/Observer Combinations
M U L T I - A N G L E S P E C T R O P H O T O M E T E R Selecting Illuminant/Observer Combinations The instrument has several illuminant/observer combinations to choose from. Any combination can be selected after a measurement to view the measurement results under various conditions. -
Page 34: Measuring A Sample
M U L T I - A N G L E S P E C T R O P H O T O M E T E R Measuring a Sample Absolute or difference measurement data is displayed for all angles that can be toleranced. Data will automatically recalculate if you select a difference color space after a measurement. -
Page 35: Using Measurement Averaging
M U L T I - A N G L E S P E C T R O P H O T O M E T E R Using Measurement Averaging NOTE: Measurement Averaging must be activated in Configuration before averaging can be performed. -
Page 36: Using Graph View
M U L T I - A N G L E S P E C T R O P H O T O M E T E R Using Graph View The graph view allows you to display L*a*b* color space coordinates and associated tolerances for ∆L*a*b*, ∆L*C*H*, ∆E*, ∆Ecmc, ∆E, ∆Ep, ∆Eeff, ∆Ec, ∆E00, and ∆E94 measurements. -
Page 37: Viewing Stored Measurements
A red or green bar displays for any aspecular standard angle that has a tolerances set. Angles that have no tolerance set will remain gray in color. Refer to X-Rite's X-Color QC software application for information on setting tolerancing for standards. -
Page 38: L*A*B* Color Space (Pass/Warning)
M U L T I - A N G L E S P E C T R O P H O T O M E T E R Failed Example The "X" and red bar indicate that at least one angle failed tolerance. -
Page 39: Using Quick Compare
M U L T I - A N G L E S P E C T R O P H O T O M E T E R Using Quick Compare The Quick Compare function is used for comparing measurements without storing data. You can compare measurements to a previously stored measurement or to a new measurement. -
Page 40: Creating Standards
NOTE: The instrument must have standards loaded and Sample Storage must be enabled in Configuration to create standards. Standards are downloaded to the instrument from X-Rite's X-Color QC software application. However, a standard can be created using the instrument. The new standard will duplicate an existing sample measurement stored with a downloaded standard. -
Page 41: Job Mode
S P E C T R O P H O T O M E T E R JOB MODE The Job mode is used to select and run a job downloaded from X-Rite’s X-Color QC software program. A typical job would display a sequence of measurement prompts on the instrument screen. -
Page 42: Selecting And Running A Job
M U L T I - A N G L E S P E C T R O P H O T O M E T E R Selecting and Running a Job The following job example downloaded from X-Color QC consists of one instruction screen and two measurement screens. - Page 43 M U L T I - A N G L E S P E C T R O P H O T O M E T E R 5. Data for the first measurement appears on the display. Make sure the Next arrow icon (→) is selected and press the Select button.
-
Page 44: Appendices
For sales questions or to order cables and accessories, visit our web site or contact your nearest X-Rite dealer or service center. • Problems and questions can also be faxed to your local X-Rite office listed on our web site. -
Page 45: Cleaning The Instrument
M U L T I - A N G L E S P E C T R O P H O T O M E T E R Cleaning the Instrument Your instrument requires very little maintenance to achieve years of reliable operation. However, to protect your investment and maintain reading accuracy, a few simple-cleaning procedures should be performed from time to time. -
Page 46: Cleaning The Black Trap
M U L T I - A N G L E S P E C T R O P H O T O M E T E R Cleaning the Black Trap The black trap should be cleaned with clean, dry air from time to time to remove any dust or contamination. -
Page 47: Troubleshooting
S P E C T R O P H O T O M E T E R Troubleshooting Prior to contacting X-Rite support department for instrument problems, try the applicable solution(s) described below. If the condition persists, contact us using one of the methods listed in the Service Information section. -
Page 48: Screen Messages
2. Open the battery access cover and remove the battery. 3. Reinstall the battery and power up the instrument. If you are still experiencing problems after a reset, contact X-Rite support using one of the methods listed in the Service Information section. -
Page 49: Instrument Specifications
M U L T I - A N G L E S P E C T R O P H O T O M E T E R Instrument Specifications General Measurement Geometries Illumination: 45° Aspecular Viewing: -15° (MA96, MA98), 15°, 25°, 45°, 75°, 110° Out-of-plane (MA98): 25°az90°, 25°az-90°, 60°az125.3°, 60°az-125.3°... - Page 50 M U L T I - A N G L E S P E C T R O P H O T O M E T E R Environmental Operating Temp: 50°F to 104°F (10°C to 40°C) Humidity Max: 85% RH max (non condensing) Storage Temp: -4°F to 122°F (-20°C to 50°C) Usage:...
- Page 53 8105 Regensdorf Switzerland Phone (+41) 44 842 24 00 Fax (+41) 44 842 22 22 Asia Pacific Headquarters X-Rite Asia Pacific Limited Suite 2801, 28th Floor, AXA Tower Landmark East, 100 How Ming Street Kwun Tong, Kowloon, Hong Kong Phone (852)2568-6283...
Need help?
Do you have a question about the MA94 and is the answer not in the manual?
Questions and answers
How to set up a Master Panel for color reading