Table of Contents
Advertisement
Advertisement
Table of Contents

Related Manuals for Electrolux EEB4231POX


Summary of Contents for Electrolux EEB4231POX
- Page 1 EEB4231POX EOB3410AOX Oven User Manual...
-
Page 2: Table Of Contents
13. ENERGY EFFICIENCY.................. 23 WE’RE THINKING OF YOU Thank you for purchasing an Electrolux appliance. You’ve chosen a product that brings with it decades of professional experience and innovation. Ingenious and stylish, it has been designed with you in mind. So whenever you use it, you can be safe in the knowledge that you’ll get great results every time. -
Page 3: Safety Information
ENGLISH SAFETY INFORMATION Before the installation and use of the appliance, carefully read the supplied instructions. The manufacturer is not responsible for any injuries or damages that are the result of incorrect installation or usage. Always keep the instructions in a safe and accessible location for future reference. -
Page 4: Safety Instructions
Always use oven gloves to remove or put in • accessories or ovenware. Before carrying out any maintenance, disconnect the • appliance from the power supply. Ensure that the appliance is switched off before • replacing the lamp to avoid the possibility of electric shock. - Page 5 ENGLISH • Do not use multi-plug adapters and • Do not operate the appliance with wet extension cables. hands or when it has contact with • Make sure not to cause damage to water. the mains plug and to the mains •...
- Page 6 2.5 Internal lighting the housing unit or the floor. Do not close the furniture panel until the appliance has cooled down WARNING! completely after use. Risk of electric shock. 2.4 Care and cleaning • The type of light bulb or halogen lamp...
-
Page 7: Product Description
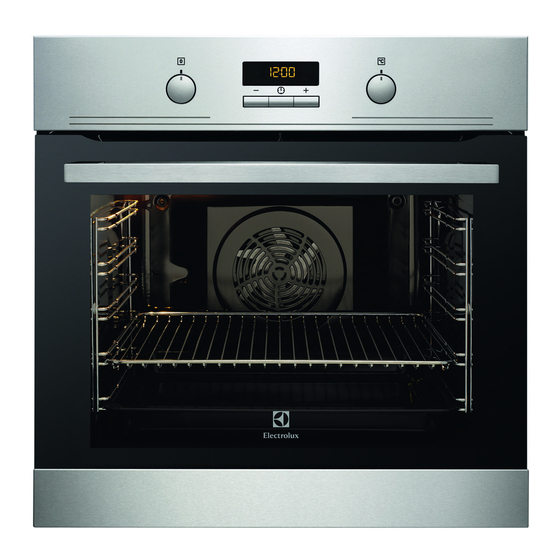
ENGLISH 3. PRODUCT DESCRIPTION 3.1 General overview Control panel Knob for the oven functions Power lamp / symbol Electronic programmer Knob for the temperature Temperature indicator / symbol Heating element Lamp Shelf support, removable Shelf positions 3.2 Accessories For cakes and biscuits. •... -
Page 8: Heating Functions
5.2 Turning the oven on and off 3. To turn off the oven, turn the knobs for the oven functions and temperature to the off position. 1. Turn the knob for the oven functions The lamp turns on when the oven to select an oven function. -
Page 9: Clock Functions
ENGLISH 5.4 Display A. Function indicators B. Time display C. Function indicator 5.5 Buttons Sensor field / Button Function Description MINUS To set the time. CLOCK To set a clock function. PLUS To set the time. 6. CLOCK FUNCTIONS 6.1 Clock functions table Clock function Application TIME OF DAY... -
Page 10: Using The Accessories
3. Press to set the DURATION 5. Press to set the time for time. END. The display shows 6. Press to confirm. Appliance turns on automatically later on, 4. When the time ends, flashes and works for the set DURATION time and an acoustic signal sounds. -
Page 11: Additional Functions
ENGLISH Baking tray / Deep pan: Push the baking tray / deep pan between the guide bars of the shelf support. Small indentation at the top increase safety. The indentations are also anti-tip Wire shelf and baking tray / deep pan devices. -
Page 12: Cooking Times
This can change the • To prevent too much smoke in the baking results and cause damage to oven during roasting, add some water the enamel. into the deep pan. To prevent the smoke condensation, add water each 9.2 Baking cakes... - Page 13 ENGLISH Food Top / Bottom Heat True Fan Cooking Time Com‐ (min) ments Tempera‐ Shelf po‐ Tempera‐ Shelf po‐ ture (°C) sition ture (°C) sition Christmas 90 - 120 In a 20 cm cake / cake Rich fruit mould cake Plum 50 - 60 In a bread...
- Page 14 Food Top / Bottom Heat True Fan Cooking Time Com‐ (min) ments Tempera‐ Shelf po‐ Tempera‐ Shelf po‐ ture (°C) sition ture (°C) sition Eclairs - 2 and 4 35 - 45 In a baking two levels tray Plate tarts 180...
- Page 15 ENGLISH Food Top / Bottom Heat True Fan Cooking Time Com‐ (min) ments Tempera‐ Shelf po‐ Tempera‐ Shelf po‐ ture (°C) sition ture (°C) sition Vegetable 45 - 60 In a mould flan 50 - 60 In a mould Quiches 180 - 190 180 - 190 25 - 40...
- Page 16 Food Top / Bottom Heat True Fan Cooking Time Com‐ (min) ments Tempera‐ Shelf po‐ Tempera‐ Shelf po‐ ture (°C) sition ture (°C) sition Goose 150 - 200 Whole Rabbit 60 - 80 Cut in pieces Hare 150 - 200...
-
Page 17: Turbo Grilling
ENGLISH Food Quantity Tempera‐ Time (min) Shelf po‐ ture (°C) sition Pieces 1st side 2nd side Hambur‐ max. 20 - 30 Fish fillet max. 12 - 14 10 - 12 Toasted 4 - 6 max. 5 - 7 sandwich‐ Toast 4 - 6 max. - Page 18 Lamb Food Quantity (kg) Temperature Time (min) Shelf position (°C) Leg of lamb, 1 - 1.5 150 - 170 100 - 120 1 or 2 roast lamb Saddle of lamb 1 - 1.5 160 - 180 40 - 60...
-
Page 19: Care And Cleaning
ENGLISH Fruit Food Temperature Time (h) Shelf position (°C) 1 position 2 positions Plums 60 - 70 8 - 10 1 / 4 Apricots 60 - 70 8 - 10 1 / 4 Apple slices 60 - 70 6 - 8 1 / 4 Pears 60 - 70... - Page 20 Install the removed accessories in the 3. Close the oven door halfway to the opposite sequence. first opening position. Then pull forward and remove the door from its 10.5 Removing and installing seat. door The oven door has two glass panels.
-
Page 21: Troubleshooting
ENGLISH the above steps in the opposite 1. Turn off the oven. sequence. Wait until the oven is cooled down. 2. Disconnect the oven from the mains. The screen-printing zone must face the 3. Put a cloth on the bottom of the inner side of the door. -
Page 22: Installation
11.2 Service data plate is on the front frame of the appliance cavity. Do not remove the If you cannot find a solution to the rating plate from the appliance cavity. problem yourself, contact your dealer or an Authorised Service Centre. -
Page 23: Energy Efficiency
2 cm longer than phase and neutral cables (blue and brown cables). 13. ENERGY EFFICIENCY 13.1 Product Fiche and information according to EU 65-66/2014 Supplier's name Electrolux EEB4231POX Model identification EOB3410AOX Energy Efficiency Index 105.9 Energy efficiency class Energy consumption with a standard load, con‐... -
Page 24: Environmental Concerns
Cooking with fan Keep food warm When possible, use the cooking Choose the lowest possible temperature functions with fan to save energy. setting to use residual heat and keep a meal warm. 14. ENVIRONMENTAL CONCERNS appliances marked with the symbol Recycle materials with the symbol with the household waste. - Page 25 ENGLISH...
- Page 26 www.electrolux.com...
- Page 27 ENGLISH...
- Page 28 www.electrolux.com/shop...
Need help?
Do you have a question about the EEB4231POX and is the answer not in the manual?
Questions and answers