Table of Contents
Advertisement
LC6
tm
Six Channel Line Output Converter
for interfacing with factory installed audio systems
Greetings from the rainforests of the Pacific Northwest. We would
like to congratulate you on your purchase of the LC6i: a six-chan-
nel, high-performance, line-output converter. This unique product
will accept two, four, or six channels of speaker-level signal from
a factory-installed amplifier or source unit, and convert it to a
high-quality, low-noise pre-amp signal. Therefore the LC6i is an ideal
OEM (Original Equipment Manufacturer) interface component, as it
will allow you to use your factory-installed source unit but give you the
ability to add really good aftermarket amplifier(s) and processor(s).
Whether this is your first product from the rainforest dwellers of Audio-
Control, or you are already a firm believer, you will definitely enjoy how
great the LC6i can make your performance system sound.
Now before you start salivating just thinking about the benefits and all
of the nifty applications for your LC6i, please take a few minutes to sit
back, have a cold beverage, and read through this manual. We always
love to get calls from our customers, but we have tried to answer all of
your questions in this manual. It contains lots of useful facts and infor-
mation - - and besides, we spent a lot of time writing it!
®
Making Good Sound Great
™
Advertisement
Table of Contents

Related Manuals for AudioControl LC6i


Summary of Contents for AudioControl LC6i
- Page 1 LC6i can make your performance system sound. Now before you start salivating just thinking about the benefits and all of the nifty applications for your LC6i, please take a few minutes to sit back, have a cold beverage, and read through this manual. We always love to get calls from our customers, but we have tried to answer all of your questions in this manual.
-
Page 2: Important Safety Instructions
Important Safety Instructions Read these instructions. Keep these instructions. Heed all warnings. Follow all instructions. Do not use this apparatus near water. Clean only with a dry cloth. Do not block any ventilation openings. Install in accordance with the manu- facturer’s instructions. - Page 3 Or, contact us and we might be able to repair it for you. Key Features of The LC6i Here are some of the cool features that your LC6i offers: • Six input and output channels •...
- Page 4 LC6i will automatically turn-off. Optionally, your LC6i is also equipped with a standard 12-Volt trigger (Remote In) that will allow you to turn on your LC6i in the traditional manner. The GTO circuit can be disabled by setting an internal jumper.
- Page 5 For example, in some vehicles there is an actively crossed-over tweeter, midrange, and woofer all in the front of the vehi- cle. The LC6i lets you take all of those signals and sum them together to get a high-quality, full-range, pre-amp signal without the use of any additional cables or hardware.
- Page 6 LC6i should stop working, we will back it with a limited five years parts and labor warranty. Should you choose to install it yourself we will still give you a one-year parts and labor warranty.
- Page 7 In many cases you can find factory speaker leads in the rear of the vehicle that are easy to access. 2. The LC6i needs to be installed in the signal path between your OEM source unit or factory-installed amplifier(s) and an aftermarket external amplifier and/or processor(s).
- Page 8 ----------------------------------------------- 8 -----------------------------------------------...
- Page 9 If music be the food of love, play on. and..if you need to know more, then read on. Heck, if you don’t need to know more, still read on, because you can never know too much, and as much as we would like to get your calls and e-mails, most of the answers to your questions are in this manual! ----------------------------------------------- 9 -----------------------------------------------...
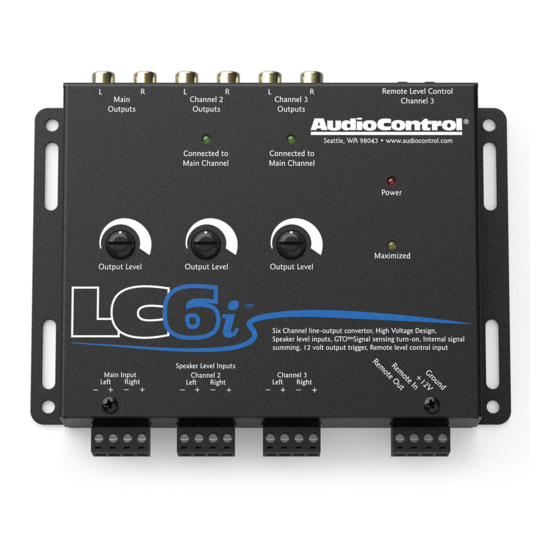
- Page 10 A Guided Tour of the LC6i Figure 2: LC6i top cover -----------------------------------------------10 ----------------------------------------------...
- Page 11 If your source unit has front, rear, and subwoofer speaker-level outputs, connect them to the three sets of inputs on your LC6i. If the source unit only has front and rear inputs, the Auto Mode circuitry in your LC6i automatically routes the Channel 2 input channels to Channel 3.
- Page 12 Pre-Amp Outputs: These RCA connectors should be connected to the next component after the LC6i, such as a signal processor, crossover or amplifier. Do not connect any speakers directly to your LC6i. (Definitely don’t connect to any home appliances, like your microwave.)
- Page 13 Under the Covers Make sure all power is OFF before removing the cover. The jumpers may be pulled out and plugged into an alternative position to custom- ize your installation (see figure 3). Output Summing Jumpers: These allow you to select which input signals will be summed into the Main outputs.
- Page 14 LC6i Block Diagram -----------------------------------------------14 ----------------------------------------------...
- Page 15 By this time we are sure that you are chomping at the bit to install your LC6i. Up to this point, everything you have read has served to educate you on the operations of LC6i. Therefore if you are still with us, we recommend you read the following sections very carefully.
- Page 16 “Remote In” feature. Remote Out: If you are going to use the LC6i to turn on any external signal processors or amplifiers, connect an 18 to 22 gauge wire from the Remote Out on the LC6i to the remote turn-on of the processors or amplifiers.
- Page 17 The next 2 pages show some examples of using the LC6i with some of our multi-channel amplifiers and subwoofer amplifiers. -----------------------------------------------17 ----------------------------------------------...
- Page 18 Interfacing with a factory-installed radio -----------------------------------------------18 ----------------------------------------------...
- Page 19 -----------------------------------------------19 ----------------------------------------------...
- Page 20 Connect the speaker wires to the Speaker-Level Inputs on your LC6i. Make sure to get your “pluses” and “minuses” connected properly. Pre-Amp Outputs Connect good quality RCA connectors from these outputs to the inputs of your amplifiers.
- Page 21 Summing The Outputs Under the cover are connection jumpers that allow the Main outputs of the LC6i to receive signals from the inputs of Channel pairs 2 and 3. These jumpers allow you to select which input signals will be summed into the Main output.
- Page 22 -----------------------------------------------22 ----------------------------------------------...
- Page 23 If your source unit has subwoofer output (and you are using it), set the output level at minimum. Disconnect the RCA cables between your LC6i and the amplifi- er(s). Otherwise get some earplugs. Start playing some dynamic music and set the volume on your source unit to about 3/4 of maximum.
-
Page 24: Custom Installation
For some of you, this may be louder than others! At this point you may find yourself going back and adjusting the Output Level controls on your LC6i to balance the front, rear, and subwoofer sections of your system to accommodate speaker placement and efficiency. - Page 25 Dash Control LED The LED on your dash control is a dashing amber and should brighten or dim when you turn the knob. Figure 8: Dash Control Assembly -----------------------------------------------25 ----------------------------------------------...
-
Page 26: Troubleshooting
LC6i Turns Off Intermittently: If you are using the GTO signal sensing to turn on your LC6i yet your system is turning off, this may be due to a cellular phone interface or navigation system built in to your factory installed source unit. - Page 27 Since the LC6i is a line output converter, you may need to turn up the gains on the LC6i or consider adding a pre-amp line driver like the AudioControl Matrix to increase the signal level to your aftermarket amplifiers.
- Page 28 If you need a crossover for your system that keeps up with your LC6i, the 6XS is a 6-channel, 2-way crossover with breathtakingly steep 24dB-per-octave slopes. If performance is important to you, then you will appreciate the 6XS. Of course if you are just looking for deeper, chest-thumping bass, then The Epicenter, our patented (U.S.
- Page 29 ...who’s “good with electronics”, try to repair your AudioControl product. So go ahead, read this warranty, and then take a few days to enjoy your LC6i before sending in the warranty card and comments.
- Page 30 You cannot let anybody who isn’t (A) the AudioControl factory; (B) somebody authorized in writing by AudioControl to service your LC6i. If anyone other than (A) or (B) messes with your LC6i, that voids your warranty. The warranty is also void if the serial number is altered or removed, or if LC6i has been used improperly.
- Page 31 Remote Trigger Output Current......1 Amp ©2017 AudioControl. All rights reserved. AudioControl, Making Good Sound Better, LC6i, The Epicenter, EQS, 6XS, GTO and AutoMode are all trademarks of AudioControl, Inc. All other trademarks and registered trademarks are copyright of their respective owners, and are hereby acknowledged.
- Page 32 ® Making Good Sound Great ™ 22410 70 Ave West Mountlake Terrace, WA 98043 USA Phone 425-775-8461 • www.audiocontrol.com P/N 913-147-0...
Need help?
Do you have a question about the LC6i and is the answer not in the manual?
Questions and answers