Table of Contents
Advertisement
Advertisement
Table of Contents

Summary of Contents for Powerhorse 53135
- Page 1 4" Chipper Shredder Owner’s Manual WARNING: Read carefully and understand all ASSEMBLY AND OPERATION INSTRUCTIONS before operating. Failure to follow the safety rules and other basic safety precautions may result in serious personal injury. Item #53135 SAVE THESE INSTRUCTIONS...
- Page 2 Thank you very much for choosing a Powerhorse™ product! For future reference, please complete the owner’s record below: Serial Number/Lot Date Code: ________________________________ Purchase Date: ____________________________________________ Save the receipt, warranty, and this manual. It is important that you read the entire manual to become familiar with this product before you begin using it.
-
Page 3: Table Of Contents
Table of Contents Intended Use ............................4 Technical Specifications ........................4 Important Safety Information ....................... 4 Specific Operation Warnings ....................... 6 Safety Labels ............................8 Main Parts of Chipper Shredder ......................12 Site Considerations ..........................13 Assembly Instructions ........................13 Before Each Use .......................... -
Page 4: Intended Use
Intended Use This Chipper Shredder is a great way to quickly turn yard waste into ground covering for gardens or trees. The highly effective cutting mechanism uses two hardened chipping knives, 10 hammers, and ten shredding blades. The dual feed enables you to use the drop-in shredding hopper for brush and leaves and the dedicated chipper chute for sticks and branches. - Page 5 ⚠WARNING WORK AREA SAFETY Inspect the work area before each use. Keep work area clean, dry, free of clutter, and well lit. Cluttered, wet, or dark work areas can result in injury. Using the Chipper Shredder in confined work areas may put you dangerously close to other cutting tools and rotating parts. ...
-
Page 6: Specific Operation Warnings
Be aware of potential for carbon monoxide (CO) poisoning. ⚠WARNING OPERATIONAL SAFETY Make sure that the machine is properly adjusted, set up correctly and the hopper and funnel are empty before starting the machine. Do not leave unattended while machine is running. Shut off the machine and disconnect the spark plug wire whenever you leave the work area. - Page 7 safety warnings. HAND SAFETY: DO NOT put hands or other body parts into hopper, funnel, or outlet while the blades are turning. The Chipper Shredder can drag you into the blade, causing amputation of fingers, hands or other body parts. DO NOT touch the exhaust during or immediately after operation to prevent burns.
-
Page 8: Safety Labels
Safety Labels Page 8 of 31... - Page 9 Page 9 of 31...
- Page 10 Page 10 of 31...
- Page 11 Page 11 of 31...
-
Page 12: Main Parts Of Chipper Shredder
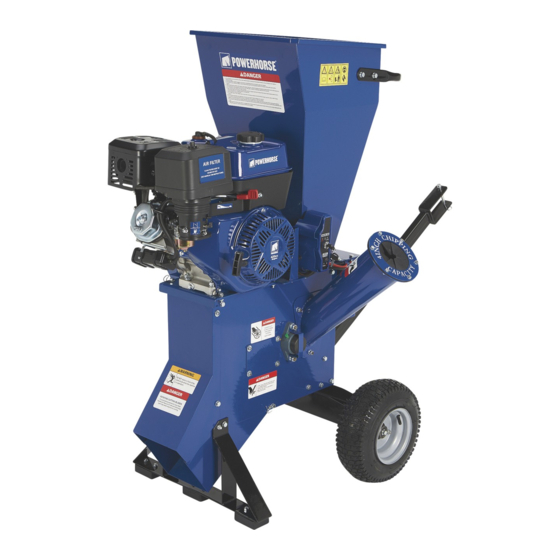
Main Parts of Chipper Shredder Pic.1 Chipper Shredder Identification Reference Subassembly Hopper Motor Chip Outlet Chipper Funnel Choke Fuel Cock ON/OFF Switch Throttle Fuel Tank Cap Air Cleaner Exhaust Pull Start Handle Battery Assembly Tow Bar Page 12 of 31... -
Page 13: Site Considerations
Site Considerations Location The Chipper Shredder must be placed on a firm, flat, grass or dirt surface to prevent the machine from tipping. DO NOT place the machine on concrete, asphalt, or other hard surfaces. The chips could bounce up from the hard surface and cause injury. Working Clearances Consider the length of the material to be processed through the machine and make sure that there is enough height above the Chipper Shredder to accommodate the material. - Page 14 Attaching the Leg (Pic. 2) Attach the wheel assembly and the leg with the bolts that were removed in Step 1. Fix the tow bar to the wheel assembly with the tow bar bolt that is attached. Place the handle on the hopper and line up all of the holes. Secure it with flat washer (Ø8, 4pcs), spring washer (Ø8, 4pcs) and bolt (M8x20, 4pcs).
- Page 15 Place the funnel over the studs in the side of the Chipper Shredder and secure it with flat washer (Ø8, 3pcs), spring washer (Ø8, 3pcs), and locknut (M8, 3pcs). See Pic.4. Pic.4 Funnel installation Install the battery assembly to the front part of the machine using the bolts (M8 x 20, 2pcs) and locknut (M8, 2pcs).
-
Page 16: Before Each Use
Before Each Use ⚠WARNING This Chipper Shredder does not have oil in the motor when shipped. Add oil before operating the Chipper Shredder, or the motor will seize. Before operating, fill the motor with oil and gas according to the instructions. Filling the Engine Oil ⚠WARNING Never open oil fill port while engine is running. -
Page 17: Operating Instructions
Operating Instructions ⚠WARNING Damage to your eyes, hands, and ears could result from using this machine without proper protective gear. Always wear safety glasses, hearing protection, and leather gloves when operating this machine. Loose hair and clothing could get caught in machinery and cause serious personal injury. Keep loose clothing and long hair away from moving machinery. - Page 18 Use the electric starter to start: Turn the key (Pic.10, 10.2) from “OFF” to “ ON” and then to “START”. If the electric starter doesn’t work, you can also use the recoil starter to start: Turn the engine ON/OFF switch to the ON position (Pic.10, 10.1). Hold down the engine firmly with one hand on the frame.
- Page 19 When the engine is running, the speed can be adjusted by moving the throttle control lever (Pic.13, 13.1) to the high (indicated by a hare), medium or low position (indicated by a tortoise). Page 19 of 31...
- Page 20 To Stop the Chipper Shredder To stop the engine, turn the key (Pic .10, 10.2) to the OFF position or you can stop the engine by turning the engine ON/OFF switch to the OFF position (Pic.14, 14.1). When the engine has stopped and before storing, turn the fuel lever to the OFF position (Pic.15, 15.1).
-
Page 21: After Each Use
Note: Move the throttle to the idle position, or turn the Chipper Shredder OFF when not actively shredding or chipping. Turn OFF the machine, allow all moving parts to completely stop, and disconnect the spark plug wire before moving the machine, emptying the bag, unclogging the inlets or outlets, filling the gas tank, or performing maintenance and repairs. -
Page 22: Maintenance
When finished chipping, turn OFF the machine, allow all moving parts to come to a complete stop, and disconnect the spark plug wire before moving the machine, emptying the bag, unclogging the inlets or outlets, filling the gas tank, or performing maintenance and repairs. Maintenance ⚠WARNING Turn OFF the machine, allow all moving parts to come to a complete stop, and disconnect the spark... - Page 23 Engine Oil Replacement Place the machine on a level surface and warm up the engine for several minutes. Stop the engine. Remove the oil filler cap (Pic.5, 5.1). Place an oil pan under the engine. Remove the oil drain plug (Pic.5, 5.2) so that the oil can be completely drained.
- Page 24 Pic.21 Chipper blade Replacing V-Belt Replace or tighten the V-belt if you notice the motor running and the chipper blades are not spinning. TURN OFF THE MACHINE, ALLOW ALL MOVING PARTS TO COME TO A COMPLETE STOP, AND DISCONNECT THE SPARK PLUG WIRE! Remove the V-belt cover as shown in Pic.22.
-
Page 25: Troubleshooting
If the engine is not to be used or is to be stored for more than one month the following storage procedure should be carried out. Drain all the fuel from the fuel tank and the carburetor ensure that all the fuel has been removed. - Page 26 Failure Possible Cause Corrective Action Chipper Shredder no 1. Dull or damaged blades and 1. Sharpen or replace blades and check longer chips or hammers. the hammers for damage. shreds well. 2. Loose, worn, or damaged V- 2. Replace or tighten V-belt. belt.
-
Page 27: Parts Diagram
Parts Diagram Page 27 of 31... -
Page 28: Parts List
Parts List Reference Name Reference Name Screw M8x25 SHCS Engine Plate Flat Washer 8 Taper Gasket 8 Rubber Foot Pothook Front leg Guard Locknut M8 15HP Engine Discharge Chute Hopper Gasket Discharge Cover Belt Cover Protecting Plate Board M6 Nylon Locknut 4.78X5X35 Flat Pin Gasket 8 Screw M6x25... -
Page 29: Replacement Parts
Rubber Grid Start switch fixing plate Cover Board 89 Small sleeve 4*16 Rivet start switch 8*24*2 Flat Washer 6×12×1.2 Flat 13" Pneumatic wheel M6*12 Bolt Bayonet lock M6*30 Bolt Axle Battery box Screw M10*45 Battery box cover plate Dishing Nut M6 12V Battery Gasket 6 Replacement Parts... -
Page 30: Limited Warranty
Northern Tool and Equipment Company, Inc. ("We'' or "Us'') warrants to the original purchaser only ("You'' or “Your”) that the Powerhorse product purchased will be free from material defects in both materials and workmanship, normal wear and tear excepted, for a period of two years from date of purchase. - Page 31 Distributed by: Northern Tool & Equipment Company, Inc. Burnsville, Minnesota 55306 www.northerntool.com Made in China Page 31 of 31...
Need help?
Do you have a question about the 53135 and is the answer not in the manual?
Questions and answers
Engine starts after spraying starter fluid in carburetor then shut off in a few seconds
The Powerhorse engine with part number 53135 starting only after spraying starter fluid in the carburetor and then shutting off after a few seconds could be caused by a fuel supply issue. Possible causes include:
1. No gas or old gas – Ensure there is fresh fuel in the tank.
2. Clogged fuel line or carburetor – Clean the fuel line and carburetor to ensure proper fuel flow.
3. Fuel shut-off valve closed – Make sure the fuel shut-off valve is open.
4. Choke or throttle not in the correct position – Adjust the choke and throttle to the proper starting position.
If the engine runs briefly on starter fluid but then shuts off, it indicates that fuel is not reaching the engine properly. Cleaning or repairing the fuel system should resolve the issue.
This answer is automatically generated