Table of Contents
Advertisement
Quick Links
Advertisement
Table of Contents

Summary of Contents for Terason t3000
- Page 1 Terason t3000™ / Echo™ Ultrasound System User Guide...
- Page 2 , a division of Teratech Corporation. All rights reserved. Information in this document is subject to change without notice and should not be construed as a commitment by Terason. ™ Terason is a trademark. Other trade names, trademarks, or registered ®...
-
Page 3: Table Of Contents
Toolbars ......................33 Image Control Bar/Measure Tabs ..............34 The Terason Console ..................... 34 Console Controls ..................... 35 Chapter 2 Installing Software Installing Terason Software ................... 37 Upgrading Terason Software ................39 Terason t3000 / Echo Ultrasound System User Guide... - Page 4 Using Split Screen Mode ..................79 Working with Annotations ..................81 Working with Text ..................... 81 Using Body Markers ..................86 Chapter 5 Working With Scan Modes Scan Modes Overview ................... 89 Terason t3000 / Echo Ultrasound System User Guide...
- Page 5 Working With Image Files Storing Images and Loops ..................131 Monitoring Disk Space ..................131 Selecting File Types ..................132 Saving Images and Loops ................133 Exporting a File ....................135 Finding Stored Images and Loops ..............136 Terason t3000 / Echo Ultrasound System User Guide...
- Page 6 Restoring All Measurement Groups to Defaults ..........201 Stress Echo ......................202 Performing a Stress Echo Study ..............202 Closing a Stress Echo Study ................207 Saving and Sending Studies ................208 Pausing and Resuming a Stress Study ............208 Terason t3000 / Echo Ultrasound System User Guide...
- Page 7 Setting Image Save and Print Defaults ............243 Changing the Display Mode Defaults ............247 Setting Measurement Defaults ..............250 Adding Custom Text to the Annotation Window ........251 Chapter 12 System Safety and Maintenance Safety Standards ....................252 Terason t3000 / Echo Ultrasound System User Guide...
- Page 8 Windows Terms ....................296 Using the Touchpad or a 2-Button Mouse ............297 Starting/Exiting Programs ..................298 Resizing Windows ....................299 Moving Windows and Toolbars ................300 Appendix B Menu and Toolbar Reference ..........301 Shortcut Keys .......................301 Terason t3000 / Echo Ultrasound System User Guide...
- Page 9 ................329 Compatibility for Non-Life-Supporting Equipment ...........331 Appendix F Acoustic Output Reporting for Track 3 ......333 Acoustic Output Tables for t3000 Transducers ..........334 Acoustic Output Tables for Echo Transducers ..........385 Index ..............................411 Terason t3000 / Echo Ultrasound System User Guide...
-
Page 10: Preface Before You Begin
System, on page 22. About this Guide This guide describes how to use the Terason software to conduct an ultrasound exam using a Terason transducer, and defines how to use the software to control and capture the ultrasound image. This guide does not: •... -
Page 11: Online User Guide
If you are reading this guide from a printed copy, you, can also read the User Guide online using Adobe Reader. To read the Terason Ultrasound User Guide online, complete these steps: 1. Click the Start button in the lower left of the screen. -
Page 12: Printing The User Guide
Terason Online Help Printing the User Guide Terason delivers the User Guide as a Portable Document Format (PDF) file. Please note that color is key for understanding some of the graphics, and these graphics may be difficult to interpret when printed on a black-and-white printer. -
Page 13: Safety Cautions And Warnings
The Terason Ultrasound System is designed for medical ultrasound imaging. Federal law restricts this device to sale by or on the order of a physician. The Terason system should only be used in a medical facility under the supervision of a trained physician. - Page 14 Before cleaning the system, always disconnect the AC power adapter from the system. The Terason Ultrasound System is a Type BF Class I product suitable for continuous operation when connected as a system to a Medical Grade AC/DC Power Adapter or operated from the laptop battery.
-
Page 15: Warnings
Observe the following safety precautions when using the Terason Ultrasound System. Intended Use The Terason Ultrasound System is designed for use as a diagnostic tool and should only be operated by someone who has received proper training in the use and operation of an ultrasound system. - Page 16 1.50m Patient Environment Portable and mobile RF communications equipment can affect medical electrical equipment such as the Terason Ultrasound System and should not be used in the patient environment. Caution:The Terason Ultrasound System should not be used adjacent to or stacked with other equipment.
- Page 17 To avoid damage to transducers, electronics or system, use anti-static spray on carpets and linoleum, and anti-static mats. The Terason Ultrasound System complies to a level of ± 2kV ESD. The latch for locking the ultrasound transducer and the FireWire port is sensitive to ESD and should not be touched when operating the system.
-
Page 18: Labels
Labels Several labels are attached to the Terason system. The following sections describe what each label means. Refer to the laptop user guide for information about its labels and regulatory compliance. -
Page 19: Shipping Label Icons
0º and 40º C (32º and 104ºF). Terason Transducers Each Terason transducer has a label that indicates its model and serial numbers: The following figure is an example of a transducer label. Terason t3000 / Echo Ultrasound System User Guide... -
Page 20: Getting Help
To read the User Guide online, complete these steps: 1. Click the Start button in the lower left of the screen. 2. Select Programs > Terason > Documentation > English > Terason User Guide. The computer opens the User Guide in the Adobe Reader software. -
Page 21: Contacting Terason
Preface Before You Begin Getting Help Contacting Terason If you have questions about the Terason Ultrasound System, you can contact Terason support: By Mail Terason™, a Division of Teratech Corporation 77–79 Terrace Hall Avenue Burlington, MA 01803 U.S.A. By Telephone Voice in the U.S.A.: 1-866-TERASON (1-866-837-2766) Ext. -
Page 22: Chapter 1 About The Terason Ultrasound System
The microminiaturized ultrasound system runs under the standard Windows interface for easy navigation. The Terason software can run on a desktop or laptop computer. You can also connect the computer to a VCR or a printer for image output. -
Page 23: 2D Mode
About Ultrasound Modes 2D Mode The Terason Ultrasound System delivers 2-dimensional digital imaging using 256 digital beam-forming channels. This imaging mode delivers excellent image uniformity, tissue contrast resolution, and steering flexibility in frequencies from 2 MHz to 12 MHz. The high channel count supports true phased array and high-element count imaging transducers. -
Page 24: Power Doppler
Power Doppler is the preferred mode to show perfusion and contour of vessel lumen. The Power Doppler scan data displays in the 2D Image Display window as shown in the following figure. Terason t3000 / Echo Ultrasound System User Guide... -
Page 25: Color Doppler
The Color Doppler scan data displays in the 2D Image Display window. The following figure shows a sample Color Doppler scan. Terason t3000 / Echo Ultrasound System User Guide... -
Page 26: Directional Power Doppler
You can also apply a high frame rate or high resolution to control the quality of the scan. The Directional Power Doppler scan data displays in the 2D Image Display window. Terason t3000 / Echo Ultrasound System User Guide... -
Page 27: Pulsed-Wave Doppler
(laminar flow typically shows a narrow band of blood flow information). In the Terason Ultrasound System, Pulsed-Wave Doppler and 2D are shown together in a mixed-mode display. This combination lets you monitor the exact location of the sample volume on the 2D image in the 2D Image Display window, while acquiring Pulsed-Wave Doppler data in the Time Series window. -
Page 28: Continuous-Wave Doppler
Doppler imaging (Color Doppler, Directional Power Doppler, or Power Doppler) with Pulsed-Wave Doppler imaging to view arterial or venous velocity and flow data. Triplex allows you to perform range-gated assessment of flow. Terason t3000 / Echo Ultrasound System User Guide... -
Page 29: Teravision
76 Support for Medical Procedures The Terason Ultrasound System can be configured with needle guides used for tissue biopsy, fluid aspriation, amniocentesis, and catheter placement. The system can also be incorporated into cryoablation (or targeted ablation) and brachytherapy products from other vendors. -
Page 30: Terason Transducers
Ultrasound System to perform biopsies. Terason Transducers The Terason Ultrasound System consists of the transducer, electronics envelope, and the Terason software. All of the Terason transducers can be used with all scan modes. The following table describes the supported transducers. Also see System Specifications... - Page 31 The Terason Ultrasound System also allows you to connect more than one transducer to a hub, and then connect the hub to a laptop or desktop computer. This configuration lets you switch transducers without having to disconnect any cables. Refer to the Configuration Guide that came with your system for instructions.
-
Page 32: About The Terason Main Screen
Note: The gray-unavailable condition does not apply to the tabs at the bottom of the Image Control window; visible tabs are always available. The tabs are gray when they are not selected. For complete descriptions of the menus and toolbars available in the Terason software, see Appendix B - Menu and Toolbar Reference. -
Page 33: Terason Explorer Window
To hide the contents of a folder, click the . You can also double-click a folder name to open or close it. For information on using the Terason Explorer window to locate patient and image files, see Finding Files in the Terason Explorer on page 136. -
Page 34: Image Control Bar/Measure Tabs
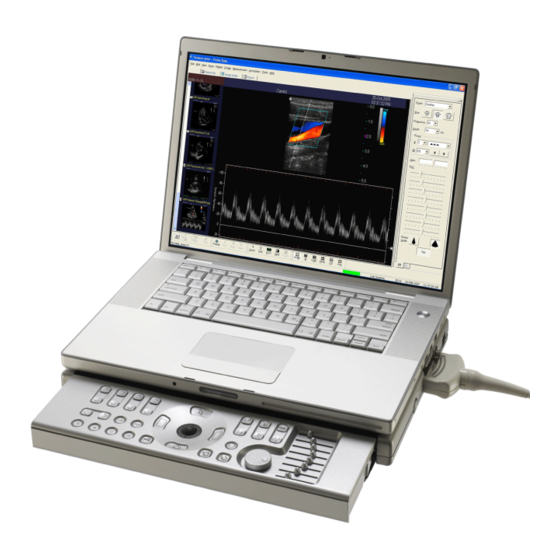
For information about using the Measure tabs, see Chapter 7, Working With Measurements. The Terason Console A slide-out console houses controls that configure and operate the Terason Ultrasound system without using a mouse. Terason t3000 / Echo Ultrasound System User Guide... -
Page 35: Console Controls
Clicking this button during live scanning selects the ultrasound cursor. Live/Freeze Button – The button just below the trackball toggles between live imaging and frozen image. Terason t3000 / Echo Ultrasound System User Guide... - Page 36 – Two buttons just to the left of the Frequency buttons set the focus depth. Scan Depth Buttons – Two buttons just to the left of the Focus Depth buttons set the scan depth. Terason t3000 / Echo Ultrasound System User Guide...
-
Page 37: Chapter 2 Installing Software
When you purchase the Terason Ultrasound System, it comes with all the required software already installed on the laptop. You may never need the information in this chapter unless you upgrade your system, or if you want to install the Terason Ultrasound System on a computer that was not provided by Terason. - Page 38 7. The Install shield opens again, to install the Sentinel Protection Installer. When the Welcome dialog box opens, click Next > Sentinel Installer Welcome 8. On the License dialog box, read the license agreement, then click the radio I accept... button and Next > Terason t3000 / Echo Ultrasound System User Guide...
-
Page 39: Upgrading Terason Software
When upgrading software, the Terason installer first removes the existing version, and then installs the new version. To upgrade to a newer version of the Terason software, complete these steps: 1. Exit all applications and unplug the Terason transducer from the engine. - Page 40 Uninstall Complete Dialog Box 5. Click . Keep the Terason CD in the drive and wait while the computer reboots Finish (restarts). After the computer finishes starting up, you may have to log on before proceeding.
-
Page 41: Uninstalling Terason Software
Remember to connect the transducer. Uninstalling Terason Software You do not need to manually uninstall the current version of software when you upgrade software. To permanently remove the Terason application, complete these steps: 1. Click in the Windows task bar. -
Page 42: Installing The Firewire Terason Transducer Driver
” message. Hardware Found When the Terason transducer is connected to your PC, you may have to install the device driver for the operating system to recognize the new hardware. After you plug in the Terason transducer for the first time, make sure your computer is turned on, and wait approximately one minute. - Page 43 5. Click Browse 6. Navigate to the Program Files folder on the C:\ drive. 7. Double-click the Teratech folder, then double-click the Terason 3000 folder. The complete path to the required folder is: C:\Program Files\Teratech\Terason 3000\Drivers 8. Click the Drivers folder to select it, then click...
-
Page 44: Installing The Terason Dicom Utility
Next> 10. Click Finish Installing the Terason DICOM Utility The Terason software must be installed before you can install the DICOM Send/Print utility or use the DICOM Worklist utility. See Installing Terason Software on page 37 for instructions on installing the Terason software. - Page 45 With the same installation disk in the CD drive, change to the Install Disk folder. b. Double-click the Setup.exe file. The installation program prompts you to choose where to install the utility. Terason t3000 / Echo Ultrasound System User Guide...
- Page 46 Start button to access the application). Selecting Program Folder (Accessed from the Start Button) d. Click . The installation program prompts you to confirm your choices. Next> Confirm Choices and Start Installation Terason t3000 / Echo Ultrasound System User Guide...
-
Page 47: Configuring The Dicom Utility
To limit the size of the communications log file, select the check box and enter a value in the KB text box. When the maximum size is reached, the system overwrites the oldest entries. Terason t3000 / Echo Ultrasound System User Guide... - Page 48 To limit the disk space consumed by DICOM files in the Failed Path, you can select the check box and enter a MB value. If you do, the system overwrites oldest files first when the maximum size is reached. j. Click Apply Terason t3000 / Echo Ultrasound System User Guide...
- Page 49 Change the default values for the Film Destination, Medium Type, Film Orientation, File Size ID, Border Density, Empty Density, Magnification Type, Configuration Information, and Print Priority to meet your requirements or if needed by the DICOM printer. Terason t3000 / Echo Ultrasound System User Guide...
-
Page 50: Licensing The Terason Software
• File name • Destination • Status If you see Failed images in the Status column, you should use the Terason software to resend those files to the server or printer, as appropriate. See Sending Files to a DICOM Server on page 228 for instructions. -
Page 51: Entering The License Or Evaluation Unlock Code
The Ultrasound License dialog box opens. Ultrasound License Dialog Box 2. To register by phone, call Terason at 1-866-TERASON (1-866-837-2766) and give the Terason Support Representative the Serial Number shown in the dialog box. 3. To register by email, send an email message to techsupport@Terason.com and provide these details: •... -
Page 52: Extending The Evaluation Period
4. Read the new Serial Number to Terason Technical Support. Technical Support will give you a new 10-digit unlock code. 5. Type the unlock code into the text field and click Unlock. The Terason software updates the status to Evaluation. - Page 53 Ultrasound License Registration window opens. Ultrasound License Registration Window 3. Write down the Serial Number. Do not close the window. 4. On the first computer, start the Terason software. 5. Select Help > License The Ultrasound License Registration window opens.
-
Page 54: Upgrading The License
14. Click Unlock You can no longer use the Terason software on the first computer. If you try to start it, you will see the License Registration dialog box showing the License Status as transferred, and you cannot run the software. - Page 55 Help > License Evaluation Period Dialog Box 3. Click the Upgrade radio button. 4. Contact Terason Technical Support and read the serial number to the Support Representative. The Representative will give you an unlock level number and an 10- digit unlock code.
-
Page 56: Chapter 3 Setting Up Patient Information
When you save an image, the Terason software puts it in a folder for the specific patient, along with a patient information file. If you do not enter patient details, the image is stored in a folder with other images and is not associated with a specific patient. -
Page 57: Using The Patient Info Window
, or selecting File > Print If an exam of the patient was saved to a DICOM server that the Terason ultrasound system has access to, you can use DICOM Worklist to automatically fill in the Patient Info window fields. See Using DICOM Worklist on page 228. - Page 58 When you add a new patient, the Terason software creates a folder in the Patient folder with the patient’s name. In that folder, the Terason software stores the Patient Info file and all saved scans for that patient.
- Page 59 15. Click the Save button or click the Image Display tab to save the entered information and open the scanning window. The patient information is saved in a Patient Info file and displays in the Terason Explorer window in a folder with that patient’s name. The Image Display window is ready for you to conduct the exam.
-
Page 60: Preparing Patient Info For An Exam
Chapter 3 - Setting Up Patient Information Preparing Patient Info for an Exam The Terason software displays the patient information in the Image Display window, with the last-used scanning mode still selected. The patient information is shown across the top of the window and is saved with scanned images you create for the patient. -
Page 61: Updating Patient Information
You cannot directly delete a Patient Info file, however, you can delete a patient’s folder and the Terason software will delete all Patient Info files within that folder. If the folders contain any saved images, those files are also deleted. - Page 62 1. In the Terason Explorer window, locate the patient’s name. 2. Right-click the patient’s folder and select Delete The Terason software prompts you to verify that you really want to delete the Patient Info file. 3. Click The Terason software prompts you to verify that you really want to delete the folder and all its contents.
-
Page 63: Powering The Laptop On And Off
Shut Down Windows Start menu. Using either method also shuts down the console. Starting and Exiting the Software You can use either of these methods to start up the Terason software: • Double-click the Terason shortcut , on your computer desktop •... -
Page 64: Connecting A Transducer
2. Insert the transducer connector into the port as far as it will go. 3. Move the locking lever to the locked position. If the Terason software is running, it detects the transducer and displays its name on the imaging window. If the software is started after the transducer is connected, the Terason software will detect and display the transducer name as soon as it starts. -
Page 65: Switching Transducers
Chapter 4 - Acquiring Images Switching Transducers Switching Transducers The Terason ultrasound system lets you change transducers without exiting the program. Complete these steps to switch between transducers: 1. If necessary, save the active image or image loop. See Saving Images and Loops page 133 for instructions. -
Page 66: Choosing A Scan Mode
To conduct an ultrasound exam in 2D, Color Doppler, Power Doppler, Directional Power Doppler, or M-mode, complete these steps: 1. If you use more than one Terason transducer, click the Image Display tab for the needed transducer. 2. Load or create the patient information. See Chapter 3,... - Page 67 4. In the 2D Image Control tab, select an exam type from the Exam menu. Choosing an Exam Type The Terason software loads preset image control settings that are optimized for the selected exam and the connected transducer. See Chapter 8,...
-
Page 68: Special Controls Used With The 4V2A Transducer
Using the Console on page 108 for instructions. 4. Click . The Terason software automatically adds the 2D Measure and PWD Measure tabs to the Image Control window (see Chapter 7, Working With Measurements, on page 150 for instructions on using the measurement tools). -
Page 69: Conducting An Exam In Triplex Mode
Doppler Image Controls on page 109 for instructions. 4. Click . The Terason software automatically adds the 2D Measure and CWD Measure tabs to the Image Control window (see Chapter 7, Working With Measurements, on page 150 for instructions on using the measurement tools). -
Page 70: Freezing Images
When you freeze an image, you can use the buttons on the Playback toolbar or the arrow keys to review an entire loop, frame by frame, to find a specific frame. You can also use the Playback buttons when viewing a saved loop. Playback Toolbar Buttons Terason t3000 / Echo Ultrasound System User Guide... -
Page 71: Saving Prospective And Retrospective Loops
Playback Functions on the Image Menu Saving Prospective and Retrospective Loops In 2D, Color, and Power Doppler modes, the Terason system can acquire loops either prospectively or retrospectively. Prospective acquisition captures a loop of live scan following the acquire command, while retrospective acquisition saves a loop of a frozen scan. -
Page 72: Determining Image Status
.ult files, or as .dcm or .avi files. Determining Image Status The Terason software continually displays an image status message at the bottom right of the main window, next to the frame rate (if displayed) for the Image Display window. In the example below, the message shows beneath the Modes toolbar. -
Page 73: Adjusting The Displayed Image
Paused AVI Video Clip A loaded AVI file is paused Adjusting the Displayed Image The Terason software lets you adjust the contents of the Image Display window. You can perform the following operations: • Enlarging an Area of the Image on page 73 •... -
Page 74: Resizing The Window
Resizing the Window You can change the size of the image by changing the size of the Image Display window. You can increase the size of the Image Display window by hiding the Terason Explorer or Image Control windows. You can also drag the border between the Image Display window and an adjacent window to show less of the other window. -
Page 75: Displaying The Image In Full Screen
View > Full Screen Hiding Windows When you show all of the Terason windows, you have access to all of the software’s functions. You can locate a patient’s information, choose an image mode, save or print images, and all of the other Terason functions. -
Page 76: Enhancing The Image Using Teravision™ Optimization
Adjusting the Displayed Image Showing or Hiding Windows The menus work as toggles: each time you select or click it, the Terason software hides or shows the window depending on its current state. The Status Bar menu item hides or shows the status bar at the bottom of the imaging window. -
Page 77: Adding Guides To The Image Display
If the control is present but grayed-out, the connected transducer is not supported by the TeraVision software. If either of these conditions occurs, call Terason for assistance. The TeraVision level numbers range from 0 to 6 or 8. All currently supported transducers have level numbers 0 through 6, except for the 4V2, which has 0 through 8. -
Page 78: Changing The Text Size
Changing the Text Size The Terason software lets you choose the font size for the text displayed in the Image Display window. If you choose a large text size, the text may overlap the image. If you choose a small text size, the text may be difficult to read. -
Page 79: Using Split Screen Mode
Changing the Text Size Using Split Screen Mode The Terason software lets you split the Image Display screen into two sections to view two current scans for a patient. For example, you can acquire a scan for the patient, select Split Screen, and then acquire another scan from a different angle or location. - Page 80 131 for information on saving images and loops. When you exit Split Screen mode, the Terason software keeps the acquired data for the active screen (the one with the cyan lines at the top and bottom) and discards the acquired data for the other screen.
-
Page 81: Working With Annotations
86 Working with Text To place text on an image, you must first view the image in the Image Display window. If the image has been saved, retrieve it from the Terason Explorer window. See Finding Stored Images and Loops on page 136 for instructions. - Page 82 This check box has no affect on text already added to the image. Click any text to add it to the image. To add the Patient Position, select the appropriate position from the pull-down menu. Patient Position Choices (Abdominal Exam) Terason t3000 / Echo Ultrasound System User Guide...
- Page 83 Chapter 4 - Acquiring Images Working with Annotations When you click a position, the Terason software adds that text at the home position. When you add a Patient Position, you can then click the blue arrow to add the shown patient position to the image (usually used for subsequent scans during an exam).
- Page 84 In addition to choosing from the provided text phrases, you can type any text you want onto an image. You can only add text to the 2D Image Display window. You cannot add text to the Time Series window. Terason t3000 / Echo Ultrasound System User Guide...
- Page 85 The Terason software lets you edit text added to the image using the Annotation window, or that you manually typed onto the image. 1. Double-click the text you want to edit. The Terason software places the text cursor at the end of the text and opens the Annotation window showing the Text tab.
-
Page 86: Using Body Markers
Annotation > Body Marker Adding a Body Marker to a Scan 2. Click the view for the body marker you want. The Terason software adds the icon to the scan and closes the Annotation window. The pink rectangle within the marker icon indicates the precise location. -
Page 87: Changing The Icon In The Body Marker
. The Terason software opens the Body Marker Annotation window showing the Body Marker tab. 2. Click the an icon in the Body Marker pane. The Terason software updates the icon shown in the body marker and closes the Annotation window. Moving the Indicator You can move the pink marker to anywhere on the icon to more precisely indicate the scanned anatomy. -
Page 88: Rotating The Indicator
2. Click and move the pointer until the pink rectangle is in the desired orientation. 3. Click to lock the rectangle in position. Removing the Body Marker To remove the Body Marker from the image, right-click the body marker and select Remove Body Marker Terason t3000 / Echo Ultrasound System User Guide... -
Page 89: Chapter 5 Working With Scan Modes
I.Q. tabs associated with 2D imaging are always displayed. All other modes available in the Terason Ultrasound System software include the 2D functions, and also include an additional tab or tabs with image controls for the selected scan mode. -
Page 90: Using 2D And I.q. Controls
You can only adjust these image controls during live scanning. When you freeze a scan, the Terason software replaces the 2D tab with a 2D Measure tab, for making measurements on the scan image. (See Chapter 7 - Working With Measurements.) - Page 91 Choosing an Exam Terason provides customized exams for scanning different types of anatomy. When you choose an exam, the Terason software loads image controls settings on the 2D and I.Q. tabs that are customized for that anatomy and the connected transducer.
- Page 92 To set a patient size, click the appropriate T-shirt symbol. Patient Size Controls You can also click on the Image menu and choose a size from the menu. Size Terason t3000 / Echo Ultrasound System User Guide...
- Page 93 You can decrease the depth to enlarge the display of structures near the skin line, or to not display unnecessary areas at the bottom of the window. When you select an exam type, the Terason software enters a preset depth value for the specific exam type, transducer, and patient size.
- Page 94 You can also use the Image menu to set the depth. To do so, complete these steps: 1. Select . The Set Depth dialog box opens. Image > Depth Set Depth Dialog Box 2. Select a depth value from the menu. 3. Click Terason t3000 / Echo Ultrasound System User Guide...
-
Page 95: Adjusting The Gain
Note: Increasing the number of focal zones decreases the frame rate. Adjusting the Gain 2D gain allows you to increase or decrease amplification of the returning echoes, which increases or decreases the amount of echo information displayed in an image. Terason t3000 / Echo Ultrasound System User Guide... - Page 96 Compensation on page 96 for more information on TGC settings. When you select an exam type, the Terason software sets the gain to a preset value for the specific exam type, transducer, and patient size. To decrease the gain, click the slider and drag it to the left. To increase the gain, click the slider and drag it to the right.
- Page 97 (Linear transducers do not support LGC.) These segments are arcs one eighth of the full width of the scan. Adjusting LGC can enhance imaging of the cardiac wall with some scanning orientations. Terason t3000 / Echo Ultrasound System User Guide...
- Page 98 Tissue harmonic imaging processes a returned harmonic signal to enhance the displayed image. The harmonic used for THI is twice the frequency of the transmitted signal. Terason t3000 / Echo Ultrasound System User Guide...
- Page 99 When Omni is on, the word Omni shows in the scan information display, and the focus markers on the depth ruler change to this: To turn Omni on or off, click the Omni button on the 2D Image Control window. Omni Button Terason t3000 / Echo Ultrasound System User Guide...
-
Page 100: Controls On The I.q. Image Control Window
The following figure shows the I.Q. controls. I.Q. Controls Inverting Images The Left/Right and Up/Down buttons control the orientation of the scanned image. The following figure shows the effect of using the invert buttons. Terason t3000 / Echo Ultrasound System User Guide... - Page 101 By default, the Terason software uses the Gray color scheme for 2D images. the Gray scheme displays images as shades of gray over a range from white to black. The Terason software provides several alternate schemes. To determine if another scheme improves visibility of the anatomy being scanned, cycle through the available options.
- Page 102 0 to 7. Choosing a Persistence Value The 0 setting represents 0% and 7 represents 100% persistence. You can also select to choose a different setting. Image > Persistence Terason t3000 / Echo Ultrasound System User Guide...
- Page 103 Reference Bar The image information display on the scan window includes a code such as below C/2/A the transducer identification. In the example, the third item ( ) is the Map value. C/2/A Terason t3000 / Echo Ultrasound System User Guide...
- Page 104 A number to the left of the slider indicates the amount of compression, from -50 to 50. Drag the slider to the right to increase compression, which darkens the image, or drag the slider to the left to decrease compression. Terason t3000 / Echo Ultrasound System User Guide...
-
Page 105: Using The Console
35 for more information on using the console. Using M-Mode Image Controls When you select M-Mode, the Terason software adds the M-Mode tab to the Image Controls window. When you freeze a scan, the Terason software replaces the M-Mode tab with an M Measure tab.(See... -
Page 106: Adjusting The Sweep Speed
Time Series window are closer or farther apart depending on the speed. Each large tick mark represents one second. Shortcut Menu in the Time Series Window of an M-Mode Scan Adjusting the Ultrasound Cursor Position The following figure shows the ultrasound cursor: Terason t3000 / Echo Ultrasound System User Guide... -
Page 107: Using Anatomical M-Mode
Anatomical M-Mode The software adds a crossbar and arrowhead to the ultrasound cursor. 2. Click on the ultrasound cursor. The ultrasound cursor turns green, and a curved arrow replaces the finger pointer. Terason t3000 / Echo Ultrasound System User Guide... -
Page 108: Using The Console
– the leftmost up and down buttons control the setting in the leftmost box, and so on. Console Controls on page 35 for more information on using the console. Terason t3000 / Echo Ultrasound System User Guide... -
Page 109: Using Spectral Doppler Image Controls
Using Spectral Doppler Image Controls Using Spectral Doppler Image Controls When you select Pulsed-Wave Doppler, the Terason software adds the PWD tab to the Image Controls window. When you select Continuous-Wave Doppler, the Terason software adds the CWD tab to the Image Controls window. -
Page 110: Setting The Velocity Display Units
(Color Doppler, Directional Power Doppler, or Power Doppler). If you change the PRF value on one tab, the Terason software also changes the PRF value on the other tab. This depends on whether you are scanning in simultaneous or non- simultaneous mode, which is controlled by the Update button. -
Page 111: Adjusting The Wall Filter
For example, if the wall filter setting is 40, each time you click the right or left arrow, the Terason software adds or subtracts 10 Hz from that value, until the selected value falls into a lower or higher range. -
Page 112: Adjusting The Steering Angle
You can also adjust the steering angle by typing a slash (/). When you type this character, the Terason software highlights the Steering Angle value and you can use the left and right arrow keys to change the value. If you press the key twice quickly, the Terason software highlights the Correction Angle. -
Page 113: Inverting The Waveform
Sample Volume along the ultrasound cursor. You can also type a period (.) to select the ultrasound cursor, and then use the keyboard left and right arrows to move it. Terason t3000 / Echo Ultrasound System User Guide... -
Page 114: Adjusting The Sample Volume (Sv) Size And Depth
2. Place the Windows pointer inside the vessel of interest. You can use the Zoom tool (see Enlarging an Area of the Image on page 73) for more precise pointer placement. 3. Right-click the vessel of interest. The shortcut menu opens. Terason t3000 / Echo Ultrasound System User Guide... -
Page 115: Adjusting Spectral Gain
Shortcut Menu 4. Select Set PWD Gate. The Terason software locks the sample volume indicator in the position where you right- clicked and adds the Time Series window for PWD mode. You can now adjust the SV size, depth, or correction angle as needed for the scan. If you are already in PWD mode, moving the gate position does not interrupt the Time Series window display. -
Page 116: Adjusting Noise Rejection
Adjust the sound volume of the signal to a comfortable level. If it is too high, system noise may interfere with the sound produced by the blood flow. Drag the slider to the left to lower the volume. Drag the slider to the right to raise the volume. Terason t3000 / Echo Ultrasound System User Guide... -
Page 117: Updating The Displays
Time Series window). When is selected, the Terason software continuously updates Update the 2D scan while acquiring Spectral Doppler data. When not selected, the Terason software freezes the 2D data while acquiring Spectral Doppler data. When Update selected, the button appears pressed in and is a lighter shade than its surroundings. -
Page 118: Using The Console
Using Color and Power Doppler Image Controls When you select Color Doppler, Power Doppler, or Directional Power Doppler, the Terason software adds a tab for the selected mode to the Image Control bar. Note: CWD is not available when the Pwr mode is selected. -
Page 119: Adjusting The Scan Area
1. Position the Windows pointer over one of the corners of the border defining the scan area. 2. Click a corner. 3. Move the mouse or trackball until the scan area is the desired size. Terason t3000 / Echo Ultrasound System User Guide... -
Page 120: Adjusting Pulse Repetition Frequency (Prf)
The Terason application may automatically adjust the PRF value when you move the region of interest to ensure that the maximum PRF is not exceeded for the new depth. -
Page 121: Inverting The Doppler Display (Color Invert)
For example, if the PRF setting is 4000, each time you click the right or left arrow, the Terason software adds or subtracts 500 Hz from that value, until the selected value falls into a lower or higher range. -
Page 122: Adjusting The Wall Filter
You can adjust the color gain to increase or decrease the amplification of the returning signal being played or displayed. Terason t3000 / Echo Ultrasound System User Guide... -
Page 123: Adjusting The Color Priority
Due to the current high level of color persistence, when saved images are reviewed, they will not appear exactly as saved. Terason t3000 / Echo Ultrasound System User Guide... -
Page 124: Adjusting The Color Baseline
You can see the effect of your change on the color reference bar. If the bar is not visible, select View Image Display Properties Reference Bar to add it to the image display. > > Terason t3000 / Echo Ultrasound System User Guide... -
Page 125: Choosing A Color Map
Save Apply select a different exam, the Terason software loads the color map for the selected exam. The color maps are designated A through F in the menu. Some maps use more colors than others, and some display in a smoother gradient than others. -
Page 126: Scanning In Triplex Mode
(Color Doppler, Directional Power Doppler, or Power Doppler). If you change the PRF value on one tab, the Terason software also changes the PRF value on the other tab. This depends on whether you are scanning in simultaneous or non- simultaneous mode, which is controlled by the Update button. -
Page 127: Region Of Interest
However, you can move the range gate, as follows: position the Windows pointer in the 2D image where you want to set the range gate, then double-click. When you set the new location for the range gate, the Terason software centers the region of interest around the new location. - Page 128 Left/Right invert Persistence Up/Down invert Colorization Smoothing Compression Noise Rejection CD/DirPwr/Pwr Scan Area Color Persistence Color Baseline Wall filter High Spatial Resolution vs. High Frame Rate Color Invert Color Gain Color Priority Terason t3000 / Echo Ultrasound System User Guide...
- Page 129 Chapter 5 - Working With Scan Modes Scanning in Triplex Mode Terason t3000 / Echo Ultrasound System User Guide...
- Page 130 Chapter 5 - Working With Scan Modes Scanning in Triplex Mode Terason t3000 / Echo Ultrasound System User Guide...
-
Page 131: Storing Images And Loops
• Exporting a File; see page 135 By default, images and loops are saved in the Terason format and have a file extension of .ult. You can also copy the image in the 2D Image window by selecting Edit > Copy Image pressing the F4 key), and pasting the image into another application on your computer. -
Page 132: Selecting File Types
• JPEG • TIFF To create images that can be viewed by others who do not have the Terason software, use a format other than the Terason format (.ult). You can email image and loop files or include them as graphics in other applications. -
Page 133: Saving Images And Loops
You can save the Split Screen image as a loop file using the DICOM or AVI formats. When you do, the Terason software saves the active screen as an image loop, and the other screen as a single frame. When you save a Split Screen image to the Terason format (ULT), only the loop in the active screen is saved. - Page 134 Finding Files in the Terason Explorer on page 136. If you open an image file and then save it again, the Terason software creates a new file; it does not overwrite the original file. To overwrite the original file, use the Export item on the File menu option and select the original file before you click the Save button.
-
Page 135: Exporting A File
You can only select the check box if you choose Terason Image File, AVI, or DICOM file as the format. 7. If you selected a file format other than the Terason format, choose an Image Size from the menu. More pixels in an image produce a larger file. Fewer pixels produce a lower-quality and smaller file. -
Page 136: Finding Stored Images And Loops
For archived images, insert the required CD and select File > Open Finding Files in the Terason Explorer If you must view a saved image or loop, you can use the Terason Explorer window to find it and open it. Locating Saved Images and Loops To open a folder, click the symbol or double-click the folder name. - Page 137 Terason software is running, right-click in the Terason Explorer window and select to update. Refresh The Terason software loads the selected image file into a new tab in the Image Display window. When finished with the image file, select and the Terason File >...
- Page 138 Click and drag in a scroll bar to see a different part of the image. For non-ULT files, the Terason software provides a shortcut menu that lets you use the Playback functions (for AVI or DICOM loops), resize the image to a selected percentage, or copy the image for pasting into an external application.
-
Page 139: Finding Files In The Review Window
The Review window lets you display thumbnail images for a specific date. When you select a dated folder in the Terason Explorer (either for a specific patient or in the Image folder), the Review window automatically displays thumbnail images for all files in the selected folder. -
Page 140: Browsing To Find Files
However, if you have archived images, or if the images are stored elsewhere for any reason, you can still use the Terason Explorer or the File menu to locate those files. To locate files that were not saved in the Terason default folder, complete these steps: 1. -
Page 141: Managing Files
Chapter 6 - Working With Image Files Managing Files The file displays in the Image Display window. Managing Files Using the Terason Ultrasound System produces hundreds of image files. To manage those files, you should understand: • Copying Files; see page 141 •... -
Page 142: Backing Up Files On A Cd
Highlight the file name Moving Files Terason does not recommend that you move files out of the default location. Only files in the default directory display in the Terason Explorer window, and you may have difficulty locating other files. Typically, you only move files when you are archiving older files that you do not need on your computer. -
Page 143: Renaming Files
4. Type a new name and press Enter. Deleting Files Terason recommends that you delete unnecessary files to free up disk space. You cannot directly delete patient info files using the Terason Explorer; you can only delete folders and image or loop files. - Page 144 Deleting Files Using the Terason Explorer, Review, and Thumbnail window To delete files from the Terason Explorer, Review or Thumbnail window, complete these steps: 1. Click the file that you want to delete, or click a folder to delete all files within the folder.
-
Page 145: Editing Images And Loops
The types of modifications you can make depend on whether you are working with an image or a loop. The Terason software can edit only Terason Image Format files and loops (.ult). You can use the Terason software to view images saved in other formats, but not to edit them. -
Page 146: Printing Images
Printing Images You can re-save the file by clicking the Save Image or Save Loop button (depending on the file type). The Terason software creates a new file. To replace the original file with the one you edited, select , locate the original file and select it, then click File >... -
Page 147: Printing From The File Menu
The Terason software scales the images to fit the selected number on the page. The smaller the number of images, the larger each image prints. To change the number of images per... -
Page 148: Printing From The Print Preview Window
If you only want to print some of the images, hold the Ctrl key down and click the images you want to print. The Terason software draws a blue line around selected images, and when you click the Print button, the software prints only the selected images. -
Page 149: Printing In Split Screen Mode
Closes the Print Preview window and shows the Terason window Printing in Split Screen Mode When in Split Screen mode, the Terason software prints both screens. For the best quality print, use the Full Screen function before printing. 1. Make sure that both screens are frozen and that you have added any necessary measurements or annotations. - Page 150 Terason Ultrasound software and by proper use of medical protocols. When you freeze a scan, the Terason software adds one or two measure tabs to the Image Control window. For example, if you scanned in M-Mode, a 2D Measure tab and an M Measure tab display.
-
Page 151: Chapter 7 Working With Measurements
2. If necessary, click the 2D Measure tab or click in the 2D window. 3. To measure a detailed area with precision, use the Zoom function (see Enlarging an Area of the Image on page 73) to enlarge an area of the 2D scan. Terason t3000 / Echo Ultrasound System User Guide... - Page 152 The Terason software displays the results in the bottom left corner of the 2D window. Distance Measurement on an Image 6. To move the start or end point of a measurement, click one of the anchors (calipers), move the target cursor to a new position, and click.
-
Page 153: Measuring Volume
6. Click at the starting point of the area’s width, then click at the ending point of the area’s width. The Terason software displays the width measurement. 7. Click The Terason software adds a new live scan adjacent to the frozen scan. 8. Click 9. Select from the Measurement list. -
Page 154: Measuring Elliptical Circumference And Area
4. Position the target cursor at one end of the area that you want to measure and click. 5. Move the target cursor to the other end of the desired area, and click. The Terason software displays a green line and shows the circumference and area values at the bottom of the image. -
Page 155: Tracing Areas On The Image
Tracing Areas on the Image The Terason software lets you trace the contour of any shape on an image to measure the circumference and area. You can also use the Ellipse tool to measure a circumference or area (see Measuring Elliptical Circumference and Area on page 154 for instructions.) - Page 156 To erase part of the polygon, press the Backspace key to remove unwanted line segments, then continue clicking on corners. 6. To complete the trace, double-click the starting point. The Terason software displays the circumference and area of the measured area. If you right-click or double-click at a location other than the starting point, the trace tool draws a straight line from that location to the starting point to complete the tracing.
-
Page 157: Calculating Percent Stenosis
4. Click at the start and end points of the vessel. The Terason software calculates the length of the line and displays the Diameter value. 5. Click at the start and end points of the residual lumen. The Terason software displays the second Diameter value and calculates the percentage stenosis. -
Page 158: Working With Measurements On An Obstetrical Exam
Use of non-medical grade peripherals will result in non-compliance of safety and EMI standards. Non-conformance to these standards can result in risks to the patient and operator of this equipment. Terason t3000 / Echo Ultrasound System User Guide... - Page 159 The Terason software adds an OB information section to the 2D Measure tab when you freeze an Obstetrical scan. When you make any of the measurements in the following list, the software estimates the average ultrasound age (AUA), and from that, an estimated due date (EDD), and displays them in the OB information section.
- Page 160 The trimester setting determines which measurements are available. When you select the trimester (using , or the Trimester arrows), the Terason software updates the list of measurements to show only those measurements applicable to that trimester. Terason t3000 / Echo Ultrasound System User Guide...
- Page 161 Outer Orbital Diameter Inner Orbital Diameter Right Foot Length Left Foot Length Radius Length Tibia Length Ulna Length If you make all four AFI measurements, the Terason application shows the AFI total. Terason t3000 / Echo Ultrasound System User Guide...
- Page 162 AFI Q4 measurement is used to calculate the cephalic index (CI). Calculating Estimated Fetal Weight The Terason software can estimate the weight of a fetus. Terason uses the Hadlock formula (see Appendix D - Gestational Tables) based on the abdominal circumference, head circumference, and femur length measurements.
- Page 163 Estimated Fetal Weight Calculation Calculating Gestational Sac Size and Age For a first trimester obstetrical exam, the Terason software can calculate the mean gestational sac size (GSS), and based on that size, provide the estimated gestational age (GA). Terason uses the Hadlock formula and tables (see Appendix D - Gestational Tables).
-
Page 164: Making Gynecological Measurements
3. Select the needed measurement from the Measurement list. The Terason software selects the Caliper tool. 4. Click at the beginning and end points of what you want to measure. The Terason software displays the measurement value. Terason t3000 / Echo Ultrasound System User Guide... -
Page 165: Measuring In The M-Mode Window
Measuring in the M-Mode Window Measuring in the M-Mode Window When you freeze an M-Mode scan, the Terason software adds the 2D Measure and M Measure tabs to the Image Control bar, with the M Measure tab active. Making M-Mode Measurements. -
Page 166: Measuring In The Spectral Doppler Modes
When you freeze a Pulsed-Wave Doppler, Continuous-Wave Doppler, or Triplex scan, the Terason software adds the 2D Measure and PWD Measure (or CWD Measure) tabs to the Image Control bar. The controls on the CWD Measure tab are identical to those on the PWD Measure tab. - Page 167 172). The vessel wall markers move the top and bottom of the gate along the ultrasound cursor when measuring flow volume as described in Measuring Flow Volume on page 174. Terason t3000 / Echo Ultrasound System User Guide...
- Page 168 Subclavian Artery Ulnar A Ulnar Artery Axillary A Axillary Artery Breast Int Mammary A Internal Mammary Artery Intercostal A Intercostal Artery Lat. Thoracic A Lateral Thoracic Artery Sup. Epigastric A Superior Epigastric Artery Terason t3000 / Echo Ultrasound System User Guide...
- Page 169 Radial A Radial Artery Umbilical A Umbilical Artery Umbilical V Umbilical Vein Uterine A Uterine Artery Inferior Pudendal Artery Prostate Inferior Vesical Artery Middle Hemorrhoidal Artery Middle Vesical Artery Superior Rectal Artery Terason t3000 / Echo Ultrasound System User Guide...
- Page 170 Greater Saphenous Vein Lesser Saphenous Vein Med. Baslic V Median Basilic Vein Profunda Femoral Artery Popliteal A Popliteal Artery Popliteal V Popliteal Vein Superficial Femoral Artery Superficial Femoral Vein Subclavian V Subclavian Vein Terason t3000 / Echo Ultrasound System User Guide...
-
Page 171: Measuring Vessel Blood Velocities
Subclavian V Subclavian Vein Ulnar V Ulnar Vein Measuring Vessel Blood Velocities When you select PS/ED to measure an arterial velocity, the Terason software calculates the following measurements: • Peak Systole • End Diastole • Peak Systole/End Diastole ratio (S/D) •... -
Page 172: Calculating Arterial Ratios
When using the Carotid, Abdominal, or Arterial exams, you can measure two arteries (different scans) and the Terason software calculates the S and D ratios between those arteries. You can use this feature to measure internal carotid artery to common carotid artery (ICA to CCA) ratios, or systolic renal artery to aorta ratio. -
Page 173: Measuring Heart Rate And Rise Time
6. In the Time Display window, click where you want to start measuring, move the target cursor to the end location and click. When you click the second time, the Terason software enters the measurements in the Time Series window. -
Page 174: Measuring Flow Volume
Measuring in the Spectral Doppler Modes Heart Rate Measurement on PWD Scan Measuring Flow Volume The Terason software automatically calculates flow when you select the Flow Volume measurement. The following values are included in this calculation: • FV: flow volume (milliliters/minute) •... -
Page 175: Measuring Vascular Exams
When you make a measurement in the 2D Image Display window, the measurement value displays at the bottom left of the window. If you make a series of measurements that result in the Terason software calculating another value, the calculated values display at the bottom left of the window. - Page 176 2. In the Configuration pull-down menu, select the type of exam you want to modify the measurement list for. 3. Click Configure... Options/Measurements Window The Configure Vascular Measurements window opens, and the Current Measurement List field displays the measurements currently included in the selected exam’s list. Terason t3000 / Echo Ultrasound System User Guide...
- Page 177 2. In the Configuration pull-down menu, select the exam type 3. Click Configure... 4. On the Configure Vascular Measurements window, click the Vessels tab. The window changes to allow adding and removing vessels from the Current Vessel List. Terason t3000 / Echo Ultrasound System User Guide...
- Page 178 Has Laterality d. If the new vessel has location, check the checkbox. Has Location e. Click to create the new vessel. f. In the Configure Vascular Measurements window, click the Measurements tab. Terason t3000 / Echo Ultrasound System User Guide...
- Page 179 5. Use the radio buttons to select the applicable scan mode (2D, M-Mode, or Spectral). 6. Click the Vessels tab. 7. Click to restore the Current Vessel list to the default set of vessels. Restore Terason t3000 / Echo Ultrasound System User Guide...
-
Page 180: Available Vascular Measurements
Time Caliper Cardiac Measurements for PWD/CD Time Series Window PS/ED Velocity Point Velocity Point Time Caliper Time Caliper Flow Volume Flow Volume TAMV Derived DIAM Derived TAPV Pulsatility Index PI_Vmax Derived PI_Vmin Derived Terason t3000 / Echo Ultrasound System User Guide... -
Page 181: Working With Vascular Reports
81. With all Spectral measurements, anatomy must be applied to the measurement, see Measuring Vessel Blood Velocities on page 171. 4. Save the image with the measurements to store them to the worksheet. Terason t3000 / Echo Ultrasound System User Guide... - Page 182 Chapter 7 - Working With Measurements Measuring Vascular Exams Film: 0001 Date: Monday, November 21, 2005 Hour: 02:21:26 PM Vascular Worksheet Terason t3000 / Echo Ultrasound System User Guide...
- Page 183 When you have examined the information on the worksheet, click the report button at the top of the worksheet to display the report. Film: 0001 Date: Monday, November 21, 2005 Hour: 02:59:00 PM Vascular Report Terason t3000 / Echo Ultrasound System User Guide...
-
Page 184: Measuring Cardiac Exams
Measuring Cardiac Exams You can make any of a number of cardiac measurements and then generate a report. The Terason software provides Cardiac measurements for the 2D Image Display window, the M-Mode Time Series window, and the PWD/CW Time Series window. - Page 185 , or ) that corresponds to the scan mode M-Mode Spectral you want to modify a group for. 5. To choose a group for modification, select it in the Group Name: pull-down menu. Terason t3000 / Echo Ultrasound System User Guide...
- Page 186 Configure Cardiac Measurements Groups Window 5. To delete a group, select it in the list and click Remove 6. To create a new group: a. Click The New Group Name window opens. New Group Name Window Terason t3000 / Echo Ultrasound System User Guide...
- Page 187 6. In the Group Name: drop-down menu, select the name of the group you want to restore. 7. Click to restore the selected group to the default, or to restore all of Restore Restore All the groups for the selected exam type. Terason t3000 / Echo Ultrasound System User Guide...
-
Page 188: Available Cardiac Measurements
Mitral valve diameter Caliper MV area Mitral valve area Trace PV diam Pulmonic valve diameter Caliper TV diam Tricuspid valve diameter Caliper LA diam Left atrium diameter Caliper RA diam Right atrium diameter Caliper Terason t3000 / Echo Ultrasound System User Guide... - Page 189 TV D-E Tricuspid valve D-to-E Depth Caliper MV E-F slope Mitral valve E-to-F slope Slope Caliper MV EPSS Mitral valve E point septal separation Depth Caliper MV excursion Mitral valve excursion Depth Caliper Terason t3000 / Echo Ultrasound System User Guide...
- Page 190 Gen Qp TVI Pulmonic time-velocity integral Velocity Trace Gen Qp HR Pulmonary heart rate Heart Rate Gen Qs TVI Systemic time-velocity integral Velocity Trace Gen Qs HR Systemic heart rate Heart Rate Terason t3000 / Echo Ultrasound System User Guide...
-
Page 191: Formulas Used In Echocardiography Measurements
LVd: LV diastolic area (cm LVd LVs – --------------------------- - %FAC Change% LVs: LV systolic area (cm Flow Area d: diameter (cm) ----- FlowArea Terason t3000 / Echo Ultrasound System User Guide... - Page 192 Fraction Teichholz (ml) -------------------- - Teichholz Vd: diastolic volume Teichholz (ml) Stroke Vs: systolic volume cubed Vd Vs – Volume (ml) Cubed Vd: diastolic volume cubed (ml) Terason t3000 / Echo Ultrasound System User Guide...
- Page 193 LV Mass LV Mass: (g) LVMass LVMI ---------------------- - Index BSA: body surface area Body W: weight (range: 0.5–160 0.425 0.725 Surface Area 0.007184 W H: height (range: 150–204 Terason t3000 / Echo Ultrasound System User Guide...
- Page 194 – ------ - Time Deceleration Slope (ms ----------------------------------------------------- - 1000 DecelerationSlope Valve Area by PHT: Pressure half time (msec) ----------- - Terason t3000 / Echo Ultrasound System User Guide...
- Page 195 (m) Artery : time velocity integral of mitral valve (m) Right : estimated right arterial mmHg Ventricular RVSP pressure (mmHg) Systolic :regurgitant velocity of Pressure from tricuspid valve (m/s) Tricuspid Regurgitation Terason t3000 / Echo Ultrasound System User Guide...
-
Page 196: Working With Cardiac Reports
IVS: x.xx cm x.xx cm LVID: x.xx cm x.xx cm xx % FT LVPW: x.xx cm x.xx cm xx % FS RVAW: x.xx cm x.xx cm xx % FT Terason t3000 / Echo Ultrasound System User Guide... - Page 197 Valves and Atria Diameter Area LVOT: x.xx cm Ao Root: x.xx cm RVOT: x.xx cm x.xx cm x.xx cm x.xx cm x.xx cm x.xx cm x.xx cm x.xx cm x.xx cm x.xx cm M-Mode Terason t3000 / Echo Ultrasound System User Guide...
- Page 198 E/A Ratio: x.xx Decel. Time: xxx ms IVRT: xxx ms PHT: xxx ms PHT Area: x.xx cm MV Diameter: x.xx cm MV CSA: x.xx cm Stroke Volume: x.x ml xx bpm Terason t3000 / Echo Ultrasound System User Guide...
- Page 199 RA Pressure: xx.x mmHg RVSP (TR): xx.x mmHg VSD Peak: x.xx m/s x.x mmHg Sys BP: xx.x mmHg RVSP (VSD): xx.x mmHg Shunts ASD Qp ASD Qs TVI: x.xx m x.xx m Terason t3000 / Echo Ultrasound System User Guide...
-
Page 200: Selecting Measurements
Formulas used to Calculate Values for the Cardiac Report. Selecting Measurements If you have multiple measurements in the 2D or Time Series window, the Terason software provides tools to help you select a specific measurement. Selecting a measurement highlights both the measurement and the value. -
Page 201: Deleting Measurements
158. Restoring All Measurement Groups to Defaults To restore all measurement groups to the defaults, open the Tools menu, select Options select the Measurements tab, and click Restore All Exams Default Measurements Terason t3000 / Echo Ultrasound System User Guide... -
Page 202: Stress Echo
Chapter 7 - Working With Measurements Stress Echo Stress Echo The Terason Echo system license level 7 includes tools for performing cardiac stress studies. These features are not available on t3000 systems. Performing a Stress Echo Study To perform a stress echo study: 1. - Page 203 When Multi is selected, the software continues to record heart cycles until it reaches 200, or until you stop the acquisition. 9. Open the View Name menu to select a different view name. Terason t3000 / Echo Ultrasound System User Guide...
- Page 204 If is selected in the Stress Setup window, the software captures Multi consecutive heart cycle loops until the acquisition is stopped. If is not selected, Multi the software captures four loops. Terason t3000 / Echo Ultrasound System User Guide...
- Page 205 Stress Echo Heart Cycle Loops on Review Screen b. Use the Review control panel to control the loop playback. (See Features of the Stress Echo Review Window on page 210.) Review Controls Terason t3000 / Echo Ultrasound System User Guide...
- Page 206 Note: The imaging settings chosen during the Rest portion of the study are automatically loaded during the Impost portion. a. Click the Acquire button. Acquire Button The software captures loops of the heart cycle and displays them in the Review screen. Terason t3000 / Echo Ultrasound System User Guide...
-
Page 207: Closing A Stress Echo Study
Closing a Stress Echo Study To close a stress echo study, open the Review window and click the Close Study button on the toolbar. (See Stress Echo Review Window on page 210.) Terason t3000 / Echo Ultrasound System User Guide... -
Page 208: Saving And Sending Studies
1. In the Stress Setup window, click Edit View... The Edit Stress View Labels window opens. Edit Stress View Labels Window 2. Select the label you want to rename, then enter a new label. 3. Click Terason t3000 / Echo Ultrasound System User Guide... -
Page 209: Features Of The Stress Echo Scanning Window
Features of the Stress Echo Scanning Window Stress Button Acquire Stage Timer ECG active Stress study ROI rectangle button selector information indicator Pause/resume indicator View selector study button Stress Echo Scanning Window Terason t3000 / Echo Ultrasound System User Guide... -
Page 210: Features Of The Stress Echo Review Window
The windowpane button toggles between thumbnail view of all the loops in the study and selected loops, or when selecting, between the selection and the set of loops already selected. Terason t3000 / Echo Ultrasound System User Guide... - Page 211 The selection you make here determines what appears in the Stage Selection menu. Stage Selection Stage Selection Menu Use this menu to choose which selected loops or stage of the study to display. Terason t3000 / Echo Ultrasound System User Guide...
-
Page 212: Chapter 8 Working With Exams
When you select a size on the 2D image control tab, the Terason software loads presets of other exam parameters for that size. When you select a different size, you need not reload the exam or load a different exam;... - Page 213 10V5S Vascular access (t3000 only) 12HL7 Intraoperative Musculoskeletal Vascular Access Nerve Block 12L5V Arterial Dialysis Access Testes Breast Musculoskeletal Thyroid Neonatal Hip Carotid Vascular Access Nerve Block Venous PDOF Cardiac (Echo only) Terason t3000 / Echo Ultrasound System User Guide...
- Page 214 When you use the Save or Save Loop buttons (see Saving Images and Loops on page 133), the Terason software uses a default file name based on the selected exam. The following table shows the abbreviation used for each exam. Exam Abbreviations Used in File Names...
-
Page 215: Opening An Exam
Chapter 8 - Working With Exams Opening an Exam When you select an exam, the Terason software loads the preset values for that exam, determined by the transducer, the patient size, and the selected scan mode. If you select a different patient size or scan mode, the Terason software updates the preset values. -
Page 216: Creating A New Exam
Terason software can use the correct preset values for the selected size. If you use different names for different size settings in the same exam, you must remember to load the size- specific exam, because the Terason software cannot update the preset values based on the size setting. - Page 217 To delete an exam, complete these steps: 1. Select . The Terason software opens the Delete Exam dialog box. Exam > Delete Exam Deleting an Exam 2. Click the exam that you want to delete from the list, and click .
-
Page 218: Chapter 9 Performing Medical Procedures
Performing Medical Procedures The Terason Ultrasound System can aid in performing medical procedures such as biopsies, brachytherapy, and cryoablation. Depending on whether you purchased the additional equipment required for these procedures, you may have to understand: • Performing a Biopsy; see page 219 •... -
Page 219: Performing A Biopsy
Note: If the needle strays outside of the guide lines, no warning displays. Performing a biopsy requires that you understand: • Assembling the Bracket and Guide on page 222 • Biopsy Procedure on page 222 Terason t3000 / Echo Ultrasound System User Guide... - Page 220 • Triplex • Zoom mode • Split Screen mode You can only see the target indicator on a live image; the Terason software removes it when you freeze the image. Needle Guide Kits A needle guide kit contains several parts that fit together to attach the needle to the transducer and provide a guide that directs the needle into the patient.
- Page 221 The following figure shows the correct bracket for the 12L5V transducer: 12L5V Transducer and Civco Bracket for Use With the 12L5V Terason t3000 / Echo Ultrasound System User Guide...
-
Page 222: Assembling The Bracket And Guide
7. Select the appropriate size needle guide insert and slide it into position. 8. Use the appropriate length needle to reach the target area. Biopsy Procedure To perform a biopsy using the Terason Ultrasound System as a guide, complete these steps: 1. Start live imaging. - Page 223 4. If the Target Indicator (green circle with an X) does not show within the guides, select View > Needle Guide Display > Needle Guide Target Indicator The Terason software adds the “Distance to Target” value at the top of the image. Warning: If the message “Uncalibrated”...
-
Page 224: Verifying The Alignment
When you insert the needle, it should be located near the center of the guidelines. If the needle appears outside of the lines, verify that you have selected the appropriate needle guide on the I.Q. tab. If you have, stop the procedure immediately and contact a Terason representative. -
Page 225: Correcting Needle Guide Positioning For Biopsies
The transducer must be cleaned and high-level disinfected between patients. For instructions, refer to Processing Terason Transducers Between Uses on page 282. To sterilize the brackets, complete the procedure recommended by Civco or Protek. Terason t3000 / Echo Ultrasound System User Guide... - Page 226 Chapter 9 - Performing Medical Procedures Cleaning the Transducers and Brackets Terason t3000 / Echo Ultrasound System User Guide...
-
Page 227: Chapter 10 Working With Dicom
Use DICOM Worklist to search the archive of patient information sets on the DICOM server, and copy patient info sets to the Terason Ultrasound system so that exams on the system are identified with the correct patients. Before you can use the Terason DICOM utility, you must install the software and configure the DICOM utility. -
Page 228: Sending Files To A Dicom Server
44. To send a saved DICOM file or loop to the server, complete these steps: 1. In the Terason Explorer, click the folder (either in the Patient folder or in the Image folder) that contains the needed DICOM files. -
Page 229: Worklist Queries
To configure Worklist to communicate with a DICOM server: 1. With the Terason software running, click in the menubar, and select Tools Options The Options window opens. 2. Click the Worklist tab. The Options window shows the Worklist options. Terason t3000 / Echo Ultrasound System User Guide... -
Page 230: Configuring Broad Queries
Configuring Broad Queries To configure a query so that it is available in the Broad Query menu on the Worklist window: 1. In the Options > Worklist window, click Query The Query window opens. Terason t3000 / Echo Ultrasound System User Guide... - Page 231 3. To modify an existing query, pull down the Select Query: menu and select the query name. 4. Enter the AE title of the Terason ultrasound computer in the AE Title: field. 5. To search for info sets of patients who have not had an ultrasound exam before, pull down the Modality: menu and choose a different exam type.
-
Page 232: Making A Query
Making a Broad Query To make a broad Worklist query: Patient Info Window 1. In the Patient Info window, click Worklist The Worklist window opens. Terason t3000 / Echo Ultrasound System User Guide... - Page 233 2. Enter the patient’s name, or ID, or accession number in the appropriate field. 3. To apply the parameters in a broad query to the patient-specific query (this further narrows the query results): a. Click so the box is checked. Use Broad Query Criteria Terason t3000 / Echo Ultrasound System User Guide...
-
Page 234: Applying A Patient Info Set
Setting the Value List Order To set the left-to-right listing order of the patient info values: 1. On the Worklist window, click Customize List... The Customize List window opens. Terason t3000 / Echo Ultrasound System User Guide... - Page 235 Worklist sorts the patient info sets in its list using the value type you selected. It sorts alphabetically starting with A, or numerically starting with 0. When you make a new query, the worklist uses the value type you set with this procedure to sort the results. Terason t3000 / Echo Ultrasound System User Guide...
-
Page 236: Dicom Network Service
This service allows automatic worklist queries to execute on schedule, even if the Terason software is stopped. If the service stops or does not start automatically, you can launch it manually. You can also stop the network service manually. -
Page 237: Testing The Monitor Display
Settings, see page 243 Testing the Monitor Display When you purchase a laptop from Terason as part of the Terason Ultrasound System, the monitor is already adjusted for proper display. Gamma refers to the monitor’s ability to display accurate colors. If you think the colors on your monitor are no longer accurate, you can perform the tests in this section to verify that the display is correct. -
Page 238: Chapter 11 Using System Tools
4. Verify that the gray bars in each column are increasingly difficult to distinguish as you look from right to left. 5. Select from the Greyscale Test Image Selection menu. bwhtest Greyscale Tests The following figure shows the BWHtest: Terason t3000 / Echo Ultrasound System User Guide... - Page 239 (BWH: Brigham and Women’s Hospital) 6. Verify that the test pattern shows a continuous grayscale image from the center of the pattern. You should not see any concentric ring-like features. 7. Select SMPTE Terason t3000 / Echo Ultrasound System User Guide...
- Page 240 In each corner and the center of the image, inspect the lines, from fat to narrow, horizontally and vertically, and make sure you can see all the lines. 8. Select Terason t3000 / Echo Ultrasound System User Guide...
-
Page 241: Correcting The Position Of The Needle Guides
You can easily reset the layout of the toolbars and windows to their default locations. To do so, complete these steps: 1. Select Tools > Restore Default Window Layout The Terason software prompts you to confirm this choice. Confirmation Before Resetting the Layout 2. Click Terason t3000 / Echo Ultrasound System User Guide... -
Page 242: Keeping The Terason Software On Top
Always on Top is Setting a Time-Out Value The Terason software lets you set a time-out value that shuts off power to the transducer if it has been inactive for a specified period. This feature is especially useful when you run a laptop on battery power. -
Page 243: Enabling Or Disabling The Color Doppler Message
, to indicate that transducer power is Terason - Suspended shut down. When you move the mouse or press any key on the keyboard, the Terason software sends power to the transducer and removes the message box. Enabling or Disabling the Color Doppler Message... - Page 244 You can choose a different format as the default for images or loops When you set a different file type as the default, the Terason software changes the Save Image and Save Loop buttons to show the file type that will be used. You can select a different default file type for images and loops.
- Page 245 File menu to select the Export Terason Image Type (or any other format) to save the file. When you select a file type for image files other than ULT, you can choose the default Image size from the Window Size menu.
- Page 246 • RGB, RLE (RGB with run-length encoding applied) • Baseline JPEG DICOM Send Formats This setting only affects files sent to a DICOM server; DICOM files saved in the Terason Image or Patient folders always use the Palette color format. Choosing enables the JPEQ Quality controls.
-
Page 247: Changing The Display Mode Defaults
By default, the Terason software expands the 2D scan data to fill the available space. Perceptually, if you change from a wide sector width to a narrow sector width, it looks like the narrow sector width is larger than the wide sector width, as shown in the following figure. - Page 248 Specifying Optional Settings Wide Sector Width vs. Narrow Sector Width If you compare the scale, you can see that the scales are different. The Terason software expanded the narrow sector image to fill the available space. To retain the same scale when you switch sector widths, you can set the default to scale the narrow image.
- Page 249 Scaling Linear Transducers This option works with linear transducers; it does not work with curved transducers. When you select a small depth, the Terason software retains the same width as the original scan, and removes the scan data from greater depths.
-
Page 250: Setting Measurement Defaults
COM port used to export obstetrical measurements to another computer. Options: Measurements Tab The Terason Ultrasound System uses the Hadlock measurement setup as the system default to make obstetrical calculations. If needed, you can use a different measurement setup. Not all measurement setups provide the full list of measurements included with the Hadlock setup. -
Page 251: Adding Custom Text To The Annotation Window
4. Type the text into the Add anatomy field. 5. Click . The Terason software adds the text to the list. 6. Repeat steps 3 to 5 for all exams and text you want to enter. 7. Click The text you add shows at the bottom of the list in the Text tab of the Annotation window. -
Page 252: Safety Standards
12 System Safety and Maintenance To use the Terason Ultrasound System successfully and safely, Terason provides the following information: • Safety Standards, see page 252 • Indications For Use, see page 254 • Acoustic Output Indices, see page 268 •... -
Page 253: Chapter 12 System Safety And Maintenance
Ultrasound Safety The following is a Prudent Use Statement regarding the use of ultrasound: Use diagnostic ultrasound only when there is a good medical reason. Also, the Terason Ultrasound System does not provide explicit control of acoustic power output. Therefore, to minimize the exposure to ultrasound energy, limit the duration of ultrasound examinations. -
Page 254: Indications For Use
This section provides Diagnostic Ultrasound Indications for Use forms for the transducers offered with the Terason ultrasound system. The first table provides indications for use for the system. The remaining tables list the indications for use for the following transducers: •... - Page 255 Includes ultrasound guidance of amniocentesis, infertility monitoring of follicle development. Includes ultrasound guidance for placement of needles. Abdominal includes GYN/Pelvic. Other use includes Urology/Prostate. Includes uses in military field settings in addition to hospital/clinic settings. Terason t3000 / Echo Ultrasound System User Guide...
- Page 256 Includes ultrasound guidance for placement of needles, catheters, cryosurgery, and brachytherapy. Includes ultrasound guidance of transvaginal biopsy. Includes ultrasound guidance of amniocentesis, infertility monitoring of follicle development. Includes uses in military field settings in addition to hospital/clinic settings. Terason t3000 / Echo Ultrasound System User Guide...
- Page 257 Includes ultrasound guidance for placement of needles, catheters, cryosurgery, and brachytherapy. Includes ultrasound guidance of transvaginal biopsy. Includes ultrasound guidance of amniocentesis, infertility monitoring of follicle development. Includes uses in military field settings in addition to hospital/clinic settings. Terason t3000 / Echo Ultrasound System User Guide...
- Page 258 Includes ultrasound guidance of transvaginal biopsy. Includes ultrasound guidance of amniocentesis, infertility monitoring of follicle development. Abdominal includes GYN/Pelvic. Other use includes Urology/Prostate. Includes uses in military field settings in addition to hospital/clinic settings. Terason t3000 / Echo Ultrasound System User Guide...
- Page 259 B+M; B+PWD; B+CD; B+DPD; B+PDV Tissue Harmonic Imaging (THI), Tissue Doppler Imaging (TDI). Includes ultrasound guidance for placement of needles, catheters. Abdominal organs and peripheral vessels Abdominal includes GYN/Pelvic. Other use includes Urology/Prostate. Terason t3000 / Echo Ultrasound System User Guide...
- Page 260 Includes ultrasound guidance for placement of needles, catheters, cryosurgery, and brachytherapy. Includes ultrasound guidance of transvaginal biopsy. Other use includes Urology/Prostate. Includes uses in military field settings in addition to hospital/clinic settings. Terason t3000 / Echo Ultrasound System User Guide...
- Page 261 Includes ultrasound guidance for placement of needles, catheters, cryosurgery, and brachytherapy. Includes ultrasound guidance of transvaginal biopsy. Other use includes Urology/Prostate. Includes uses in military field settings in addition to hospital/clinic settings. Terason t3000 / Echo Ultrasound System User Guide...
- Page 262 Includes ultrasound guidance for placement of needles, catheters, cryosurgery, and brachytherapy. Includes ultrasound guidance of transvaginal biopsy. Other use includes Urology/Prostate. Includes uses in military field settings in addition to hospital/clinic settings. Terason t3000 / Echo Ultrasound System User Guide...
- Page 263 Includes ultrasound guidance for placement of needles, catheters, cryosurgery, and brachytherapy. Includes ultrasound guidance of transvaginal biopsy. Other use includes Urology/Prostate. Includes uses in military field settings in addition to hospital/clinic settings. Terason t3000 / Echo Ultrasound System User Guide...
- Page 264 Includes Color Doppler (CD), Directional Power Doppler (DPD), and (non-directional) Power Doppler (PD). B+M; B+PWD; B+CD; B+DPD; B+PDV Tissue Harmonic Imaging (THI), Tissue Doppler Imaging (TDI). Includes ultrasound guidance for placement of needles, catheters. Abdominal organs and peripheral vessels Abdominal includes GYN/Pelvic. Terason t3000 / Echo Ultrasound System User Guide...
- Page 265 B+M; B+PWD; B+CD; B+DPD; B+PDV Tissue Harmonic Imaging (THI), Tissue Doppler Imaging (TDI). Includes ultrasound guidance for placement of needles, catheters. Abdominal organs and peripheral vessels Abdominal includes GYN/Pelvic. Other use includes Urology/Prostate. Terason t3000 / Echo Ultrasound System User Guide...
- Page 266 B+M; B+PWD; B+CD; B+DPD; B+PD; B+CD+PWD. Tissue Harmonic Imaging (THI), Tissue Doppler Imaging (TDI). Includes ultrasound guidance for placement of needles, catheters. Abdominal organs and peripheral vessels. Abdominal includes GYN/Pelvic. Other use includes Urology/Prostate. Terason t3000 / Echo Ultrasound System User Guide...
- Page 267 2D+M; 2D+PWD; 2D+CD; 2D+DPD; 2D+PDV Tissue Harmonic Imaging (THI), Tissue Doppler Imaging (TDI). Includes ultrasound guidance for placement of needles, catheters. Abdominal organs and peripheral vessels. Abdominal includes GYN/Pelvic. Other use includes Urology/Prostate. Terason t3000 / Echo Ultrasound System User Guide...
-
Page 268: Acoustic Output Indices
Acoustic Output Indices Acoustic Output Indices The Terason Ultrasound System complies with the Standard for Real-Time Display of Thermal and Mechanical Acoustic Output Indices on Diagnostic Ultrasound Equipment (UD3-98). When the relevant output index is below 1.0, the index value is not displayed. -
Page 269: Mi: The Mechanical Index
Neonatal Cephalic Doppler (when the beam focus is near cranial bone). TIB has the following characteristics. • Potential bioeffect: Thermal heating of bone (and indirect heating of adjacent soft tissue) due to absorption of ultrasound at the bone surface. The TIB value indicates the Terason t3000 / Echo Ultrasound System User Guide... -
Page 270: Tic: The Cranial (Bone) Thermal Index
MI, TIS, TIB nor Neonatal Cephalic 2D only Include either Adult Cephalic or MI, TIS, TIB, TIC Neonatal Cephalic Any mode, other than 2D- Include neither Adult Cephalic TIS, TIB only nor Neonatal Cephalic Terason t3000 / Echo Ultrasound System User Guide... -
Page 271: Acoustic Output Index Displays
MI value displayed. Since 2D operation under such conditions is considered without significant risk from non- linear acoustic effects, the Terason Ultrasound System can be used in 2D with all available transducers, for all intended applications, without concern for monitoring and minimizing a displayed MI value. - Page 272 1.0.cp Control of Acoustic Index Parameters For any transducer used with the Terason Ultrasound System in which all relevant acoustic indices are displayed in standard video (without an associated real-time value), operation in the intended clinical applications of the active transducer is considered normally without significant risk due to mechanical effects or heating of tissues by ultrasound energy.
- Page 273 x < 3.25 Etc. Etc. In all operating modes with the Terason Ultrasound System, control of acoustic exposure is available indirectly. For a description of the indirect effects that certain control adjustments may have on displayed index values, consult Chapter 5 -...
- Page 274 Relative error due to temporal instability of the hydrophone, estimated as 1% .3 Relative error in estimating derating factor, due to uncertainties in estimating frequency and reproducibility in determining derating location, estimated as 4% Terason t3000 / Echo Ultrasound System User Guide...
- Page 275 W of less than 1% for the sample measurements. The relative error in the Mechanical Index, defined as , is approximately: Terason t3000 / Echo Ultrasound System User Guide...
- Page 276 W of less than 1% for the sample measurements. The relative error in total acoustic power at the scan/beam entrance to the body, defined as , is approximately: Terason t3000 / Echo Ultrasound System User Guide...
- Page 277 Relative error in estimating the equivalent diameter of the active aperture, estimated as 2% The estimated relative errors of the calculated indices are as follows. = 6.4% = 11.2% TISscan = 11.2% TISunsc-A<1 Terason t3000 / Echo Ultrasound System User Guide...
-
Page 278: Relationship Of Index To Display Accuracy
The following table indicates the precision of the display for MI values. MI Value Display Precision Range of calculated Displayed value value x Calc. Display x < 0.4 < 0.4 0.4 x < 0.5 Terason t3000 / Echo Ultrasound System User Guide... - Page 279 Items in the following table correspond to index values actually displayed with the Terason Ultrasound System. For those indices for which no values are displayed, all calculated values of the index are less than 1.0 when the given index is considered relevant to the operating mode and possible intended use of the transducer.
-
Page 280: Acoustic Output Tables
Mechanical Index (MI) values greater than 1.9 exceed FDA Guideline levels. Acoustic Output Tables Terason tests all transducers it sells for use on humans, to determine their maximum acoustic outputs in the scanning modes supported by the transducers. When the results of... -
Page 281: Accuracy Measures
RMS errors: For A=3.1 cm2, accuracy=4% Circumference Circumference accuracy measures are as follows: Assumptions: Elliptical cross section, length of axes: 2a, 2b Terason t3000 / Echo Ultrasound System User Guide... -
Page 282: Volume
– clean and at least high-level disinfect the transducer. Use of a sheath is required. Warning: In addition to the instructions in this guide, follow the instructions provided by the manufacturer of cleaners and disinfectants. Terason t3000 / Echo Ultrasound System User Guide... -
Page 283: General Cleaning
The cable and connector are not waterproof. Do not immerse the cable or allow liquid to contact the connector. Warning: The Terason Ultrasound System (electronics), the laptop, and the AC/DC adapter are not protected from spills or splashes. Protect them with a drape as needed when cleaning the transducers. -
Page 284: Precleaners And Low-Level Disinfectants
• Alkazyme High-Level Disinfectants The following high-level disinfectants have been tested, found compatible with transducers used with the Terason Ultrasound System, and are cleared for use by the United States Food and Drug Administration (FDA): • Cidex 2% • Cidex OPA •... -
Page 285: Compliance And Approvals
• Electric Shock: IEC 60601-1, Class I, Type BF System Warranty The warranty period for the Terason Ultrasound System is twelve (12) months, but you can purchase an extended warranty. To obtain warranty service, U.S. customers call Terason at 1-866-TERASON (1-866-837-2766); International customers call 781-270- 4143. -
Page 286: Recommended Maintenance
Do not expose transducers to direct heat such as strong sunlight or a local heat source, as heat can cause crystal aging and loss of sensitivity. When storing the Terason Ultrasound System in environments between 0º and 50ºC, the original shipping container must be used. - Page 287 Using accessories, transducers, or cables other than those specified, with the exception of those sold by the manufacturer as replacement parts for internal components, may result in increased electromagnetic emissions or decreased EMI immunity of the Terason Ultrasound System. Terason t3000 / Echo Ultrasound System User Guide...
-
Page 288: System Specifications
Chapter 12 - System Safety and Maintenance System Specifications System Specifications The following table lists the system specifications for the Terason Ultrasound System. Gray blocks signify that the category does not apply to that component. terason Ultrasound System Specifications Category... -
Page 289: Optional
650 mW Environmental Protection Product Recycling and Disposal Terason has programs for return of used products. For more information, contact your local Terason representative. Terason provides disassembly instructions to treatment facilities for the safe and proper removal and recycling of electronic components in this product. For more information, contact your local Terason representative. -
Page 290: Caring For Batteries
Warning: Do not throw batteries into the trash. Collect and recycle used batteries separate from other waste. Terason t3000 / Echo Ultrasound System User Guide... -
Page 291: Disposing Of The Packaging Materials
Contact your local Terason representative for battery shipment instructions. Disposing of the Packaging Materials To the extent required by local laws and regulations, Terason will collect and dispose of packaging materials for this product. For more information, contact your local Terason representative. - Page 292 For maximum energy conservation when the system is in storage, power off and unplug the system from the power outlet. Note: Unplugging the system from the power outlet for more than four weeks at a time can damage the system. Terason t3000 / Echo Ultrasound System User Guide...
-
Page 293: Appendix A Working With Microsoft Windows
Moving Windows and Toolbars, see page 300 The examples use the Terason software, but the concepts apply to all programs that run on Windows. If you want more help in using Windows, you can use the Windows online help, or you can purchase a third-party book available at most bookstores. - Page 294 Click Start to open this menu. You can start any program or utility from here. Utility shortcuts Windows Desktop Terason t3000 / Echo Ultrasound System User Guide...
-
Page 295: Application Windows
Application Windows Application Windows Most applications have a similar user interface. When you learn a technique for one application, you can use it with other applications. The following figure shows the Terason application window: Tabs — windows that share the Window controls: Application title bar;... -
Page 296: Windows Terms
If you minimized a window, you use the Restore function to return it to its original size. You can restore a program by clicking its button on the Task bar, or by selecting Restore from the right-click menu if you click the button. Terason t3000 / Echo Ultrasound System User Guide... -
Page 297: Using The Touchpad Or A 2-Button Mouse
The Image Display, Review, and Patient Info tabs share the same space in the Terason window, but you can only see one of them at a time. Task bar The bottom of the desktop, where you can access utilities, the Start menu, and minimized programs. -
Page 298: Starting/Exiting Programs
3. Move the Windows pointer onto the list and onto the one you need. Windows highlights that item, and if it has more choices for that application, displays another list of items. Terason t3000 / Echo Ultrasound System User Guide... -
Page 299: Resizing Windows
Windows pointer to change shape as shown in the figure below, then click and drag the pane border to a new position. Resizing Parts of the Window Terason t3000 / Echo Ultrasound System User Guide... -
Page 300: Moving Windows And Toolbars
Moving Windows and Toolbars You can change where panes and toolbars appear within the Terason window. For example, you can move the Terason Explorer pane to the far right, and you can move the Tools toolbar to below the Playback toolbar. -
Page 301: Appendix B Menu And Toolbar Reference
Reference, see page 309 • Toolbar Reference, see page 313 Shortcut Keys The Terason software has mapped the keyboard function keys (F1 to F12) and several other keys to specific functions, as listed in the following table. Shortcut Keys Description Description... -
Page 302: Menu Reference
Window on page 148 Print Setup Configures default printer options Printing Images on page 146 Exit Closes the Terason Ultrasound Starting and Exiting the System application Software on page 63 Terason t3000 / Echo Ultrasound System User Guide... - Page 303 Deleting Text from an Image box or text on the Image Display page 85 window, Clear All Deletes text entries and Deleting Text from an Image measurements on the Image page 85 Display window Terason t3000 / Echo Ultrasound System User Guide...
- Page 304 Full Screen Enlarges the Image Display Displaying the Image in Full window to cover the entire Screen on page 75 computer’s screen, hiding all other windows and toolbars Refresh Updates the thumbnail list Terason t3000 / Echo Ultrasound System User Guide...
- Page 305 26 image Power Doppler Activates Power Doppler scanning Power Doppler on page 24 and starts a live image Toggles tissue harmonic imaging Tissue Harmonic Imaging (THI) on and off on page 98 Terason t3000 / Echo Ultrasound System User Guide...
- Page 306 Deletes all measurements in the Deleting Measurements Series Time Series window page 201 Measurements Send Transmits OB and GYN Changing the Indicator’s Measurements measurements to another Direction on page 87 to Serial Port computer Terason t3000 / Echo Ultrasound System User Guide...
- Page 307 Doppler scan on page 123 Warning with a high level of color persistence Options Sets options for Save functions, Specifying Optional Settings Display Modes, Measurements, page 243 and Annotations Terason t3000 / Echo Ultrasound System User Guide...
- Page 308 About Terason Opens a message box that Contacting Terason Technical displays the Terason copyright Support on page 320 information, and the current version of the software Terason t3000 / Echo Ultrasound System User Guide...
-
Page 309: Shortcut Menu Reference
Shortcut Menu Reference Shortcut Menu Reference When you right-click on an area in the Terason window, a shortcut menu pops up with items specific to the location or item where you clicked. The following table lists the shortcut menus you might see, with a brief description of the available menu items. - Page 310 Saves an image loop in the Terason Saving Images and Loops (ULT) file format on page 133 Export Specifies a filename, location, and Exporting a File image format when saving an image page 135 or loop Terason t3000 / Echo Ultrasound System User Guide...
- Page 311 Deletes all measurements in the 2D Deleting Measurements Series and Time Series windows on page 201 Measurements Clear All Deletes all text and measurements Deleting Measurements from the 2D and Time Series on page 201 windows Terason t3000 / Echo Ultrasound System User Guide...
- Page 312 Show Arrow Add an arrow from the text toward the Placing Arrows on the center of the 2D scan (you can then Image on page 83 move the arrow head to any location) Terason t3000 / Echo Ultrasound System User Guide...
-
Page 313: Toolbar Reference
Appendix B - Menu and Toolbar Reference Toolbar Reference Toolbar Reference The Terason software provides several toolbars that you can hide or display, or move into individual windows. Descriptions of Buttons on the Image Mode Toolbar Toolbar Button Mode Description Opens and closes the Terason Explorer window 2D: provides a standard two-dimensional display in real time. - Page 314 Mode Description Save button saves the current image to a file; icon may be different if you selected a default format other than Terason ULT; click arrow to select different file format Save Loop button saves the maximum allowed number of previous frames as a loop;...
-
Page 315: Appendix C Solving Problems
319 • Network Problems on page 320 If you complete the procedures and the problem persists, contact Terason as described in Contacting Terason Technical Support on page 320. Installation Problems When installing the Terason software, you cannot have any other applications open on the laptop, especially Microsoft Outlook. -
Page 316: Plugging In The Transducer
Problems with Scanning To determine how to proceed, look at the Image Status Message at the bottom of the Terason window. This message describes the current status of scanning as defined in Determining Image Status on page 72. Use the following table to determine how to... - Page 317 6. Look for an entry named , and click the Imaging devices 7. If you do not see , follow the instructions for Installing Terason 3000 Ultrasound Probe the FireWire Terason Transducer Driver on page 42. Terason t3000 / Echo Ultrasound System User Guide...
-
Page 318: Interference On The Scan
Appendix C - Solving Problems Interference on the Scan 8. If you see the Terason entry, close all windows and start the Terason software. If you still cannot see an image, contact Terason Technical Support. Interference on the Scan If the transducer or the Terason electronics envelope is too close to an electronic device, such as your computer, you may see interference patterns in the scan image. -
Page 319: Display Problems
VCR or TV. Some VCRs require you to select Line 1, others Line 2, others Composite Video. The type of connection required is determined by the VCR, not by the laptop or the Terason software. Caution:A VCR or TV installed within the patient environment may result in non- conformance to safety standards. -
Page 320: Network Problems
Create CD only. If you choose Test and Create CD, the Create CD software lets you know immediately if any errors occurred. • Always use the Terason software after writing to a CD to open an image on that CD. This step lets you know immediately if there is a problem with the CD. - Page 321 Copy the serial number, then click to close the message box. Continue Ultrasound If you call Terason and a support specialist is not available, please leave the following information, and we will return your call as soon as possible: • Name •...
-
Page 322: Appendix D Gestational Tables
12.6 16.0 19.6 23.2 27.0 30.9 35.0 39.2 12.7 16.1 19.6 23.3 27.1 31.0 35.1 39.3 12.8 16.2 19.7 23.4 27.2 31.1 35.2 39.4 12.9 16.3 19.8 23.5 27.3 31.2 35.3 39.5 Terason t3000 / Echo Ultrasound System User Guide... - Page 323 (weeks) (mm) (weeks) (mm) (weeks) 12.1 19.3 29.3 12.3 19.6 29.7 12.5 19.9 30.1 12.8 20.2 30.5 13.0 20.5 30.9 13.2 20.8 31.3 13.4 21.1 31.7 13.6 21.5 32.1 13.8 21.8 32.5 Terason t3000 / Echo Ultrasound System User Guide...
- Page 324 11.4 14.5 11.5 14.6 11.6 14.7 11.7 14.8 11.7 14.9 11.8 15.0 11.9 15.1 12.0 15.2 12.0 15.3 12.1 15.3 12.2 15.4 12.3 15.5 12.3 15.6 12.4 15.7 12.5 15.9 12.6 16.0 Terason t3000 / Echo Ultrasound System User Guide...
- Page 325 24.5 35.4 16.0 24.9 35.9 16.3 25.3 36.4 16.6 25.7 36.9 16.9 26.1 37.4 17.2 26.5 37.9 17.6 26.9 38.4 17.9 27.3 38.9 18.2 27.7 39.4 18.6 28.2 39.9 18.9 28.6 40.4 Terason t3000 / Echo Ultrasound System User Guide...
- Page 326 12.5 14.8 17.3 20.3 23.6 27.6 32.2 37.6 12.6 14.8 17.4 20.3 23.7 27.7 32.3 37.7 12.6 14.9 17.5 20.4 23.8 27.8 32.5 37.9 12.7 15.0 17.6 20.5 23.9 27.9 32.6 38.0 Terason t3000 / Echo Ultrasound System User Guide...
- Page 327 21.14 30.86 13.86 21.57 31.43 14.14 22.00 32.00 14.57 22.57 32.57 14.86 22.86 33.14 15.14 23.43 33.57 15.57 23.86 34.14 15.86 24.29 34.86 16.29 24.86 35.29 16.71 25.29 35.86 17.14 25.71 36.57 Terason t3000 / Echo Ultrasound System User Guide...
- Page 328 Appendix D - Gestational Tables (mm) (weeks) (mm) (weeks) (mm) (weeks) 17.43 26.14 37.14 17.86 26.71 37.71 18.14 27.14 38.29 18.57 27.71 38.86 19.00 28.14 39.57 19.43 28.86 40.14 Terason t3000 / Echo Ultrasound System User Guide...
-
Page 329: Appendix E Electromagnetic Compatibility Tables
This appendix provides reference tables for emissions and immunity requirements. The Terason Ultrasound System is intended for use in the electromagnetic environment specified in the following tables. The customer or user of the Terason system should ensure that it is used in such an environment. - Page 330 Terason system is recommended. Power Frequency 3A/m 3A/m Power Frequency magnetic fields should 50/60 Hz be that of a typical commercial or hospital environment. Magnetic Field IEC 61000-4-8 Terason t3000 / Echo Ultrasound System User Guide...
-
Page 331: Compatibility For Non-Life-Supporting Equipment
Interference may occur in the vicinity of equipment containing a transmitter. Recommended Separation Distances Between Portable and Mobile RF Communications Equipment and the Terason Ultrasound System and Systems that Are Not Life-Supporting Separation Distance According to Frequency of Transmitter Meters (m) - Page 332 Note: At 80 MHz and 800 MHz, the separation distance for the higher frequency range applies. Note: These guidelines may not apply in all situations. Electromagnetic propagation is affected by absorption and reflection from structures, objects and people. Terason t3000 / Echo Ultrasound System User Guide...
-
Page 333: Appendix F Acoustic Output Reporting For Track 3
Acoustic Output Reporting for Track 3 Terason follows Track 3 of the FDA's Information for Manufacturers Seeking Marketing Clearance of Diagnostic Ultrasound Systems and Transducers. Track 3 does not require evaluation of acoustic output on an application-specific basis, but the global maximum... -
Page 334: Acoustic Output Tables For T3000 Transducers
3. Information need not be provided regarding TIC for any transducer assembly not intended for transcranial or neonatal cephalic uses. 4. Information on MI and TI need not be provided if the equipment meets both exemption clauses given in 51.2 aa) and 51.2 dd). Terason t3000 / Echo Ultrasound System User Guide... - Page 335 2. Information need not be provided regarding TIC for any transducer assembly not intended for transcranial or neonatal cephalic uses. 3. Information on MI and TI need not be provided if the equipment meets both exemption clauses given in 51.2 aa) and 51.2 dd). Terason t3000 / Echo Ultrasound System User Guide...
- Page 336 2. Information need not be provided regarding TIC for any transducer assembly not intended for transcranial or neonatal cephalic uses. 3. Information on MI and TI need not be provided if the equipment meets both exemption clauses given in 51.2 aa) and 51.2 dd). Terason t3000 / Echo Ultrasound System User Guide...
- Page 337 Appendix F - Acoustic Output Reporting for Track 3 Acoustic Output Tables for t3000 Transducers Acoustic Output Reporting Table for Track 3 for the 4V2A Transducer (Terason t3000 Ultrasound System in Continuous-Wave Doppler Mode) Index Label Scan Non-scan Non- scan ...
- Page 338 Appendix F - Acoustic Output Reporting for Track 3 Acoustic Output Tables for t3000 Transducers Acoustic Output Reporting Table for Track 3 for the 4V2A Transducer (Terason t3000 Ultrasound System in Pulsed-Wave Doppler Mode) Index Label Scan Non-scan Non- scan ...
- Page 339 2. Information need not be provided regarding TIC for any transducer assembly not intended for transcranial or neonatal cephalic uses. 3. Information on MI and TI need not be provided if the equipment meets both exemption clauses given in 51.2 aa) and 51.2 dd). Terason t3000 / Echo Ultrasound System User Guide...
- Page 340 2. Information need not be provided regarding TIC for any transducer assembly not intended for transcranial or neonatal cephalic uses. 3. Information on MI and TI need not be provided if the equipment meets both exemption clauses given in 51.2 aa) and 51.2 dd). Terason t3000 / Echo Ultrasound System User Guide...
- Page 341 2. Information need not be provided regarding TIC for any transducer assembly not intended for transcranial or neonatal cephalic uses. 3. Information on MI and TI need not be provided if the equipment meets both exemption clauses given in 51.2 aa) and 51.2 dd). Terason t3000 / Echo Ultrasound System User Guide...
- Page 342 3. Information need not be provided regarding TIC for any transducer assembly not intended for transcranial or neonatal cephalic uses. 4. Information on MI and TI need not be provided if the equipment meets both exemption clauses given in 51.2 aa) and 51.2 dd). Terason t3000 / Echo Ultrasound System User Guide...
- Page 343 Appendix F - Acoustic Output Reporting for Track 3 Acoustic Output Tables for t3000 Transducers Acoustic Output Reporting Table for Track 3 for the 4V2S Transducer (Terason t3000 Ultrasound System in Continuous-Wave Doppler Mode) Index Label Scan Non- scan Non- scan ...
- Page 344 2. Information need not be provided regarding TIC for any transducer assembly not intended for transcranial or neonatal cephalic uses. 3. Information on MI and TI need not be provided if the equipment meets both exemption clauses given in 51.2 aa) and 51.2 dd). Terason t3000 / Echo Ultrasound System User Guide...
- Page 345 2. Information need not be provided regarding TIC for any transducer assembly not intended for transcranial or neonatal cephalic uses. 3. Information on MI and TI need not be provided if the equipment meets both exemption clauses given in 51.2 aa) and 51.2 dd). Terason t3000 / Echo Ultrasound System User Guide...
- Page 346 Appendix F - Acoustic Output Reporting for Track 3 Acoustic Output Tables for t3000 Transducers Acoustic Output Reporting Table for Track 3 for the 5C2A Transducer (Terason t3000 Ultrasound System in Color Flow Mode) Index Label Scan Non- scan Non- scan ...
- Page 347 Appendix F - Acoustic Output Reporting for Track 3 Acoustic Output Tables for t3000 Transducers Acoustic Output Reporting Table for Track 3 for the 5C2A Transducer (Terason t3000 Ultrasound System in Pulsed-Wave Doppler Mode) Index Label Scan Non- scan Non- scan ...
- Page 348 2. Information need not be provided regarding TIC for any transducer assembly not intended for transcranial or neonatal cephalic uses. 3. Information on MI and TI need not be provided if the equipment meets both exemption clauses given in 51.2 aa) and 51.2 dd). Terason t3000 / Echo Ultrasound System User Guide...
- Page 349 2. Information need not be provided regarding TIC for any transducer assembly not intended for transcranial or neonatal cephalic uses. 3. Information on MI and TI need not be provided if the equipment meets both exemption clauses given in 51.2 aa) and 51.2 dd). Terason t3000 / Echo Ultrasound System User Guide...
- Page 350 Appendix F - Acoustic Output Reporting for Track 3 Acoustic Output Tables for t3000 Transducers Acoustic Output Reporting Table for Track 3 for the 7L3V Transducer (Terason t3000 Ultrasound System in Color Flow Mode) Index Label Scan Non- scan Non- scan ...
- Page 351 Appendix F - Acoustic Output Reporting for Track 3 Acoustic Output Tables for t3000 Transducers Acoustic Output Reporting Table for Track 3 for the 7L3V Transducer (Terason t3000 Ultrasound System in Pulsed-Wave Doppler Mode) Index Label Scan Non- scan Non- scan ...
- Page 352 2. Information need not be provided regarding TIC for any transducer assembly not intended for transcranial or neonatal cephalic uses. 3. Information on MI and TI need not be provided if the equipment meets both exemption clauses given in 51.2 aa) and 51.2 dd). Terason t3000 / Echo Ultrasound System User Guide...
- Page 353 2. Information need not be provided regarding TIC for any transducer assembly not intended for transcranial or neonatal cephalic uses. 3. Information on MI and TI need not be provided if the equipment meets both exemption clauses given in 51.2 aa) and 51.2 dd). Terason t3000 / Echo Ultrasound System User Guide...
- Page 354 2. Information need not be provided regarding TIC for any transducer assembly not intended for transcranial or neonatal cephalic uses. 3. Information on MI and TI need not be provided if the equipment meets both exemption clauses given in 51.2 aa) and 51.2 dd). Terason t3000 / Echo Ultrasound System User Guide...
- Page 355 Appendix F - Acoustic Output Reporting for Track 3 Acoustic Output Tables for t3000 Transducers Acoustic Output Reporting Table for Track 3 for the 8BP4 Transducer linear array (Terason t3000 Ultrasound System in Color Flow Mode) Index Label Scan Non- scan...
- Page 356 Appendix F - Acoustic Output Reporting for Track 3 Acoustic Output Tables for t3000 Transducers Acoustic Output Reporting Table for Track 3 for the 8BP4 Transducer linear array (Terason t3000 Ultrasound System in Pulsed-Wave Doppler Mode) Index Label Scan Non- scan...
- Page 357 2. Information need not be provided regarding TIC for any transducer assembly not intended for transcranial or neonatal cephalic uses. 3. Information on MI and TI need not be provided if the equipment meets both exemption clauses given in 51.2 aa) and 51.2 dd). Terason t3000 / Echo Ultrasound System User Guide...
- Page 358 2. Information need not be provided regarding TIC for any transducer assembly not intended for transcranial or neonatal cephalic uses. 3. Information on MI and TI need not be provided if the equipment meets both exemption clauses given in 51.2 aa) and 51.2 dd). Terason t3000 / Echo Ultrasound System User Guide...
- Page 359 Appendix F - Acoustic Output Reporting for Track 3 Acoustic Output Tables for t3000 Transducers Acoustic Output Reporting Table for Track 3 for the 8BP4 Transducer curved linear array (Terason t3000 Ultrasound System in Color Flow Mode) Index Label Scan...
- Page 360 Appendix F - Acoustic Output Reporting for Track 3 Acoustic Output Tables for t3000 Transducers Acoustic Output Reporting Table for Track 3 for the 8BP4 Transducer curved linear array (Terason t3000 Ultrasound System in Pulsed-Wave Doppler Mode) Index Label Scan...
- Page 361 2. Information need not be provided regarding TIC for any transducer assembly not intended for transcranial or neonatal cephalic uses. 3. Information on MI and TI need not be provided if the equipment meets both exemption clauses given in 51.2 aa) and 51.2 dd). Terason t3000 / Echo Ultrasound System User Guide...
- Page 362 2. Information need not be provided regarding TIC for any transducer assembly not intended for transcranial or neonatal cephalic uses. 3. Information on MI and TI need not be provided if the equipment meets both exemption clauses given in 51.2 aa) and 51.2 dd). Terason t3000 / Echo Ultrasound System User Guide...
- Page 363 Appendix F - Acoustic Output Reporting for Track 3 Acoustic Output Tables for t3000 Transducers Acoustic Output Reporting Table for Track 3 for the 8EC4A Transducer (Terason t3000 Ultrasound System in Color Flow Mode) Index Label Scan Non- scan Non- scan ...
- Page 364 Appendix F - Acoustic Output Reporting for Track 3 Acoustic Output Tables for t3000 Transducers Acoustic Output Reporting Table for Track 3 for the 8EC4A Transducer (Terason t3000 Ultrasound System in Pulsed-Wave Doppler Mode) Index Label Scan Non- scan Non- scan ...
- Page 365 2. Information need not be provided regarding TIC for any transducer assembly not intended for transcranial or neonatal cephalic uses. 3. Information on MI and TI need not be provided if the equipment meets both exemption clauses given in 51.2 aa) and 51.2 dd). Terason t3000 / Echo Ultrasound System User Guide...
- Page 366 2. Information need not be provided regarding TIC for any transducer assembly not intended for transcranial or neonatal cephalic uses. 3. Information on MI and TI need not be provided if the equipment meets both exemption clauses given in 51.2 aa) and 51.2 dd). Terason t3000 / Echo Ultrasound System User Guide...
- Page 367 Appendix F - Acoustic Output Reporting for Track 3 Acoustic Output Tables for t3000 Transducers Acoustic Output Reporting Table for Track 3 for the 8MC3 Transducer (Terason t3000 Ultrasound System in Color Flow Mode) Index Label Scan Non- scan Non- scan ...
- Page 368 Appendix F - Acoustic Output Reporting for Track 3 Acoustic Output Tables for t3000 Transducers Acoustic Output Reporting Table for Track 3 for the 8MC3 Transducer (Terason t3000 Ultrasound System in Pulsed-Wave Doppler Mode) Index Label Scan Non- scan Non- scan ...
- Page 369 2. Information need not be provided regarding TIC for any transducer assembly not intended for transcranial or neonatal cephalic uses. 3. Information on MI and TI need not be provided if the equipment meets both exemption clauses given in 51.2 aa) and 51.2 dd). Terason t3000 / Echo Ultrasound System User Guide...
- Page 370 2. Information need not be provided regarding TIC for any transducer assembly not intended for transcranial or neonatal cephalic uses. 3. Information on MI and TI need not be provided if the equipment meets both exemption clauses given in 51.2 aa) and 51.2 dd). Terason t3000 / Echo Ultrasound System User Guide...
- Page 371 Appendix F - Acoustic Output Reporting for Track 3 Acoustic Output Tables for t3000 Transducers Acoustic Output Reporting Table for Track 3 for the 8TV4 Transducer (Terason t3000 Ultrasound System in Color Flow Mode) Index Label Scan Non- scan Non- scan ...
- Page 372 Appendix F - Acoustic Output Reporting for Track 3 Acoustic Output Tables for t3000 Transducers Acoustic Output Reporting Table for Track 3 for the 8TV4 Transducer (Terason t3000 Ultrasound System in Pulsed-Wave Doppler Mode) Index Label Scan Non- scan Non- scan ...
- Page 373 2. Information need not be provided regarding TIC for any transducer assembly not intended for transcranial or neonatal cephalic uses. 3. Information on MI and TI need not be provided if the equipment meets both exemption clauses given in 51.2 aa) and 51.2 dd). Terason t3000 / Echo Ultrasound System User Guide...
- Page 374 2. Information need not be provided regarding TIC for any transducer assembly not intended for transcranial or neonatal cephalic uses. 3. Information on MI and TI need not be provided if the equipment meets both exemption clauses given in 51.2 aa) and 51.2 dd). Terason t3000 / Echo Ultrasound System User Guide...
- Page 375 2. Information need not be provided regarding TIC for any transducer assembly not intended for transcranial or neonatal cephalic uses. 3. Information on MI and TI need not be provided if the equipment meets both exemption clauses given in 51.2 aa) and 51.2 dd). Terason t3000 / Echo Ultrasound System User Guide...
- Page 376 Appendix F - Acoustic Output Reporting for Track 3 Acoustic Output Tables for t3000 Transducers Acoustic Output Reporting Table for Track 3 for the 10V5S Transducer (Terason t3000 Ultrasound System in Pulsed-Wave Doppler Mode) Index Label Scan Non-scan Non- scan ...
- Page 377 2. Information need not be provided regarding TIC for any transducer assembly not intended for transcranial or neonatal cephalic uses. 3. Information on MI and TI need not be provided if the equipment meets both exemption clauses given in 51.2 aa) and 51.2 dd). Terason t3000 / Echo Ultrasound System User Guide...
- Page 378 2. Information need not be provided regarding TIC for any transducer assembly not intended for transcranial or neonatal cephalic uses. 3. Information on MI and TI need not be provided if the equipment meets both exemption clauses given in 51.2 aa) and 51.2 dd). Terason t3000 / Echo Ultrasound System User Guide...
- Page 379 Appendix F - Acoustic Output Reporting for Track 3 Acoustic Output Tables for t3000 Transducers Acoustic Output Reporting Table for Track 3 for the 12HL7 Transducer (Terason t3000 Ultrasound System in Color Flow Mode) Index Label Scan Non- scan Non- scan ...
- Page 380 Appendix F - Acoustic Output Reporting for Track 3 Acoustic Output Tables for t3000 Transducers Acoustic Output Reporting Table for Track 3 for the 12HL7 Transducer (Terason t3000 Ultrasound System in Pulsed-Wave Doppler Mode) Index Label Scan Non- scan Non- scan ...
- Page 381 2. Information need not be provided regarding TIC for any transducer assembly not intended for transcranial or neonatal cephalic uses. 3. Information on MI and TI need not be provided if the equipment meets both exemption clauses given in 51.2 aa) and 51.2 dd). Terason t3000 / Echo Ultrasound System User Guide...
- Page 382 2. Information need not be provided regarding TIC for any transducer assembly not intended for transcranial or neonatal cephalic uses. 3. Information on MI and TI need not be provided if the equipment meets both exemption clauses given in 51.2 aa) and 51.2 dd). Terason t3000 / Echo Ultrasound System User Guide...
- Page 383 Appendix F - Acoustic Output Reporting for Track 3 Acoustic Output Tables for t3000 Transducers Acoustic Output Reporting Table for Track 3 for the 12L5V Transducer (Terason t3000 Ultrasound System in Color Flow Mode) Index Label Scan Non- scan Non- scan ...
- Page 384 Appendix F - Acoustic Output Reporting for Track 3 Acoustic Output Tables for t3000 Transducers Acoustic Output Reporting Table for Track 3 for the 12L5V Transducer (Terason t3000 Ultrasound System in Pulsed-Wave Doppler Mode) Index Label Scan Non- scan Non- scan ...
-
Page 385: Acoustic Output Tables For Echo Transducers
2. Information need not be provided regarding TIC for any transducer assembly not intended for transcranial or neonatal cephalic uses. 3. Information on MI and TI need not be provided if the equipment meets both exemption clauses given in 51.2 aa) and 51.2 dd). Terason t3000 / Echo Ultrasound System User Guide... - Page 386 2. Information need not be provided regarding TIC for any transducer assembly not intended for transcranial or neonatal cephalic uses. 3. Information on MI and TI need not be provided if the equipment meets both exemption clauses given in 51.2 aa) and 51.2 dd). Terason t3000 / Echo Ultrasound System User Guide...
- Page 387 3. Information need not be provided regarding TIC for any transducer assembly not intended for transcranial or neonatal cephalic uses. 4. Information on MI and TI need not be provided if the equipment meets both exemption clauses given in 51.2 aa) and 51.2 dd). Terason t3000 / Echo Ultrasound System User Guide...
- Page 388 2. Information need not be provided regarding TIC for any transducer assembly not intended for transcranial or neonatal cephalic uses. 3. Information on MI and TI need not be provided if the equipment meets both exemption clauses given in 51.2 aa) and 51.2 dd). Terason t3000 / Echo Ultrasound System User Guide...
- Page 389 2. Information need not be provided regarding TIC for any transducer assembly not intended for transcranial or neonatal cephalic uses. 3. Information on MI and TI need not be provided if the equipment meets both exemption clauses given in 51.2 aa) and 51.2 dd). Terason t3000 / Echo Ultrasound System User Guide...
- Page 390 2. Information need not be provided regarding TIC for any transducer assembly not intended for transcranial or neonatal cephalic uses. 3. Information on MI and TI need not be provided if the equipment meets both exemption clauses given in 51.2 aa) and 51.2 dd). Terason t3000 / Echo Ultrasound System User Guide...
- Page 391 2. Information need not be provided regarding TIC for any transducer assembly not intended for transcranial or neonatal cephalic uses. 3. Information on MI and TI need not be provided if the equipment meets both exemption clauses given in 51.2 aa) and 51.2 dd). Terason t3000 / Echo Ultrasound System User Guide...
- Page 392 3. Information need not be provided regarding TIC for any transducer assembly not intended for transcranial or neonatal cephalic uses. 4. Information on MI and TI need not be provided if the equipment meets both exemption clauses given in 51.2 aa) and 51.2 dd). Terason t3000 / Echo Ultrasound System User Guide...
- Page 393 2. Information need not be provided regarding TIC for any transducer assembly not intended for transcranial or neonatal cephalic uses. 3. Information on MI and TI need not be provided if the equipment meets both exemption clauses given in 51.2 aa) and 51.2 dd). Terason t3000 / Echo Ultrasound System User Guide...
- Page 394 2. Information need not be provided regarding TIC for any transducer assembly not intended for transcranial or neonatal cephalic uses. 3. Information on MI and TI need not be provided if the equipment meets both exemption clauses given in 51.2 aa) and 51.2 dd). Terason t3000 / Echo Ultrasound System User Guide...
- Page 395 2. Information need not be provided regarding TIC for any transducer assembly not intended for transcranial or neonatal cephalic uses. 3. Information on MI and TI need not be provided if the equipment meets both exemption clauses given in 51.2 aa) and 51.2 dd). Terason t3000 / Echo Ultrasound System User Guide...
- Page 396 3. Information need not be provided regarding TIC for any transducer assembly not intended for transcranial or neonatal cephalic uses. 4. Information on MI and TI need not be provided if the equipment meets both exemption clauses given in 51.2 aa) and 51.2 dd). Terason t3000 / Echo Ultrasound System User Guide...
- Page 397 3. Information need not be provided regarding TIC for any transducer assembly not intended for transcranial or neonatal cephalic uses. 4. Information on MI and TI need not be provided if the equipment meets both exemption clauses given in 51.2 aa) and 51.2 dd). Terason t3000 / Echo Ultrasound System User Guide...
- Page 398 2. Information need not be provided regarding TIC for any transducer assembly not intended for transcranial or neonatal cephalic uses. 3. Information on MI and TI need not be provided if the equipment meets both exemption clauses given in 51.2 aa) and 51.2 dd). Terason t3000 / Echo Ultrasound System User Guide...
- Page 399 2. Information need not be provided regarding TIC for any transducer assembly not intended for transcranial or neonatal cephalic uses. 3. Information on MI and TI need not be provided if the equipment meets both exemption clauses given in 51.2 aa) and 51.2 dd). Terason t3000 / Echo Ultrasound System User Guide...
- Page 400 2. Information need not be provided regarding TIC for any transducer assembly not intended for transcranial or neonatal cephalic uses. 3. Information on MI and TI need not be provided if the equipment meets both exemption clauses given in 51.2 aa) and 51.2 dd). Terason t3000 / Echo Ultrasound System User Guide...
- Page 401 3. Information need not be provided regarding TIC for any transducer assembly not intended for transcranial or neonatal cephalic uses. 4. Information on MI and TI need not be provided if the equipment meets both exemption clauses given in 51.2 aa) and 51.2 dd). Terason t3000 / Echo Ultrasound System User Guide...
- Page 402 2. Information need not be provided regarding TIC for any transducer assembly not intended for transcranial or neonatal cephalic uses. 3. Information on MI and TI need not be provided if the equipment meets both exemption clauses given in 51.2 aa) and 51.2 dd). Terason t3000 / Echo Ultrasound System User Guide...
- Page 403 2. Information need not be provided regarding TIC for any transducer assembly not intended for transcranial or neonatal cephalic uses. 3. Information on MI and TI need not be provided if the equipment meets both exemption clauses given in 51.2 aa) and 51.2 dd). Terason t3000 / Echo Ultrasound System User Guide...
- Page 404 2. Information need not be provided regarding TIC for any transducer assembly not intended for transcranial or neonatal cephalic uses. 3. Information on MI and TI need not be provided if the equipment meets both exemption clauses given in 51.2 aa) and 51.2 dd). Terason t3000 / Echo Ultrasound System User Guide...
- Page 405 3. Information need not be provided regarding TIC for any transducer assembly not intended for transcranial or neonatal cephalic uses. 4. Information on MI and TI need not be provided if the equipment meets both exemption clauses given in 51.2 aa) and 51.2 dd). Terason t3000 / Echo Ultrasound System User Guide...
- Page 406 2. Information need not be provided regarding TIC for any transducer assembly not intended for transcranial or neonatal cephalic uses. 3. Information on MI and TI need not be provided if the equipment meets both exemption clauses given in 51.2 aa) and 51.2 dd). Terason t3000 / Echo Ultrasound System User Guide...
- Page 407 2. Information need not be provided regarding TIC for any transducer assembly not intended for transcranial or neonatal cephalic uses. 3. Information on MI and TI need not be provided if the equipment meets both exemption clauses given in 51.2 aa) and 51.2 dd). Terason t3000 / Echo Ultrasound System User Guide...
- Page 408 3. Information need not be provided regarding TIC for any transducer assembly not intended for transcranial or neonatal cephalic uses. 4. Information on MI and TI need not be provided if the equipment meets both exemption clauses given in 51.2 aa) and 51.2 dd). Terason t3000 / Echo Ultrasound System User Guide...
- Page 409 2. Information need not be provided regarding TIC for any transducer assembly not intended for transcranial or neonatal cephalic uses. 3. Information on MI and TI need not be provided if the equipment meets both exemption clauses given in 51.2 aa) and 51.2 dd). Terason t3000 / Echo Ultrasound System User Guide...
- Page 410 3. Information need not be provided regarding TIC for any transducer assembly not intended for transcranial or neonatal cephalic uses. 4. Information on MI and TI need not be provided if the equipment meets both exemption clauses given in 51.2 aa) and 51.2 dd). Terason t3000 / Echo Ultrasound System User Guide...
-
Page 411: Index
8MC3 Transducer 346, 347, 390, 391, 392, 2D suppress, 125 Acoustic output, 365, 366, 367, 2D tab, 89, 90 7L3V transducer, 348, 349, Depth, 93 Features, 31 350, 351, 352, 394, 395, Terason t3000 / Echo Ultrasound System User Guide... - Page 412 Error correction, 224 Freeze, 67, 68, 69, 133 Antecubital Vein, 170, 171 Kits, ordering, 220 Full, 75 Anterior Tibial Modes, 30 Gray, 32 Artery, 168 Needle guide, 104, 222 Image Mode toolbar, 32 Terason t3000 / Echo Ultrasound System User Guide...
- Page 413 Desktop, 293 Index, 162 Femoral Artery, 168, 170 DIA (Diameter), 174 Vein, 170, 171 Femoral Vein, 170, 171 DIA file name, 214 Cerebellum Size measurement, 161 Iliac Artery, 168 Dialysis Access exam, 213 Terason t3000 / Echo Ultrasound System User Guide...
- Page 414 Copy Image, 131 Image, 136 Cut, 57 Patient, 60, 136 Delete, 201 F1 key, 301 Viewing, 33 Paste, 57 F4 key, 131 Font size, 78 Undo, 57 F8 key, 134 Frame rate, 288 Terason t3000 / Echo Ultrasound System User Guide...
- Page 415 TGC Display, 97 Vesical Artery, 169 HASP, 45 Folder, 33, 134 Info tab, 34, 137 Hazards, 13 JPEG artifacts, 132 DICOM files, 138 HC measurement label, 161 Map, 103 Initializing status message, 73 Terason t3000 / Echo Ultrasound System User Guide...
- Page 416 M Measure tab, 165 Value, displaying on image, 155 Thoracic Artery, 168 PWD Measure tab, 166 Vessels, 167 Ventrical Width measurement, Measurement groups Width, 153 cardiac, 184 measurements Laterality, 167 restoring, 201 vascular, 175 Terason t3000 / Echo Ultrasound System User Guide...
- Page 417 Selecting from Image menu, 102 Choosing, 222 Folder, 136 PFA measurement label, 168, 170 Displaying, 104, 222 Size, 92 PFV measurement label, 171 I.Q. tab, 104 Exam types, saved in, 216 Placenta, 169 Terason t3000 / Echo Ultrasound System User Guide...
- Page 418 Data, 316 Scan line position, 113, 117 Thumbnail size, 139 Info, 78 Sound volume, 116 Thumbnails, 139 Verification test, 241 Speed, 109 RF Interference, 14 See also Terason transducers. Steering angle, 112 Right Terason t3000 / Echo Ultrasound System User Guide...
- Page 419 Patient Info file, 60 SFV measurement label, 170 Subclavian Refresh, 137 Shock hazard, 14 Artery, 168, 169 Terason software Shortcuts, 309 Vein, 170, 171 Biopsy support, 219 SieVision, 29 Superficial Femoral Desktop shortcut, 63 Terason t3000 / Echo Ultrasound System User Guide...
- Page 420 Introduction, 28 TeraVision, 76 Time Series PRF, 127 Changing default, 250 Measurements Region of Interest, 127 Terms, 296 M-Mode, 165 Wall Filter, 127 TES file name, 214 Pulsed-Wave Doppler, 166 Troubleshooting, 315 Terason t3000 / Echo Ultrasound System User Guide...
- Page 421 Vein, 169 Worklist Velocity display units for PWD, 110 broad query, 232 VEN file name, 214 configuring, 229 Venous exam, 213 configuring broad query, 230 Verification test, 241 patient specific query, 233 Terason t3000 / Echo Ultrasound System User Guide...
Need help?
Do you have a question about the t3000 and is the answer not in the manual?
Questions and answers