Advertisement
KOBALT® and the K Design® are registered
trademarks of LF, LLC. All Rights Reserved.
ATTACH YOUR RECEIPT HERE
Serial Number
Questions, problems, missing parts? Before returning to your retailer, call our customer
service department at 1-888-3KOBALT (1-888-356-2258), 8 a.m. - 8 p.m., EST,
Monday - Friday.
AB15125B
Purchase Date
1
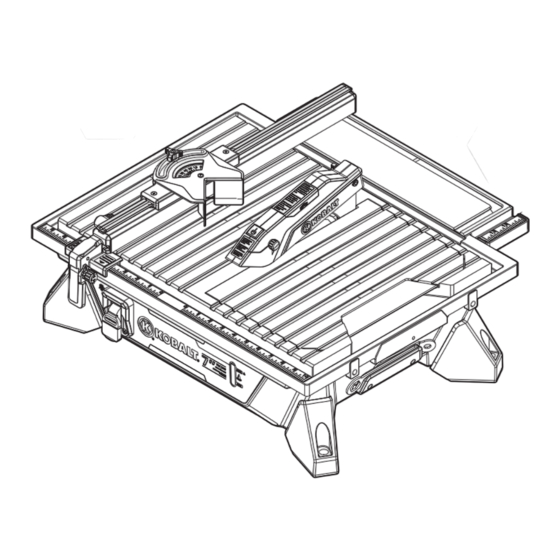
ITEM #0632868
7 IN. BOX
TILE SAW
MODEL #KWS B7-06
Français p. 30
Español p. 60
kobalttools.com
Advertisement
Table of Contents

Related Manuals for Kobalt KWS B7-06


Summary of Contents for Kobalt KWS B7-06
- Page 1 7 IN. BOX TILE SAW MODEL #KWS B7-06 Français p. 30 Español p. 60 KOBALT® and the K Design® are registered trademarks of LF, LLC. All Rights Reserved. ATTACH YOUR RECEIPT HERE Serial Number Purchase Date Questions, problems, missing parts? Before returning to your retailer, call our customer service department at 1-888-3KOBALT (1-888-356-2258), 8 a.m.
-
Page 2: Table Of Contents
TABLE OF CONTENTS Product Specifications ......................2 Package Contents ....................... 3 Hardware Contents......................4 Safety Information ....................... 5 Preparation ........................10 Assembly Instructions......................11 Operating Instructions ....................... 20 Care and Maintenance ..................... 27 Troubleshooting ........................ 28 Three-Year Warranty ......................29 Replacement Parts List .................... -
Page 3: Package Contents
PACKAGE CONTENTS PART DESCRIPTION QUANTITY PART DESCRIPTION QUANTITY Locking Lever Assembly Bevel Table (preassembled to tile saw) Cord Storage Arbor Nut Wrench Miter Gauge (preassembled to tile saw) Rip Guide Rail Arbor Wrench Blade Guard Assembly (preassembled to tile saw) Riving Knife Water Level Indicator Overflow Drain... -
Page 4: Hardware Contents
HARDWARE CONTENTS Locking Knob Assembly for Blade Guard Riving Knife Assembly Replacement Part #535113006 Replacement Part #535113007 Fixing Plate Lock Nut Washer Screw (preassembled to Qty. 1 Qty. 1 (preassembled to tile saw (R)) tile saw (R)) Qty. 1 Qty. 2 Hex Bolt with Knob Qty. -
Page 5: Safety Information
SAFETY INFORMATION Please read and understand this entire manual before attempting to assemble, operate, or install the product. This manual contains information that relates to PROTECTING PERSONAL SAFETY and PREVENTING EQUIPMENT PROBLEMS. It is very important to read this manual carefully and understand it thoroughly before using the product. - Page 6 SAFETY INFORMATION OPERATION/WORKPLACE • KEEP GUARDS IN PLACE and in working order. • REMOVE ADJUSTING KEYS AND WRENCHES. Form the habit of checking to see that keys and adjusting wrenches are removed from tool before turning it on. • KEEP CHILDREN AWAY. All visitors should be kept at a safe distance from work area. •...
- Page 7 SAFETY INFORMATION • CHECK FOR DAMAGED PARTS. Before further use of the tool, a guard or other part that is damaged should be carefully checked to determine that it will operate properly and perform its intended function. Check for alignment of moving parts, binding of moving parts, breakage of parts, mounting and any other conditions that may affect operation.
- Page 8 SAFETY INFORMATION • Use only diamond discs for which the maximum possible speed is not less than the maximum spindle speed of the tool and the material to be cut. • Maximum size of working piece should be 10 sq. ft. (1 m2). •...
- Page 9 SAFETY INFORMATION USE DUST MASK Some dust created by sawing contains chemicals that are known to cause cancer, birth defects or other reproductive harm. Some examples of these chemicals come from lead-based paints, crystalline silica from bricks, cement and other masonry products, arsenic and chromium from chemically treated lumber.
-
Page 10: Preparation
SAFETY INFORMATION WARNING • Use the proper extension cord. Make sure to use an extension cord that is heavy enough to carry the current required by the tool. An undersized cord will cause a drop in line voltage, resulting in loss of power and overheating of the tool. -
Page 11: Assembly Instructions
This tile saw can be mounted to an optional stand (Item #0544098, sold separately at www.lowes. com). This stand can be shared with the Kobalt 7 in. sliding saw (Item #0632871, sold separately). 1. The tile saw (R) can also be mounted to a firm supporting surface such as a workbench. - Page 12 ASSEMBLY INSTRUCTIONS Tile Cutting Wheel For maximum performance and safety, it is recommended that you use the 7 in. cutting wheel provided with your saw. Additional cutting wheels are sold separately. WARNING • DO NOT use cutting wheels rated less than the no load speed of this tool. Failure to heed this warning could result in personal injury.
- Page 13 ASSEMBLY INSTRUCTIONS 4. Remove arbor nut (FF) and outer washer (HH), leaving the inner washer on the arbor. WARNING • A LWAYS install the inner wheel washer before placing wheel on arbor. Failure to do so could cause an accident since the wheel will not tighten properly. NEVER use wheels that have openings, grooves, or teeth on this tool.
- Page 14 ASSEMBLY INSTRUCTIONS Installing Blade Guard Assembly 1. Loosen and remove screws (DD) and fixing plate (EE) with a Phillips screwdriver (not included). 2. Place riving knife (F) onto the mounting area on table. Reinstall screws (DD) through fixing plate (EE) and table and into riving knife (F). 3.
- Page 15 ASSEMBLY INSTRUCTIONS 4. Slide blade guard assembly (E) over riving knife (F) and align holes in blade guard assembly (E) with slot in the riving knife (F). 5. Place lock nut (AA) onto hollow hex-shaped area on blade guard assembly (E) and hold in place. 6.
- Page 16 ASSEMBLY INSTRUCTIONS Installing the Laser Batteries 1. On top of blade guard assembly (E), pull cover of battery compartment in direction of arrow molded into the battery cover to remove. 2. Place two AAA batteries (JJ) into battery compartment. Take care to insert batteries with the correct polarity as indicated inside battery compartment.
- Page 17 ASSEMBLY INSTRUCTIONS Installing the Extension Table 1. Align two supporting rod pins with two mounting holes on tile saw (R) and insert until the extension table (H) hangs on edges of main worktable. Rotate knob clockwise to lock extension table (H) in place. Note: Following the same procedure, extension table could be also be mounted on the left or right side of main worktable.
- Page 18 ASSEMBLY INSTRUCTIONS 3. Slide locking level assembly (A) until the end of rip guide rail (D) is flush with the machining area on locking lever assembly. Rotate locking level assembly knob clockwise to lock in place. Note: The position of locking level assembly knob can be adjusted by pulling out assembly knob, rotating to desired position, then pushing back into position.
- Page 19 ASSEMBLY INSTRUCTIONS Installing the Miter Guide 1. Align groove under miter gauge (C) with grooves in top of the rip guide rail (D). Push miter guide onto rip guide to desired operating position. Note: Slide miter guide off rip guide to remove. Installing the Overflow Drain 1.
-
Page 20: Operating Instructions
OPERATING INSTRUCTIONS WARNING • DO NOT allow familiarity with the tools to make you careless. Remember that a careless fraction of a second is sufficient to inflict serious injury. • ALWAYS wear eye protection with side shields marked to comply with ANSI Z87.1. Failure to do so could result in objects being thrown into your eyes, resulting in possible serious injury. - Page 21 OPERATING INSTRUCTIONS FILLING THE RESERVOIR WATER 1. Fill the water reservoir with clean tap water to the max fill line. Note: The overflow drain prevents overfilling. TO CHANGE RESERVOIR WATER 1. Unplug the saw. 2. Remove the overflow drain and empty waste water into a bucket.
- Page 22 OPERATING INSTRUCTIONS USING THE RIP GUIDE The rip guide can be used on either the left or the right side of the cutting wheel. The flat side of the rip guide must ALWAYS be facing the cutting wheel. The locking lever assembly can be repositioned for either side of the rip guide.
- Page 23 OPERATING INSTRUCTIONS MAKING CUTS • ALWAYS draw the line to be cut on the tile using a marker or grease pencil. If the tile is shiny and hard-to-mark, place masking tape on the tile and mark the tape. • A common problem when cutting tile is straying from the marked line. Once you’ve strayed from the mark, you can not force the wheel back to the line by twisting the tile.
- Page 24 OPERATING INSTRUCTIONS MAKING A 45° DIAGONAL CUT 45° Diagonal cuts are also referred to as “long point-to-long point cuts”. • Using a marker or grease pencil, mark the area to be cut on material. • Install the miter gauge (C). •...
- Page 25 OPERATING INSTRUCTIONS TO MAKE AN L-CUT L-cuts are cuts that remove a piece of tile to fit in a corner, around a cabinet, or a piece of moulding and are made by making two separate cuts. Note: Only overcut on the bottom or underneath side of the material being cut.
- Page 26 OPERATING INSTRUCTIONS TO MAKE BEVEL CUT Beveled 22.5° and 45° cuts can be made using the bevel table. • Using a marker or grease pencil, mark the area to be cut on material. • Remove the rip guide. • Tilt the bevel table (L). •...
-
Page 27: Care And Maintenance
CARE AND MAINTENANCE WARNING • When servicing, use only identical Kobalt replacement parts. Use of any other parts may create a hazard or cause product damage. • ALWAYS wear eye protection with side shields marked to comply with ANSI 787.I during product operation. -
Page 28: Troubleshooting
TROUBLESHOOTING If you have any questions regarding the product, please call customer service at 1-888-3KOBALT (1-888-356-2258). PROBLEM POSSIBLE CAUSE CORRECTIVE ACTION Motor not running. No power. 1. Check cable, plug, socket, and fuse. Motor runs, cutting Arbor nut loose. 1. Check the inner washer and outer disk remains still. -
Page 29: Three-Year Warranty
Riving knife assembly 632868007 Switch key 632868008 Bevel Table legs 632868011 assembly Blade Locking Assembly 632868013 Lever assembly knob 632868003 Printed in China KOBALT® and the K Design® are registered trademarks of LF, LLC. All Rights Reserved. kobalttools.com...
Need help?
Do you have a question about the KWS B7-06 and is the answer not in the manual?
Questions and answers
How can I get a replacement blade guard and riving knife assembly for my tile saw.
The replacement parts list is included in the manual, and the saw comes with a customer service number for inquiries. To obtain a replacement blade guard and riving knife assembly for the Kobalt KWS B7-06 tile saw, contact Kobalt customer service at 1-888-356-2258, available Monday - Friday, 8 a.m. - 8 p.m. EST.
This answer is automatically generated