Hyundai Veloster Owner's Manual
Hide thumbs
Also See for Veloster:
- Owner's manual (406 pages) ,
- User manual (140 pages) ,
- Brochure & specs (27 pages)

Related Manuals for Hyundai Veloster


Summary of Contents for Hyundai Veloster
- Page 1 ENGLISH Car Navigation System OWNER’S MANUAL Veloster Please read this manual carefully before operating your set and retain it for future reference. Designs and specifi cations are subject to change without prior notice.
-
Page 2: Table Of Contents
General information Table of contents Safety notes ............7 Types of Playable Discs . - Page 3 In City ..........................28 Name ..........................28 Hyundai service ......................28 Phone number ......................28 GPS input ............29 Parking .
- Page 4 Using the map menu Table of contents Map menu overview ..........36 General operations of map menu .
- Page 5 CD/MP3/WMA/USB/iPod operation Table of contents Playing an audio CD and MP3/WMA/USB/iPod files ..... 51 Skipping to the next track/file .................. 52 Skipping to the previous track/file ................
- Page 6 Voice recognition system Table of contents Voice recognition ..........61 Giving voice commands .
-
Page 7: General Information
General information Safety notes Always operate the vehicle in a safe When driving your vehicle, be sure to CAUTION manner. Do not become distracted by keep the volume of the unit low enough RISK OF ELECTRIC SHOCK the vehicle while driving and always be to allow you to hear sounds coming DO NOT OPEN fully aware of all driving conditions. - Page 8 General information WARNING: • The navigation system does not take • Do not rely exclusively on the navi- • Don't use a cellular phone when you the relative safety of the suggested gation system when attempting to are driving. You must stop at a safe routes into consideration.
-
Page 9: Types Of Playable Discs
General information CAUTION: CAUTION: Types of Playable Discs • Do not keep the navigation system This unit plays CD-R or CD-RW con- running with the engine stopped. taining audio titles, MP3 or WMA files. Doing so may discharge the vehicle •... -
Page 10: Handling Discs
General information Handling discs • Clean the disc NOTES ON COPYRIGHTS before playback. • A defective or soiled disc It is forbidden by law to copy, broadcast, Wipe the disc from inserted into the unit can show, broadcast via cable, play in pub- the center outward cause sound to drop during lic, or rent copyrighted material without... -
Page 11: Fcc Information
General information FCC Information y Reorient or relocate the receiving antenna. y Increase the separation between the equipment The Federal Communications Commission Radio and receiver. Frequency Interference Statement includes the iPod and iPhone is a trademark of y Connect the equipment into an outlet on a following warning: Apple Inc., registered in the U.S. -
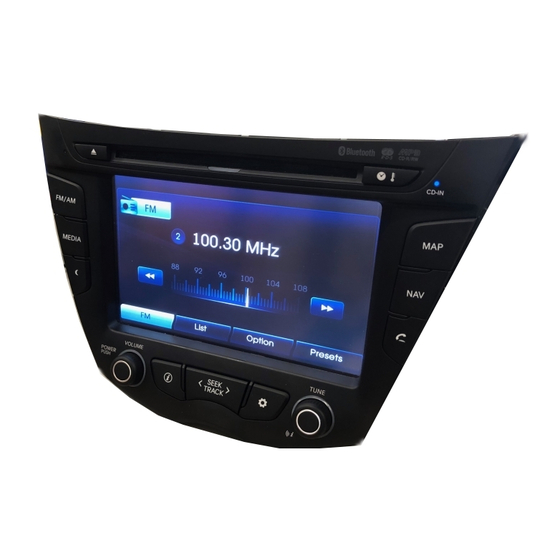
Page 12: Name Of Each Component
Name of each component Control Panel 9. Info ( Press to view the destination, route, and traffic information. • Destination: shows the informa- tion of current vehicle position and destina- tion. • Route: shows the route informa- tion. • Traffic: shows the traffic information. - Traffic info on route: the list of traffic information on active route... - Page 13 Name of each component SEEK/TRACK 12. Right knob (TUNE) 17. Clock ( • Press to: Rotate it clockwise/counterclockwise. • Press to display the digital/analog - Automatic tuning: • Searches the previous or next radio RADIO clock and outside temperature in - Track up/down: frequency.
-
Page 14: Steering Wheel Remote Control
Name of each component Steering wheel remote control MODE 1. MODE Press to select a source. • Press to activate voice recognition Press to operate Bluetooth Hands- FM t AM t CD t USB (or iPod) Free function. mode. t BT t AUX t FM... •... -
Page 15: Basic Operation
Basic operation Note Start-up screen Turning the unit off If the ejected disc is not removed in The unit starts after ignition switch is in Press POWER on the control panel approximately 10 seconds, the disc is ACC or ON position. when the system is on. -
Page 16: Selecting A Source On The Control Panel
Basic operation Selecting a source on the Selecting a source on the Rear view camera (Optional) The rear view mode is displayed on the control panel screen unit when the gearshift is moved to Press MEDIA repeatedly to select a 1. -
Page 17: Setup
Setup General operations of SETUP Bluetooth System This menu describes connection This menu describes system settings. menu schemes of Bluetooth. The navigation system allows configura- tion on the following menus: Bluetooth, System, Traffic, Navigation, Audio, Display 1. Turn the unit on. Language View Bluetooth device list Allows you to change the system and voice... - Page 18 Setup Clock Units/Temperature Navigation demo This allows you to set the time format and Allows you to set the units of distance and This is a demonstration function. After a the summer time. temperature displayed on the navigation route is set, a simulation of route guid- system.
-
Page 19: Traffic
Setup Factory settings Traffic Navigation Allows you to set all of the settings This menu describes traffic information Describes the navigation menu. back to default. settings. Motorway junction view - All: resets all the settings back to the Displays motorway junction on the map. Sets the TMC mode to “Off”, “Auto”... -
Page 20: Audio
Setup Sound (Default: Center) Audio Balance This menu describes audio settings. Touch to adjust the sound the left and right speakers. Fader Touch to adjust the sound of the front and rear speakers. Bass, Mid, Treble SDVC (Speed Dependent Volume Control) Balance/Fader Bass/Mid/Treble Touch... -
Page 21: Display
Setup Variable EQ Display Map mode Sets the variable EQ. Map colours combination can be This menu describes the display set- 1. Touch [Variable EQ]. changed to improve visibility at day and tings. 2. Touch the desired EQ. night. - Auto: map is displayed by autolight or illumination signal. -
Page 22: What Is Gps
Getting started with navigation What is GPS? Acquiring satellite signals Indicators of the map screen The Global Positioning System (GPS) Before the unit can determine your cur- How to view a map screen is a satellite-based navigation system rent position and navigate a route, you The navigation system displays various made up of a network of 24 satel- must do the following steps:... -
Page 23: Changing The Scale Of A Map
Getting started with navigation 2. Select [+] to zoom in. During Select [-} to zoom out. the voice • guidance Indicates the arriving time, distance and remaining time to the destina- tion. Method 2 If you want to adjust the navigation vol- ume, rotate the volume knob (VOLUME) •... -
Page 24: Destination Input Menu
Destination input menu Navigation menu overview General operations of desti- 4. Touch the preferred setting method. • Address: finds a destination by nation menu Navigation menu setting an address. (Page 25) • Last destinations: sets a destina- Address 1. Turn the unit on. tion from last destinations you Last destinations have set. -
Page 25: Address Search
Destination input menu Address Search 5. Input the street name and select Refer to the “Route options” on the [Ok]. page 39. You can find a destination by inputting an address. 9. Touch [Start]. 1. Press [NAV] > Touch [Address]. 2. -
Page 26: Last Destinations
3. Touch the preferred route, then 3. Touch the preferred route, then the facility. (Page 28) touch [Start]. touch [Start]. • Hyundai service: finds facilities of Hyundai service. (Page 28) • Phone number: finds POI by entering its phone number. (Page... -
Page 27: Near Position
Destination input menu Near position 5. Touch [Ok] after confirming the 8. Touch [Start]. location of the displayed POI. 1. Press [NAV] > Touch [POI] > [Near position]. 2. Select one of the categories. (For example: Emergency) Drive in accordance with the screen If you want to call on the telephone, and voice information. -
Page 28: Near Destination
4. Touch [Ok] after confirming the Hyundai service location of the displayed POI. 1. Press [NAV] > Touch [POI] > [Hyundai service]. 2. Follow steps 4-8 on the page 27 3. Touch the city in the list. -
Page 29: Gps Input
Destination input menu GPS input 4. Input the minute of the latitude 6. Touch [Ok]. coordinate. (For example: 58’) You can find a destination by inputting the coordinates of latitude and longi- tude. 1. Press [NAV] > Touch [Advanced] > [GPS input]. -
Page 30: Parking
Destination input menu Parking Using map 4. Touch the preferred route, then touch [Start]. You can find a destination by searching This allows you to search for a destina- for parking facilites. tion by scrolling over the map. 1. Press [NAV] > Touch [Parking]. 1. -
Page 31: Tour Planner
Destination input menu Tour planner 4. Set a destination by using the navi- gation menu. The Tour planner allows you to travel (Refer to the page 24.) through the searched routes by setting The destination you set is displayed. a destination or way point. You can enter a total of 4 destinations or way points. - Page 32 Destination input menu Editing/deleting a destination or way [Tourlist sort]: changes the order of the set destinations point and way points. (Follow You can modify or delete set destina- Steps 5-6) tions or way points. [Tourpoint delete]: deletes way points. (Follow 1.
-
Page 33: Store Destination
Destination input menu Store destination Store position Destinations that you visit frequently The current vehicle position can be can be stored in the Address book. stored in the Address book. They can be easily retrieved to be used again. 1. Press [NAV] > Touch [Advanced] > This is available only when a destination [Store position]. -
Page 34: Home 1/Work 2/3 ~ 12
Destination input menu Home 1/Work 2/3 ~ 12 4. If you want to set the location to Storing your home by using the your home, touch [1 Home]. [Favourites] menu Storing your home by using the Address book 1. Press [NAV] > Touch [Favourites]. Routes to your home, work, and other favourite locations can be easily 2. - Page 35 Destination input menu Finding your home 1. Press [NAV] > Touch [Favourites]. 2. Touch [Home 1]. 3. Touch the preferred route, then touch [Start]. Drive in accordance with the screen and voice information. Note The procedure to find your work and other favourite locations is similiar as in finding your home location.
-
Page 36: Map Menu Overview
Using the map menu Map menu overview General operations of map menu Map menu POI category 1. Turn the unit on. View 2D /3D 2. Press MAP to display the map. Info on route [Route] menu Manoeuvre Full screen 3. Touch [Menu]. Store position Route options Route... -
Page 37: Poi Category
Using the map menu 3. Touch [Ok]. POI category 2D/3D Some landmarks in the surrounding The map can be viewed in 2D or 3D. area can be displayed as icons on the - 2D: displays the map in a 2-dimen- screen. -
Page 38: Info On Route/Full Screen
Using the map menu Info on route/Full screen Manoeuvre/Full screen Store position When the route guidance is active, the When the route guidance is active, the The current vehicle position can be turn list is displayed on the right side in manoeuvre is displayed on the right stored in the Address book. -
Page 39: Tour Planner
Using the map menu Tour planner Route options route at the intersection and turn- ing point based on fuel consump- The Tour planner allows you to travel You can modify the route conditions or tion table with real time traffic through the searched routes by setting confirm the route information. -
Page 40: Browser/Detour
Using the map menu Browser Detour • Toll Road ( An enlarged view of route sections can If you want to make a detour due to - use: includes toll roads. - avoid: avoids toll roads. be displayed when the route guidance traffic conditions, you can use the •... -
Page 41: Info Nearby
Using the map menu 4. Touch the preferred route, then Info nearby 5. Touch to return to the previous touch [Start]. screen. Press MAP to return to the The list of traffic information around the current location map screen. current vehicle position is displayed. 1. -
Page 42: Info On Route
Using the map menu Note Info on route Checking the TMC event on the map Touch [Show map], if you want to screen The list of traffic information found on view the position about the event 1. Touch the displayed TMC icon on the recommended route from the cur- found on the route. -
Page 43: Bluetooth Wireless Technology
Bluetooth functionality, refer to the device manual. • You can check the Bluetooth phone When it is not connected, the con- compatibility list on the web-site nection failure message appears on (http://www.navigation.com/hyundai). the screen. If you want to cancel, touch [Cancel]. - Page 44 ] > Touch [Bluetooth] > [External device authorization]. If you want to cancel, touch [Cancel]. 3. In your phone, initiate a search for 3. Follow steps 4-5 on the page 43. Bluetooth devices. 4. After search is completed in your phone, select "Veloster".
-
Page 45: Viewing The Connected Device
Bluetooth wireless technology Viewing the connected device Disconnecting the bluetooth Connecting the bluetooth 1. Touch [View Bluetooth device list] on phone phone the “Bluetooth” screen. 1. Press [ ] > Select [Bluetooth]. 1. Press [ ] > Select [Bluetooth]. 2. Touch [View Bluetooth device list] on 2. -
Page 46: Deleting A Connected Phone
Bluetooth wireless technology 3. To finish the call, select [Hang up]. Deleting a connected phone Changing the passkey If you no longer need to use a phone, 1. Press [ ] > Select [Bluetooth] > you can delete it from [Bluetooth devic- [Change passkey]. -
Page 47: Answering Calls
Bluetooth wireless technology Answering calls Using your Phone Book Searching for phone book entries 1. Touch [Search by name] on the 1. When you receive a call, your phone The unit can download calling list from “Phone book” screen. rings and the “Incoming Call” win- phones supporting PBAP (Phone Book dow is displayed on the unit. -
Page 48: Using Your Calling List
Bluetooth wireless technology 3. Select the contact you want to call. Using your Calling list The unit can download calling list from phones supporting PBAP (Phone Book Acces Profile). During every connection, the unit down- loads the calling lists from your phone. Missed calls This process may take up to one min- ute. -
Page 49: Making A Call With Speed Dial Numbers
Bluetooth wireless technology 3. Select one of the categories. Making a call with speed dial Calling a number from the speed (For example: Phone book) dial list numbers 1. Press on the control panel, then You can assign up to 12 speed dial select [Speed dial]. -
Page 50: Activating The Audio Streaming Mode
Bluetooth wireless technology Activating the audio stream- Skipping the tracks Touch to select the previous/next ing mode track. Connect the unit and your phone before activating the audio streaming mode. Fast Forward/Rewind (Pages 43 - 44) Select and hold the to rewind. -
Page 51: Cd/Mp3/Wma/Usb/Ipod Operation
CD/MP3/WMA/USB/iPod operation Note Playing an audio CD and iPod • You can play 12-cm audio CDs on your You can play an iPod device on the unit MP3/WMA/USB/iPod files CD player. We strongly recommend by connecting the iPod to the USB port Disc only playing 12-cm CDs. -
Page 52: Skipping To The Next Track/File
CD/MP3/WMA/USB/iPod operation Skipping to the next track/file Intro scanning Repeat function Disc - Audio CD Disc - MP3/WMA The currently selected track/file is Touch to select the next track/file. The first 10 seconds of each tracks/files played repeatedly. are played. Skipping to the previous track/file 1. -
Page 53: Random Function
CD/MP3/WMA/USB/iPod operation Random function Disc - MP3/WMA Disc - MP3/WMA • [Repeat off]: plays repeatedly all • [Random off]: cancels random play- files within the disc or back. All tracks/files are played randomly. USB. • [Random folder]: the unit plays ran- •... -
Page 54: Playing Files By Classifying Into Folder/Album/Artist
CD/MP3/WMA/USB/iPod operation Note Playing files by classifying Browsing through folders/files • In case of MP3/WMA file, touch the into folder/Album/Artist using (the) "List" menu button to move to upper folder. Disc - Audio CD • Touch the buttons to select You can play files in a USB according to the list you want to view. -
Page 55: Setting Audio Books Playback Speed
CD/MP3/WMA/USB/iPod operation • [Playlists]: plays the songs in the • [Audiobook fast]: Setting audio books playback [Playlists]. plays the audio books with fast speed • [Artists]: plays the songs in the speed. iPod [Artists]. • [Audiobook slow]: Setting the playback speed only affects •... - Page 56 The MP3 player requiring installation of safety and regulatory standards. a driver is not supported. • USB Flash Drive: devices that support USB2.0 or USB1.1 . • You can check the USB compatibility list on the web-site (http://www.navigation. com/hyundai).
-
Page 57: Radio Operation
Radio operation 3. Auto tuning: 4. Touch and hold one of the preset but- Listening to stations touch on the screen. Or press tons. 1. Press the “FM/AM” button to select SEEK/TRACK on the control The preset station information will be the radio. -
Page 58: As (Autostore)
Radio operation AS (Autostore) Scanning broadcast frequen- TA (Traffic announcement) TA function allows the unit to switch cies This is only available for AM reception. to traffic announcement (TA) from the This function lets you automatically The first 10 seconds of each broadcast current source (Another FM station, CD, store the strong broadcast frequencies. -
Page 59: News
Radio operation NEWS Region auto/off function This function allows the unit to switch to This is only available for FM reception. news from the current source (Another FM station, CD, or other connected 1. Select the band to FM. components). 2. -
Page 60: Auxiliary Device Operation
Auxiliary device operation Note Using an AUX source Adjusting the video screen • Some auxiliary devices that do not have It is possible to use auxiliary equipment (Default: Center) the video source may not produce output with unit. For safety reasons, the video screen to the video screen. -
Page 61: Voice Recognition System
Voice recognition system Voice recognition Giving voice commands How to say numbers Voice recognition allows hands-free Voice recognition requires a certain 1. Press on the steering wheel operation of the AV system (RADIO, way to say numbers in voice com- remote control. -
Page 62: Voice Command Examples
Voice recognition system Voice command examples 5. After the beep sounds, say “Frequency one-hundred two” or To use the voice recognition function, “one-hundred two mega hertz”. saying one command is sometimes sufficient, but at other times it is neces- 6. When the spoken frequency is recog- sary to say two or more commands. -
Page 63: Help Command
Voice recognition system Example 3: Dialling a number 5. When the spoken numbers are 3. The voice feedback will announce recognized, the system announces “Possible commands are”. To use this function, you need a mobile the recognized numbers and then phone which supports Bluetooth. -
Page 64: Voice Commands
Voice recognition system Voice commands Category Voice command Category Voice command Category Voice command Application Radio News off Phone Dial Number command News on Incoming iPod Next station Missed Previous station Outgoing Radio TA off Phone Book TA on Call Name Bluetooth Preset <number>... - Page 65 Voice recognition system Voice commands Category Voice command Category Voice command Category Voice command iPod Repeat off Directory up Audio CD List (CD, USB) Repeat on List Option Scan start Option Repeat off Random off Repeat folder Repeat track Random all Repeat off Scan start Random album...
-
Page 66: Troubleshooting
How to update the navigation map and off. Adjust the volume of voice guidance. turning. software • When driving on a road that is narrow- To update the navigation map and soft- ing fast. ware, visit the site (http://www.naviga- tion.com/hyundai). - Page 67 Troubleshooting Symptom Cause Correction Power does not turn on. The ignition switch is NOT turned ON. Turn the ignition switch to ON. The unit does not operate. The ignition switch is NOT set to ACC. Set the ignition switch to ACC. The power of the unit is turned OFF.
-
Page 68: Index
2D/3D ......... .37 Hyundai service ........28 Transfer a call. -
Page 69: Symbols For The Display Of Traffic Problems
Symbols for the display of traffic problems If the traffic problem is on the calculated route, the symbol will be highlighted. Symbol Description Symbol Description Rock fall Stationary traffic Accident Queuing traffic Other danger Wind Storm Narrowing road Snow, Ice Chipping Block road, Closed Road work... - Page 70 Support - Hotline Web Site : http://www.navigation.com/hyundai International Toll Free Number: 00800 18 23 53 22 Telephone number for all other countries (or if Toll Free numbers are not supported) : +31 555 384 245...
Need help?
Do you have a question about the Veloster and is the answer not in the manual?
Questions and answers