Table of Contents
Advertisement
Advertisement
Table of Contents

Summary of Contents for Briel Computers Replica 1 Plus
- Page 1 I plus Setup and Users Manual JUNE 2014 PLUS EDITION Briel Computers...
- Page 2 El Cajon, CA 92021 Copyright 2014 Briel Computers. All rights reserved. Printed in the United States of America. Except as permitted under the Copyright Act of 1976, no part of this publication may be reproduced or distributed in any form or by any means, or stored in a database or retrieval system, without the prior written permission of the publisher, with the exception that the program listings may be entered, stored, and executed in a computer system, but they may not be reproduced for publication.
- Page 3 Replica 1 plus Users Manual Forward How the replica 1 came to be Thank you for purchasing your replica 1 computer. I take pride in every kit and assembled replica that is shipped and my goal is that all kits and assembled boards work as designed. In early 2001 I was an avid collector of vintage computers.
- Page 4 A1 replica. I also just put my initials on the board with the year 2003. Shortly after my first prototypes were built, I created Briel Computers. At this stage my old high school friend Chris contacted Woz through his webmaster asking for permission to use the Apple 1 code.
- Page 5 Users Manual Setup and Users Manual Index Chapter 1: A Brief History of the Apple 1 Chapter 2: Introducing the replica 1 plus Chapter 3: Unpacking and Setting Up Chapter 4: Assembling Kit Version Chapter 5: Programming the replica 1...
-
Page 6: Chapter 1: A Brief History Of The Apple
Replica 1 plus Users Manual Chapter 1: A brief History of the Apple 1 Steve Wozniak had designed and built many different little projects before the Apple 1 computer. The Apple 1 was not even his first computer design. He had designed the “cream soda computer” long before the Apple 1. - Page 7 Replica 1 plus Users Manual They knew they had a great product and that the average person could have a computer on their kitchen table. Woz quickly worked on a BAIC for the Apple 1 but it still lacked a means of storage. Shortly after the Apple 1’s release, Woz designed a cassette interface simply named the ACI (Apple Cassette Interface).
-
Page 8: Chapter 2: Introducing The Replica I Plus Computer
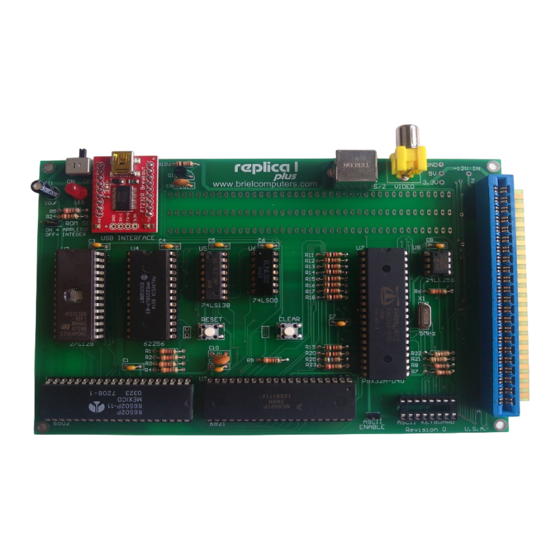
Briel Computers forum to announce custom developed features and improvements to the firmware. The owner takes all responsibility for any firmware installed that is not released or approved by Briel Computers. Using untested firmware could damage the replica 1 plus, however with the Parallax software, restoring is easy. - Page 9 Keeping a simple design structure was important with the replica 1. Chip reduction is the way Woz designed the Apple 1 and the replica 1 follows in its path. Only 8 IC chips are now on the replica 1 plus the serial USB adapter making it the most efficient replica 1 ever.
-
Page 10: Chapter 3: Unpacking And Setting Up System
Next you need to choose what type of power supply you are going to use. There are two ways you can power your replica 1 plus. The mini USB cable is not only the serial port but also the power source. - Page 11 Figure 8: ASCII keyboard port Now you are ready to test your replica 1 plus. Make sure your TV or monitor is turned on and flip the switch on the replica 1 up. The red LED below the switch should light up and a screen of garbage should appear. If you do not see the random garbage screen, or the LED is not lit, turn the replica 1 off and recheck your work.
-
Page 12: Chapter 4: Assembling The Replica 1 Plus Kit
Replica 1 plus Users Manual Chapter 4: Assembling the replica 1 plus kit If you have experience with soldering circuit boards, then not only will you enjoy the replica 1 kit, but you will also have the pride in assembling it yourself while saving money. If you have never built a circuit board kit, please start with something a little simpler before attempting to build the replica 1. - Page 13 Make sure you have proper working space and that you heat your iron before beginning the assembly. This kit is not for beginners and Briel Computers assumes that you have some prior experience with soldering circuit boards. If you have never soldered circuit boards before or don’t feel you are ready, you should build other kits of a smaller, less complex nature before building your replica 1.
- Page 14 Replica 1 plus Users Manual Reading and identifying capacitors: It takes less time to read the values of the capacitors than to read the values of the resistors. The key is to understand and read the numbers correctly. Larger capacitors may have the values clearly printed on them. For example: 10uF = 10 Micro Farads Smaller capacitors however, may only have 2 or 3 numbers on them.
- Page 15 Replica 1 plus Users Manual Step 2: Place the 5MHz crystal into its location and while holding it flush with the board, turn the board over and set it on your work bench. Verify that the crystal is still flush with the board and solder the 2 pins into place.
- Page 16 Replica 1 plus Users Manual Step 6: Install the transistor. The pins may need to be separated a little to make them fit into the holes. Make sure the flat spot on the transistor matches the flat spot on the board. Turn the board over and solder down. Cut away the excess leads.
- Page 17 Replica 1 plus Users Manual Step 8: Install 2 pin jumpers. Hold one jumper and install it near the EPROM. While holding the jumper, turn over the replica 1 and place it on the work bench. Allow the work bench to hold the jumper while you solder into position.
- Page 18 Replica 1 plus Users Manual Step 12: Install the 10uF electrolytic capacitor. This capacitor is cylinder shaped and black. They are polarized and the longer lead is the positive side. The negative side has an arrow pointing down to the lead to help out.
- Page 19 Any parts that get accidentally damaged during the building process can be replaced at the owner’s expense. Contact Briel Computers for any replacement parts needed. The goal of Briel Computers is that ALL replica 1 kits get completed successfully. If you are having a problem, please feel free to ask for help.
-
Page 20: Chapter 5: Programming The Replica
Replica 1 plus Users Manual Chapter 5: Programming the replica 1 The replica 1 can be programmed in one of 3 built in ways. You can enter values into memory directly using the Woz monitor. Another way is to use BASIC that is built into ROM. BASIC was the most commonly used language among beginner all the way to experienced programmers in the 70’s and 80’s. - Page 21 Replica 1 plus Users Manual The monitor will once again drop below the displayed line and be ready for more input. To program more than one consecutive location simply put a space after the value, then type in the next value of the next memory location.
- Page 22 Replica 1 plus Users Manual Programming in BASIC: To start the replica 1 and enter BASIC, turn on the replica and press reset. Next type in: E000R [RETURN] The memory contents of E000 are displayed and BASIC begins. The prompt for BASIC is ‘>’. This is how you know you are in BASIC.
-
Page 23: Chapter 6: Using The Usb To Serial Interface
Replica 1 plus Users Manual Chapter 6: Using the USB to Serial Interface With the previous versions of the replica 1, setting up the serial port was just a matter of setting up Hyper- Terminal which came with Windows. With more recent versions of Windows, Hyper-Terminal is no longer included with Windows. - Page 24 Replica 1 plus Users Manual Under Serial Port options, the new BAUD rate for the replica 1 is the default 9600, 1 stop bit, no parity, and no flow control. Change the msec/char from 0 to 50 and the msec/line to 200. This keeps proper delays so no data loss should happen.
- Page 25 Replica 1 plus Users Manual Transferring files with Tera Term To send a file to your replica, simply click on the File tab, select “Transfer” then select “Send Text File” from the drop down list. Figure 18: Send text file Find the file on your PC and select “OK”.
-
Page 26: Chapter 7: Using The Krusader Assembler
Replica 1 plus Users Manual Chapter 7: Using the Krusader Assembler Krusader is a powerful assembler written by Ken Wessen for the replica 1. This assembler makes programming the 6502 processor in the replica 1 a breeze. No hand converting mnemonic instructions to hex then manually entering them in the Woz monitor. -
Page 27: Chapter 8: Troubleshooting Your Replica
These are a few of the most common problems reported by kit builders. The number one source was missed pins. If the pins don’t get soldered, the circuit may work, but act very strange. If you absolutely can’t find out what is wrong, contact Briel Computers to have your board checked. The replica 1 forums at: http://www.brielcomputers.com/phpBB2/... -
Page 28: Appendix A: Ascii Keyboard Pin Out
Replica 1 plus Users Manual Appendix A: ASCII Keyboard pin out Figure 20: replica I keyboard port from the 16 pin DIP connector. Pin 1 is 5V. Figure 21: Apple 1 keyboard port from the 16 pin DIP connector; Pin 1 is reset. -
Page 29: Appendix B: Replica 1 Memory Map
Replica 1 plus Users Manual Appendix B: Replica 1 Memory Map © Briel Computers 2014 page... -
Page 30: Appendix C: Woz Monitor Listing
Replica 1 plus Users Manual Appendix C: Woz Monitor listing FF00: D8 RESET Clear decimal arithmetic mode. FF01: 58 FF02: A0 7F LDY #$7F Mask for DSP data direction register. FF04: 8C 12 D0 STY DSP Set it up. FF07: A9 A7 LDA #$A7 KBD and DSP control register mask. - Page 31 Replica 1 plus Users Manual FF5F: B9 00 02 NEXTHEX LDA IN,Y Get character for hex test. FF62: 49 B0 EOR #$B0 Map digits to $0-9. FF64: C9 0A CMP #$0A Digit? FF66: 90 06 BCC DIG Yes. FF68: 69 88 ADC #$88 Map letter “A”-“F”...
- Page 32 Replica 1 plus Users Manual FFC1: 20 DC FF JSR PRBYTE Output it in hex format. FFC4: 86 2B XAMNEXT STX MODE 0->MODE (XAM mode). FFC7: A5 24 LDA XAML FFC8: C5 28 CMP L Compare ‘examine index’ to hex data.
-
Page 33: Warranty
Briel Computers, shall have resulted either directly or indirectly from accident, abuse, or misapplication of the product, shall be assumed by the customer, and the Briel Computers shall assume no liability as a consequence of such events under the terms of this warranty.
Need help?
Do you have a question about the Replica 1 Plus and is the answer not in the manual?
Questions and answers