Paxton Net2 Entry Instructions Manual
Vr panel
Hide thumbs
Also See for Net2 Entry:
- Manual (11 pages) ,
- Instruction (9 pages) ,
- Quick start manual (6 pages)
Table of Contents
Advertisement
17/08/2015
Ins-30208 Instructions – Net2 Entry – VR panel
Technical Support
01273 811011
Technical help is available:
Documentation on all Paxton products can be found on our website - http://www.paxton.co.uk/
Description of product
The Net2 Entry vandal resistant panel is a robust door entry panel incorporating both door entry and access
control functions. It is powered using Power over Ethernet (PoE) and communicates with the other elements of
the system using IPv6, providing 'plug and play' installation. Each panel is associated with a Net2 Entry control
unit which is the interface to the door hardware.
The panel is equipped with a keypad and a proximity token reader. A resident can use either the keypad or a token
to gain entry. Installers gain access to the menu options using an engineer code or an engineer token.
Net2 software is used to administer the access control functions.
6
5
4
3
1
support@paxton.co.uk
Monday - Friday from 07:00 - 19:00 (GMT)
Saturday from 09:00 - 13:00 (GMT)
7
8
2
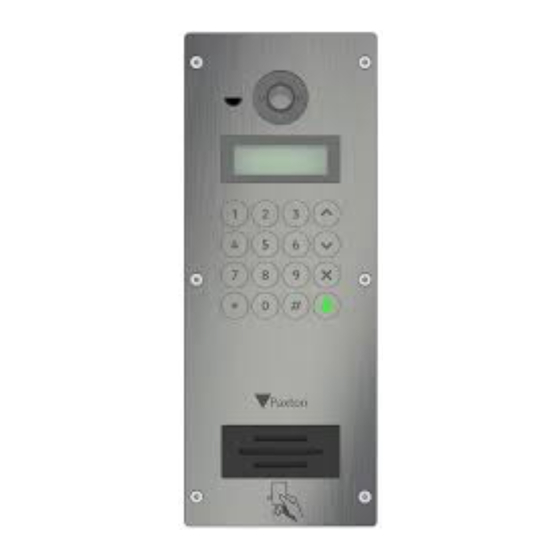
1. Speaker
2. Proximity reader
3. Keypad
4. LCD display
5. LED's for low light operation
6. Microphone
7. Colour camera
8. Light sensor
Paxton
Page 1
Advertisement
Table of Contents

Related Manuals for Paxton Net2 Entry


Summary of Contents for Paxton Net2 Entry
-
Page 1: Technical Support
Documentation on all Paxton products can be found on our website - http://www.paxton.co.uk/ Description of product The Net2 Entry vandal resistant panel is a robust door entry panel incorporating both door entry and access control functions. It is powered using Power over Ethernet (PoE) and communicates with the other elements of the system using IPv6, providing ‘plug and play’... - Page 2 PoE (Power over Ethernet) so the network must support this switch type. Paxton recommend that the network cable is run to each location and terminated in a network box. A patch cable should then be used to link the unit to the network. This makes unit replacement or removal for building maintenance much easier.
- Page 3 SURFACE MOUNT FLUSH MOUNT Page 3...
- Page 4 It then asks for an Engineer code to be set up. Enter the required code and press the bell key. Confirm the code and press bell to complete the process. The Net2 Entry system uses a separate control unit to operate the door. To associate a panel with its control unit, the Serial Number of the control unit must be entered.
-
Page 5: Volume Settings
Use the up and down arrows on the panel to view all the menu options. Use the key to Cancel 1. Door open time from the Engineer menu - Press key 1. This is the time period that the lock will stay released once the open door button has been pressed on a monitor. - Page 6 1. Set control unit from Panel settings menu - Press key 1 This sets the control unit that the Net2 Entry panel is associated with. Enter the Serial Number of the control unit and then press Bell. 2. Factory reset...
- Page 7 2. Numbered list from Set Operating mode menu - Press key 2 This displays the monitor IDs to the visitor as a numeric list with its name which they can scroll or enter the number. Menu will also respond to numeric input. 3.
- Page 8 Current draw of lock 650mA* The declaration of conformity is available on request. Contact details are provided at: http://paxton.info/596 *Current available for lock depends on number of monitors connected - some power calculation required, refer to Paxton support. Page 8...
Need help?
Do you have a question about the Net2 Entry and is the answer not in the manual?
Questions and answers