Advertisement
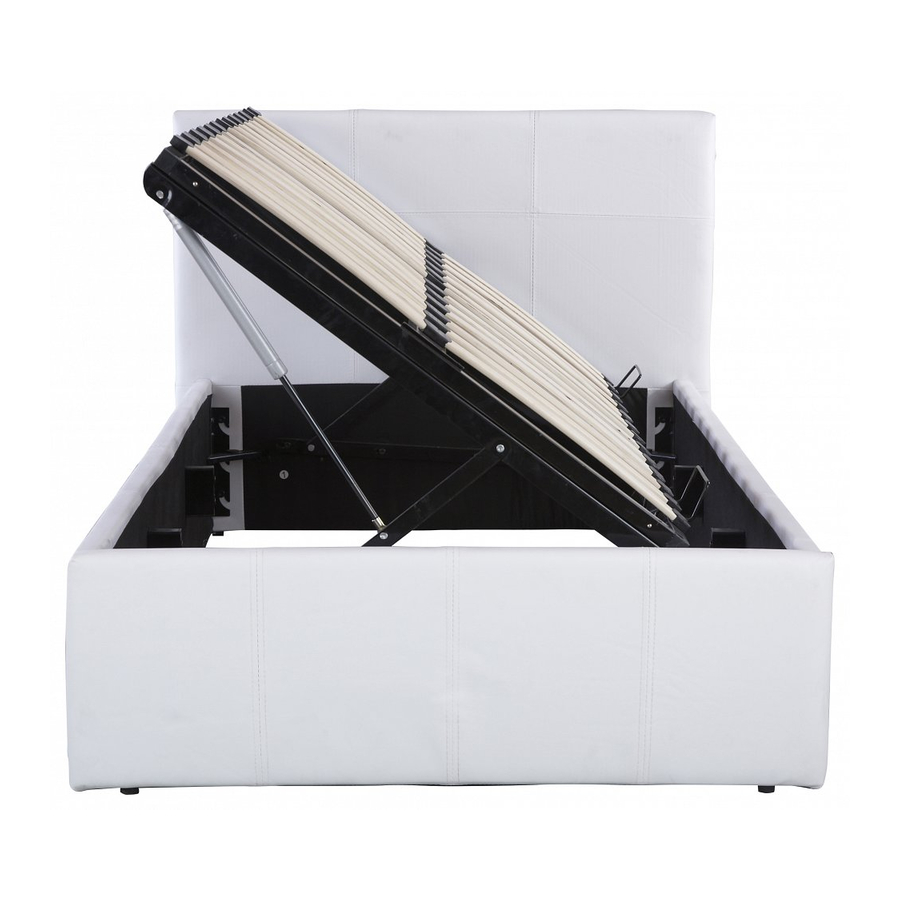
SIDE LIFT OTTOMAN BED ASSEMBLY INSTRUCTIONS
Thank you for purchasing the SIDE LIFT OTTOMAN BED.
Please read the instructions carefully to ensure safe operation of the product.
PLEASE READ this sheet prior to assembly to familiarise yourself with the various stages of construction.
Carefully open the pack supplied and check the contents against the parts and fittings check list.
Do not destroy any of the packaging until you are certain that you have all the necessary parts
for the assembly.
CAUTION:There are small components used in the construction of this unit.These loose items should
be kept away from young children whilst assembling your unit to avoid the danger of choking hazards.
Tools Required
5mm Allen key x 1
Left Side
2010mm×1060mm×840mm 3ft
2010mm×1360mm×840mm 4ft
2010mm×1510mm×840mm 4ft 6 DOUBLE
2110mm×1660mm×840mm 5ft
Finish: Faux Leather
COLOURS: BLACK, BROWN, WHITE
4mm Allen key x 1
Batch no:WMI14908
SINGLE
SMALL DOUBLE
KING
Spanner x 1
Page 1 of 19
Right Side
1.5 Hour
x 2
Set Up
Advertisement
Table of Contents

Related Manuals for GFW Side Lift Ottoman


Summary of Contents for GFW Side Lift Ottoman
-
Page 1: Tools Required
SIDE LIFT OTTOMAN BED ASSEMBLY INSTRUCTIONS Thank you for purchasing the SIDE LIFT OTTOMAN BED. Please read the instructions carefully to ensure safe operation of the product. Left Side Right Side 2010mm×1060mm×840mm 3ft SINGLE 2010mm×1360mm×840mm 4ft SMALL DOUBLE 2010mm×1510mm×840mm 4ft 6 DOUBLE 2110mm×1660mm×840mm 5ft... - Page 2 SIDE LIFT OTTOMAN BED ASSEMBLY INSTRUCTIONS IMPORTANT - READ CAREFULLY - RETAIN THESE INSTRUCTIONS FOR FUTURE REFERENCE. INFORMATION This product is intended for a maximum person’s weight of 130kg per side. Do not exceed • this weight. Due to the size of this product we recommend that it is assembled in the room intended for use.
- Page 3 SIDE LIFT OTTOMAN BED ASSEMBLY INSTRUCTIONS Please check the pack contents before assembling the product.If any components are missing,please contact your retailer.The fittings pack contains small items that should be kept away from small children. Batch no:WMI14908 Page 3 of 19...
- Page 4 SIDE LIFT OTTOMAN BED ASSEMBLY INSTRUCTIONS Parts Headboard end Description: HEADBOARD Description: FOOTBOARD Description: LEFT SIDE RAIL Qty: 1PC Qty: 1PC Qty: 1PC Carton No: 1 of 2 Carton No: 1 of 2 Carton No: 2 of 2 Headboard end...
- Page 5 SIDE LIFT OTTOMAN BED ASSEMBLY INSTRUCTIONS Fixings (to scale) Dimensions Bolt-M8x25 Bolt-M6x15 Bolt-M6x40 Flat Washer- Ø 8x16 Spring Washer- Ø 8x13 12 Bolt-M6x65 Nut-M8x16 (Not to scale) Dimensions 4mm Allen Key 5mm Allen Key Spanner CAUTION: There are many small components used in the construction of this product.
- Page 6 SIDE LIFT OTTOMAN BED ASSEMBLY INSTRUCTIONS 13 of 19 Turn to page 13 for fitting the hinges ! IMPORTANT PISTON INFORMATION The pistons used in the construction of this product are extremely strong and cannot be operated by hand when not fitted to the ottoman hinges. All pistons are tested in the factory for correct pressure and operation before use.
- Page 7 SIDE LIFT OTTOMAN BED ASSEMBLY INSTRUCTIONS Hints and Tips To operate the ottoman,always use 2 hands at arm's length and only where illustrated on this product .You must ensure the mattress is on the bed frame before lifting the mechanism. Failure to do so may result in injury.
- Page 8 SIDE LIFT OTTOMAN BED ASSEMBLY INSTRUCTIONS Do not attempt to move the bed whilst the frame is in the upright positon. Batch no:WMI14908 Page 8 of 19...
- Page 9 SIDE LIFT OTTOMAN BED ASSEMBLY INSTRUCTIONS Layout Parts on Soft Surface Lay out all 4 sides on a soft surface i.e. Rug, Carpet or Packaging Carton. Batch no:WMI14908 Page 9 of 19...
- Page 10 SIDE LIFT OTTOMAN BED ASSEMBLY INSTRUCTIONS Parts Required Step 1 Left side rail x 1 Right side rail x 1 Holding blocks x 4 65mm M6 Bolt x8 4mm Allen key Step 2 Parts Required Headboard x 1 Footboard x 1...
- Page 11 SIDE LIFT OTTOMAN BED ASSEMBLY INSTRUCTIONS Step 3 Parts Required Headboard x 1 & Footboard x 1 Left side rail x 1 Right side rail x 1 5mm Allen key 3 & MAKE CERTAIN THE BED IS SQUARE AS SHOWN.
- Page 12 SIDE LIFT OTTOMAN BED ASSEMBLY INSTRUCTIONS Information Parts Required Headboard x 1 Footboard x 1 FOUR PRE-DRILLED HOLES ON HEADBOARD/FOOTBOARD FOR FIXING ON PNEUMATIC ARM LIFTING LEFT. FOUR PRE-DRILLED HOLES ON HEADBOARD/FOOTBOARD FOR FIXING ON PNEUMATIC ARM LIFTING RIGHT. Batch no:WMI14908...
- Page 13 SIDE LIFT OTTOMAN BED ASSEMBLY INSTRUCTIONS Step 5 Parts Required Headboard x 1 Footboard x 1 Pneumatic arm x 2 Pneumatic support rail x 2 40mm M6 Bolt x 8 M8 Nut x 2 Note: Secure bolt position 4mm Allen key as shown below.
- Page 14 SIDE LIFT OTTOMAN BED ASSEMBLY INSTRUCTIONS Step 6 Parts Required Side frame rail x 2 Centre frame rail x 1 Plastic bracket sets Pneumatic arm x 2 15mm M6 Bolt x 4 4mm Allen key Batch no:WMI14908 Page 14 of 19...
- Page 15 SIDE LIFT OTTOMAN BED ASSEMBLY INSTRUCTIONS Parts Required Step 7 Side frame rail x 2 Horizontal frame rail x 2 40mm M6 Bolt x 4 4mm Allen key Hand entrapment Batch no:WMI14908 Page 15 of 19...
- Page 16 SIDE LIFT OTTOMAN BED ASSEMBLY INSTRUCTIONS Step 8 Parts Required Adjustable legs x 4 Woven fabric x 1 Batch no:WMI14908 Page 16 of 19...
- Page 17 SIDE LIFT OTTOMAN BED ASSEMBLY INSTRUCTIONS Step 9 Parts Required Belt x 1 Bent slats x 26/30 Plastic slat caps x 26/30 Centre slat caps x 13/15 Mattress stopper x 2 Batch no:WMI14908 Page 17 of 19...
- Page 18 SIDE LIFT OTTOMAN BED ASSEMBLY INSTRUCTIONS Complete Assembly Your bed frame is now completely assembled but the ottoman will not operate correctly unless a mattress is placed on the slat frame and will not stay shut unless the mattress remains in position. To position the mattress on the slat frame, simply place the mattress on top of the slat frame whilst it is in the up (open) position.
- Page 19 SIDE LIFT OTTOMAN BED ASSEMBLY INSTRUCTIONS Periodically check to ensure that the components are in their proper position, free from damage. Also, make sure the connectors are tight and secure. Keep instructions for future reference Batch no:WMI14908 Page 19 of 19...
Need help?
Do you have a question about the Side Lift Ottoman and is the answer not in the manual?
Questions and answers