Verathon BladderScan BVI 9400 User Manual
Bladder volume instrument
Hide thumbs
Also See for BladderScan BVI 9400:
- User manual (79 pages) ,
- Service manual (132 pages) ,
- Operation & maintenance manual (86 pages)
Table of Contents
Advertisement
Advertisement
Table of Contents

Related Manuals for Verathon BladderScan BVI 9400


Summary of Contents for Verathon BladderScan BVI 9400
- Page 3 BladderScan BVI 9400 ® Bladder Volume Instrument User’s Manual CAUTION: In the United States, federal law restricts this device to use by or on the order of a physician.
- Page 4 Copyright © 2008 by Verathon Inc.. All rights reserved. No part of this User’s Manual may be copied or transmitted by any method without the express written consent of Verathon Inc.. Verathon , Verathon Medical , BladderScan , ScanPoint , Sontac , and NeuralHarmonics™...
-
Page 5: Quick Reference
BladderScan , ScanPoint , Verathon , and Verathon ® ® ® ® Medical are registered trademarks of Verathon Inc. in the US and other countries. Copyright © 2008 by Verathon Inc. All rights reserved. ® User’s Manual page 5... - Page 6 ® To order additional rolls of paper (0800-0319) or batteries (0400-0066), contact Customer Care at 800.331.2313. www.verathon.com https://my.scanpoint.com For more information, call 800.331.2313 (in the U.S. and Canada) or contact your local Verathon Medical representative. ® Verathon Corporate Headquarters: 20001 North Creek Parkway, Bothell, WA 98011, USA. Phone: +1.425.867.1348 VM Europe B.V.: Boerhaaveweg 1, 3401 MN IJsselstein, The Netherlands, Phone:+31.30.68.70.570...
- Page 7 ® representative. ScanPoint ® , BladderScan ® , Verathon ® , and Verathon Medical are registered trademarks of Verathon Inc. in the US and other countries. Copyright © 2007 by Verathon Inc. All rights reserved. ® User’s Manual page 7...
- Page 8 To order additional rolls of paper (0800-0319) or batteries (0400-0066), contact Customer Care at 800.331.2313. www.verathon.com https://my.scanpoint.com For more information, call 800.331.2313 (in the U.S. and Canada) or contact your local Verathon Medical ® representative.
-
Page 9: Table Of Contents
BladderScan BVI 9400 Table of Contents ® Table of Contents Quick Reference ............................5 President’s Statement ..........................13 Important Information ..........................14 Product Description ..........................14 Intended Use Warnings and Cautions ....................14 Biological Safety ..........................14 Statement of Prescription .........................15 Statement of Intended Use .......................15 Contraindications (U. - Page 10 BladderScan BVI 9400 Table of Contents ® Displays, Controls, and Indicators .......................31 Console Displays and Button Functions ....................31 Home Screen ............................31 Scan Screen .............................33 Results Screen ..........................33 Review Screen ..........................34 Tutorial Screen ..........................35 Video Viewing Screen ........................36 Settings Screen ..........................37 Alpha-Numeric Screen ........................38 Date &...
- Page 11 Printer Problems ..........................58 No Paper ............................58 Too Hot .............................59 Clearing a Paper Jam ........................59 Warranty ..............................60 Disclaimer of Additional Warranties ......................60 Contacting Verathon ..........................61 ® Safety and Performance Summary .......................62 Parts and Accessories ...........................63 BladderScan BVI 9400 System Components ..................63 ®...
- Page 12 Table of Figures Figure 1. BladderScan BVI 9400 Controls and Indicators ..............18 ® Figure 2. Battery Charger/Wireless Hub ....................20 Figure 3. Home Screen ........................24 Figure 4. Settings Screen ........................24 Figure 5. Alpha-Numeric Screen ......................25 Figure 6. Facility Name in Display Header ..................25 Figure 7.
-
Page 13: President's Statement
BladderScan BVI 9400 President’s Statement ® President’s Statement The team at Verathon is committed to improving health care delivery by putting ® healthcare providers and their patients first. Our products support you, the health care provider, by consistently offering accuracy, utility, reliability and excellence. -
Page 14: Important Information
Failure to comply with these instructions may compromise the performance of the device and the reliability of its measurements. For the most current version of the User’s Manual, please visit the Verathon Web site at: http://www.verathon.com, then select the BladderScan > ®... -
Page 15: Statement Of Prescription
BladderScan BVI 9400 Important Information ® Statement of Prescription United States federal law restricts the BladderScan BVI 9400 to use by, or on the order of, ® a physician. This statement is required per 21 Code of Federal Regulations (CFR) 801.109. NOTE: It is standard practice to have medical staff authorize the use of the BladderScan BVI 9400... -
Page 16: Bluetooth ® Wireless Technology
BVI 9400 signal input port or signal output port configures ® a medical system, and is therefore responsible for ensuring that the system complies with EN/IEC 60601-1-1. If you need assistance, contact your biomedical staff, Verathon Medical representative, ® or the Verathon Medical Customer Care Department at 1.800.331.2313. -
Page 17: Introducing The Bladderscan ® Bvi 9400
BladderScan BVI 9400 measurements can be printed via an onboard printer or transmitted ® using HIPAA-compliant ScanPoint technology for storage and archiving on Verathon servers. ® ® Stored exams can be accessed at any time from your office’s computer for viewing or printing. -
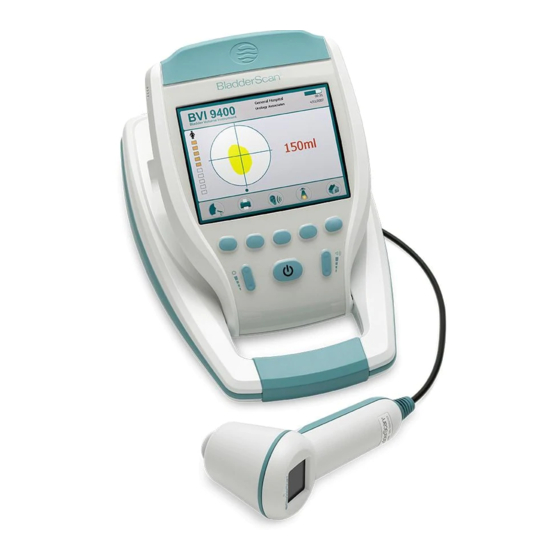
Page 18: Bladderscan ® Parts And Features
BladderScan BVI 9400 Introducing the BladderScan BVI 9400 ® ® The BladderScan BVI 9400 may be mounted on a purpose-designed cart which holds ® the instrument securely and provides a holder for ultrasound gel and other accessories. The BladderScan BVI 9400 is designed for simple, intuitive operation. However, to ®... -
Page 19: Probe Components
BladderScan BVI 9400 Introducing the BladderScan BVI 9400 ® ® Probe Components The Probe transmits and receives ultrasound waves, automatically moving its internal transducer 360º to scan twelve different planes to produce a three-dimensional image of the bladder. The Probe is attached to the Console by a cable. The Probe has three main features: Part Name Purpose SCAN button... -
Page 20: Battery Charger/Wireless Hub
BladderScan BVI 9400 Introducing the BladderScan BVI 9400 ® ® Battery Charger/Wireless Hub The BladderScan BVI 9400 is powered by a Lithium Ion (Li-Ion) battery pack. The ® battery charger provided with your BVI 9400 can charge two Li-Ion battery packs while simultaneously functioning as the wireless hub linking your BVI 9400 to the ScanPoint host ®... -
Page 21: Parts And Accessories
BladderScan BVI 9400 Introducing the BladderScan BVI 9400 ® ® Parts and Accessories Part Number Description 0570-0190 BVI 9400 Pediatric Instrument - Console 0570-0188 BVI 9400 Pediatric Instrument - Probe 0570-0193 Battery Charger/Wireless Hub 0570-0066 Lithium Ion Battery (2 provided) 0900-1606 BVI 9400 User’s Manual (on In-service CD) 0900-1601... -
Page 22: Getting Started
Set the shipping container right side up and carefully open the top flaps (do not insert anything sharp through the top of the box). Remove the contents and verify that you have received everything listed below. If anything is missing or damaged, notify your authorized Verathon Medical representative or Verathon Medical Customer Care Department at 1.800.331.2313. -
Page 23: Install A Battery Pack In The Console
BladderScan BVI 9400 Getting Started ® To charge the batteries: Plug the Battery Charger/Wireless Hub unit in to a standard wall outlet. Remove the label covering the battery contacts and insert the battery into the recess in the battery charger. NOTE: Fully charging the battery may take up to 6 hours. -
Page 24: Figure 3. Home Screen
BladderScan BVI 9400 Getting Started ® NOTE: Use of extended-Latin and/or non-Latin characters: The following instructions explain how to enter a facility name that uses only standard Latin characters. Extended Latin characters (tilde, umlaut, accents, circumflex, etc.) and/or non-Latin characters can be entered only by using ScanPoint with QuickPrint software. -
Page 25: Figure 5. Alpha-Numeric Screen
BladderScan BVI 9400 Getting Started ® Figure 5. Alpha-Numeric Screen On the Alpha-Numeric screen (Figure 5), use the buttons to move to the desired character. When the desired character is highlighted (red), press the button to add it to your text. Use the button to delete characters. -
Page 26: Set The Date And Time
BladderScan BVI 9400 Getting Started ® Set the Date and Time The clock has its own Lithium battery and maintains the correct date and time for at least ten years. To set the date and time: If the BladderScan instrument is turned off, turn the power on by pressing the ®... -
Page 27: Setting General Preferences And Savings Preferences
To avoid paper jams, never fold the end of the paper roll or cut it diagonally or to a point. NOTE: If the paper appears to be stuck in the printer, contact your authorized BladderScan ® Service Center, your local BladderScan distributor, or Verathon Medical Customer Care at ® ® 1.800.331.2313 for service. User’s Manual... -
Page 28: Assemble The Medical Cart
BladderScan BVI 9400 Getting Started ® Assemble the Medical Cart Figure 9. Medical Cart, PN: 0800-0322 NOTE: If you’re not using the medical cart, please skip to the next section, Install the ScanPoint with QuickPrint ® Software, on page 30. The optional Medical Cart is illustrated in Figure 9. -
Page 29: Figure 10. Medical Cart Assembly
BladderScan BVI 9400 Getting Started ® To assemble the cart: While following the assemble procedure, refer to Figure 10. Align and press one 3-inch Caster with Brake (Item 7) and four 3-inch Casters (Item 6) into Medical Cart Base (Item 3). Align through round hole in Bracket and Post (Item 2) bracket to through hole in Medical Tray... -
Page 30: Install The Bladderscan ® On The Optional Mobile Cart
BladderScan BVI 9400 Getting Started ® Install the BladderScan on the Optional Mobile Cart ® Your BladderScan BVI 9400 is completely portable and can be ® easily moved and positioned for convenient use. Installing the BVI 9400 on the optional mobile cart will allow you to move the BladderScan along with related accessories (spare battery, ®... -
Page 31: Watch The Training Video
The training video provides an overview of how to perform an ultrasound scan of the bladder using the BladderScan BVI 9400. The video is approximately 5 minutes long. ® • The training video is available on the In-Service CD and at the Verathon Web site: ® http://www.verathon.com/Training%20Videos.htm. •... -
Page 32: Figure 12. Home Screen
BladderScan BVI 9400 Displays, Controls and Indicators ® Figure 12. Home Screen Home Screen Buttons Button Function Single button with three modes. When performing an exam, press the button repeatedly until the desired setting appears above the saved exams folders: •... -
Page 33: Scan Screen
BladderScan BVI 9400 Displays, Controls, and Indicators ® Scan Screen Figure 13. Scan Screen The Scan screen (Figure 13) appears after you press the SCAN button on the probe and displays a progressively updating image of the bladder outline. When the ultrasound measurement is complete, the Results screen opens automatically. -
Page 34: Review Screen
BladderScan BVI 9400 Displays, Controls and Indicators ® Review Screen The Review screen (Figure 15) opens when you select a saved exam (yellow folder icon) to review. The displays shows the ultrasound images associated with the selected exam. A green open-folder icon indicates which exam is being viewed. -
Page 35: Tutorial Screen
BladderScan BVI 9400 Displays, Controls, and Indicators ® Tutorial Screen To open the Tutorial Screen (Figure 16) press the button from the Home screen (Figure 12, page 32). The Tutorial screen presents a menu of training modules. To select a title, press either button until the desired title is highlighted (red). -
Page 36: Video Viewing Screen
BladderScan BVI 9400 Displays, Controls and Indicators ® Video Viewing Screen The Video Viewing (Figure 17) screen is activated by pushing the button on the Tutorial screen (Figure 16). NOTE: The SCAN button is disabled during video playback. Figure 17. Video Viewing Screen Video Viewing Screen Buttons Button Function... -
Page 37: Settings Screen
BladderScan BVI 9400 Displays, Controls, and Indicators ® Settings Screen To open the Settings screen (Figure 18), push the SETTINGS button on the Home screen. The display presents a list of user-configurable settings: Name, Time & Date, General Preferences, Savings Preferences, and Self-Test. Use the Up/Down arrows to move through the list of setup options. -
Page 38: Alpha-Numeric Screen
BladderScan BVI 9400 Displays, Controls and Indicators ® Alpha-Numeric Screen This screen allows you to select the appropriate alpha-numeric characters for entering your health care institution’s name. Figure 19. Alpha-Numeric Screen Alpha-Numeric Screen Buttons Button Function Press to move down in the grid. Press to move to the right in the grid. -
Page 39: Date & Time Screen
BladderScan BVI 9400 Displays, Controls, and Indicators ® Date & Time Screen This screen allows you to adjust the date and time. NOTE: If the time display is set to show a 24-hour clock, the hour units are 0 – 23. If the clock is set to show a 12-hour clock, the hour units are 1 AM –12 AM and 1 PM –... -
Page 40: General Preferences Screen
BladderScan BVI 9400 Displays, Controls and Indicators ® Date & Time Screen Buttons (continued) Button Function Press to add and/or toggle digits as appropriate (hours, minutes, AM/PM, months, day, years). Press and hold the button to move through options more quickly. Press to subtract or toggle digits as appropriate (same as above). -
Page 41: Savings Preferences Screen
BladderScan BVI 9400 Displays, Controls, and Indicators ® General Preferences Screen Buttons Button Function SELECT PREVIOUS: Press to select the previous setting in the list. SELECT NEXT: Press to select the next setting in the list. For settings with a list of options, press to select the next option. For settings with a list of options, press to select the previous option. -
Page 42: Self-Test Screen
BladderScan BVI 9400 Displays, Controls and Indicators ® Figure 22. Savings Preference Screen Savings Preferences Screen Buttons Button Function SELECT PREVIOUS: Press to select the previous setting in the list. SELECT NEXT: Press to select the next setting in the list. For settings with a list of options, press to select the next option. -
Page 43: Scanpoint ® Screen
BladderScan BVI 9400 Displays, Controls, and Indicators ® Self-Test Screen Buttons Button Function No function. No function. No function. No function. Press to return to the Setup screen. ScanPoint Screen ® NOTE: Only available if optional ScanPoint software is installed on a PC. ®... -
Page 44: Sleep Mode
BladderScan BVI 9400 Displays, Controls and Indicators ® ScanPoint Screen Buttons ® Button Function No function. CANCEL: Cancels the current action and ends communication with ScanPoint ® No function. Sleep Mode The Sleep mode helps preserve battery power. After four minutes of idle time, a Sleep mode alert message displays for 15 seconds (Figure 25). -
Page 45: Measuring Bladder Volume
Introducing the BladderScan BVI 9400 on page 17). ® • If you are a new BladderScan user, Verathon recommends that you perform your first ® ® exam on a patient with a moderately full bladder, rather than initially attempting to locate and scan a nearly empty bladder. -
Page 46: Measuring Bladder Volume
BladderScan BVI 9400 Measuring Bladder Volume ® Measuring Bladder Volume Turn on the BVI 9400. Turn on the BVI 9400 by pressing the ON/OFF button. Select the exam mode. Select to scan a patient with height less than 48 inches (122 cm) tall and weight less than 60 lbs (27 kg). - Page 47 BladderScan BVI 9400 Measuring Bladder Volume ® Aim toward the bladder. Standing at the patient’s right side, place the Probe on the gel and aim it toward the expected location of the bladder. For most patients, this means angling the Probe slightly toward the patient’s coccyx (tail bone) so the scan clears the pubic bone.
- Page 48 BladderScan BVI 9400 Measuring Bladder Volume ® 7b. To re-aim: Note that the crosshairs correspond to the anatomy of the patient as follows: • The small dot at the base of the crosshairs represent the feet of the patient. • The top of the crosshairs represents the patient’s head.
-
Page 49: Additional Scanning Tips
BladderScan BVI 9400 Measuring Bladder Volume ® Additional Scanning Tips Applying too much pressure when scanning will lead to a Greater Than symbol (>) preceding the measurement. Apply less pressure and re-scan. Hold the device steady while scanning. Movement will result in an inaccurate reading. Volume reading will be affected by: •... - Page 50 BladderScan BVI 9400 Measuring Bladder Volume ® To record a voice annotation: Press the RECORD button (microphone). A STOP button is now displayed. The microphone is located just above the aiming display on the Probe. Hold the microphone approximately 6 inches (15 cm) from your mouth when you are recording the annotation, and speak clearly.
-
Page 51: Deleting A Saved Exam
If the facility name, date, and time have not been set, those lines will be skipped on the printout. The BVI 9400 prints on thermal paper, which fades over time. For maximum storage life, Verathon recommends that you photocopy the printout. ®... -
Page 52: Histogram Of Cost Savings
BladderScan BVI 9400 Histogram of Cost Savings ® Histogram of Cost Savings Each volume measurement from a completed scanning procedure is stored in the BVI 9400 memory in one of eleven volume ranges (each with a 100 ml increment). This data is analyzed and can be displayed on the BVI 9400 at any time. -
Page 53: Cleaning And Maintenance
® instrument with a dampened cloth. To remove all traces of disinfectant solution and wipe the instrument with a clean soft cloth dampened in sterile water or cleaning solution. Verathon recommends ® wiping the device three separate times to remove all residual disinfectant. -
Page 54: Weekly Inspections
Verathon Medical Customer Care Department. ® IMPORTANT! If you see any physical faults or cracks in the instrument, discontinue use immediately and contact your local Verathon Medical representative or the ® Verathon Medical Customer Care Department at 1.800.331.2313. -
Page 55: Self-Calibration
Premium Warranty customers have access on loaner, replacement unit, and free shipping options which vary according to plan. If you have any questions, contact your local Verathon Medical representative or the ®... -
Page 56: Troubleshooting
® in the table below. You can obtain copies of this manual, Quick Reference Cards, and clinical studies by visiting the Verathon Web site at www.verathon.com or by contacting your ® VerathonMedical representative. A complete listing of contact information is ®... -
Page 57: Icons On The Bladderscan ® Console
BladderScan BVI 9400 Troubleshooting ® www.verathon.com includes many in-service training resources. From the Verathon Home ® Verathon Web site ® page, select “BladderScan .” On the BladderScan ® ® page, select “Customer Service.” In North America, call: 1.800.331.2313. International customers, please refer to the list of... -
Page 58: Diagnosing Problems
BladderScan BVI 9400 Troubleshooting ® Diagnosing problems Instrument Does Not Turn On If the instrument does not turn on, this is usually due to a dead or discharged battery and can be remedied by replacing the dead battery with a charged battery. Check the battery icon in the upper right corner of the LCD display. -
Page 59: Too Hot
CAUTION! Possible device damage. If the paper jam is inaccessible, do not try to disassemble the printer. Contact you authorized Verathon Service Center or your local Verathon distributor for service. ® ® User’s Manual page 59... -
Page 60: Warranty
Premium Warranty. Damage or loss insurance is available as part of the Total Reliability Plan. Pursuant to this warranty, a service center authorized by Verathon will repair or replace units that ®... -
Page 61: Contacting Verathon
® patients first. Our products support healthcare professionals by providing accuracy, utility, and excellence. For additional product and company information, visit the Verathon Web site at www. ® verathon.com. If you have any questions or comments about Verathon products and services, ®... -
Page 62: Safety And Performance Summary
BladderScan BVI 9400 Safety and Performance Summary ® Safety and Performance Summary • The BladderScan BVI 9400 computes the volume of the urinary bladder based ® upon twelve cross-sectional ultrasound images. For maximum accuracy, be sure to hold the Probe motionless while scanning. •... -
Page 63: Parts And Accessories
ScanPoint with QuickPrint User's Manual (on In-Service CD) 0900-1446 Quick Reference Cards - Demo/Use 0900-1447 Quick Reference Cards - Calibration To order any of the above parts, contact your authorized Verathon Medical ® sales representative or contact the Verathon Medical Customer Care Department ®... -
Page 64: Product Specifications
CE marked in accordance with the Medical Device Directive (MDD). Canadian Standards Association (CSA) mark of certification to United States standards for electromedical equipment. This unit is powered by a Lithium-Ion battery pack. The Verathon ® part number for the batter pack is 0400-0066... -
Page 65: Electromagnetic Effects
If such interference is suspected, separate the two devices as much as possible, or discontinue simultaneous operation, if practical, and contact Verathon ®... -
Page 66: Ultrasound Output Parameters
The accuracy specifications assume the instrument is being used according to the instructions provided by Verathon , scanning a tissue-equivalent phantom. ® Specification Description ± 15%, ± 15 ml (on a Verathon tissue-equivalent phantom) ® Bladder volume accuracy Bladder volume range 0 - 999 ml (0-200ml in small child scan mode) User’s Manual... -
Page 67: Bladderscan ® Bvi 9400 Operating Conditions
BladderScan BVI 9400 Product Specifications ® BladderScan BVI 9400 Operating Conditions ® The BladderScan BVI 9400 is designed to function properly within the following specifications: ® Condition Description Indoor Ambient Temperature Range +10 - +40º Celsius (+50 - +104º Fahrenheit) Atmospheric pressure range 700 hPa - 1060 hPa Relative humidity... - Page 68 BladderScan BVI 9400 Product Specifications ® POWER, SCAN: opens Aim/Scan screen, (1) PATIENT TYPE: toggle between three modes: small child, female Home Screen with uterus, all other patients, (2) TUTORIAL: opens tutorial Appears when the instrument is screen, (3) SETUP: opens Setup screen, (4) REVIEW: first turned on.
-
Page 69: Instrument Display
BladderScan BVI 9400 Product Specifications ® POWER, (1) Move forward to next changeable unit, (2) Move back to previous changeable unit, (3) Add/toggle Date & Time Screen units as appropriate (hold down to move faster), (4) Allows the user to set the date Decrease/toggle units as appropriate (hold down to move and time faster), (5) Save current date/time entries and return to... -
Page 70: Battery Charger/Wireless Hub Specifications
BladderScan BVI 9400 Product Specifications ® Screen/Mode Display Start up screen Displays “BladderScan ” and a progress bar ® Memory indicator, Correct scanning technique graphic, Home Screen Savings Calculation table. Appears when the operator presses the SCAN button. Scan Screen As bladder volume is calculated, the display refreshes and updates until the scan is complete. -
Page 71: Operating Conditions
BladderScan BVI 9400 Product Specifications ® Operating Conditions The following are proper operating conditions for the Battery Charger/Wireless Hub: Specification Description Indoor Ambient Temperature +5 - +40º Celsius (+41 - +104º Fahrenheit) Range Atmospheric pressure 70 kPa - 106 kPa range Relative humidity 30% - 75% non-condensing... -
Page 72: Battery Specifications
BladderScan BVI 9400 Product Specifications ® Battery Specifications The BladderScan BVI 9400 is provided with two Lithium Ion batteries. A battery icon on ® the instrument display is always present indicating how much power remains and when the battery needs to be changed. The user can change the battery whenever necessary. Removing a discharged battery and replacing with a fresh battery will not erase any saved exams or user settings. -
Page 73: Glossary
BladderScan BVI 9400 Glossary ® Glossary Term Meaning Arrows that appear on the LCD screen to indicate the location of the Aiming arrows bladder relative to the Probe. A solid aiming arrow means re-aiming is optional. The unit that charges the Lithium Ion batteries that power the Battery Charger/ BladderScan and simultaneously receives and sends information... - Page 74 Located on the underside of the BladderScan hand grip, this button is ® SCAN button used to initiate the measurement. The software and online service provided by Verathon that prints ® ScanPoint ® exam results, maintains patient records, displays ultrasound images...
- Page 75 BladderScan BVI 9400 Glossary ® When the BladderScan shuts down to conserve energy. Press any ® Sleep mode button to turn on the instrument. Indicates the bladder is inside the scan cone but is not completely centered. The arrow shows the direction to move or tilt the Solid aiming arrow BladderScan to improve the measurement.
Need help?
Do you have a question about the BladderScan BVI 9400 and is the answer not in the manual?
Questions and answers