
Related Manuals for Lightwave LW821

Summary of Contents for Lightwave LW821
- Page 1 Version 2 Inline Relay (500W) Model No. LW821 Instruction Manual Connect Series www.lightwaverf.com...
- Page 2 EC DECLARATION OF CONFORMITY Responsible Authority: LightwaveRF PLC, Innovation Campus Birmingham Faraday Wharf Holt Street Birmingham B7 4BB Tel: +44 (0)121 250 3625 Email: enquiries@lightwaverf.com Model Number(s): JSJSLW821 Description: Inline Relay Directives this equipment Complies with: 2006/95/EC The Low Voltage Directive N/A 2004/108/EEC The Electromagnetic Compatibility Directive 1999/5/EC R&TTE Directive 93/68/EEC CE Marking Directive...
-
Page 3: How Do I Get Started
Get Started How do I get started? Please refer to the following installation and setup instructions that will guide you through the installation and setup process. What do I need? The relay is designed to remotely turn on/o lighting or power circuits (max 500W) or to control door, window or curtain openers. -
Page 4: Installation
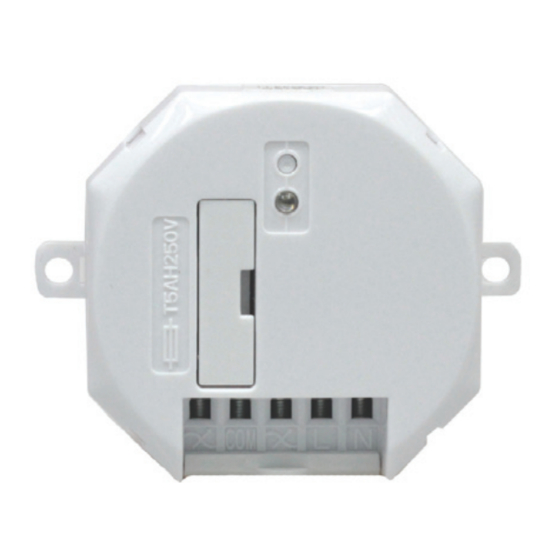
Installation Overview Power LED. When On/o & linking illuminated the button. relay is powered. Fuse compartment. Mounting hole. Wiring Screw cover. terminals. IMPORTANT: All LightwaveRF products can be legally DIY installed in your own home; however, if in doubt, always consult a qualified electrician or heating engineer. -
Page 5: Wiring Terminals
Installation Wiring terminals Switched Common Switched Live Neutral live 1 live 2 Switching terminals. 230V Mains Volts free OR mains power in The Inline relay requires mains power to operate. It can be used to provide up to 500W of mains powered switching OR separate volts free switching for circuits not requiring additional mains power. - Page 6 Installation Wiring the relay IMPORTANT: Turn o the mains electrical supply. Connect the live and neutral terminals, as shown in the diagram, to Relay terminals provide power to the relay. When the green LED is illuminated, the relay is connected to mains power. NOTE: Even if switching a low voltage or non-mains circuit, the relay must always Live wire Neutral...
- Page 7 Installation Connect the outgoing wire ‘load’ to the leftmost load terminals ( as shown in the diagram. This is the wire that will be collected to the ‘load’ (i.e. device to be switched or lamp). The relay now has 2 positions - ‘on’ Circuit Mains power Circuit...
- Page 8 Installation Switching between two Circuits If a second load wire connected to another circuit is attached to the second switched live terminal (see diagram), the relay can be used to switch between two circuits. In addition to the on and o positions, there is also a ‘stop’...
- Page 9 To operate the stop command you will need a LightwaveRF ‘On/O /Stop Switch’ which includes ‘on/o ’ (open/close) and ‘stop’ commands OR the LightwaveRF App (requires Lightwave Link). If you are using the App, you must slect the device as ‘open/close’ during linking process (see in-app help).
- Page 10 Installation NOTE: Because of the extra ‘stop’ command, LightwaveRF ‘On /o /stop Switch’ LightwaveRF App and Lightwave Link will be required to operate this Circuit Circuit Circuit setup. switched live wire switched live 1 (to live 2 (to device) device)
-
Page 11: Device Setup
6 LightwaveRF controllers in total. If you are using a smartphone/tablet/PC to control the relay via the Lightwave Link, this will always count as ONE controller and take up one memory slot even if you are using multiple smartphones/tablets. - Page 12 Device setup NOTE: Linking mode lasts for 12 seconds; if no signal is received from a controller during this time then the socket will automatically exit linking mode without linking the device. If, when expecting a quick flashing LED to confirm pairing, a slow flash is received instead, then the relay memory is FULL and no further remotes may be linked with it unless one of the existing remotes is unpaired first (see below).
- Page 13 flash slowly to confirm that the memory has been cleared. NOTE: Reliable range of remote operation is around 15 metres indoors and up to 100m outdoors using the Lightwave Link. This figure may vary depending upon the environment; very thick walls, bodies of water or large metal objects may interfere with radio range.
-
Page 14: Remote Operation
Remote operation Remote operation Control with the LightwaveRF App or On/o /stop Switch 1. Press the ‘on’/’open’ button on the transmitter to turn the circuit on or switch between circuits. 2. Press the ‘o ’/‘close’ button on the transmitter to turn the circuit o or switch between circuits. -
Page 15: Specification
Technical specification Specification RF frequency: 433.92 MHz Input rating: 220-240V~ 50Hz. Output rating: 500W Max. Dimensions: Width 68mm, Height 52mm, Depth 27mm Standby Energy Use: Less than 1W Warranty: 2 year standard warranty... - Page 16 Version 2 2 Quadrant Park Mundells Welwyn Garden City Herts AL7 1FS 01707 386035 www.lightwaverf.com...
Need help?
Do you have a question about the LW821 and is the answer not in the manual?
Questions and answers