
Related Manuals for Simplex 4098-9685

Summary of Contents for Simplex 4098-9685
-
Page 1: Installation Instructions
4098-9685, -9686, -9688, -9755, -9756 Duct Detector/Sensor Installation Instructions 574-776 Rev. C Technical Manuals Online! - http://www.tech-man.com... - Page 2 Blank Page Technical Manuals Online! - http://www.tech-man.com...
- Page 3 DO NOT INSTALL ANY SIMPLEX PRODUCT THAT APPEARS Cautions and Warnings DAMAGED. Upon unpacking your Simplex product, inspect the contents of the carton for shipping damage. If damage is apparent, immediately file a claim with the carrier and notify Simplex.
- Page 4 Blank Page Technical Manuals Online! - http://www.tech-man.com...
-
Page 5: Table Of Contents
Detector Base is protected by U.S. Patent No. 5,173,683. 2000 Simplex Time Recorder Company, Westminster, MA 01441-0001 U.S.A. 2000 Simplex International Time Equipment Co., Ltd., Mississauga, Ontario L4V 1H3 Canada. All specifications and other information shown were current as of publication, and are subject to change without notice. - Page 6 BLANK PAGE Technical Manuals Online! - http://www.tech-man.com...
-
Page 7: General Description
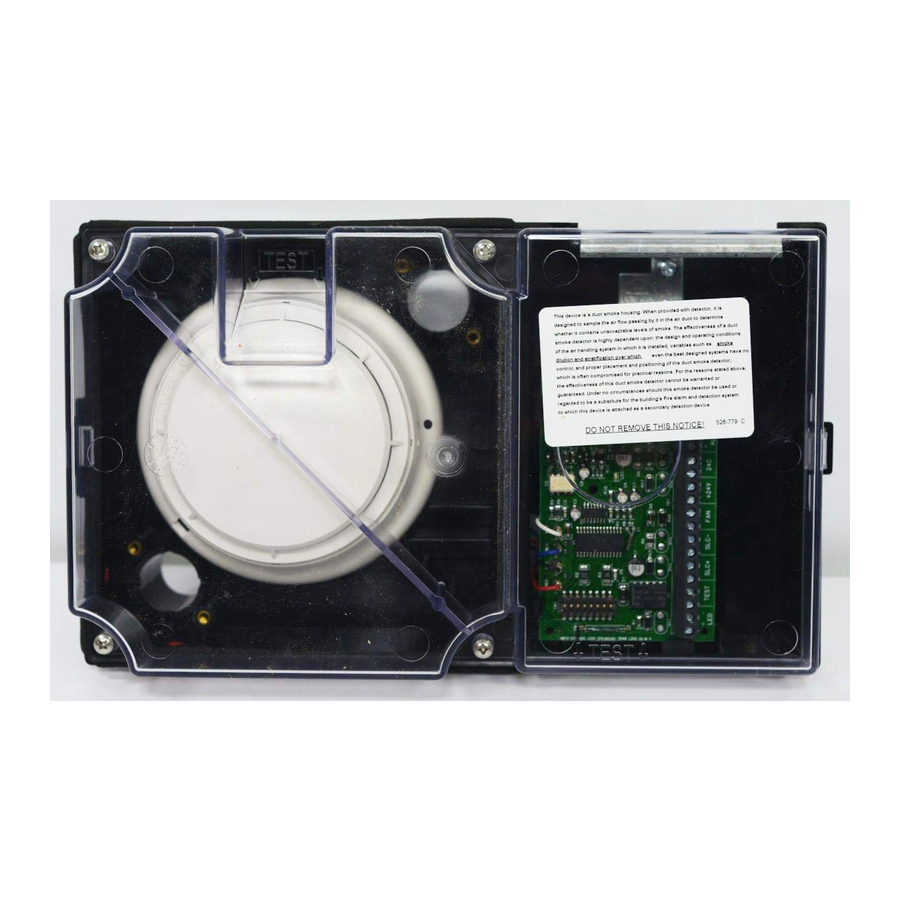
4098-9756 Four-Wire Duct Sensor supplied with the 4098-9714 Photo Smoke Sensor The 4098-9685, 4098-9686, and 4098-9688 Duct Detectors have a red LED on the detector for “POWER ON” indication (red LED flashing) or for “ALARM” indication (red LED “ON” steady). - Page 8 General Description, Continued HOUSING BASE BASE GASKET COVER GASKET CAP PLUG SHIP GROUP 748-518 SEE NOTE STATUS LED DETECTOR #8 CAPTIVE PANHEAD SCREW SENSOR QTY: 4 DETECTOR MAGNETIC TEST LOCATION 3/4" CONDUIT ENTRY (2) # 12-18 AWG WIRE RECOMMENDED SMOKE PORT/AIR FLOW TEST HOLES DETECTOR/SENSOR BASE...
-
Page 9: Setting The Duct Sensor's Address
Setting the Duct Sensor’s Address The procedures that follow are used to install the 4098-9755 or 4098-9756 Addressable Duct Sensors addressable duct sensors. See Figure 1 for the location of the duct sensor DIP 4098-9755 or 4098-9756 switches. The instructions provided show how to set the address at each sensor (MAPNET II/IDNet) and also how to make electrical connections. - Page 10 Setting the Duct Sensor’s Address, Continued Address Setting for the 4010, Using the example given in Step 1 as a guideline, set the duct sensor’s 4020, 4100+, or 4120 address using Figure 3. Loosen the four screws securing the clear plastic (continued) cover to the housing base.
- Page 11 Setting the Duct Sensor’s Address, Continued 4010, 4020, 4100+, OR 4120 USE ONLY DIPSWITCH IS SHOWN SET AT ADDRESS 7. 1 = ON 0 = OFF DIP SWITCHES 5 THRU 8 0000 1000 0100 1100 0010 1010 0110 1110 0001 1001 0101 1101 0011 1011 0111 1111 112 128 144 160 176 192 208 224 240 0000 113 129 145 161 177 193 209 225 241...
-
Page 12: Electrical Specifications
(Shielded twisted pair- wire for the MAPNET II/IDNet circuit is recommended; if not shielded or twisted, consult Simplex Sales Engineering.) For relay operation (4098-9756 only), a separate 24VDC source of power is required in addition to the MAPNET II/IDNet lines. Refer to Table 1 for duct sensor compatibility. - Page 13 2, 3 TO OTHER MAPNET II/ IDNet DEVICES SEE NOTE 4 UL-LISTED CONTROL PANEL SHIELD SIMPLEX 2120, 4010 4020, 4100+ OR 4120 SEE NOTE 1 SHIELD MAPNET II / IDNet SHIELD (OPTIONAL) Notes: Duct Sensor wiring is 12 to 18 AWG.
- Page 14 TEST +24V 3, 4 TO OTHER MAPNET II/ IDNet DEVICES SEE NOTE 2 OPTIONAL UL-LISTED CONTROL PANEL SHIELD SIMPLEX, 4010 4020, 4100+ OR 4120 SHIELD BLUE BLUE MAPNET II / IDNet 4098-9843 4098-9843 1/2 W 10K EOL RESISTOR CIRCUIT SEE NOTE 1...
-
Page 15: Non-Addressable Duct Detectors
Electrical Specifications, Continued Non-Addressable Duct Note: Refer to Table 2 for 4098-9685 and 4098-9688 duct detector compatibility. Detectors 4098-9685 Duct Detector Electrical Specifications - Two-Wire DC Operation (Figure 6, Page 12) • Input Voltage - 15 to 32VDC, polarized •... -
Page 16: Two-Wire Duct Detector Compatibility
Table 2. 4098 Two-Wire Duct Detector Compatibility. MAXIMUM QUANTITY OF DUCT DETECTOR SYSTEM DETECTORS PER INITIATING CIRCUIT 2120 ET/FADM 2120 FABT/VPBT 2120/4100+ ZAM 4001 4098-9685 Two-Wire Duct Detector 4002 4020 4100+/4120/UT 4004/4005 4004/4005 High Current 4002 4098-9688 Two-Wire Duct Detector 4020 with Relay Control... -
Page 17: Accessories
Accessories Accessory installation instructions are provided on Page 19 of this publication. Remote Alarm Indicator - Model 2098-9808 (Use with 4098-9755 or 4098-9756) or Model 4098-9830 (Use with 4098-9685, 4098-9688, or 4098-9686) • Red LED indicator ON when detector/sensor is in alarm •... - Page 18 4098-9685 4098-9685 2-WIRE DUCT DETECTOR 2-WIRE DUCT DETECTOR OPTIONAL (SEE ACCESSORIES) OPTIONAL 4098-9834 (SEE ACCESSORIES) REMOTE ALARM INDICATOR / 4098-9830 KEYSWITCH REMOTE INDICATOR ALARM ALARM TEST SEE NOTES 4,5 NOTES TEST TEST RELAY RELAY 4, 5 PRIMARY 1 UL-LISTED CONTROL PANEL...
- Page 19 (SEE ACCESSORIES) NOTE 6 INDICATOR / KEYSWITCH PRIMARY 1 ALARM NOTES 4, 5 UL-LISTED CONTROL PANEL SIMPLEX 2120, 4001, 4002, 4004, 4005, TEST 4020, 4100+ OR 4120 OPTIONAL 4098-9830 WIRED THE SAME AS INITIATING 4098-9834 LESS DEVICE SEE NOTES 2, 3 "TEST"...
- Page 20 TEST TEST -IDC -IDC +IDC UL-LISTED CONTROL PANEL CIRCLE INDICATES WIRE PAIR BUT SIMPLEX 2120, 4001, 4002, EOL RESISTOR MULTICONDUCTOR CABLE MAY BE USED 4004, 4005, 4020, 4100+ OR 4120 IF USED, SEE SEE NOTE 5 OPTIONAL NOTE 1 RESETTABLE...
-
Page 21: Installation
300-4000 feet-per- minute (91 to 1220 M/min.). Simplex recommends measurements of air flow and examination of engineering specifications that define expected duct air velocities under all conditions. This is done to determine if a location is suitable for duct detector/sensor operation. -
Page 22: Duct Detector/Sensor Installation
Installation, Continued Rules to Follow (continued) Locate air duct detectors/sensors on branch lines if close identification of the alarm source is required. Locate air duct detectors/sensors on the downstream side of filters to sense fire in filters. However, should the filters block, sufficient air flow may not be available for proper air duct detector/sensor operation. - Page 23 Installation, Continued Duct Detector/Sensor Installation, (continued) AIR FLOW AIR FLOW DIRECTION DIRECTION HORIZONTAL DUCTS OVER 13" HIGH HORIZONTAL DUCTS UNDER 13" HIGH VERTICAL DUCTS AIR FLOW DIRECTION NEVER MOUNT AT AN ANGLE WITH RESPECT TO AIR FLOW Figure 12. Template Positioning Inlet Tube Selection Inlet tubes should be selected and cut to length as specified in Table 3.
- Page 24 Installation, Continued Table 3. Inlet Tube Selection Duct Detector/Sensor Installation, (continued) OVERALL DUCT TUBE REQUIRED TUBE TYPE SUGGESTED TOTAL WIDTH LENGTH 12 inches (30 cm) 2098-9796 Hole ½ inch (1.27 cm) 13 inches (33.02. cm) longer than duct width 13 inches (33.02 cm) to 2098-9804 Hole ½...
-
Page 25: Wiring Procedures
Connect the optional accessory as specified in the following paragraph and the associated installation and wiring diagrams. Note: Only one remote indicator may be connected to each 4098-9685, 4098-9686, 4098-9688, 4098-9755, or 4098-9756. Accessory Installation The 2098-9806, 2098-9808, 4098-9830, 4098-9834, and 4098-9835 accessories are intended for installation to a standard 2-inch x 3-inch outlet box having a depth of at least two inches. -
Page 26: Detector/Sensor Replacement
Installation, Continued Detector/Sensor Replacement To properly remove and replace the detector/sensor to the base (see Figure 1): Remove power from the Duct Detector/Sensor. Loosen the four screws that secure the clear plastic cover to the housing base. Insert a small blade screwdriver into the lock release slot in the base. Rotate the detector/sensor counterclockwise to remove it from the base. -
Page 27: Magnetic Test For Detectors And Sensors
The 4098-9601 photoelectric detector may be tested by placing a magnet at the location indicated by a “TEST” mark embossed on the cover for four (4) seconds (see Figure 16). Use the Simplex Magnet Tester (Part No. 553-810), Table 4, and the following information to test detectors. -
Page 28: Preferred Method Of Testing Smoke Detectors/Sensors
Installation, Continued When placing the magnet near the location (see Figure 16) indicated by a Magnetic Test for Detectors “TEST” mark embossed on the cover, the visible LED flashes indicating the and Sensors (continued) detector's condition. The following are descriptions of what you should see when using the MAG TEST. -
Page 29: Dc Operation Detector/Sensor Testing
Installation, Continued DC Operation Detector/Sensor Basic Unit Test Testing With the air handling unit OFF and power applied to the air duct detector/sensor, introduce aerosol into the detector/sensor or activate the built-in test feature as described in the 4098 Detectors, Sensors, and Bases Application Manual 574-709. Observe alarm LED operation. -
Page 30: Air Differential Pressure Test
Installation, Continued Air Differential Pressure Test With the air handling unit turned on and all filters and dampers in place, measure the air differential pressure using a Dwyer Instrument Co. (Michigan City, Ind.) No. 20026 0 to 2” H O (or equivalent) differential pressure gauge. Take measurements from inside of the detector/sensor housing before the cover is installed. - Page 31 POSITION 1 AND 2 HOLES MARKED "A" ARE FOR SAMPLING AND EXHAUST TUBES. HOLES ARE 1 1/4" INCH (31.75mm) NOT ALLOWED POSITION 1 POSITION 3 DETECTOR DETECTOR POSITION 2 DETECTOR DETECTOR PREFERRED BLANK PAGE Figure 18. Duct Detector/Sensor Mounting Template Technical Manuals Online! - http://www.tech-man.com...
- Page 32 BLANK PAGE Technical Manuals Online! - http://www.tech-man.com...
- Page 33 BLANK PAGE Technical Manuals Online! - http://www.tech-man.com...
- Page 34 BLANK PAGE Technical Manuals Online! - http://www.tech-man.com...
- Page 35 BLANK PAGE Technical Manuals Online! - http://www.tech-man.com...
- Page 36 Simplex Time Recorder Co., • Simplex Plaza • Westminster, Massachusetts 01441-0001 U.S.A. Rev. C 574-776 Simplex International Time Equipment, Co., LTD. • Mississauga, Ontario, Canada Technical Manuals Online! - http://www.tech-man.com...
Need help?
Do you have a question about the 4098-9685 and is the answer not in the manual?
Questions and answers