Advertisement
Table of Contents
Advertisement
Table of Contents

Subscribe to Our Youtube Channel
Related Manuals for Exerpeutic 1020H


Summary of Contents for Exerpeutic 1020H
- Page 1 Electric Treadmill with Pulse 1020H.5-020317 OWNER’S MANUAL...
- Page 2 PLEASE DO NOT RETURN THIS PRODUCT TO THE STORE. STOP. Contact customer service if you have any questions regarding assembly or proper operation of the machine. Email us at: Service@paradigmhw.com Or call us at: 1-844-641-7921 Hours: 8:00 am to 5:00 pm (PST) Daily...
- Page 3 TABLE OF CONTENT SERVICE ---------------------------------------------------------------------- 2 LABEL PLACEMENT ------------------------------------------------------- 3 IMPORTANT SAFETY GUIDELINES ---------------------------------- OVERVIEW DRAWING ---------------------------------------------------- 8 PARTS LIST ------------------------------------------------------------------ 9 HARDWARE & TOOL LIST----------------------------------------------- ASSEMBLY ------------------------------------------------------------------- 12 COMPUTER ------------------------------------------------------------------ 15 STORAGE -------------------------------------------------------------------- ADJUSTMENTS ------------------------------------------------------------ MAINTENANCE ------------------------------------------------------------ TROUBLE SHOOTING --------------------------------------------------- WARRANTY ------------------------------------------------------------------ 26 PARTS REQUEST FORM ------------------------------------------------...
-
Page 4: Service
SERVICE IMPORTANT: FOR NORTH AMERICA ONLY For damaged or defective product, questions, replacement parts or any other service support, please contact our customer service department by the below methods: For The Best Service, please Email: service@paradigmhw.com Response Time: 1-2 Business Days Emailing us with the information above will be the best method to receive a response during peak business hours Website:... -
Page 5: Label Placement
LABEL PLACEMENT... -
Page 6: Important Safety Guidelines
IMPORTANT SAFETY GUIDELINES Basic precautions should always be followed, including the following safety instructions when using this treadmill: Read all instructions before using this treadmill. DANGER: To reduce the risk of electric shock, please read the following: Always unplug the treadmill from the electrical outlet immediately after using and before cleaning, assembling, or servicing. - Page 7 IMPORTANT SAFETY GUIDELINES Keep Dry - do not operate in a wet or moist condition. Save these instructions. Do not operate the treadmill near a blanket. Excessive heating can occur and cause fire, electrical shock, or injury to user. ...
-
Page 8: Grounding Instructions
IMPORTANT SAFETY GUIDELINES GROUNDING INSTRUCTIONS This product must be grounded. If it should malfunction or break down, grounding provides a path of least resistance for electric current reducing the risk of electric shock. * This treadmill is equipped with a cord having equipment grounding conductor and a grounding plug. - Page 9 IMPORTANT SAFETY GUIDELINES WARNING: Before beginning any exercise program consult your physician. This is especially important for the persons who are over 35 years old or who have pre-existing health problems. Read all instructions before using any fitness equipment. We assume no responsibility for personal injury or property damage sustained by or through the use of this product.
-
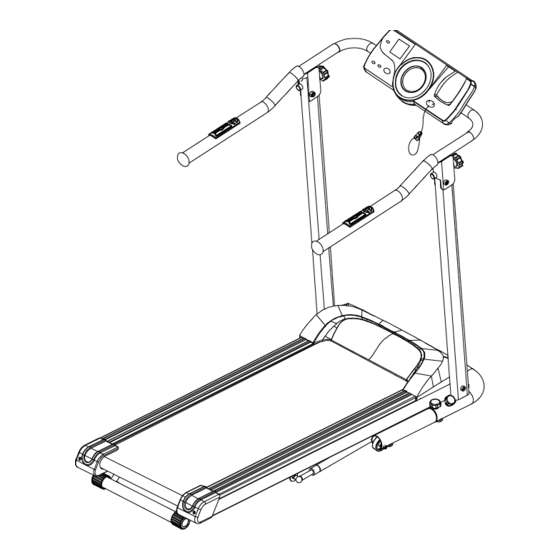
Page 10: Overview Drawing
OVERVIEW DRAWING... -
Page 11: Parts List
PARTS LIST Part # Description Part # Description Main Frame Computer MT18 Handlebar Safety Tether Key Incline Adjuster Triangle Knob M6X45mm Safety Tube A 480*30*40mm Handlebar Knob Safety Tube B Cross recess Phillips Screw T1.2*20*20*350mm M10X50mm Air Piston Cap Nut M10 Hex Bolt M12X90mm Lock Nut M10 Foam Grip φ32*T2.0*2480mm... - Page 12 PARTS LIST Part # Description Part # Description Motor Rear Roller Optical Coupler Motor Cover Hex Bolt M8X25mm Phillips Screw M5X10mm Spring M8 Side Rail Self-Tapping Screw Flange Nut M8 ST5*14mm Rubber Pad 55*35*8.5mm Rear Left End Cap Support Board 50*12*T4*556mm Rear Right End Cap Round End Cap φ25*15mm Spring Knob 54*27*27mm...
- Page 13 HARDWARE & TOOLS PACK (8) Stabilizer Knob 4 PCS (28) Triangle Knob 2 PCS 6mm Allen Wrench Silicone Oil 1 PC 1 bottle...
-
Page 14: Assembly
ASSEMBLY Step 1 1a. Lowering the Treadmill: Ensure that the treadmill is standing upright. Place one hand firmly on the walking platform and pull the Spring Knob (77) out to allow the Main Frame (1) to lower itself. Be careful to not be under the treadmill as it is lowering. Ensure that the Spring Knob (77) “POPS” into the locked position and that the Main Frame (1) is flat with the ground. - Page 15 ASSEMBLY Right Left Step 2 2a. Installing the Right & Left Stabilizer Tubes: Install the Right Stabilizer Tube (82) into the Stabilizer (80). Align the holes on both parts and insert two Stabilizer Knobs (8) through the holes. Thoroughly tighten the Stabilizer Knobs (8) by turning in a clockwise manner. Repeat this step to install the Left Stabilizer Tube (81) to the Stabilizer (80).
- Page 16 ASSEMBLY (28) Triangle Knob 2 PCS Step 3 3a. Handlebar Placement: Pull out the Short Knob (78) and then lift the Handlebar (2) until it is perpendicular to the Stabilizer (80) frame. Ensure that the Short Knob (78) "POPS" into the locked position after the Handlebar (2) is adjusted.
-
Page 17: Computer
COMPUTER Quick Start: Plug the Power Cord (37) into a wall outlet and flip the Power Switch (39) that is located at the front of the treadmill to the ON position. Make sure the Safety Tether key (27) is positioned on the Computer (26) then attach the Safety Clip (other end of the Safety Tether Key) securely to your clothing. - Page 18 COMPUTER Computer Functions: TIME: Displays your elapsed workout time in minutes and seconds. SPEED: Displays the current speed from the minimum 0.4 MPH to the maximum 4.0 MPH. You may increase or decrease the speed by pressing the UP or DOWN button on the computer console.
- Page 19 COMPUTER Pre-Set: PRE-SET TARGET GOALS: The computer allows for 3 different Pre-set target features, Time/Distance/Calories. To set a Target, have the computer in stop mode and press the MODE button to select one of the 3 targets. The display will flash, ready for you to press SPEED UP or SPEED DOWN to adjust the goals.
- Page 20 COMPUTER MODE: Press MODE button on the Left Handrail to select each function (TIME, DISTANCE, or CALORIES) for set up a workout goal value. On/Off: Press the On/Off button Located on the Left Handrail to start or stop the treadmill. SPEED UP: Press the SPEED UP button on the Right Handrail to increase speed.
-
Page 21: Storage
STORAGE Handlebar Knob (29) Spring Knob (77) Handlebar (2) Short Knob (78) FOLDING THE TREADMILL For your convenience, the treadmill can be folded up and placed in a storage area. To fold the treadmill, pull out the Spring Knob (77) while slowly lifting up the Main Frame (1) up and allowing the Spring Knob (77) to POP in place. -
Page 22: Adjustments
ADJUSTMENTS Adjustable Pads: There are five Adjustable Pads (9). There is one on the bottom of both Left and Right Stabilizer Tubes (81) & (82). There are three on the bottom of the Stabilizer (80). Turn the various Adjustable Pads (9) as needed to level the treadmill. -
Page 23: Belt Adjustment
ADJUSTMENTS Belt Adjustment: The belt may come loose during transportation and/or from use. After prolonged use of the treadmill, the belt will stretch out. If the belt is shifting to the left, turn on the main power switch of treadmill and let the belt run at the speed of 1-1.5 MPH. -
Page 24: Incline Adjustment
ADJUSTMENTS Incline Adjustment: Place one hand on the rear end of main frame. Lift the main frame up then adjust the Incline Adjuster (3) to the desired position. Two Incline Degree Options: 3 % Incline degree when Incline Adjuster at Position A. 6 % Incline degree when Incline Adjuster at Position B. -
Page 25: Maintenance
MAINTENANCE Silicone Oil The treadmill been coated with "Silicone Oil" in advance. Silicone oil is a non-volatile oil and by the time you receive the treadmill, there should be oil permeated through the belt. There will be no need to re-apply the oil under normal circumstances. To maintain the belt, "Silicone Oil" may be re-applied once the resistance has been increased and the belt starts rubbing against the walking deck. - Page 26 MAINTENANCE WARNING: To prevent electrical shock, please turn off and unplug the treadmill before cleaning or performing routine maintenance. CLEANING The treadmill can be cleaned with a soft cloth and mild detergent. Do not use abrasives or solvents. Be careful not get excessive moisture on the display panel as this might cause an electrical hazard or electronics to fail.
-
Page 27: Trouble Shooting
TROUBLESHOOTING Error Codes Cause and Solutions Fault Code Cause Solution 1. Ensure that the Safety Tether Key is installed on the Computer (57). 2.Restart the power after 1 minute and install the Safety SAFE Safety tether key protection Tether Key 3. -
Page 28: Warranty
WARRANTY MANUFACTURER’S LIMITED WARRANTY Paradigm Health & Wellness warrants to the original purchaser that this product is free from defects in material and workmanship when used for the purpose intended, under the conditions that it has been installed and operated in accordance with Paradigm’s Owner’s Manual. -
Page 29: Parts Request Form
PARTS REQUEST FORM Paradigm Health & Wellness, Inc. EMAIL THIS FORM WITH YOUR RECEIPT OF PURCHASE TO Service@paradigmhw.com NAME:_____________________________________________________________________________________ ADDRESS:__________________________________________________________________________________ CITY:________________________ STATE:_____________ ZIP:_______________________________________ TELEPHONE: (Day)__________________________________________________________________________ (Night)_________________________________________________________________________ SERIAL#:___________________________________________________________________________________ MODEL#:___________________________________________________________________________________ PURCHASE DATE:___________________________________________________________________________ PLACE OF PURCHASE:_______________________________________________________________________ PART # DESCRIPTION “YOUR ORDER WILL BE PROCESSED WITHIN 3 BUSINESS DAYS” * This form can also be faxed in Fax #: 626-810-2166...
Need help?
Do you have a question about the 1020H and is the answer not in the manual?
Questions and answers
My treadmill automatically increases the speed to 4.0mph, regardless of current speed I put it on. I cannot stop it, unless I pull the safety key.