
Summary of Contents for GCS ProxiPen
- Page 1 ProxiPe n an d W inDAU Instal lation Ma nual ProxiPen Hardware and WinDAU Software Installation Manual...
- Page 2 ProxiPen and WinDAU Installation Manual PROXIPEN HARDWARE AND WINDAU SOFTWARE INSTALLATION MANUAL TABLE OF CONTENTS General Information………………………………………………………………………………………………….3 I. Setting Up ProxiPen……………………………………………………………………………………………….4 II. Installing WinDAU Software and Components………………………………………………………………...5 A. Installing MDAC…………………………………………………………………...…………………….5 B. Installing SLMan32……………………………………………………………..……………………….7 C. Installing WinDAU………………………………………………………………..……………………13 III. Configuring WinDAU……………………………………………………………………………………………17 IV. Dongle Installation………………………………………………………………………………..…………….20 V.
-
Page 3: I. Setting Up Proxipen
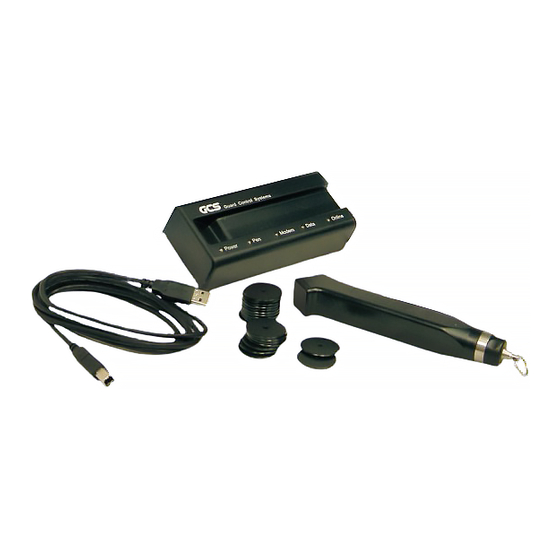
1. Remove ProxiPen, cradle (Data Transfer Unit – DTU) and cables from box. 2. Attach one end of the serial cable that comes with the ProxiPen (GCS 9-pin to 9-pin cable) to the DTU and the other end to the serial port on the back of the PC. -
Page 4: Ii. Installing Windau Software And Components
A. Installing MDAC MDAC, Microsoft Data Access Component, is a required component for WinDAU in order to allow for viewing of GCS reports via the WinDAU report viewer application and database integration. 8. Click Install next to the MDAC Version 2.5 box. - Page 5 ProxiPen and WinDAU Installation Manual If so, click OK to continue. Then, go to Section B. Install Software License Manager (SLMan32). 9. Mark the check box next to “Yes, I accept all of the terms of the preceding license agreement.”...
- Page 6 ProxiPen and WinDAU Installation Manual 11. Click Finish on the Setup is Complete screen. B. Installing Software License Manager (SLMan32) SLMan32 is a required component to run the WinDAU software. The Software License Manager is not actually engaged unless WinDAU Enterprise Edition is being used.
- Page 7 ProxiPen and WinDAU Installation Manual 13. Close any applications that may be running and click Next through the Welcome screen. Enter your User Information. NOTE: All fields are required in order to continue.
- Page 8 ProxiPen and WinDAU Installation Manual 15. Click Next through Choose Destination Location. Default installation drive will be C:\. 16. Under the Select Components screen, click Next for the default options unless you have a dongle (required for Enterprise Edition). If you have a dongle, check the Dongle Driver Software...
- Page 9 ProxiPen and WinDAU Installation Manual 17. Click Next to select the default Program Folder. Click Next on the Start Copying Files screen. During the installation process, the following screen will appear:...
- Page 10 ProxiPen and WinDAU Installation Manual Select Yes and follow steps detailed in Step A if you have a Hasp dongle OR Select No and continue to Step 20, if you have a Hardlock dongle or no dongle. NOTE: Dongles are required to run WinDAU Enterprise Edition. If you do not know if you are using WinDAU Enterprise Edition, please contact your security, purchasing or network director/administrator for verification.
- Page 11 ProxiPen and WinDAU Installation Manual 20. Next, the following screen will appear: Select Yes and follow steps detailed in Step 19, A and B (above) if you have a Hardlock dongle Select No and continue to Step 20, if you have a Hasp dongle or no dongle.
-
Page 12: C. Installing Windau
ProxiPen and WinDAU Installation Manual C. Installing WinDAU 22. The Master Setup screen will appear once again. Click Install next to WinDAU 1.1 Build 101. 23. Close any applications that may be running and click Next on the Welcome screen. - Page 13 ProxiPen and WinDAU Installation Manual Enter your User Information. NOTE: All fields are required in order to continue. NOTE: These fields will be populated with the information from the Software License Manager fileds that were filled out previously. Click Next through Choose Destination Location. Default installation drive will be C:\.
- Page 14 ProxiPen and WinDAU Installation Manual 28. Click Next on the Start Copying Files screen. Click Finish on the Setup Complete screen. Click Exit on the Master Setup screen.
- Page 15 ProxiPen and WinDAU Installation Manual 31. Select “Yes, I want to restart my computer,” then, click OK to restart Windows. WinDAU is now installed and ready to be configured.
-
Page 16: Iii. Configuring Windau
NOTE: Administrator login is required and used in configuration of the hardware. User password is not mandatory. 3. Click No on the "Do you want to use WinDAU just for the Escorte / Patrol Manager?" screen. 4. Verify your user information and click Send to submit your registration information to GCS (recommended). - Page 17 ProxiPen and WinDAU Installation Manual 5. In the bottom portion of the main WinDAU screen, select the radio button ( ) next to PenDTU. 6. Click the Configuration button. 7. Set the Time Zone, if it is not already set correctly. All other options should be set to their default.
- Page 18 NOTE: If you are using a modem, please contact Technical Support at 800-889-9138 for additional configuration settings. 8. Now, select the radio button ( ) next to ProxiPen in the bottom portion of the main WinDAU screen. 9. Then, click the Configuration button.
-
Page 19: Iv. Dongle Installation
3. Once the dongle is attached, go to the main screen in WinDAU and click Search in the top left corner. This will allow WinDAU to search for an attached dongle. 4. Go to the Windows Start button and then to Programs / GCS Office / Software Licensing Manager. - Page 20 ProxiPen and WinDAU Installation Manual Dongle-ID is the dongle number found on the inside of the WinDAU Enterprise Edition binder and, possibly also on the dongle. NOTE: Only the last portion of the number should be entered. For example: only 400026 would be entered for the Dongle-ID from the set of numbers below.
- Page 21 ProxiPen and WinDAU Installation Manual Click on Settings to verify your information and then click OK. 8. Click Exit when complete.
-
Page 22: V. Setting Up Tours
ProxiPen and WinDAU Installation Manual V. Setting Up Tours 1. Remove the tags from the ProxiPen kit. Included with the kit are: QTY./TAG STYLE SUGGESTED USAGE (5) larger 50mm tags Start tags to begin each tour (25) smaller 30mm tags... -
Page 23: A. Adding Start Points
A. Adding Start Points 5. First, scan one of the larger start tags with the ProxiPen. Do this by removing the pen from the DTU and bringing it within ¼" – ½” proximity of the tag. NOTE: Start points can only be used once ever in WinDAU. Control points can be used as multiple points on multiple tours. - Page 24 10. Select Yes from the following dialog box. This will clear any previously scanned tags from the ProxiPen’s memory, as they have now been imported into WinDAU. 11. The tag that was scanned will now appear in the section labeled 2. Pool. The tags will be listed in the order in which they were scanned.
- Page 25 ProxiPen and WinDAU Installation Manual 13. From the listing under Tours in 3. Tour Definition, click on Tour 1, so that it is shaded. Tour 1 will then be the item populated in the next step. NOTE: The first tag selected to be moved into a tour will become the start point for the tour.
-
Page 26: B. Adding Control Points
16. Scan one or more of the smaller control point tags with the ProxiPen to identify specific points in a tour. If you are scanning more than one tag, be sure they are clearly identified and the order in which they are scanned is noted. - Page 27 20. Select Yes from the following dialog box. This will clear any previously scanned tags from the ProxiPen’s memory, as they have now been imported into WinDAU. 21. The tags that were scanned will now appear in the section labeled 2. Pool. The tags will be listed in the order in which they were scanned.
-
Page 28: C. Adding Personnel
NOTE: Control points are added to a tour in no particular order. A tour is considered complete once all points designated to a tour have been scanned with the ProxiPen. You will now need to enter the personnel and incidents to complete the basic Tour Definition. - Page 29 ProxiPen and WinDAU Installation Manual 25. Scan the personnel tag(s) (i.e. the wristband, pendant tag or RFID card) with the ProxiPen. 26. Place the ProxiPen in the DTU. 27. Select Add Control Points from ProxiPen from the drop down menu.
- Page 30 29. Select Yes from the following dialog box. This will clear any previously scanned tags from the ProxiPen’s memory, as they have now been imported into WinDAU. 30. The tag(s) that was scanned will now appear in the section labeled 2. Pool. The tags will be listed in the order in which they were scanned.
-
Page 31: D. Adding Incidents
ProxiPen and WinDAU Installation Manual 33. Continue these steps until all personnel are added. D. Adding Incidents Again, adding incidents is the same as adding tags of any kind, except that they will be added to the Incidents category under the Tours section rather than to a tour. - Page 32 38. Scan the tag(s) from the incident booklet with the ProxiPen. Be sure to note the order in which the tags are scanned.
- Page 33 42. Select Yes from the following dialog box. This will clear any previously scanned tags from the ProxiPen’s memory, as they have now been imported into WinDAU. 43. The tags that were scanned will now appear in the section labeled 2. Pool. The tags will be listed in the order in which they were scanned.
- Page 34 ProxiPen and WinDAU Installation Manual Once completed, the tour(s) that have been entered are ready to be executed. Select Exit to leave the Tour Definitions screen and return to WinDAU’s main screen. The following sections, E and F, are for WinDAU Enterprise Edition users only. If you are Using WinDAU Standard Edition, continue to Section VII.
- Page 35 ProxiPen and WinDAU Installation Manual 48. Scan the tags designated for a break (control point tags) with the ProxiPen. 49. Place the ProxiPen in the DTU. 50. Select Add Control Points from ProxiPen from the drop down menu. 51. The following dialog box will appear:...
- Page 36 52. Select Yes from the following dialog box. This will clear any previously scanned tags from the ProxiPen’s memory, as they have been imported into WinDAU. 53. The tag that was scanned will now appear in the section labeled 2. Pool. The tags will be listed in the order in which they were scanned.
- Page 37 ProxiPen and WinDAU Installation Manual 56. Continue these steps until all break options are added. F. Adding Maps (WinDAU Enterprise Edition only; if you are using WinDAU Standard Edition, continue to Section VII.) WinDAU Enterprise Edition users, are able to import location maps and/or images of personnel for identification purposes.
- Page 38 ProxiPen and WinDAU Installation Manual 59. Once the map screen opens, select Open from the menu bar options. 60. Navigate to the location of the map or personnel file (must be .jpg or .bmp file). Select the file and click Open.
- Page 39 ProxiPen and WinDAU Installation Manual 61. The map will be imported into WinDAU. The Start Point of the tour will be denoted in red and present on the map image. Drag and drop the to the location of the corresponding Start Point.
-
Page 40: Vi. Using Proxipen And Windau Together
During a tour, all data is stored in the ProxiPen until the time of download at the end of the tour or after a given period of time (1 day, 3 days, 1 week, 3 shifts, etc.). After which, reports can be derived from the downloaded information including the personnel on the tour, time at which point a control tag was scanned, whether points were missed or duplicated, and more. - Page 41 (3) The clock of the computer running WinDAU is being updated by a server, periodically; thus, causing a discrepancy. To correct or avoid this problem, it is a good practice to enter ProxiPen configuration from WinDAU prior to any download. Then, click the Set to PC Date/Time button. This will resynchronize the time between the ProxiPen and the PC and alleviate data corruption due to time/date discrepancies.
-
Page 42: C. Report Summary Examination
13. The following screen will allow the user to run reports from any range of dates for which the ProxiPen has received data. Select the date range for which the report will be run. 14. Click the Report button to generate a report. The GCS report viewing software that comes with WinDAU will be launched. - Page 43 NOTE: Reports are output in an ascending time format, therefore the most recent downloads from the ProxiPen will show at the end of the report. Statistical information is also available on the last page of the report. This allows for the ability to quickly observe any delinquencies and then review the report in detail, if necessary.
-
Page 44: Vii. Login: Administrator Versus User
ProxiPen and WinDAU Installation Manual VII. Login: Administrator versus User User Privileges Administrator Privileges Ability to use Configuration and Tour Definitions tools Configuration or Tour Definitions not accessible from from main screen in WinDAU. main screen in WinDAU. Optimized reporting capabilities. (Enterprise Edition Limited reporting capabilities. - Page 45 ProxiPen and WinDAU Installation Manual Enhanced Options (from main screen). Limited Options (from main screen). Enterprise Edition Reporting Options Features Additional reports: • Personnel report • Control point report • Incident report • Break report Additional print options for different reports: •...
-
Page 46: Viii. Windau Screen Details
Dongle Indicator AND Help Option 2 – Search Search for Dongle 3 – Options WinDAU software options 4 – Homepage Launch GCS home page (requires Internet connection) 5 – Report Reporting screen 6 – Tour Definition Configure tour definitions 7 – Get Started Launches WinDAU integrated Help 8 –... - Page 47 * Select logo to appear on reports. Select background image to appear on reports. WinDAU will be used with Escorte only. Change report font. Report output options: VSR requires WinDAU, HTML is universally viewable GCS Toolbar (will appear on main screen of WinDAU)
- Page 48 Launches GCS website, which requires an Internet connection. 5. Report The report button can be used at any time after reports have been downloaded from the ProxiPen. The following screen will be launched (your screen may look slightly different, depending upon which...
- Page 49 Manager, to import and/or export data between these programs and WinDAU. Contact your GCS sales office for more information on the GCS product line. The Pool menu option allows users of GCS's Prisma software to export pool data from WinDAU to Prisma.
- Page 50 ProxiPen and WinDAU Installation Manual 7. Get Started Clicking on the "Get Started" text will launch WinDAU's integrated help file. 8. Configuration ProxiPen Configuration Modem setup information. Number of control points to be Number of control points downloaded from pen.
- Page 51 10. Hardware Selector Use the radio buttons ( ) to select the type of pen you are using: ProxiPen, Escorte or Escorte II; or select the DTU (Data Transfer Unit). Once a hardware type is selected, click the Configuration button to configure this item. See item #7 in this section for more on Configuration options.
-
Page 52: Ix. Gcs Start Menu Options
ProxiPen and WinDAU Installation Manual IX. GCS Start Menu Options From the Windows Start / Programs / GCS Office menu, you can access a variety of launch, configuration and help options. GCS Office Menu Software Licensing Manager Sub-menus WinDAU 1.1 Sub-menu... -
Page 53: X. Installing Over Older Versions Of Windau
• language Once these steps are taken, proceed with the installation. Once the installation is complete, follow steps 1 – 3 above, and then copy the folders from the GCS file on the Desktop back into the WinDAU folder. -
Page 54: Xi. Alternate Configurations
Winspector or WinArgus you may require additional assistance. Customizable configurations are available through GCS or an authorized dealer. Some technical support may require an additional charge. Please contact your GCS representative or GCS Headquarters at 800- 889-9138 for more information. -
Page 55: Xii. Service Patches / Fixes
Firmware Update For some versions of WinDAU, upon the first installation and configuration on each system the firmware will need to be updated. From ProxiPen Configuration, a message will notify you as to whether you need to perform this update. - Page 56 ProxiPen and WinDAU Installation Manual 4. Select Firmware Update from the Options menu. 5. The Open file dialog box will pop up. Select the “ProxiPen Firmware v2.8.pff” file and click Open. 6. Once notified via the pop-up window, the update is complete.
Need help?
Do you have a question about the ProxiPen and is the answer not in the manual?
Questions and answers