Advertisement
Website:
www.sorellefurniture.com
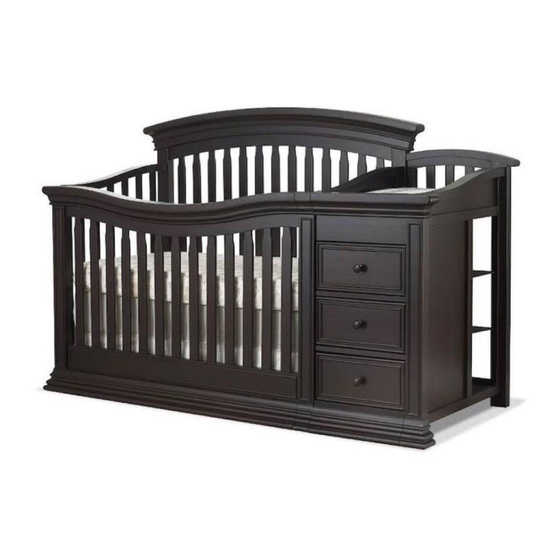
Sedona Crib and Changer
Assembly Instruction
Important Information:
Read all instructions BEFORE assembling crib.
KEEP INSTRUTIONS FOR FUTURE USE.
Made in Thailand
Advertisement
Table of Contents

Related Manuals for Sorelle Sedona Crib and Changer


Summary of Contents for Sorelle Sedona Crib and Changer
- Page 1 Website: www.sorellefurniture.com Sedona Crib and Changer Assembly Instruction Important Information: Read all instructions BEFORE assembling crib. KEEP INSTRUTIONS FOR FUTURE USE. Made in Thailand...
- Page 2 C&T International / Sorelle for replacement parts and instructional literature if needed. Do not substitute parts. *Follow warnings on all products in a crib. *If refinishing, use a non-toxic finish specified for children's products.
- Page 3 The maximum recommended weight of the child is 30lbs for the changing table. Use only the pad provided by C&T International / Sorelle or Manufacturer’s Always secure the pad to the changing surface by inserting the strap through the hole in the middle of the pad.
- Page 4 - Do not scratch or chip the finish. - Inspect the product periodically, contact C&T International / Sorelle for replacement parts or questions. - Do not store the product or any parts in extreme temperatures and conditions such as a hot attic or a damp, cold basement.
- Page 5 SORELLE Assembly Parts (C) Footboard (x1) (A) Left End (x1) (A1) Middle Panel (x1) (B) Headboard (x1) (A2) Right End (x1) (D1) Middle - Front Leg (x1) (F): Stabilizer Bars (x2) (D2) Right - Front Leg (x1) (H2) Front- Middle Support Bar (x2)
- Page 6 SORELLE Assembly Parts Hardware list Allen head bolt Ø11XM5 X 32mm ( x8) Metal Shelf Support Allen Wrench ( X1 ) Wing Nuts ( x8) Wall Strap Kit (x1) Mattress Support (x1) Barrel Nut (x8) M4 x 12mm Bolt (x8)
- Page 7 SORELLE Crib Assembly Important: All Washers( g ) and Lock Washers ( f ) must be inserted into bolts except (d&e) before assembly as figure. 1. Attach the Left End (A) to the Headboard (B) by using two Bolts ( b ) and a Wooden Dowel ( j ).
- Page 8 SORELLE 3. Attach Middle Panel ( A1) to Head board ( B ) using two (2) Bolts ( b ) . See Figure 3. ( A1) Figure 3: This crib has a high position setup on mattress support (o) for use during your baby’s first months. As soon as your baby starts to sit up, you must use the lowest mattress level.
- Page 9 SORELLE Attach the Mattress Base (O) to Stabilizer Bars(F) as shown Fig 2. Allen head bolt Ø11XM5 X 32mm ( 4 pcs) Wing Nuts ( 4 pcs) Figure 5 : Attach completed Mattress Support Assembly to crib using eight (8) Bolts( a ). See Figure 6.
- Page 10 SORELLE 7. Attach Changer back panel (E) to Headboard ( B ) , Using two Bolt (c) . Attach the Middle-Bottom Support Bar (I3) to Middle Panel (A1) . Attach the Front- Middle Support Bar (H2) to Middle - Front Leg (D1).
- Page 11 SORELLE 9. Using three (3) bolt (d) Assembly the Left End ( A ) and Footboard ( C ) . See Figure 9. ( C ) ( A ) Figure 9 : 10. Attach the Front -Top Bar (H) to Middle front post (D1) , Using one (1) bolt (a) See Figure 10.
- Page 12 SORELLE 11. Assembly the Right - Front Leg (D2) , Using one (1) bolt (a) . Assembly the Changer Top Shelf with Support Bar( I ) Assembly the Changer Middle MDF Pane ( I2 ) See Figure 11. ( I )
- Page 13 SORELLE 13. Insert Metal Shelf Support ( l ) into holes Middle Panel & Right End See Figure 13. Figure 13 Metal Shelf Support 14. Attach three Shelf to changer. See Figure 14. Figure 14 Page 13...
- Page 14 SORELLE Drawer Assembly (K2) 1. Working on a padded fl at surface, attach Drawer (K4) Sides (K3 &K4) to Drawer Back (K2) with bolts (e). (K3) Grooves Figure 1. 2. Slide Drawer Bottom (K5) into drawer (K5) assembly. Figure 2.
- Page 15 SORELLE Insert three (3) drawers into changer. Add changing pad to top of organizer. Important : Tighten all bolts before use your Crib. Changing Pad Assembly Important : If changing pad and safety belt are assembled, make sure warnings are facing up and visible.
- Page 16 Follow all instructions supplied with the 152# Toddler Rail System. NOTE:152# Toddler Rail System is not included. Please see your crib retailer, visit WWW.Sorellefurniture.com or contact C&T International / Sorelle for more information. ( 152# Toddler Rail System Not included, sold separately)
Need help?
Do you have a question about the Sedona Crib and Changer and is the answer not in the manual?
Questions and answers