Table of Contents
Advertisement
Advertisement
Table of Contents

Related Manuals for Zte Axon M


Summary of Contents for Zte Axon M
- Page 1 User Manua l...
- Page 2 Copyrig Copyrigh ht © 2017 ZTE C CORPORATION All rights s reserved. No part of f this publication may be quoted, reproduced, tran...
- Page 3 Google and Android are trademarks of Google, Inc. ® The Bluetooth trademark and logos are owned by the Bluetooth SIG, Inc. and any use of such trademarks by ZTE Corporation is under license. microSDXC Logo is a trademark of SD-3C, LLC. ®...
- Page 4 Conte ents Getting Started ............6 Getti ng to Know Your r Phone ..........6 Know wing the Keys ..............8 Insta lling the nano-SI IM Card and mic roSDXC Card ..
- Page 5 Using Options During a Call ..........32 Managing Multi-party Calls ..........33 Adjusting Your Call Settings ..........34 Contacts ..............36 Adding a New Contact ............36 Searching for a Contact ............. 36 Editing Contacts ..............
- Page 6 File Manager ..............48 Recorder ................49 Google Apps ..............49 Settings ..............51 Wireless and Networks ............51 Device ................54 Personal ................59 System ................63...
- Page 7 Gettin g Started Getting g to Know Your Phon 1. nano-SIM M/microSDXC ca ard slot 2. Volume k 3. .Power k key/Fingerprint se ensor 4. .Quick la aunch key...
- Page 8 5. Headse et jack 6. Auxiliar ry microphone 7. Left scr reen 8. Flash 9. Camer 10. Earpie 11. Proxim mity & light senso 12. Indica ator light 13. Right screen 14. Speak kerphone 15. Charg ging/micro-USB j 16. Micro phone 17.
-
Page 9: Im Card And Mic Rosdxc Card
Knowing the Keys Function Press and hold to turn airplane mode on or off, restart, or power off. Power key/Fingerprint sensor Press to turn off or on the screen display. Press to register the fingerprint. Press or hold either end of the key to turn the Volume key volume up or down. -
Page 11: R Phone,
Chargi ng the Bat ttery Your phone e’s battery should d have enough p power for the pho one to turn on, find d a signal, and m make a few calls. You should fully charge the battery as soon as possible. - Page 12 2. Conne ect the charger to o a standard AC power outlet. If t phone e is on, you’ll see e a charging icon , such as appea ar on the status b bar. 3. Disco nnect the charge er when the batte ery is fully charge NOTE If the batt...
-
Page 13: Setting Up For The First Time
Powering On/Off Press and hold the Power key to power on your phone. To power off, press and hold the Power key and touch Power off. NOTE: If the phone freezes or takes too long to respond, you can press and hold the Power key for about 10 seconds to restart the phone. -
Page 14: Using The Touch Screen
NOTE: To save battery power, the phone automatically turns off the screen after some time of inactivity. You will still be able to receive messages and calls while the phone screen is off. To unlock the screen and keys: 1. Press the Power key to turn the screen on. Press and hold a blank area of the screen or to wake the phone, or... - Page 15 Touch and Hold To open the available options for an item (for example, a message or link in a web page), touch and hold the item. Swipe or Slide To swipe or slide means to quickly drag your finger vertically or horizontally across the screen.
-
Page 16: Multi-Screen
Gettin ng to Know w the Multi -screen Your AXO ON M offers a va riety of different s screen modes. T switch mo ode, flip open you ur device and tou The devic ce’s multi-screen functionality is d dependent on ma agnetic flux level. - Page 17 Extend mode To use Extend Mode, touch . In this mode, the left and right screens show a single extended view.
-
Page 18: Dual Mode
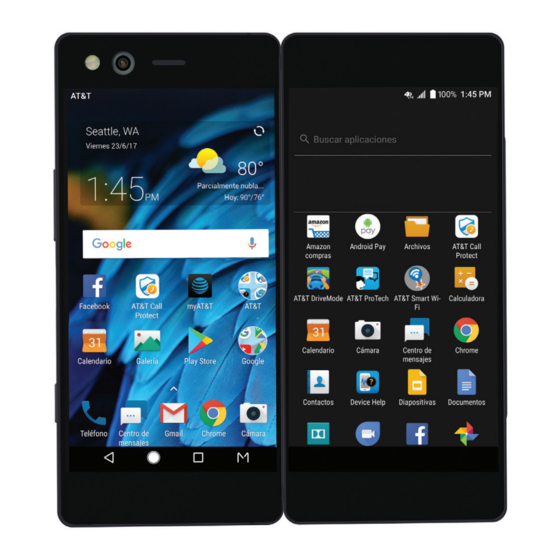
Dual mode To use Dual Mode, touch . In this mode, the left and right screens show different views. You can have a different app open on each screen. - Page 19 Single mode To use Single Mode, touch . In this mode, only the left screen shows the current view; the right screen is blank. Extended Home Screen Panels Your home screen is extendable, providing more space for shortcuts, widgets, and more. Simply swipe left or right on the home screen to see the extended panels.
-
Page 20: E Status
2. Touch h and hold an ap plication icon or a widget and dra ag it to the rig ght edge of the sc creen to create a a new home scre panel and put the icon n or widget on it. Choosing g Your Wallpape You can s... - Page 21 bration mode Airplan ne mode ® o not disturb mode Blueto ooth attery low Conne ected to a Wi-Fi net twork attery full Wi-Fi i in use attery charging Speak kerphone on arm set Phone e microphone off cation on NFC o obile hotspot on Video...
- Page 22 Call on hold USB connected Song playing USB tethering on Video call via Wi- Video call via mobil e data New voicemail(s) Video call on hold Open/C Close the No otification P Panel Notificatio ons report the ar rrival of new me ssages, calenda events, a nd alarms, as w...
- Page 23 To remove all notifications, touch CLEAR ALL below all the notifications. To manage notifications you have received, touch and hold a notification to identify the application that created it. You can then touch Show notifications silently > DONE to silence future notifications from this app, or touch MORE SETTINGS to configure other notification options for this app.
- Page 24 Data Saver: Touch to turn Data saver mode on or off. Press and hold to open the Data usage menu. Battery Saver: Touch to turn Battery saver mode on or off. Press and hold to open the Battery saver menu. ...
-
Page 25: Navigation Bar
Getting to Know the Navigation Bar Home key Back key Mode key Recent apps key Function Back key Touch to go to the previous screen. Touch to return to the home screen from any Home key application or screen. Touch and hold to access the Google app. Touch to see recently used applications. - Page 26 Conn necting to o Network ks and Devic Conne ecting to M Mobile Net works Control Mobile Data Us To enable e or disable data access: 1. From t the home screen > > > Settings > Data usage. 2. Touch Cellular data sw witch to enable or d disable mobile dat...
- Page 27 service p provider. Touch > Save to comp plete. NOTE: To set the A APN to default sett tings, touch > R Reset to default. Connec cting to W Wi-Fi Wi-Fi is a w wireless networki ng technology th hat can provide Internet acc cess at distances s of up to 300 fee...
-
Page 28: Oth Devices
security details from the network's administrator. 1. From the home screen > > Settings > Wi-Fi. 2. Slide the Wi-Fi switch to the On position. 3. Touch Add network. 4. Enter the network SSID (name). If necessary, enter security or other network configuration details. 5. - Page 29 NOTE: You cannot transfer files between your phone and your computer via USB while the phone is USB tethered. 1. Connect your phone to your computer with a USB cable. 2. From the home screen > > Settings > More > Tethering &...
- Page 30 To stop s haring your data connection, swit tch off Bluetooth tethering Conne ecting to V Virtual Priv vate Netwo orks Virtual pri ivate networks (V VPNs) allow you to connect to the resources s inside a secure ed local network. VPNs are comm monly deployed...
- Page 31 Phone e Calls You can pla ace calls from the e Phone app, the e Contacts app, o other apps or widgets that d display contact in nformation. Wher rever you see a p phone number, y you can usually to ouch it to dial.
-
Page 32: Ng Calls
Place a Call From Your Contacts 1. From the home screen > > CONTACTS. 2. Touch next to a contact to place the call. Answering or Rejecting Calls When you receive a phone call, the incoming call screen opens, displaying the caller ID or the information about the caller that you've entered in the Contacts app. - Page 33 leave voice email messages w when they canno ot reach you. Her re’s how to chec ck the messages s they left. 1. From th he home screen n > 2. If the di alpad is closed, t touch to dis splay it.
- Page 34 Touch to put the caller you are sp peaking to on ho old, and switch h to another call t that has been pu ut on hold. Touch to en nd the current cal Manag ging Multi- -party Call When the e call waiting and d three-way call fe...
-
Page 35: Call Setting
3. When y ou’re connected to the second pa rty, touch If one of the e people you call ed hangs up dur ring your call, you u and the remaini ng caller stay co onnected. If you i nitiated the call a are the first t to hang up, all c callers are discon... - Page 36 Call forwarding: Call forwarding feature allows you to forward your incoming calls to another phone number. Call waiting: To get notified of incoming calls during a call. Additional settings: Touch Caller ID to choose whether your number is displayed when someone receives your outgoing call.
-
Page 37: Contacts
Conta You can ad dd contacts on yo our phone and sy ynchronize them with the contact s in your Google e account or othe er accounts that support con ntact syncing. To see your r contacts, from t the home screen n >... -
Page 38: Editing Contacts
the contact has to search for it. The contacts matched will be listed. Editing Contacts 1. From the home screen > > 2. Touch a contact you need to edit and then touch 3. Edit the contact and touch... -
Page 39: E Networks
Gmail From the ho ome screen and select Gmail. U se it to receive a send emails s from your webm mail or other acc counts, using PO or IMAP, or r access your Ou utlook, Hotmail an nd Yahoo accoun for your cor rporate email nee eds. -
Page 40: Messaging
Mess saging You can u use Messaging to o set message ba ack up, exchange e text messages s (SMS) and mu ltimedia messag es (MMS). Openi ing the Me essaging S Screen From the home screen > The Mess saging screen o pens, where you u can create a ne... - Page 41 4. If you w want to send a mu ultimedia messag ge, touch add a s ubject or attach a a file to the mess sage. 5. Touch NOTE Do not add a message subj ject or any attach hment if you wan nt to send a text message.
-
Page 42: Web Browser
Browser Use Chro ome to view web pages and sear rch for informatio Openi ing the Bro owser From the home screen > to launch th he web browser. You can a also open the bro owser by touchin g a web link - for example, in an email or a text message. - Page 43 To switch b between tabs: 1. Touch (The number s shows how many y tabs you have open). 2. Swipe v vertically to scroll l through the list of opened web pages, and touch the on ne you want to vi ew..
-
Page 44: Camera
Came Captu uring a Pho 1. From the home screen n > Or you u can quickly ope en the Camera fr rom any screen b double e-tap the quick l launch button. 2. Flip th he device over, a nd then aim the camera at the su ubject... - Page 45 Number Function Set a time delay before the camera takes a picture after you tap the shutter icon. Change the High-Dynamic Range (HDR) setting (back camera only). Switch mode: VIDEO (front or back camera), PHOTO (back camera) / SELFIE (front camera), or MANUAL (back camera) / BEAUTIFY (front camera) Exit the camera.
- Page 46 Numb ber Function Select a colou r effect or other spe ecial effect Capture a pho oto. Capture a LIV E photo. View pictures and videos you hav ve taken. Use special ph hoto or video came ra modes: PANORA AMA, MULTI EXPOS SURE, TIMELAPSE...
- Page 47 Record ding a Vide You can rec cord video clips a at normal-speed with front or bac camera. Th he back camera m mode also allows s you to record ti lapse video 1. From th he home screen > >...
-
Page 48: Music
More Apps an nd Feature Music From the home screen > > Play Musi ic > > Music library to open the Music library. There yo ou can view all yo audio files s or by categoriz zed lists or album ms, and genres. -
Page 49: Use The Stopwatch
NOTE To enab ble or disable exi sting alarms dire ectly, just slide th switche s to the right of e each alarm. Touch > Setting to co onfigure alarm se ettings. Use Wo rld Time 1. Open th he Clock app and d touch 2. -
Page 50: Recorder
Recorder Recorder enables you to record voice memos and listen to them whenever you like. 1. From the home screen > > Recorder. 2. Touch to start recording. Touch to pause or continue the recording. 3. Touch Done to stop recording. 4. - Page 51 Maps: Find your place and find your way in the world. Photos: Manage photos on the phone and your Google account. Play Movies & TV: Purchase, download and watch the latest and your favorite movies and TV shows. ...
-
Page 52: Settings
Settin From the home screen > > Settings. T The Settings contains m most of the tools for customizing and configuring your phone. Wirele ess and Ne etworks Wi-Fi Turn Wi-F Fi on or off and c onfigure your Wi i-Fi connections. -
Page 53: Data Usage
recommended) or WPA2 PSK (other users can access your Wi-Fi hotspot only if they enter the correct password). When you select WPA2 PSK, touch the Password field to edit the security password. Show password: Check to show or hide the password. ... - Page 54 Wi-Fi Calling Touch More > Wi-Fi Calling to turn Wi-Fi calling on or off. When Wi-Fi calling is on, your phone can route calls via Wi-Fi networks or your carrier's networks, depending on the strength of the signal. Tethering & Portable Hotspot configure Touch More >...
-
Page 55: Device
Device Quick Launch Button By default, pressing and holding the Quick Launch button launches Phone app. You can change the following settings: Double-tap for Camera: Enable or disable double-tapping the Quick Launch button to open the Camera app. Long press: Select the app that is launched when you press and hold the Quick Launch button. - Page 56 to work with Extended screen mode, whether or not they support it. Brightness level: Set the brightness of the display. Adaptive brightness: Automatically adjust screen brightness. Night Light: Manage the Night Light function. Night Light tints your screen amber. This makes it easier to look at your screen or read in dim light, and may help you fall asleep more easily.
- Page 57 Navigation key light duration: Touch to select navigation key light duration. Notifications Control the display of notifications. Touch > On the lock screen to enable/disable notification display on the lock screen. Touch an app to control its notifications. You can turn its notifications off, allow them in Do not disturb mode, allow pop-up display, or hide content on the lock screen.
- Page 58 UNINSTALL: Uninstall the app. DISABLE/ENABLE: Disable or enable the app. Storage: Check its storage information, clear its data or cache. Data usage: Check how much data has been used by the app during the time cycle you set and restrict background data for the app.
- Page 59 Save locat tion: Select the d default location fo or new data, such h as files downlo oaded, photos ca aptured, and voic ce recorded. Device sto orage: Tap Phon e > Used space e to get a detailed breakdown of space usage by type.
-
Page 60: Personal
Call Settings Configure all call settings. Connect to PC Select the USB connection mode between your phone and Personal Location Activate location services to determine your location. To use location-related applications, such as finding your location on Google Maps, you must have location services turned on on your phone. - Page 61 Security Screen lock: Lock the screen with long press, pattern, PIN, or password. Fingerprint: Register up to five fingerprints and enable them to unlock the phone or quickly open a selected app. Enable pressing the Power key/Fingerprint sensor to take a photo or answer incoming calls.
- Page 62 a PIN Unlock Key (PUK) to restore the nano-SIM card. Make passwords visible: Display passwords as you enter them. Device administrators: View or deactivate apps you have authorized to be device administrators. Unknown sources: Check this option to permit installation of apps from sources other than the Play Store.
- Page 63 Google Manage settings for Google apps and services that are installed on your device. Languages & Input Languages: Select a language for your system. Spell checker: Use Google Spell Checker to check for spelling errors when entering text. ...
-
Page 64: System
text-to-speech output feature supports the current system language. Pointer speed: Select how fast the pointer/mouse should scroll when you connect the phone to a trackpad or mouse accessory. Backup & Reset Back up my data: Back up app data, Wi-Fi passwords, and other settings to Google servers after you sign in to your Google account. -
Page 65: About Phone
your phone, such as using Color inversion or Display size for users with low vision.. Printing Manage printer plug-ins installed from the Play Store or your printer manufacturer. About Phone View phone status, legal information, and other information. You can also touch Software updates > SD CARD UPDATE to install updates from update packages copied to the storage card. - Page 66 This is because the phone is designed to operate at multiple power levels so as to use only the power required to reach the network. In general, the closer you are to a wireless base station antenna, the lower the power output. The exposure standard for wireless devices employing a unit of measurement is known as the Specific Absorption Rate, or SAR.
- Page 67 ensure RF exposure level c compliant or lowe er to the reported level. To su upport body-worn n operation, choo ose the belt clips holsters, wh hich do not conta ain metallic comp ponents, to main tain a separatio n of 10 mm betw ween this device and your body.
- Page 68 These limits are designed to provide reasonable protection against harmful interference in a residential installation. This equipment generates, uses and can radiate radio frequency energy and, if not installed and used in accordance with the instructions, may cause harmful interference to radio communications.
- Page 69 Enqueir ring the E-la abel In home scre een, Settings->Abo out phone-Regulat t ory labels...
Need help?
Do you have a question about the Axon M and is the answer not in the manual?
Questions and answers