
Related Manuals for Holzstar TKS 250 SC


Summary of Contents for Holzstar TKS 250 SC
-
Page 1: Instruction Manual
Instruction Manual Circular Table Saw TKS 250 SC - 400V TKS 250 SC - 230V TKS 250 SC... - Page 2 Imprint Circular Table Saw Product identification Item number: 5900256 TKS 250 SC - 230V 5900255 TKS 250 SC - 400V Stürmer Maschinen GmbH Manufacturer Dr.-Robert-Pfleger-Str. 26 D-96103 Hallstadt Fax: 0049 (0) 951 96555 - 55 E-mail: info@holzstar.de Internet: www.holzstar.de Information on Operating Instructions...
- Page 3 Table of C..ontents 1. Getting to Know Your Table Saw ..................1 2. Please Read First ........................2 3. Safety .............................2 3.1 SpeciÞ ed conditions of use ....................2 3.2 General safety instructions ....................2-3 3.3 Symbols used throughout these instructions ..............4 3.4 Safety devices ........................4 4.
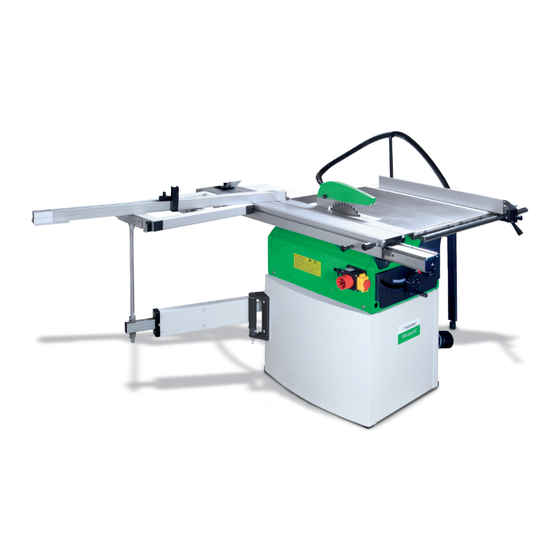
- Page 4 1. Getting to know your saw 1. Box Stand 12. Right Extension Table 2. ON/OFF Switch with Emergency Stop 13. Extractable Stop Rail 3. Saw Unit 14. Sliding Carriage 4. Miter Gauge 15. Swing Arm Assembly 5. Blade Guard 16. Sliding Table Frame Assembly 6.
-
Page 5: Please Read First
General Hazard! 2. Please Read First! • Keep your work area tidy – a messy work • Read these instructions before use. Pay area invites accidents. special attention to the safety instructions. • Be alert. Know what you are doing. Set out •... -
Page 6: Symbols Used Throughout These Instructions
not jam. All parts must be correctly installed • Ensure that when switching on (e.g. after and meet all conditions necessary for the servicing) no tools or loose parts are left on proper operation of the machine. or in the machine. •... -
Page 7: Safety Devices
3.4 Safety devices 4. Special Product Features Blade guard • Precisely adjustable bevel tilt from 0° • The blade guard (a) (Figure 1) protects through 45° against unintentional contact with the saw • Steplessly adjustable depth of cut 0 – 80mm blade and from chips ß... - Page 8 Handwheel for setting the depth of cut Miter gage • The depth of cut can be adjusted by turning • The miter gage is used in making cross cuts the handwheel (c) (Figure 4) in the workpiece. • Adjust the angle (Figure 7) 1, Loosen the knurled nut and the shorter lock knob 2, Keep the longer lock knob by hand and...
-
Page 9: Initial Operation
6.2 Installing the front rail 6. Initial Operation Install the front rail needs following Caution: hardwares: This table saw is shipped in two packages: 4-M8x25 mm cross cylinder head screws the master case and the sliding carriage 4-8 mm ß at washer carton. -
Page 10: Installing The Rear Extension Table
4, Slide the rip fence back and forth. It should 6.3 Installing the Rear Extension Table move freely with about 2mm clearance Install the rear rail needs following below the rip fence. If it dosen’t, loosen the hardware: screws of the front rail, and adjust it up or 2-M8x25 mm Hex Head Bolt down. -
Page 11: Connection Of Dust Collector
6.7 Connection of dust collector Danger! By the revolving motion of the saw blade the Danger! saw dust is blown from the chip ejection tube. • Dust of certain timber species (e.g. oak and Watch where the jet of saw dust is aimed at. ash) can cause cancer when inhaled. - Page 12 M12 Nut Figure 19 Figure 17 Be sure the safety switch is placed in the correct position (Hole A) of the sliding carriage. (Figure 18 - 1) Otherwise the ma- chine can not be switched on. Square Nut Handle Figure 20 The safety switch may ensure the Machine not to run in case of the sliding Check the surface alignment of the major...
-
Page 13: Mains Connection
5, Attach the support bracket to the swing arm (A) and Þ x it by 1-M20 mm nut. Attach the sliding table frame to the sliding carriage, with the square nut insertting into the T-slot of the sliding carriage. (Figure 22 - 1) Figure 23 8, Place the clamping plate (A) on the sliding carriage, and Þ... -
Page 14: Operation
7.1 Sawing 7. Operation Risk of injury! • For cutting the workpiece is evenly fed • This machine may only be operated by against the saw blade towards the rear of one person at a time. Other persons may the table: stay only at a distance from the saw for the purpose of feeding or removing stock. -
Page 15: Sliding Cut
2, Reposition auxiliary fence extrusion if 7, Push the sliding carriage forward to cut necessary: workpieces in a single pass. - Low edge (as shown) = for sawing thin 8. Switch the machine off if no further cutting stock, and with a tilted saw blade is to be done immediately afterwards. -
Page 16: Cleaning The Saw
6, Loosen the saw blade spindle arbor nut with spanner (L.H. thread!). 7, Take the outer blade collar and saw blade off the saw spindle. 8, Clean clamping surfaces of the saw spindle and the saw blade. Danger! Figure 31 Do not use cleaning agents (e.g. -
Page 17: Tips And Tricks
Stated top speed is not reached 9. Tips and Tricks • Motor supply voltage too low: • Make trial cut with pieces of scrap before - use a shorter extension cable or extension cutting a workpiece to size. cable with larger lead cross section (≥1.5 •... - Page 18 12. Spare Parts Drawing TKS 250 SC 230V_400V The following drawing should help in case of service to identify necessary spare parts. To order, please send a copy of the part drawing with the marked components to your authorized dealer.
- Page 19 �alzslar Holzbearbeitungsmaschinen...
- Page 20 ------- 11"4 115116 117 137138 1 Jll 1• 11<12 143 14'1 1'5 141J 150151152153 l� 1158 1571S8 159 1 103...
- Page 21 �alzslar Holzbearbeitungsmaschinen RP21 �RP22 RP20 ..-,- _,,. RP 23 RP 24 _,.;;.- R P1 9 RP25 -,cP � RP18 RP 26 � ..(/ T i ;;.; : : _/ ..• 3� RP4/ · · ... �;1\ d-___ RP8 RP9 RP10 RP n RP12 (")
-
Page 22: Wiring Diagrams
13. Wiring Diagram Wiring Diagram for TKS 250 SC - 230V Wiring Diagram for TKS 250 SC - 400V... - Page 23 D-96103 Hallstadt hereby declares that the following product Holzstar® Woodworking Machines Product Category: Machine type: e typ Circular Table Saw TKS 250 SC - 230V Denomination of the Machine: TKS 250 SC - 400V Item number 5900256 5900255 Serial number:...
- Page 24 www.holzstar.de...
Need help?
Do you have a question about the TKS 250 SC and is the answer not in the manual?
Questions and answers