
Related Manuals for BlissLights TRIO


Summary of Contents for BlissLights TRIO
- Page 1 TRIO User’s Guide Manufactured by: BlissLights Phone: 1-888-868-4603 www.blisslights.com support@blisslights.com MADE IN USA Please ONLY use manufacturer provided power supply...
- Page 3 TABLE OF CONTENTS Notice ..........................1 Introduction ........................2 Before You Begin ......................2 Parts List ..........................2 Setting up the BlissLights Trio ................3 Operating the BlissLights Trio .................3 Operating the Timer ....................3 Operating the Remote Control ................3 Remote Control Functions ..................4 Precautionary Tips for the Remote Control............5 Precautionary Tips for Battery Installation ............5...
-
Page 4: Notice
As with all bright light-sources, when you operate this device in unsupervised general public areas, it is recommended that up-close access to the BlissLights be restricted or prevented. -
Page 5: Introduction
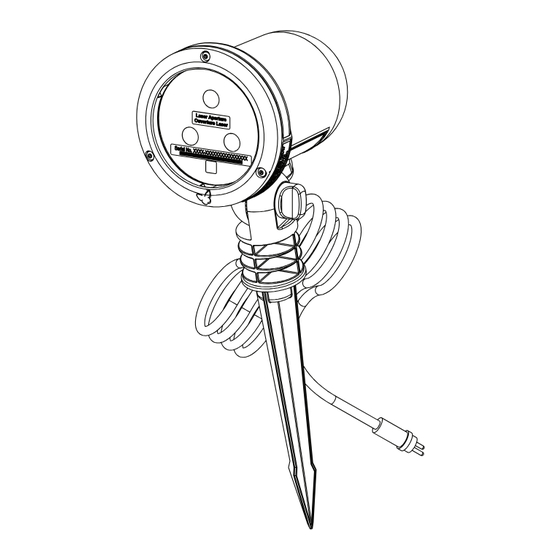
INTRODUCTION Thank you for purchasing the BlissLights Trio. The BlissLights Trio is a unique indoor/ outdoor light fixture that uses new laser and holographic technology to project thousands of pin-points of light. See the “fireflies” dance in your garden, create a fun and mesmerizing ambience indoors, or add some extra allure to your holiday display. -
Page 6: Setting Up The Blisslights Trio
SETTING UP THE BLISSLIGHTS TRIO Before operating your laser projector, please read the “Before you Begin” section and “Notice” section of this user guide. 1. Connect the light fixture to the provided UL/CUL power supply. 2. Connect the power supply into an available standard electrical outlet. -
Page 7: Remote Control Functions
REMOTE CONTROL FUNCTIONS • Power: Press to put the device in standby mode. Before entering standby mode, the device will save all current settings so that when the Power button is pressed again, the device will resume with the last mode before entering standby. This is the same behavior as unplugging the device. -
Page 8: Precautionary Tips For The Remote Control
• If you choose to mount the BlissLights for downlighting (e.g. from balcony railing, fence line, roof line, etc.), it is recommended that, for safety purposes, your lights are properly mounted using a suitable hanging clamp and safety cable. -
Page 9: Product Specifications
PRODUCT SPECIFICATIONS Dimensions 143 x 101 x 355 mm 5.6 x 4 x 14” Cord length: 6 m / 20’ Housing Metal Laser Classification Class 2M Laser Wavelength Red—660 nm, Green—515 nm, Blue—445 nm Maintenance Maintenance free Power Consumption 50-80 mW, continuous operation 24/7 Power Supply Input 110 V AC (with provided UL/CUL transformer) Light Input... -
Page 10: Troubleshooting
TROUBLESHOOTING How to avoid IR interference: If the lasers start and stop randomly, there is a wireless signal interference (i.e. radio control toys, remote controls for TV or entertainment systems, automatic vaccuums, etc.). To verify if this is the case, please try covering the window at the bottom of the front lens with your finger to block stray infrared signals from entering the fixture. -
Page 11: Limited Warranty
This warranty gives you specific legal rights and you may also have other rights which vary from state to state. Please contact BlissLights at support@blisslights.com, or (626) 709- 3319.
Need help?
Do you have a question about the TRIO and is the answer not in the manual?
Questions and answers