Table of Contents
Advertisement
Advertisement
Table of Contents

Related Manuals for Paula Deen KC2601

Summary of Contents for Paula Deen KC2601
- Page 1 1600W DIGITAL PRESSURE OVEN Instruction Manual & Recipes MODEL KC2601...
- Page 2 Meet Paula Deen Culinary icon Paula Deen is a self- made entrepreneur who learned her savory secrets from her grandmother. She started her career in the food industry with a small catering company called The Bag Lady, but business quickly outgrew her home kitchen.
- Page 3 Faster and healthier? It sounds like a dream, doesn’t it? With its polished finish, my Paula Deen Pressure Oven looks beautiful on my counter, so I never worry about stashin’ it away in a cupboard. I know you’ll love using your pressure oven just as much as I do.
- Page 4 WHAT’S INCLUDED INSTRUCTION MANUAL & RECIPES PRESSURE OVEN CRUMB TRAY ROASTING RACK BAKE PAN ROTISSERIE ROTISSERIE TOOL TRAY REMOVAL REMOVAL TOOL TOOL...
- Page 5 IMPORTANT SAFEGUARDS When using electrical appliances, basic safety precauFons should be followed as follows: • Read all the instrucBons. • Not intended for commercial use. • The exterior of the oven will become very hot during use. Do not touch hot surfaces. Use handles or knobs. • To protect against electric shock, do not immerse cord, plug, or any parts of the oven in water or other liquids. For cleaning instrucBons see page 16. • If the cord or plug become damaged, do not use machine. • Do not place oven near or on gas or electric burners or in a heated oven. • Do not place cord or oven by another hot surface as this may cause damage to the cord and oven. Do not let the cord hang over the edge of a table or counter. • When operaBng the oven, keep at least four inches of space on all sides of the oven to allow for adequate air circulaBon. • The unit must be in the locked posiBon for the unit to build pressure. • The unit will sBll operate if the door is opened, be sure to always cancel the cooking seVng before opening the door. • Unplug unit from outlet when not in use and before wiping the unit clean. Allow unit to cool before cleaning.
- Page 6 • Be extremely careful when handling pans, tray, racks, or grease from oven as they could be extremely hot. • Do not clean with metal scouring pads. Pieces can break off the pad and touch electrical parts, creaBng a risk of electric shock. • The risk of fire may occur if the oven is covered or near flammable materials (ex. Curtains, drapes, walls). Do not store any item on top of the unit when in operaBon. • Make sure that the oven vents and openings are not obstructed during use. • Make sure the oven has four inches of space around to avoid fire. • Do not place containers constructed of materials other than metal, glass, or ceramic in the oven. • Do not put paper, cardboard, or plasBc inside the oven. • Do not touch the glass window on the oven during use as this will be extremely hot. Also, do not place utensils or anything against the glass window. • Do not leave the oven una\ended during use in case of fire. • Do not let children operate oven. • Do not place eyes or face in close proximity with the tempered safety glass door, in the event that the safety glass breaks. • CauBon should always be used when opening the oven due to the steam as this could result in burns. • Use extreme cauBon when emptying trays and allow liquids to cool fully before handling.
- Page 7 • Always wear protecBve, insulated oven mi\s when inserBng or removing items from the hot oven. • This appliance has a tempered safety glass door. The glass is stronger than ordinary glass and more resistant to breakage. Tempered glass can break, but the pieces will not have sharp edges. Avoid scratching door surface or nicking edges. • Do not use appliance for anything other than its intended use. • To ensure conBnued protecBon against risk of electric shock connect to properly grounded outlets. Do not use an extension cord with unit. • SAVE THESE INSTRUCTIONS.
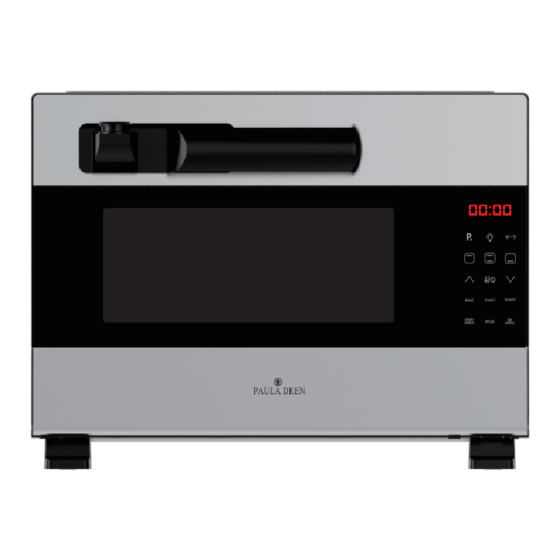
- Page 8 CONTROL PANEL Displays the time/temperature. Use the bake function for delicious cakes, muffins, breads and more. Use the toast function for breads, bagels, pizza, etc. To brown the top of your dish press the Broil button. Use roast when making fish or vegetables. To begin cooking press START/CANCEL.
- Page 9 BEFORE FIRST USE 1. Remove all packaging materials. Place the oven on a flat surface. 2. Clean pans, racks and accessories with hot water, dishwashing liquid, and a non-abrasive sponge. 3. Wipe the inside and outside of the appliance with a cloth. USING THE APPLIANCE Plug the unit in. Note: The screen will display “- - - -” and the power bu\on will blink. Place the crumb tray in the bo\om of the oven, depending on recipe place either the baking pan or roasBng rack in the oven in desired posiBon. If these items need to be removed during cooking, use the tray removal tool, this can also assist with liding the pan/rack when they become hot from cooking. To choose a funcBon on the oven, press the desired funcBon. Note: Default Bmes and temperatures of each funcBon can be found in the cooking chart located on page 16. The temperature must be adjusted first on each funcBon. To adjust the temperature press the Bme/ temp bu\on to show the temperature, then the up or down bu\on to increase or decrease the temperature.
- Page 10 Then Bme can be adjusted on the unit. To adjust the Bme press the Bme/temp bu\on on the screen to show the Bme and then the up or down bu\on to increase or decrease the Bme. Once the Bme and temperature have been selected, set the heaBng element posiBon. Ader the Bme, temperature and heaBng element have been confirmed, press the power bu\on again to start the oven. To put the unit under pressure press the pressure release bu\on, the unit will now be under pressure while cooking. NOTE: While the unit is under pressure, steam will escape from the unit and condensaBon can build up, use cauBon when opening the unit.The unit will beep when finished. HOW TO OPERATE THE OVEN AS A PRESSURE OVEN For the oven to build pressure close the door and move the handle to the locked posiBon (move handle to the very top posiBon) and press the Pa bu\on.
- Page 11 HOW TO SET THE DIY MENU Press DIY MENU, the screen will display “01”. This is the first DIY seVng. To customize “01”, go through the menu as explained in USING THE APPLIANCE. Once you have selected the Bme, temperature, funcBon, heaBng element posiBon, roBsserie then press START/CANCEL. This will save the funcBon and also start the oven. The seVngs chosen will now be shown as “01”. The unit can hold up to 10 DIY seVngs.
- Page 12 How to Prepare Your RoFsserie for Chicken Remove chicken from packaging. Make sure if previously frozen it is completely thawed. Check cavity and remove neck and giblets. Check at the tail and make sure the kidneys have been removed. The kidneys are the dark reddish colored objects located on back side of cavity near the tail. If they have not been removed, use your thumbs to force them out. The chicken should then be rinsed thoroughly inside and out with cold water. Pat dry inside and out with paper towels. The chicken needs to be placed on a spit so that it is centered and evenly balanced. It must also be held in place so it does not move around as it is cooking. Slide the spit rod through the neck opening of the chicken and out the bo\om end. Place the chicken so that it is in the center of the rod. Keep the rod running through the center of the chicken and a\ach the roBsserie spit forks into the breast end. Once in place secure the forks on the spit by Bghtening the wing nut. Then a\ach the spit forks at the tail end in the same manner. When the forks are a\ached, the rod should be centered through the chicken so that it is evenly balanced. It is important for the chicken to be balanced so that it rotates smoothly on the roBsserie unit. Make sure the forks are pushed in so that they are holding the chicken securely and that the wing nut on both forks has been Bghtened. Cut several lengths of kitchen twine. First loop a piece around the tail, securing it to the rod, unless the tail was secured by one of the tongs of the spit fork. Then cross the legs and wrap the twine up around the legs several Bmes. Tie the twine securely, making sure the opening to the cavity is closed so that the ingredients inside will not drop out as the chicken rotates on the roBsserie spit.
- Page 13 Wrap another piece of twine around the fa\y part of the legs a couple of Bmes and Be securely. Use another piece of twine to wrap around the breast area to hold the wings in close to the body of the chicken. Insert the pointed end of the spit in to the spit mount hole in the pressure oven, then rest the back of the spit on the stainless groove adjacent. Close the handle on the door, select roast funcBon, select the rolling fork bu\on, then select the pressure roast funcBon. Set the temperature to 465 degrees and set Bmer for 35 minutes for a 4-5- pound chicken. Always make sure the crumb tray is in place before pressing start. Once the cook Bme is complete, remove the roBsserie rod using the roBsserie removal tool by placing it under the roBsserie and liding up. How to Prepare Your RoFsserie for other Fowl and Roasts The meat needs to be placed on a spit so that it is centered and evenly balanced. It must also be held in place so it does not move around as it is cooking. Slide the spit rod through the middle of the protein and out the bo\om end. Place the protein so that it is in the center of the rod. Keep the rod running through the center of the protein and a\ach the roBsserie spit forks into the end. Once in place secure the forks on the spit by Bghtening the wing nut. Then a\ach the spit forks at the other end in the same manner. When the forks are a\ached, the rod should be centered through the protein so that it is evenly balanced. It is important for the protein to be balanced so that it rotates smoothly on the roBsserie unit.
- Page 14 Make sure the forks are pushed in so that they are holding the protein securely and that the wing nut on both forks has been Bghtened. Cut several lengths of kitchen twine. First loop a piece around the end, securing it to the rod, unless the it was secured by one of the tongs of the spit fork. Then wrap the twine up around the protein several Bmes. Tie the twine securely, making sure the opening to the cavity is closed so that the ingredients inside will not drop out as the protein rotates on the roBsserie spit. Insert the pointed end of the spit in to the spit mount hole in the pressure oven, then rest the back of the spit on the stainless groove adjacent. Close the handle on the door, select roast funcBon, select the rolling fork bu\on, then select the pressure roast funcBon. Set the temperature to desired temperature and Bme of protein. Always make sure the crumb tray is in place before pressing start. Once the cook Bme is complete, remove the roBsserie rod using the roBsserie removal tool by placing it under the roBsserie and liding up.
- Page 15 TIPS • When taking food out, please use cauBon as steam may escape. If the door is difficult to open the oven could sBll be under pressure and simply press the Pressure Release Bu\on again. The door should open with ease. • The Bme can be changed once the unit has started. The temperature and heaBng element can be changed throughout the cooking process. • To cancel the oven at any Bme, press the Start/Cancel bu\on again. • If the door needs to be opened at any Bme, release all pressure first. NOTE: When a\empBng to close the oven again make sure it is fully locked in place. If it is difficult to close the unit sBll has pressure. Open the door and let the steam subside, the door should be able to lock in place ader. • To fully stop the oven press Start/Cancel ader releasing the pressure.
- Page 16 CLEANING Clean ader every use. 1. Turn the oven off, unplug and allow to cool completely. 2. Wash pans and tools in hot water with dish liquid. Rinse and dry thoroughly. 3. Wipe the external surface of the oven with a sod damp cloth and dry surfaces with sod dry cloth. Do not use detergent or abrasives as these may scratch the coaBng. Note: Never immerse or place water inside the oven housing. STORAGE Unplug the cord. Make sure all parts are clean and dry. PAULA’S COOKING CHART FUNCTION DEFAULT TIME TIME RANGE DEFAULT TEMP. TEMP. RANGE BAKE 4O MINUTES 1 MIN- 1 HOUR 355°F 300°F- 430°F TOAST 5 MINUTES 1 MIN.- 12 MIN. 390°F 320°F- 465°F ROAST 45 MINUTES 1 MIN.- 2 HRS. 465°F 355°F- 465°F BROIL 20 MINUTES 1 MIN.- 90 MIN.
-
Page 17: Troubleshooting
TROUBLESHOOTING CODE CAUSE SOLUTION Open circuit issue. Unplug unit and call customer care at 312-526-3760. Short circuit issue. Unplug unit and plug back into the same plug. If the unit doesn't work, use a different plug on a different circuit. Unit has overheated. Unplug unit and let it cool for 10-30 minutes before plugging back in. Sensor connecFon failure. Unplug unit and call customer care at 312-526-3760. - Page 18 Paula Deen’ s Pressure Oven Recipes Orange Coffee Cake…19 Baked Potatoes…27 Macho Nachos…20 Perfectly Simple Broiled Salmon Goat Cheese and Roaster Red Salad for Two…28 Pepper Brusche\a…21 Old Fashioned Turkey Pa\y Blue Cheese and Bacon Broiled Melts…29 Tomatoes…22 Mini Southern Hot Browns…30 Paula Deen’s Pizza Dough Balsamic Glazed London Pizza…23 Broil…31 Basic Pizza Recipe for Pressure Roast Prime Rib of Beef with a Oven…24 Rich Pan Sauce…32 Squash Casserole…25 1 Hour Turkey…33 Aunt Peggy’s Sweet Potato Soufflé…26...
- Page 19 Orange Coffee Cake Serves 4-6 2 tablespoons bu\er, melted, plus more for the pan 1 (16 1/3-ounce) can refrigerated biscuits, (recommend flaky) ¼ cup walnuts, minced 1/3 cup granulated sugar 2 teaspoons orange zest ½ cup confecBoner’s sugar 2-ounce cream cheese, sodened 2 tablespoons orange juice, or more if necessary *Preheat pressure oven on bake funcBon, set to 350 degrees for 10 minutes. Bu\er a 9-inch round pan. Separate the biscuit dough into 8 biscuits. Place 1 biscuit in center of pan. Cut remaining biscuits in half, forming 14 half-circles. Arrange pieces around center biscuit with cut sides facing in the same direcBon. Brush melted bu\er over tops of biscuits. In a small bowl, combine walnuts, granulated sugar and orange zest. Mix well and sprinkle over biscuits. Place stainless rack in center posiBon in oven. Place pan on rack and close door. Select bake funcBon, set temperature to 350 degrees and set Bmer for 20 minutes, or unBl golden brown. Meanwhile, in a small bowl, combine confecBoner’s sugar, cream cheese, and orange juice. Blend unBl smooth adding more orange juice if needed to thin. Drizzle glaze over warm coffee cake and serve.
- Page 20 Macho Nachos Serves 4-6 1 16 oz can refried beans 1 large bag white corn torBlla chips 1 medium onion, chopped 1 cup chili (canned or homemade) 1 cup pepper jack cheese, shredded 1 cup cheddar cheese, shredded 1/2 cup sour cream 1 cup chopped green onion 1 tomato, diced 1 jalapeño, sliced *Preheat pressure oven on broil and set to 450 degrees for 10 minutes. In a small saucepan, on low heat, heat refried beans unBl they are loose enough to spoon onto nachos. Spray baking sheet with nonsBck spray, spread out torBlla chips and quickly put a teaspoon of hot refried beans on each chip. Working quickly, sprinkle with onions, jack cheese, and jalapeño slices. Spoon on chili and top with cheddar cheese. Repeat this layering process unBl ingredients are used up. Place baking sheet with nachos in center rack of pressure oven, set temperature to 350 degrees and Bmer for 10 minutes, or unBl cheese has melted. Remove from oven and place on a trivet or heatproof surface, Top nachos with sour cream, green onions, diced tomatoes and jalapeño slices. Serve hot.
- Page 21 Goat Cheese and Roasted Red Pepper Bruschetta Yields about 2 dozen ½ (8 ½-ounce) bague\e, cut into 1/4-inch thick slices 2 tablespoons extra-virgin olive oil 1 (4-ounce) log goat cheese, sodened ¼ teaspoon dried oregano ½ cup jarred roasted red peppers, cut into 1-inch strips 24 fresh basil leaves 2 tablespoons balsamic vinegar glaze *Preheat pressure oven on toast to 375 degrees. Line baking pan with aluminum foil. Brush both sides of bread slices with oil, and place half the slices on prepared pan. Place baking sheet on top rack in oven and toast on 375 degrees for 5 minutes, turn and toast 5 minutes more. Repeat with the remaining toast.
- Page 22 Blue Cheese and Bacon Broiled Tomatoes Serves 4-6 1 sleeve round bu\ery crackers, crushed 1 (5-ounce) container blue cheese, crumbled ½-pound bacon, cooked and crumbled ¼ cup finely chopped green onions 1 sBck bu\er, melted 3 large tomatoes, cut in half crosswise ¼ teaspoon sea salt ¼ teaspoon freshly ground black pepper *Preheat pressure oven on broil, set temperature to 460 degrees and Bmer for 10 minutes. Line baking sheet with foil. In a small bowl, combine crackers, blue cheese, bacon and green onions. Add bu\er, sBrring to mix well. Place tomatoes, cut side up, on prepared baking sheet. Sprinkle tomato halves evenly with salt and pepper. Divide cracker mixture evenly among tomato halves. Slide baking sheet into rack posiBon, set pressure oven to broil, set temperature to 460 degrees and Bmer for 6 minutes, or unBl lightly browned.
- Page 23 Paula Deen’s Pizza Dough Recipe Yields 2 16-inch round pizzas or 2 square 5 cups all-purpose flour 2 packages acBve dry yeast 2 tablespoons sugar 2 tablespoons extra-virgin olive oil, divided 2 teaspoons sea salt 2 cups water, warmed In a standing mixer with a hook a\achment, place warm water, yeast, sugar and 1 tablespoon olive oil. Allow to sit unBl yeast begins to foam. Add flour and salt, and mix dough unBl it is smooth and pulls away from side of bowl. Drizzle half remaining olive oil over the top of dough, turn dough over in the bowl, cover, and allow it to rise to approximately twice its size, (about an hour). Punch dough down and pour out onto a lightly floured surface. Knead again. Place it back in bowl and drizzle with remaining olive oil. Turn dough over, cover and allow to rise a second Bme. Ader it has risen, punch it down again. It is now ready to roll out for your pizzas!
- Page 24 Basic Pizza Recipe for Pressure Oven 1 batch Paula Deen’s Pizza Dough, risen twice, then divided in half 1 cup crushed canned tomatoes 1 tablespoon olive oil ½ cup shredded mozzarella ¼ Parmigiano Reggianno cheese, grated ½ teaspoon dried oregano 1 fresh mozzarella ball, drained and sliced, (opBonal) *Preheat pressure oven on roast funcBon, set temperature to 450 degrees and set Bmer for 10 minutes. Rub half the olive oil onto baking pan using your hands. Stretch the dough to cover pan. Spread half cup tomatoes over dough. Sprinkle with half of the mozzarella and half of the Parmigiano. Sprinkle with oregano and if using fresh mozzarella, place a few slices on top of pizza at least 2-inches apart. Place baking sheet in center rack of pressure oven. Close door and put handle into locked posiBon. On the roast funcBon set the temperature to 460 degrees and set Bmer for 10 minutes. When cook Bme is complete cheese should be bubbly and crust browned beauBfully.
- Page 25 Squash Casserole Serves 4-6 1 tablespoon vegetable oil 6 medium yellow squash, thinly sliced 1 large Vidalia onion, thinly sliced 1 tablespoon bu\er ½ cup Parmesan cheese, grated 1 cup sharp cheddar cheese, shredded ½ cup sour cream 1 sleeve bu\ery crackers, crushed medium to fine *Preheat pressure oven on bake funcBon to 350 degrees and set Bmer for 10 minutes. Grease a 2-quart casserole dish. Heat oil in a large skillet over medium heat. Saute squash, onion, and bu\er unBl sod. Transfer to a bowl and sBr in Parmesan cheese, cheddar and sour cream. Add salt and pepper to taste. Place squash mixture into prepared dish and sprinkle cracker crumbs evenly over the top. Place stainless steel rack in center posiBon of pressure oven and slide in casserole. Select the Bake funcBon for 20 minutes at 350 degrees, or unBl top is golden brown and bubbly.
- Page 26 Aunt Peggy’s Sweet Potato Soufflé Serves 2-4 3 cups cooked, mashed sweet potatoes, (2-3 small baked potatoes) 1 cup granulated sugar 3 eggs, beaten ½ cup milk 12 tablespoons unsalted bu\er, divided 1 tablespoon vanilla extract ½ teaspoon salt 1 cup light brown sugar, packed ½ cup self-rising cake flour ½ cup pecans, chopped *Preheat pressure oven to 400 degrees for 15 minutes. Soufflé: Lightly grease an 8-inch square baking dish. In a large bowl, combine sweet potatoes, sugar, eggs, milk, 8 tablespoons melted bu\er, vanilla and salt. Pour mixture into prepared baking dish. Topping: Combine brown sugar, 4 tablespoons bu\er cubed, at room temperature, flour and pecans in a separate bowl. Crumble topping over sweet potato mixture evenly. Place stainless rack in center posiBon in pressure oven and place casserole on rack. Set oven on bake, temperature to 350 degrees and Bmer for 20 minutes. Bake for 20 to 25 minutes, unBl topping is golden brown. Serve hot.
-
Page 27: Baked Potatoes
Baked Potatoes Serves 3 3 medium russet potatoes 2 tablespoons extra-virgin olive oil 1 tablespoon kosher sea salt *Preheat pressure oven on bake set to 400 degrees for 10 minutes. Scrub potatoes, dry with paper towels and rub with oil. Pierce potatoes 4 Bmes on top and bo\om with the Bp of a knife, at least 1 inch apart. Rub sea salt all over potatoes and place on center rack of pressure oven. Close door and set into lock posiBon. Select roast funcBon, press temperature/Bme funcBon, set temperature to 350 degrees and Bmer for 45 minutes; lock handle and press start. When cook, Bme is complete, place handle in exhaust posiBon and when pressure has fully released, you can gently press down on handle to open oven door. Internal temperature of potatoes should be 210°F. Serve with your favorite toppings. - Page 28 Perfectly Simple Broiled Salmon Salad for Two Serves 2 2 (6-ounce) salmon fillets, ½-inch thick, skinned 2 tablespoons extra-virgin olive oil, divided 1 teaspoon kosher sea salt, divided ½ teaspoon fresh ground pepper, divided 4 big handfuls baby arugula, (or spinach) 1 cup cherry tomatoes, sliced in half ¼ cup slivered almonds ¼ cup feta cheese, crumbled Juice of ½ lemon *Preheat oven on broil to 400°F for 5 minutes. Place baking pan on top rack of pressure oven and close door. Rub salmon with 1 tablespoon oil and season on both sides with ½ salt and pepper. Place salmon on baking pan. Broil for 8 to 10 minutes on 450 degrees, unBl browned and cook through. While salmon is broiling, add greens to a large bowl along with cherry tomatoes, almonds and feta cheese. Drizzle with lemon juice, remaining oil, salt and pepper. Toss all together and divide salad among 2 large plates. When salmon is cooked to desired doneness, top each salad with a fillet and dig in!
- Page 29 Old-Fashioned Turkey Patty Melts Serves 5 2-pounds ground turkey 2 tablespoons steak sauce 1 teaspoons dried thyme 1 teaspoon salt ¼ teaspoons freshly ground pepper 2 tablespoons bu\er, plus more for spreading 1 (8-ounce) package baby Portobello mushrooms, sliced 1 large onion, thinly sliced 5 slices whole grain bread, toasted Store-bought bacon jam, opBonal 5 slices provolone cheese *Preheat pressure oven to broil, set temperature to 450 degrees and Bmer for 10 minutes. In a large bowl, combine turkey, steak sauce, thyme, salt and pepper. Shape mixture into 5 paVes. Cook paVes, in batches if necessary, in a skillet over medium heat unBl cooked through, about 6 minutes per side. In a large skillet, melt 2 tablespoons bu\er over medium heat. Add mushrooms and onion and cook unBl onion is tender. 8-10 minutes, sBrring frequently. Remove mixture from skillet; set aside to keep warm. Bu\er bread on both sides and place on rack in top posiBon in the pressure oven and toast for 3 minutes on both sides unBl toasted. Remove and top with bacon jam if desired. Place toasted bread on baking pan and top each with 1 pa\y. Divide onion mixture among paVes and top with 1 slice of cheese. Place baking pan into pressure oven in the center posiBon, set to broil set temperature to 460 degrees set Bmer for 5 minutes or unBl cheese is melted.
- Page 30 Mini Southern Hot Browns Serves 10 1/3 cup bu\er ¼ cup all-purpose flour 2 cups milk ½ cup shredded Swiss cheese ¼ teaspoon sea salt ¼ teaspoon freshly ground black pepper 5 frozen bu\ermilk biscuits, baked per package direcBons and halved horizontally 2 tablespoons bu\er, melted ½-pound thinly sliced deli turkey 2 plum tomatoes, thinly sliced 1 (12-ounce) package bacon, chopped, cooked and drained ¼ cup shredded Parmesan cheese *Preheat pressure oven on toast for 10 minutes at 450 degrees. In a medium saucepan, melt bu\er over medium heat. Whisk in flour, cook, whisking constantly for 2 minutes. Whisk in milk, cook, whisking frequently for 8-10 minutes or unBl mixture is thick and bubbly. Whisk in Swiss cheese, salt and pepper unBl melted. Line the baking pan with parchment paper, place 5 biscuit half cut-side up, and brush with melted bu\er. Toast in pressure oven on 450 degrees for 3-4 minutes or unBl lightly browned. Repeat with the remaining biscuit halves. Top each biscuit half with turkey, tomato, bacon, and cheese sauce, sprinkle with Parmesan. Toast on 450 degrees for 4-5 minutes or unBl golden brown. Serve immediately.
- Page 31 Balsamic Glazed London Broil Serves 6-8 3-pound London broil ½ teaspoon kosher sea salt ½ teaspoon freshly ground black pepper 1/3 cup balsamic vinegar 1 tablespoon brown sugar, packed 1 clove garlic, smashed and peeled 1 bay leaf *Preheat pressure oven on broil, set temperature to 450 degrees and Bmer for 20 minutes. Line baking sheet with foil. Season meat with the salt and pepper. In a large skillet, over low heat, combine vinegar, brown sugar, garlic and bay leaf. Simmer unBl liquid has reduced by half and is a syrupy consistency, about 5 minutes. Discard garlic and bay leaf. Put meat on baking sheet and slather it with glaze. Place baking sheet on top shelf of pressure oven. Close oven door and lock handle. Cook for 5 minutes at 450 degrees, exhaust handle and flip steak. Lock handle and cook for an addiBonal 5 minutes for medium rare, or cook unBl steak reaches a desired level of doneness. Remove baking sheet from pressure oven and place meat on a cuVng board and let rest for 5 minutes. Slice meat against the grain and transfer to a serving pla\er.
- Page 32 Roast Prime Rib of Beef with a Rich Pan Sauce Serves 6-8 5-pound prime rib roast bone in 2 tablespoons Paula Deen House Seasoning 2 cups beef stock, or canned broth sprig thyme, or ½ teaspoon dried thyme 2 tablespoons Steak sauce) ½ teaspoons kosher sea salt ½ teaspoons freshly ground black pepper * Preheat pressure oven to roast, set temperature to 450 degrees and Bmer for 10 minutes. Rub meat with Paula Deen House Seasoning, wrap with plasBc and refrigerate overnight. Remove roast from refrigerator and let sit for 30 minutes, to an hour, at room temperature. Place roast, fat-side up in baking pan so that ribs act as a rack. Place pan in pressure oven, set to roast, set temperature to 350 and Bmer for 2 hours place handle in lock posiBon, check that internal temperature reaches your desired doneness using a thermometer 120 degrees for medium rare before resBng.
- Page 33 1 Hour Turkey Serves 4-6 10 Pound Turkey, thawed if frozen, washed and pa\ed dry 1 1/2 teaspoons kosher sea salt 1/2 teaspoon black pepper, plus 1/8 teaspoon 1 onion, quartered 1 head garlic, halved crosswise 2 teaspoons chopped thyme, plus several sprigs of fresh herbs, such as thyme parsley, rosemary and sage 2 bay leaves 1/2 cup unsalted bu\er, melted 1 (14 1/2 ounce) can chicken broth 1/4 cup cornstarch 1/3 cup water * Preheat pressure oven to roast, set temperature to 400 degrees and Bmer for 10 minutes. Sprinkle 1/2 teaspoon salt and 1/4 teaspoon pepper inside turkey cavity. Place onion, garlic, herb sprigs and bay leaves inside cavity. Place turkey breast- side up on baking pan. Brush turkey with half the bu\er, sprinkle with 1/4 teaspoon pepper and remaining salt. Truss, if desired.
- Page 34 RECIPE NOTES _____________________________ _____________________________ _____________________________ _____________________________ _____________________________ _____________________________ _____________________________ _____________________________ _____________________________ _____________________________ _____________________________ _____________________________ _____________________________ _____________________________ _____________________________ _____________________________...
- Page 35 RECIPE NOTES _____________________________ _____________________________ _____________________________ _____________________________ _____________________________ _____________________________ _____________________________ _____________________________ _____________________________ _____________________________ _____________________________ _____________________________ _____________________________ _____________________________ _____________________________ _____________________________...
- Page 36 This warranty covers the original retail purchaser or gid recipient. During the applicable warranty period within normal household use, we will repair or replace, at our discreBon, any mechanical or electrical part which proves defecBve, or replace unit with a comparable model. Shipping and handling costs are not included for warranty replacements and are the responsibility of the customer. To obtain service under the terms of this warranty, call our customer care department at 312-526-3760 (Monday- Friday 10:00AM-6:00PM CST), or send an email to customercare@alliedrich.net. Please provide the model number listed on the bo\om of this page when contacBng us. THIS LIMITED WARRANTY COVERS UNITS PURCHASED AND USED WITHIN THE UNITED STATES AND DOES NOT COVER: • Damages from improper installaBon. • Damages in transit. • Defects other than manufacturing defects. • Damages from misuse, abuse, accident, alteraBon, lack of proper care and maintenance, or incorrect current or voltage. • Damage from service by other than authorized dealer or service center. • Shipping and handling costs. • This warranty gives you special legal rights and you may also have other rights to which you are enBtled which may vary from state to state. Manufacturer does not assume responsibility for loss or damage for return shipment. We recommend that you keep your original packaging should you require repair service. Before returning product please contact our customer care department for return authorizaBon. When returning product for repair please include your full name, return address, and dayBme phone number. Also include a brief descripBon of the problem you are experiencing and a copy of your sales receipt or other proof of purchase in order to validate warranty status. MODEL KC2601...
Need help?
Do you have a question about the KC2601 and is the answer not in the manual?
Questions and answers