Table of Contents
Advertisement
Advertisement
Chapters
Table of Contents

Related Manuals for Precor 100i


Summary of Contents for Precor 100i
- Page 1 Product Owner's Manual 100i Commercial Adaptive Motion Trainer...
-
Page 3: Important Safety Instructions
Important Safety Instructions When using Precor equipment, always take basic precautions, including the following: Read all instructions before using the equipment. These instructions are written to educate patrons and other users in the proper use of the equipment. Other sections in this manual provide more details of safety features. -
Page 4: Safety Approval
Proper disposal of the battery is required by federal law. If you plan to dispose of your equipment, contact Precor Commercial Products Customer Support for information regarding battery removal. Refer to Obtaining Service. -
Page 5: Radio Frequency Interference (Rfi)
WARNING Per FCC rules, changes or modifications not expressly approved by Precor could void the user’s authority to operate the equipment. Industry Canada This Class A digital apparatus complies with Canadian ICES-003. -
Page 6: Obtaining Service
You should not attempt to service the equipment except for maintenance tasks described in this manual. For information about product operation or service, see the Precor web site at www.precor.com. Should you need more information regarding customer support numbers or a list of Precor authorized service centers, visit the Precor web site at www.precor.com/corp/contact. -
Page 7: Table Of Contents
Setting a Pause Time Limit ...14 Setting a Cool-Down Time Limit ...14 Informational Displays ...15 User ID Entry with CSAFE Equipment...18 Maintenance...19 Daily Inspection ...19 Daily Cleaning...19 Moving the Equipment...19 Storing the Chest Strap ...20 Long-Term Storage ...20 Precor Commercial Equipment Limited Warranty...21... - Page 8 AMT Safety Features Before allowing users on Precor equipment, review the safety instructions found at the beginning of this manual. You should also teach your patrons how to safely use the equipment. Explain to your patrons that they should: Stand on the rear pedestal and grasp an arm or a stationary handlebar for stability when preparing to step on or off the equipment.
-
Page 9: Obtaining Service
Self-Powered Features On self-powered equipment, the battery initializes and displays the Precor banner when a user starts exercising. A minimum rate of motion must be maintained for the banner to appear, as shown in the following table. When a person meets the requirements, the power that is generated allows the equipment to function properly. -
Page 10: Symptoms Of A Low Battery
When the pause time limit expires and the user has not resumed exercising, the display returns to the Precor banner. Refer to Setting a Pause Time Limit. To learn how to install... -
Page 11: The Optional Power Adapter Kit
CAUTION: The internal cable kit must be installed by authorized service personnel. Do not attempt installation on your own as you could void the Precor Limited Warranty. For more information, refer to Obtaining Service. Once the internal cable kit is installed, you can plug the optional power adapter into the equipment. -
Page 12: Club Features
30-second shutdown procedure. The club programming mode is accessed by pressing the RESET key at the Precor banner. The remaining key presses must occur quickly and without pause. Note: Keys that can be used interchangeably in club programming mode are OK and ENTER. -
Page 13: Accessing Club Programming Mode And Changing The Settings
Precor equipment. To access the available menus and change the program settings, perform the following steps: 1. At the Precor banner, press the following keys in sequence without pausing between selections: RESET, 5, 6, 5, 1, 5, 6, 5 The club programming prompts appear sequentially and in a menu format. - Page 14 CLEAR key without saving any changes. RESET RESET key Exits Club Programming Mode and returns to the Precor banner. Note: The number keypad is disabled once you enter club programming mode. Product Owner's Manual: Club Features Use the following flowchart to navigate through the menu settings.
-
Page 15: Choosing A Language
Choosing a Language The equipment can display user prompts, text, and user entries in several different languages. When the equipment is shipped from the factory, it is set to display English. Note: Programming prompts are not affected by language selection. The prompts in this section continue to appear in English. -
Page 16: Setting A Pause Time Limit
1 and 120 seconds (two minutes). For example, if you set a pause time limit of 60 seconds, the display automatically resets to the Precor banner if no movement is detected and no key press occurs for one minute. -
Page 17: Informational Displays
The equipment provides information about its use (odometer and hour meter), as well as software versions and part numbers, serial number, usage log, and error log. In general, you would only access this information if directed to do so by Precor Customer Support. - Page 18 Product Owner's Manual: Club Features Description The odometer value correlates to the type of Precor product and the standard of units, U.S. or Metric, selected in the club programs. Treadmill shows the number of cumulative miles or kilometers logged to date.
-
Page 19: Error Log
You may want to resolve any issues you are experiencing with the equipment before erasing the error log. When you are ready, press RESET to return to the Precor banner. , scrolls off the display. When the key is... -
Page 20: User Id Entry With Csafe Equipment
User ID Entry with CSAFE Equipment The equipment is fully compatible with CSAFE protocols. When the equipment is connected to a CSAFE master device, the user is prompted to press ENTER and begin an identification process. The user ID is displayed as five zeros and indicates the starting point. -
Page 21: Maintenance
Place an OUT OF SERVICE sign on it and make sure all patrons and users know that they must not use the equipment. To order parts or to contact a Precor authorized service provider in your area, refer to Obtaining Service. Product Owner's Manual: Maintenance... -
Page 22: Storing The Chest Strap
Storing the Chest Strap If you purchased the optional heart rate chest strap, store it in a place where it remains free of dust and dirt (for example, in a closet or drawer). Be sure to protect the chest strap from extremes in temperature. -
Page 23: Precor Commercial Equipment Limited Warranty
To claim under this warranty, the buyer must notify Precor or your authorized Precor dealer within 30 days after the date of discovery of any nonconformity and make the affected product available for inspection by Precor or its service representative. - Page 24 SAME PARTS. PRECOR HEREBY DISCLAIMS AND EXCLUDES THOSE WARRANTIES THEREAFTER. Some States do not allow limitations on how long an implied warranty lasts, so the above limitation may not apply to you. PRECOR ALSO HEREBY DISCLAIMS AND EXCLUDES ALL OTHER OBLIGATIONS...
- Page 26 Please detach and mail in the warranty registration within ten days of purchase.
- Page 28 P.O. Box 7202 Any party contemplating the use of Precor’s product designs is hereby forewarned that Precor considers the unauthorized appropriation of its proprietary rights to be a very serious matter. Precor will vigorously pursue all Woodinville, WA USA 98072-4002 unauthorized appropriation of its proprietary rights.
- Page 29 User's Reference Manual 100i Commercial Adaptive Motion Trainer...
-
Page 31: Obtaining Service
Obtaining Service The fitness facility manager can help you with most questions regarding the equipment. For additional information about product operation or exercise routines, refer to the Precor web site at www.precor.com. - Page 32 Table of Contents Important Safety Instructions...1 Obtaining Service ... 1 AMT Features ...3 Adaptive Motion... 3 Moving Handlebars Support the Total Body Workout ... 3 Using the Stationary Handrails... 3 Self-Powered Features ... 4 Heart Rate Features ...5 Important Use and Safety Information ... 5 Wearing a Chest Strap...
-
Page 33: Amt Features
AMT Features The AMT is equipped with certain items that, when used properly, help sustain an enjoyable workout. These items include: Adaptive Motion™ Moving handlebars for a total body workout Using the Stationary Handrails Self-powered features Important: Before exercising, review the safety instructions found at the beginning of this manual. -
Page 34: Self-Powered Features
Meeting the minimum requirements for operation causes the Precor banner to appear. You can press QUICKSTART or select a program to begin exercising. For more information, refer to Workout Options. -
Page 35: Heart Rate Features
Heart Rate Features CALORIES HEART RATE SmartRate WARMUP FATBURN CARDIO PEAK HIGH ® Heart rate and SmartRate features are available when you wear the chest strap or grasp both touch-sensitive grips. When a heartbeat is detected, the HEART RATE display shows your heart rate and, if your age has been entered, the SmartRate LED blinks and indicates your target zone. - Page 36 Heart Rate Target Zones 20 25 30 35 40 45 50 55 60 65 70 75 Your Age Figure 1: Heart rate target zones The calculation used for the heart rate target zone is: (220 minus your age) multiplied by a percent. For example: Warmup range: (220 minus your age) multiplied by 55% Peak range: (220 minus your age) multiplied by 85%...
-
Page 37: Wearing A Chest Strap
Wearing a Chest Strap During a workout, the heart rate features appear on the display when you wear a chest strap. To receive an accurate reading, the chest strap needs to be in direct contact with your skin. 1. Carefully dampen the back of the strap with tap water Refer to the following figure. -
Page 38: Using The Touch-Sensitive Grips
Using the Touch-Sensitive Grips While exercising, you must grasp both touch-sensitive grips for a minimum of five to ten seconds to transmit your heart rate to the display. Refer to the following figure. Figure 5: Touch-sensitive grips Usually, the concentration of salts in a person’s perspiration provides enough conductivity to transmit a signal to the receiver inside the display console. - Page 39 WARMUP You do not enter your age during an exercise session. WARMUP For example, pressing QUICKSTART at the Precor banner FAT BURN causes the Manual Program to begin. Your age has not been FAT BURN entered and is considered a null value.
-
Page 40: Exercise To Your Target Heart Rate
(beats per minute) on the display, either wear a chest strap or grasp both touch-sensitive grips. The Precor web site (www.precor.com) has several suggestions for workouts with varying levels of intensity. It provides many workout details that include the appropriate target heart rate. -
Page 41: Troubleshooting Heart Rate
The following table may help you understand and troubleshoot erratic heart rate readings. Important: A heart rate can only be detected when the Precor heart rate receiver is properly installed in the display. A user must wear the chest strap or grasp both touch-sensitive grips. -
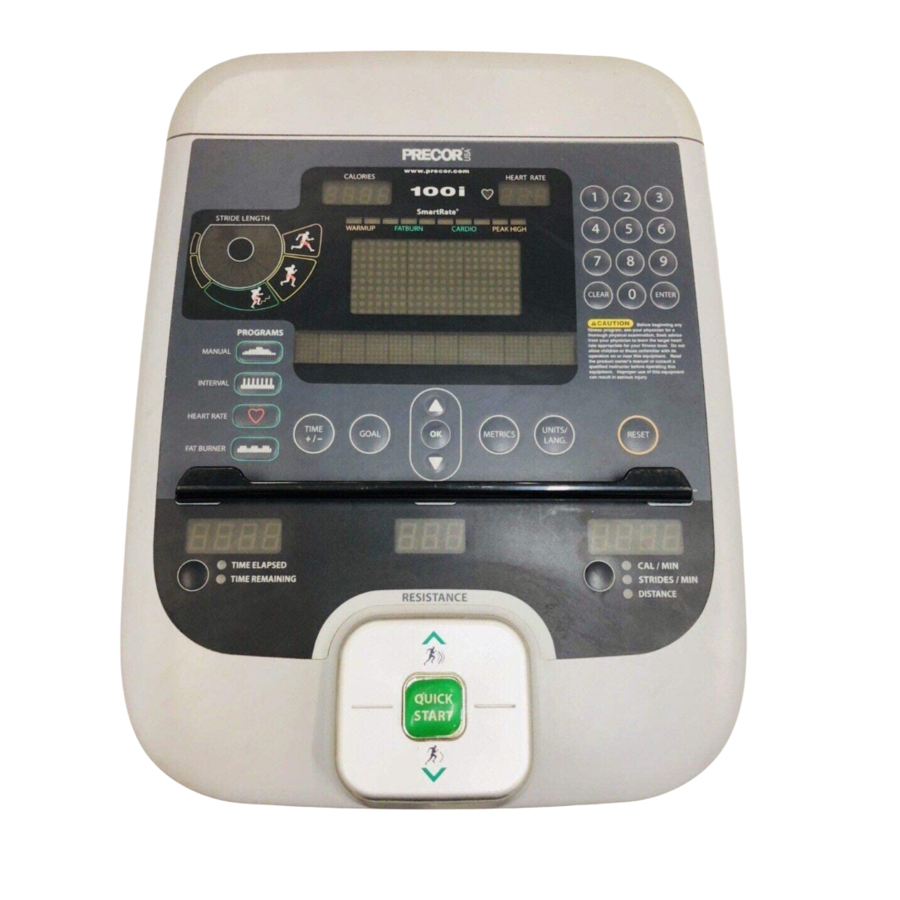
Page 42: Display Console
User's Reference Manual: Display Console CALORIES HEART RATE SmartRate STRIDE LENGTH WARMUP FATBURN CARDIO PEAK HIGH PROGRAMS MANUAL INTERVAL HEART RATE METRICS FAT BURNER RESISTANCE QUICK START UNITS/ RESET LANG. 2007 Precor Incorporated, en CAL / MIN STRIDES / MIN... - Page 43 CALORIES display: The estimated cumulative number of calories being burned appears. Upper display: Initially shows the Precor banner. It changes to the program profile when you select a program or press QUICKSTART. A blinking column in the profile indicates your position.
-
Page 44: More Information About The Upper Display
More Information about the Upper Display CALORIES SmartRate STRIDE LENGTH WARMUP FATBURN CARDIO The upper display includes the CALORIES, HEART RATE, SmartRate, and a program profile display. The following descriptions explain what appears in the displays. CALORIES—indicates the estimated cumulative number of calories being burned. -
Page 45: Stride Length Display
Stride Length Display STRIDE LENGTH The STRIDE LENGTH display presents a visual representation of the length of your stride. The lighted pendulum swings to the right as you stride forward with your right leg and swings to the left as your left leg moves forward. -
Page 46: More Information About The Lower Display
More Information about the Lower Display RESISTANCE The lower display provides information about your workout session. Pressing the keys beneath each window affects what appears in the displays. Each display provides information about your workout statistics and is described in the list below. Note: If you choose to rest a book or magazine on the display, you can still view these workout statistics. -
Page 47: Keypads
CALORIES/MIN, STRIDES/MIN, and DISTANCE CAL/MIN—displays the approximate number of calories burned per minute. STRIDES/MIN—displays the number of strides you complete in a minute up to a maximum value of 510 strides per minute. A stride is an exaggerated walking movement. If you start in a position with one foot plate forward, a stride is completed when you move the rear foot plate all the way forward while the other foot plate moves to the rear. - Page 48 Left selection key: Every time you press this key, the display reflects either the amount of time elapsed since you began your exercise session or it shows the time remaining. An LED lights and indicates which information is being displayed. RESISTANCE: Press and hold a RESISTANCE key to increase or decrease the force applied against your stride from 1 to 20.
- Page 49 An exception to this rule exists if you have entered the 30-second shutdown period. When you press RESET, the display returns to the Precor banner. Refer to Pausing During a Workout or the Cool-Down Period or Self-Powered Features.
-
Page 50: Number Keypad
Number Keypad CLEAR ENTER The number keypad has several functions depending on what is connected to the equipment. Connection Description Computer If a computer is attached to the CSAFE (CSAFE connection on the equipment, the number keypad compatible) lets you enter your user ID and answer other setup prompts. -
Page 51: Workout Options
Workout Options CAUTION: Before beginning any fitness program, see your physician for a complete physical examination. Know your physician-recommended heart rate target zone. Stand on the rear pedestal and face the display. Place one foot in the lower foot plate and grasp an arm or a stationary handlebar for stability while you step into the other foot plate. -
Page 52: Choosing Quickstart
Choosing QUICKSTART QUICK START 1. While the Precor banner scrolls, press QUICKSTART to begin the Manual Program. QUICKSTART applies the following defaults: Prompts Default Value Program Manual Time Fitness Facility setting Weight 150 lb (68 kg) Use the RESISTANCE keys to change the resistance. -
Page 53: Selecting A Program
Note: To change a value (program, time, weight, or age) that you have already entered, press RESET to return to the Precor banner. Select a program and re-enter the appropriate values. Maintain a comfortable and consistent stride rate while... -
Page 54: Storing Workout Statistics
Note: If the display is blank, you will need to maintain the minimum rate of motion to supply power. If the Precor banner appears, the equipment is not connected to a computer. Refer to Selecting a Program or Choosing QUICKSTART. -
Page 55: Setting Display Preferences Before Exercising
Setting Display Preferences Before Exercising While the Precor banner scrolls, you have the opportunity to set units of measure and language display preferences. Once you set your display preferences, you have a 5-second window to select a program. If you do not select a program from... -
Page 56: Cooling Down After A Workout
Cooling Down After a Workout Incorporate a cool-down period into your workout to help lower your heart rate and minimize muscle stiffness or soreness. When you complete a program with a time limit or specified goal, you automatically enter a cool-down period. The settings change to help reduce the intensity of your workout. -
Page 57: Ending A Workout
When you complete the cool-down period, the workout summary appears. When you are ready, press RESET to return to the Precor banner. If you hold on to the touch-sensitive grips or wear a chest strap while exercising, a heart rate analysis appears during the workout summary. -
Page 58: Programs
User's Reference Manual: Programs Program Tips Begin at the Precor banner and choose a program by pressing a PROGRAMS key or QUICKSTART. Refer to Workout Options. While exercising, you need to sustain your exercise motion. -
Page 59: Manual Program
Manual Program The Manual Program profile, available by pressing the MANUAL key, begins as a flat line. You control resistance settings using the RESISTANCE keys. The program profile reflects any changes. The blinking column indicates your position in the program. A cool-down period occurs automatically when you end your workout. -
Page 60: Heart Rate Program
HRC Program. These tips provide general information regarding how the program functions. For more information and exercise suggestions, refer to the Precor web site at www.precor.com. Important: Maintain a rate of motion above the minimum requirements. Refer to Self-Powered Features. Automatic adjustments to the resistance cannot take place if you drop below the minimum requirements for operation. -
Page 61: Fat Burner Program
The workout time is set to the fitness facility limit. To adjust the time, press the TIME +/- key and use the navigational arrow keys followed by OK to change the workout time. If you wish to quit the Basic HRC Program, you can make a mid-session transfer to another program, but you cannot return or transfer mid-session to the Basic HRC Program. -
Page 62: Exercise Session
Any display selections set during the course of your exercise session are reset to the fitness facility settings when you end your session and return to the Precor banner. While exercising, you can: change the program you are using... -
Page 63: Changing The Workout Time
Changing the Workout Time To change the duration of your program, take the following steps: Press TIME +/-. A workout time blinks in the display. Use the navigational arrow keys or the number keys to adjust the time. Press OK. A message scrolls across the display indicating that the new workout time has been accepted. -
Page 64: Changing Your Workout Display Options
Changing Your Workout Display Options During an exercise session, the display becomes a message bar. It can show additional workout statistics depending on user selections accessed through the METRICS menu. To display more workout statistics or choose one among them, take the following steps: Press METRICS. - Page 65 Table 4. Workout statistics using OPTIONS or METRICS key Equipment Menu % C O M P L E T E T I M E I N Z O N E S E G M E N T T I M E R E M A I N I N G A V E R A G E S P E E D AMT, climber...
-
Page 66: Changing The Units Of Measure
L A N G U A G E Note: When you press the UNITS/LANG. key a third time, you exit the menu and return to the Precor banner. The center display appears blank. To reenter the menu, press UNITS/LANG. again. - Page 68 Precor’s product designs is hereby forewarned that Precor considers the unauthorized P.O. Box 7202 appropriation of its proprietary rights to be a very serious matter. Precor will vigorously pursue all unauthorized Woodinville, WA USA 98072-4002 appropriation of its proprietary rights.
- Page 69 Assembly Guide 100i Commercial Adaptive Motion Trainer...
-
Page 71: Installation Requirements
Product Owner’s Manual. If any items are missing, contact your dealer. Should you need more information regarding customer support numbers or a list of Precor authorized service centers, visit the Precor web site at www.precor.com/corp/contact. Unpacking the Equipment Ask for help from two or more people to unpack and assemble the AMT. -
Page 72: Hardware Kit
Hardware Kit Fasteners (A) Locknut ( (B) Hex head screw (1¾-inch) (C) Flat washer ( 100i Commercial AMT Assembly Guide 2 — Plastic boot (D) Qty. -inch) -inch) 2 — End caps (E) -
Page 73: Assembly Steps
Move the AMT to the location where you plan to use it. Insert the end caps (E) into the front frame tube. Align the end caps and, if necessary, use a rubber mallet to secure them in place. 100i Commercial AMT Assembly Guide... - Page 74 Lower board cable Heart rate cable 100i Commercial AMT Assembly Guide Important: Temporarily cover the pivot arm holes on the front covers with packing material so fasteners or tools do not inadvertently fall inside. Use a Phillips-head screwdriver to remove the four screws that secure the back console plate to the display console.
- Page 75 Note: When the handlebars are mounted correctly, each bends slightly outward. Cover the fasteners with a plastic boot. Rotate the plastic boot so its tab aligns with the cutout. Apply downward pressure to secure the plastic boots in place. 100i Commercial AMT Assembly Guide...
- Page 76 3. When you are finished adjusting the AMT, ask your assistant to gently lower the unit to the floor. 100i Commercial AMT Assembly Guide Install the rear pedestal over the rear crosspiece. Important: The rear pedestal lays flat on the floor. It provides a...
- Page 77 Note: If a number does not appear in the HEART RATE display, check the 4-prong heart rate cable to make sure it is properly connected. 100i Commercial AMT Assembly Guide Replace the back console plate onto the display console using the four screws removed in step 4.
- Page 78 Notes: 100i Commercial AMT Assembly Guide...
- Page 80 Precor Incorporated ©2008 Precor Incorporated 20031 142nd Avenue NE www.precor.com P.O. Box 7202 100i AG 49736-106, en Woodinville, WA USA 98072-4002 28 March 2008...
Need help?
Do you have a question about the 100i and is the answer not in the manual?
Questions and answers