Advertisement
Advertisement
Table of Contents

Summary of Contents for BURG-WACHTER TSE 4001
- Page 1 Elektronisches Türschloss HOME Montage- und Bedienungsanleitung Installation and User Manual BURG-WÄCHTER KG Instruction de montage et mode d’emploi Altenhofer Weg 15 58300 Wetter Montage- en gebruiksaanwijzing Germany BA/MA TSE Set 4001 dp/mri/dn 11/2011 www.burg-waechter.de...
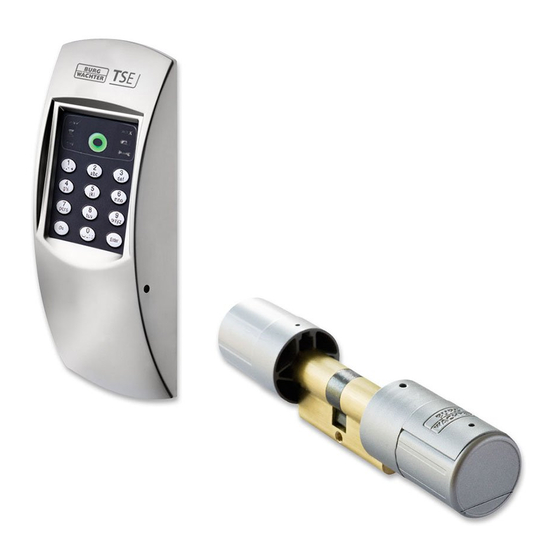
- Page 2 Blocking time When a wrong opening code is entered three times in succession, the The BURG-WÄCHTER TSE 4001 can be controlled by using a pin-code or a lock blocks the operation for one minute. After every further wrong code BURG-WÄCHTER TSE E-KEY – please find additional information in the User entry, the lock will be blocked for 3 minutes.
-
Page 3: Technical Data
Technical data 1. Commissioning The electronic cylinder operates using a 6-digit pincode. In option to that, When the TSE 4001 pincode is first put into operation, it is necessary to Blocking times After 3 x wrong pincode entry you can also use the TSE 5103 E-KEY. -
Page 4: Menu Functions
Menu functions As long as the programming mode is active, the icon „Prog“ is lit, 7 Resetting the radio channel other E-KEYS can be programmed without re-entering the code. – The radio channel can be reset here (12 channels to select from; factory Besides numbers, the keypad also includes letters. -
Page 5: Keypad Installation
Keypad installation Keypad battery replacement Installation instructions for TSE cylinder 1 Choose a place for fixing the keypad. Place the keypad within a maximum 1 Remove the cover by pressing its detent notches on both sides with The installation of the TSE cylinder is described below. distance of approx. - Page 6 Replacing the knob batteries (exterior) Remark 4 Shift the outer knob along the shaft until the required dimension is The basic size of the cylinder is 30 mm for each side. When delivered, attained. Please make sure that the distance between the rotary knob Attention: When replacing the batteries, make sure that no the cylinder is completely pushed together (smallest possible cylinder length).
Need help?
Do you have a question about the TSE 4001 and is the answer not in the manual?
Questions and answers