Advertisement
Table of Contents
Table of Contents
• Thank you for purchasing Panasonic product.
• This product is intended for household use only.
• Please read these instructions carefully and follow safety
precautions when using this product.
• Before using this product please give your special attention to
"Precautions" (Page 2).
• Please make sure the date and name of store of purchase on
the Warranty and keep it with this Operating Instructions.
請您特別留意
Operating Instructions
Model No.
2
4-5
6
7
8
9
9
10-11
back cover
遵循
Juicer/Blender
MJ-M176P / MJ-M171P
(Household Use)
Advertisement
Table of Contents

Summary of Contents for Panasonic MJ-M176P
- Page 1 How to Clean 10-11 Specifications back cover • Thank you for purchasing Panasonic product. • This product is intended for household use only. • Please read these instructions carefully and follow safety precautions when using this product. • Before using this product please give your special attention to “Precautions”...
- Page 2 Before using this appliance, make sure voltage and frequency indicated on the bottom surface are as per your local supply. To protect against risk of electrical shock do not put motor housing, supply cord or plug in water or other liquids. This appliance is not intended for use by persons (inclucing children) with reduced physical, sensory or mental capabilities, or lack of experience and knowledge, unless they have been given supervision or instruction concerning use of the appliance by a person responsible for their safety.
- Page 3 .ﭽﻨﺎﻨﭽﻪ ﻗﺴﻤﺖ ﭽﺭﺨﺎﻦ ﻳﺎ ﺪﺭﭘﻮﺵ ﻅﺭﻒ ﺁﺴﻳﺐ ﺪﻴﺪﻩ ﻳﺎ ﺗﺭک ﺧﻮﺭﺪﻩ، ﺍﺯ ﺪﺴﺘﮕﺎﻩ ﺍﺴﺗﻓﺎﺪﻩ ﻨﮑﻨﻳﺪ .ﻫﻨﮕﺎﻢ ﺭﻴﺧﺗﻥ ﻣﺎﻴﻊ ﺪﺍﻍ ﺩﺍﺨﻝ ﻣﺨﻠﻭﻂ ﻜﻦ ﺍﺤﺗﻳﺎﻁ ﮐﻨﻳﺪ، ﻣﻣﮑﻦ ﺍﺴﺖ ﺒﻪ ﺩﻠﻴﻝ ﺒﺨﺎﺭ ﺪﺍﺸﺗﻦ ﺒﻪ ﺒﻳﺭﻮﻦ ﭙﺎﺸﻳﺪﻩ ﺸﻮﺪ .ﺍﺤﺮﺺ ﻋﻠﻰ ﻋﺪﻢ ﺇﺗﻼﻒ ﺍﻟﺳﻠﻚ ﺃﻭ ﺍﻠﻘﺎﺒﺲ .ﻗﻢ...
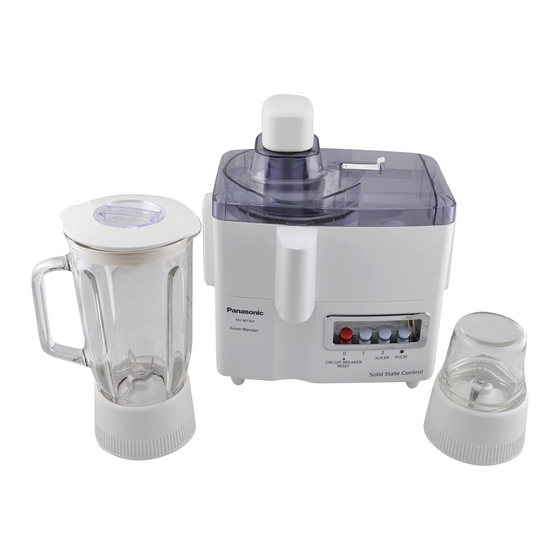
- Page 4 Please wash each part, before use the appliance first time. (P.10-11) Cleaning brush Opening for brush Food pusher Feeder opening Container cover Spinner Juicer container Spout cover Cover Cover unit Blender container Gasket Blender cutting blades Blender container base Motor housing Clamp Switch panel Cord...
- Page 5 NOTE: When containers are not clamped or locked properly, motor does nor operate. 備注 To assemble, follow instructions in reverse order. Release clamps. Lift up the juicer container. Remove container cover. Remove spinner. Remove spout cover. Spout cover cannot be taken off when container cover is on. CAUTION: Be sure to attach container to corresponding container base.
- Page 6 Wash and cut ingredients to fit in feeder opening. Make sure the clamps are locked in position. Place glass or bowl under spout. If juicer container is not clamped correctly, motor does not operate. Plug in. Press button “2”. Note: Button “1”...
- Page 7 Attach the container and container base first and place it on motor housing. Twist container clockwise to lock. Place ingredients in container. Cover. Plug in. Select one of two speed buttons as required. Use “PULSE” button for precision blending. When adding ingredients or seasonings, remove cap as shown left. Be sure to attach cap again.
- Page 8 Place ingredients in mill container, then attach mill container base. Place container on motor housing. Twist container clockwise to lock. Plug in. Support container then press button “2”. When grinding is completed, press button “0” (off). Be sure to support container until motor stops completely. Unplug.
- Page 9 When circuit breaker automatically stops motor due to overloading, press “0” button and follow directions below. Remove food residue in container. AND / OR Reduce ingredients to less than half. Resume operation. Cut ingredients smaller size and push them into If it still does not start, press “0”(Off) again, then resume.
- Page 10 CAUTION: • Before cleaning, unplug. • Cutting blades are sharp. Handle carefully when emptying the container and during cleaning. • Use cold water or lukewarm water. • Do not use cleansers, steel wool pads, or other 清潔劑 abrasive materials. • Do not use benzene, thinner, alcohol, etc.
- Page 11 Remove food residue from spinner Fill the bottle with water. Attach brush unit. Do not use the cleaning brush without water filled in the bottle. Place a glass or bowl under spout. Plug in. Press button “2”. Insert brush in cover opening, then move it back and forth while squirting water from the bottle.
- Page 12 Power supply 220 - 240 V ~ 50 - 60 Hz Power consumption 210 - 230 W Operation rating Container capacity Maximum 1,000 mL Dimensions (H x W x D) Weight Attachment 220 - 240 V ~ 50 - 60 Hz 210 - 230 W...
- Page 13 MEMO...
- Page 14 MEMO...
- Page 15 MEMO...
- Page 16 ﻻ ﺗﻘﻢ ﺑﺘﺸﻐﻴﻞ ﺍﻟﺠﻬﺎﺯﺇﺫﺍ ﻛﺎﻥ ﺍﻟﻘﺎﺑﺲ ﺃﻭ ﺍﻟﺴﻠﻚ ﻣﺘﻀﺮ ﺭ ًﺍ ﺃﻭﻋﻨﺪ ﺗﻌﻄﻞ ﺍﻟﺠﻬﺎﺯ ﺃﻭ ﺳﻘﻮﻁﻪ ﺃﻭ ﺗﻀﺮﺭﻩ ﺑﺄﻱ ﺷﻜﻞ ﺁﺧﺮ. ﺃﻋﺪ ﺍﻟﺠﻬﺎﺯ .ﺇﻟﻰ ﺃﻗﺮﺏ ﻣﺮﻛﺰ ﺧﺪﻣﺔ ﻣﻌﺘﻤﺪ ﻟﻔﺤﺼﻪ ﺃﻭ ﺇﺻﻼﺣﻪ ﺃﻭ ﺇﺟﺮﺍء ﺗﻌﺪﻳﻼﺕ ﻛﻬﺮﺑﺎﺋﻴﺔ ﺃﻭ ﻣﻴﻜﺎﻧﻴﻜﻴﺔ Website: http://www.panasonic.com JZ50Y1423 © Panasonic Corporation 2010 A0310-3027...


Need help?
Do you have a question about the MJ-M176P and is the answer not in the manual?
Questions and answers