Advertisement
Quick Links
Operating Instructions
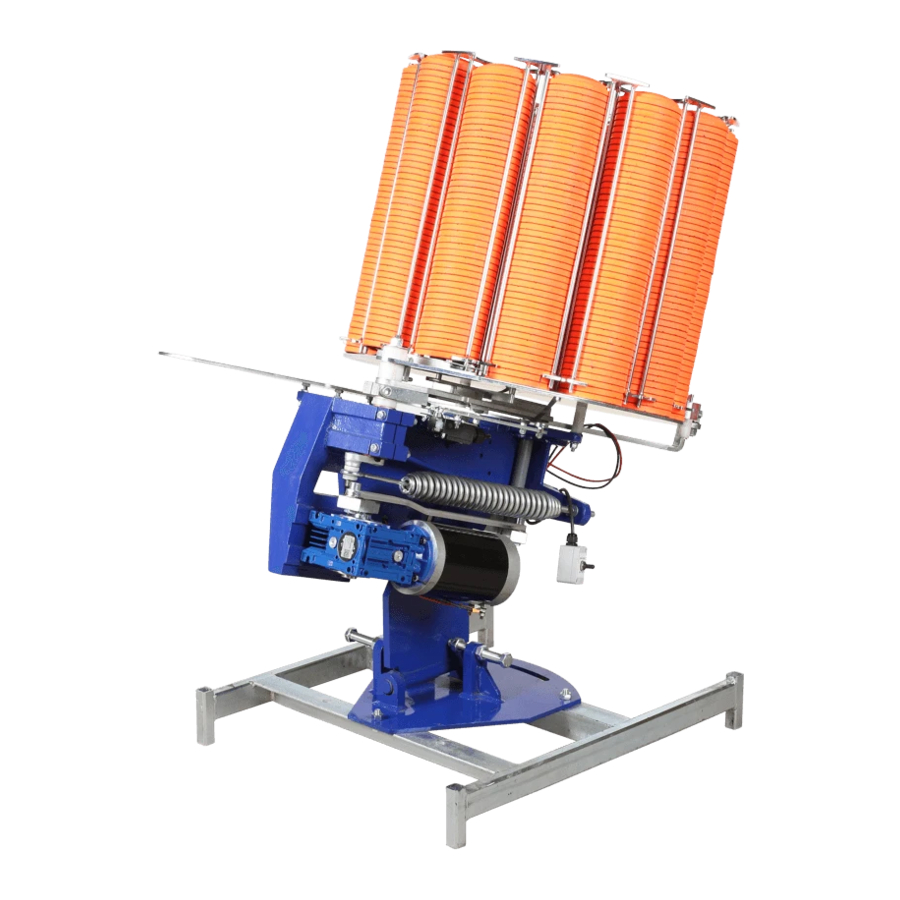
Hobby - Clay target launcher
WARNING
Clay target launchers can be dangerous and must be
treated with great care at all times to avoid accidents.
Never place any bodily part into the path of any me-
chanical piece whilst the machine is in motion or likely
to be so.
You must treat a clay target launcher with the same
caution that you would treat a loaded gun.
Assume at all times that a clay target launcher is
armed and loaded and treat it accordingly
Specifications:
Single column 55 target hopper.
Weight: 34.5kg / 76 lbs
Length: 490mm / 19 ¼"
Width: 420mm / 16 ½ "
Height: 940mm / 37" (On tilt base)
Power: 12vDC Rechargeable battery
This document must be read in full before attempting to operate the machine
Advertisement

Related Manuals for Promatic Hobby


Summary of Contents for Promatic Hobby
-
Page 1: Operating Instructions
Operating Instructions Hobby - Clay target launcher WARNING Clay target launchers can be dangerous and must be treated with great care at all times to avoid accidents. Never place any bodily part into the path of any me- chanical piece whilst the machine is in motion or likely to be so. - Page 2 Conventions used within this manual: Trap: Your Hobby - Clay target launcher—commonly known as a clay trap and may be referred to in this manual as “The trap” or “The machine” Warnings & Cautions: Warning: This section contains instructions which, if ignored or carried out incorrectly, may result in risk of personal injury.
- Page 3 Understanding your new trap: Throwing Arm Casting Plate Main Shaft Spring Adjustment Gearbox block Handwheel Spring Motor Hopper Plunger Hopper Mounting screws Elevation Adjustment Roller Switch Handwheel...
- Page 4 Connecting the battery: Ensure you are behind the machine, the ARM/DISARM switch is in the OFF position and it is otherwise safe to proceed. Connect the red cable to the Red (+) terminal and the black cable to the Black (-) Terminal. Ensure the terminal fasteners are tight, the battery is securely strapped to its tray and the charger has been removed.
- Page 5 Positioning the machine Clay Target Launchers must be situated on firm level ground in a position that will allow unrestricted access to rear of machine. There must be no obstructions to the path of the throwing arm. Ensure that the power supply can be easily disconnected and cables cannot become tangled in any part of the mechanism.
- Page 6 Safe Mode Procedure - Warning: Stand at rear of machine only 1. Disarm the machine by flicking the ARM/DISARM switch upwards towards the DISARM position and immediately releasing (long enough for the trap to fire, but not giving the machine a chance to rearm). The Gearbox block (A rectangular block attached to the gearbox shaft) should stop in a position pointing towards the front of the machine.
- Page 7 ALWAYS disarm the machine before carrying out loading, adjustment or maintenance. Adjustment: Elevation Setting Elevation angle Trajectory of clays are from approximately 26 - 50 degrees. Loosen handwheel nut as shown, tilt to desired angle, re-tighten handwheel . Be aware that if machine is already tilted upwards, when the hand- wheel is subsequently undone the machine will jolt forward.
- Page 8 ALWAYS disarm the machine before carrying out loading, adjustment or maintenance. Adjustment: Spring Tension Spring adjustment is always easier if the spring attachment point is at its rearmost position, this relieves the spring of a large proportion of it’s tension making adjust- ment much easier as well as reducing wear on the spring adjustment mechanism.
- Page 9 WARNING BEFORE ADJUSTMENT (Arm timing) Part of this procedure requires you to work very close to the trap - before proceeding be sure you understand and have practised the procedure for putting the trap into safe mode (this can be found on page 6 of this manu- al) and fully understand when the trap is safe and when it is not.
- Page 10 Spare Parts List: For parts not listed please call Promatic or you local dealer or visit www.promaticpartsusa.com THROWING ARM PLASTIC KNOB CASTING PLATE HB/2010 D01V/100513 HB/3100 ROLLER LIMIT UPPER LEFT IRIS RIGHT IRIS SWITCH MAIN SHAFT BACKRAIL EL/3550 EL/3600 E11V/83850...
- Page 12 Tel: +44 (0) 151 327 2220 (General) +44 (0) 1407 860800 (Sales) Fax: +44 (0) 151 3277075 E-mail info@promatic.co.uk Website: www.promatic.co.uk Promatic Inc. 801 MID AMERICA DRIVE PLATTSBURG, MO 64477 Toll Free: 888.767.2529 Fax: 816.539.0257 E-mail: sales@promatic.biz Website: www.promatic.biz Hobby Version 1.4 July 2013...
Need help?
Do you have a question about the Hobby and is the answer not in the manual?
Questions and answers