
Related Manuals for Cygnus MR400


Summary of Contents for Cygnus MR400
-
Page 1: Table Of Contents
2.6 “HIRED” Mode – For charging for Time and/or Distance 2.7 “STOPPED” Mode – At the end of the journey 2.8 Flowchart of the MR400’s Basic Operations 2.9 Using the MR400 with a Receipt Printer 2.10 What Next? 2.11 Flowchart of the MR400’s Advanced Operations TARIFFS AND FEATURES WHICH ARE OPTIONAL 12 3.1 Tariffs... - Page 2 5.8.1 Totals System TOTALS AND CONDITIONAL ACCESS 6.1 Totals 6.2 Conditional Access 6.3 The Totals Systems 6.4 The Totals Information Stored by the MR400 6.5 Totals “Banks” 6.6 Reading the Totals 6.7 Displaying/Printing Journey Summary Information 6.8 Clearing the Totals 6.9 Totals Reorganisation...
-
Page 3: About This Manual
Cygnus MR400 Taximeter User Guide 1 About this Manual f MR400 should also have been provided with a record of its PIN Numbers. Please keep these for future reference. The Section headed “The MR400 Taximeter” shows you how to switch it on and use it in your taxi. -
Page 4: The Mr400 Taximeter
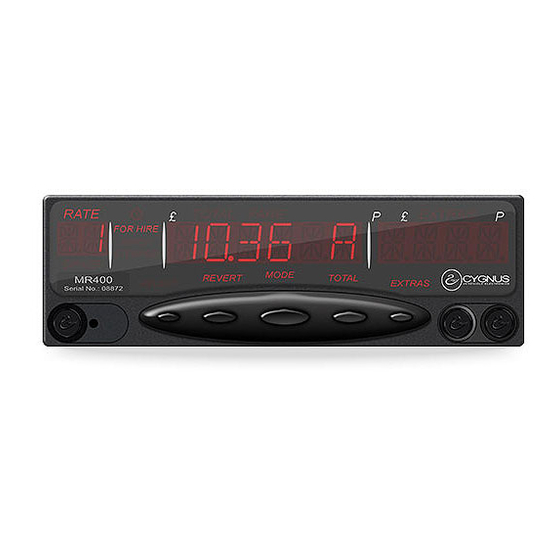
Cygnus MR400 Taximeter User Guide 2 The MR400 Taximeter “Rate Mode “Fare Window”. Window” Indicator. Shows the Fare “Extras Window” Used to show Here Showing being charged. Shows the Extras the rate being that the meter Also used for being charged. Also charged. -
Page 5: This Section
The MR400 has an internal “rechargeable battery” which maintains the internal clock when power is removed. The battery recharges in a few hours once power is restored. The MR400’s clock may need to be reset if power is removed for a continuous period of more than 4 weeks. -
Page 6: On" And "Off" Modes - When The Taxi Is Not For Hire
Cygnus MR400 Taximeter User Guide 2.4 “On” and “Off” Modes – When the taxi is not for hire When in “Off” mode, the meter’s display is blank. In “On” mode, there is a dot shown in the Rate Window. There may also be a clock display in the Fare Window. -
Page 7: For Hire" Mode - For When The Taxi Is For Hire
Figure 4: For Hire Mode f Your taxi’s “TAXI” roof sign is driven by the MR400. In FOR HIRE mode, it is normally turned ON. This depends, however, on how your meter has been programmed. -
Page 8: Hired" Mode - For Charging For Time And/Or Distance
“STOPPED” in Section 8.1) tariff. mode. Figure 5: HIRED Mode f Your taxi’s “hired” lamp is driven by the MR400. In HIRED mode, it is normally turned ON. This depends, however, on how your meter has been programmed. -
Page 9: Stopped" Mode - At The End Of The Journey
© 2014 Cygnus Automotive Limited 2.7 “STOPPED” Mode – At the end of the journey At the end of the journey, select “STOPPED” mode. The MR400 will now no longer increase the fare due to time. However, it may increase it due to distance travelled. -
Page 10: Flowchart Of The Mr400'S Basic Operations
Cygnus MR400 Taximeter User Guide 2.8 Flowchart of the MR400’s Basic Operations Figure 7: Flowchart of basic operations. -
Page 11: Using The Mr400 With A Receipt Printer
© 2014 Cygnus Automotive Limited 2.9 Using the MR400 with a Receipt Printer The MR400 supports the use of a printer to produce receipts and to create copies of the totals (see section 6 for more information on the MR400’s totals facility). -
Page 12: What Next
Cygnus MR400 Taximeter User Guide 2.10 What Next? This section has shown you the most important parts of operating the MR400, namely: • Switching it on. • Working out the fare for a journey. • Finding out the amount to charge the customer at the end of the journey. -
Page 13: Flowchart Of The Mr400'S Advanced Operations
© 2014 Cygnus Automotive Limited 2.11 Flowchart of the MR400’s Advanced Operations FOR HIRE or ON Mode Press Press “TOTAL” “EXTRAS” TIME OPTS Section 6 Section 5.4 Press Press “EXTRAS” “SELECT” “TOTAL” USER OPTS Select Next Set Display Next Section 5.9... -
Page 14: Tariffs And Features Which Are Optional
This is how the MR400 deals with this problem: 3.1 Tariffs In order to work correctly, the MR400 needs to be programmed with a Tariff. As well as containing the charges, times, distances etc, it also contains information such as: •... -
Page 15: Tariff Code Number
3.2 Tariff Code Number You will see later on that you can find out the tariff code number of the tariff in your MR400. When the information in the tariff is programmed, it is given a unique number. From your tariff code number we can find out how your meter has been programmed and deal with any queries you may have. -
Page 16: Pin Numbers
A record of these numbers is provided with your new MR400. The numbers are: 4.2.1 The “Disable” PIN This PIN allows you to control the use of your MR400 by only allowing it to work for a pre-set period of time before it is disabled. See section 5.4.3 for details. -
Page 17: The "Totals" Pin
MR400. 4.2.3 The Clock Set PIN This is used to set the clock of the MR400 if required, perhaps due to the internal battery going flat. The MR400 will prompt you if this is required. 4.3 The “User” PIN If you do not want to have to remember the factory set “Disable”... -
Page 18: Entering A Pin
1 to 5 from left to right. Figure 9: Entering a PIN Number If you do not press a button for 20 seconds, the MR400 times out and goes back to its previous state. 4.5 Setting a New PIN Whenever you need to set a new PIN Number, the MR400 always gets you to enter it twice to make sure that you have not made any typing errors. -
Page 19: The Mr400'S "Info" Menu
The “Info” menu gives you access to most of the options and features available to you, and in some cases allows you to get information out of the MR400. f Remember that the MR400 is controlled by the information programmed in the “tariff”, so some of the options may not be available on your unit. -
Page 20: Navigating The "Info" Menu
Cygnus MR400 Taximeter User Guide 5.2 Navigating the “Info” Menu Figure 7: Navigating the Info Menu The Info Menu is arranged in a tree structure: • To move to the next item at the same level, press EXTRAS. • To move up a level, press SELECT. -
Page 21: Driver Log On/Log Off
© 2014 Cygnus Automotive Limited 5.3 Driver Log On/Log Off f This option is not present for all “Totals Systems”. Where it is present, its exact behaviour depends on the options selected in the Tariff. If this item does not appear on your meter, then you do not need to log on and off to make it work. - Page 22 Press SELECT to log on. The next stage depends on the totals system you are using. Log On/Off System The MR400 prompts you for a PIN number. You can use any one of two PINs to log on: • The Totals PIN...
-
Page 23: Time Options
The sub-menu entries accessed from “Time Options” are: 5.4.1 Time This menu entry gives you the time of day according to the MR400’s internal clock. From here you can also set the clock display to 12 or 24 hour format, or... - Page 24 Cygnus MR400 Taximeter User Guide From this option you can make minor adjustments to the MR400’s internal clock. You can adjust the time forwards or backwards by up to 3 minutes, to allow for the accuracy of the clock. f The meter periodically resets this adjustment (about every 24 days), and allows you to make a further change of up to 3 minutes either way.
- Page 25 © 2014 Cygnus Automotive Limited In this case, the display is always in 24-hour format. Adjusting the Time • Press and hold down the “SELECT” button. • Use the “MODE” button to adjust the time backward by up to 3 minutes.
-
Page 26: Date
Cygnus MR400 Taximeter User Guide 5.4.2 Date This entry shows the date according to the MR400’s internal clock. The display is for information only. Figure16: Date Menu Entry Showing Tuesday 12th July 2011 f Important Note: The MR400 was put into manufacture in 1998. It therefore handles dates before year 2000. -
Page 27: Disable Feature
After that date it will not allow you to enter “HIRED” mode from “FOR HIRE” mode. This means that you can allow someone else to use your MR400 until a date of your choice. Beyond this date they will have to return the meter to you to get the Disable Feature turned off or another date entered into it. - Page 28 Points to note about the Disable Feature • If the Disable Feature is in use, and the Disable date is approaching, the MR400 may scroll a warning message across the display when you switch it to “FOR HIRE” mode from “Off” or “On”.
-
Page 29: User Options
© 2014 Cygnus Automotive Limited 5.5 User Options The “User Options” are a group of menu items, which allow you customise the way in which the MR400 operates. Press “SELECT” to enter the User Options sub-menu. Figure 19: User Options... -
Page 30: Display Brightness
Cygnus MR400 Taximeter User Guide 5.5.1 Display Brightness This Menu Option allows you to change the brightness of the MR400’s display. There are 6 settings, with “1” being the dimmest and “6” being the brightest. Press and hold Press “TOTAL” to “SELECT”... -
Page 31: Sounder Setting
© 2014 Cygnus Automotive Limited 5.5.2 Sounder Setting As you will have noticed, the MR400 makes various sounds when you press buttons, change modes etc. If you prefer your meter not to make these sounds, you can turn them off here. - Page 32 Cygnus MR400 Taximeter User Guide Press and hold down Press “EXTRAS” “SELECT” while to change between changing the setting. ON and OFF. Figure 22: Automatic Turn Off...
-
Page 33: User Pin
© 2014 Cygnus Automotive Limited 5.5.4 User PIN As you will have seen from Section 4.3, the MR400 has a series of PIN’s that are pre-set when the unit is first manufactured. However, it is possible to define your own PIN numbers for two of these: the Disable and Totals PIN Numbers. -
Page 34: The User Pin Submenus
Totals User PIN, use the meter’s Totals PIN. • Then enter the new User PIN when prompted. • The MR400 will then ask for the same number to be entered again for verification. If the same number is entered again, the MR400 will... -
Page 35: Comms Options
© 2014 Cygnus Automotive Limited 5.5.6 Comms Options This menu allows the serial communications interface options to be configured. Press “SELECT” to enter the Comms options. Figure 25: Comms Options... -
Page 36: Baud Rate
Cygnus MR400 Taximeter User Guide 5.5.7 Baud Rate This option allows the speed of the serial communication link to be selected. The most common setting is 9600. Press and hold “SELECT” while changing the baud rate setting. Press “EXTRAS” to change the setting between “9600”... -
Page 37: Parity
© 2014 Cygnus Automotive Limited 5.5.8 Parity This option allows the parity of the serial communication link to be selected. The available settings are None, Even, Odd and Space Press and Hold Press “EXTRAS” to “SELECT” to scroll through the... -
Page 38: Mdt Mode
Cygnus MR400 Taximeter User Guide 5.5.9 MDT Mode f This option may not be present on your version of MR400. Mobile Data Terminals (MDT) are often installed in taxis. They are used to receive information about jobs from a fleet control/booking centre. Many MDT types can interface to the Cygnus MR400 taximeter via the serial communications link. -
Page 39: Tariff And Software Information
Figure 29: Tariff and Software Information 5.6.1 Serial Number f This item tells you the Serial Number of your MR400. The number shown here should be the same as the one printed on the front panel of the unit. If this is not the case then you should contact Cygnus Automotive for advice. -
Page 40: Tariff Code
Cygnus MR400 Taximeter User Guide 5.6.2 Tariff Code In Section 3.1 we described the use of Tariffs to configure the MR400 for your particular area and application. This Menu Entry allows you to find out the code of your current tariff. -
Page 41: Contact Information
© 2014 Cygnus Automotive Limited 5.6.4 Contact Information f The Contact Information Menu item contains information programmed by a dealer. It is optional and therefore may not be present on your MR400. This entry contains a short piece of text, which was designed to contain information about how to get in touch with your local dealer. -
Page 42: Software Information Sub-Menu
• The Software Date of your MR400. This is the date your meter’s software was “built”. • The Load Date of your software. This is the date your MR400 was programmed with its software. • The Tariff Programmer used to program your meter’s software. -
Page 43: Vehicle Options
© 2014 Cygnus Automotive Limited 5.7 Vehicle Options The “Vehicle Options” are a group of menu items generally to do with your vehicle. Press “SELECT” to enter the “Vehicle Options”. Figure 35: Vehicle Options... -
Page 44: Calibration
This is known as the calibration. f The calibration number of a taxi varies between make and model of vehicle. It is important that the calibration is set correctly for the MR400 to charge correct fares and record distances accurately. If the calibration needs to be changed you should consult your dealer. -
Page 45: Pulse Check
© 2014 Cygnus Automotive Limited 5.7.2 Pulse Check f The “Pulse Check” facility can be a very useful tool for checking the pulse signal from your taxi without having to remove any seals. This entry allows you to display a count of the pulses received from the vehicle. -
Page 46: Speedometer
5.7.3 Speedometer f This feature may not be present for some tariff or software set-ups The MR400’s speedometer shows you the speed of your vehicle either in Miles per Hour or Kilometres per hour, regardless of the units of measurement used for the calibration or in the Tariff information. -
Page 47: Speed Alarms
© 2014 Cygnus Automotive Limited 5.7.4 Speed Alarms f This option may not be present on your version of MR400 or some Tariff set-ups. The MR400 has two speed alarms. f If the “Movement Warning in STOPPED Mode” feature is in use, only one speed alarm is available (See Section 8.8) - Page 48 Cygnus MR400 Taximeter User Guide The ranges of values allowed are: 20 to 159 Km/h, or 10 to 99 ML/h. “A1” indicates that this Speed setting, Units of is Alarm Setting 1. or “41”. Measurement. Press “REVERT” Press Press “EXTRAS”...
-
Page 49: Hire Sign Detection
© 2014 Cygnus Automotive Limited 5.7.5 Hire Sign Detection f This feature may not be present on your version of the MR400 or for some Tariff set-ups. The Hire Sign Detection feature automatically detects the failure of one or both of the lamps in the taxi’s “TAXI”... -
Page 50: Door Handle Illumination
Figure 42: Payment Lamp Feature 5.7.7 Door Handle Illumination If the door handle illumination feature is enabled, the MR400 automatically illuminates your taxi’s Door Handle lamps when the meter is in FOR HIRE mode and the vehicle is stationary. -
Page 51: Totals Config
Section 7. It may not be present for all software and tariff setups. The Totals Configuration menu allows you to choose the way the MR400 stores totals and how it controls access to your meter. -
Page 52: Totals System
Cygnus MR400 Taximeter User Guide 5.8.1 Totals System f From here you can choose the system of totals to be used by your MR400. Please refer to Section 6 for a full explanation of the totals systems available. To Choose the Totals System Press and hold down the Press “EXTRAS”... -
Page 53: Totals And Conditional Access
© 2014 Cygnus Automotive Limited 6 Totals and Conditional Access f The behaviour of the Totals System in the MR400 depends on the settings in your tariff and the option chosen in the Info Menu. There are several possible settings for these features. - Page 54 Cygnus MR400 Taximeter User Guide meter by entering either the Totals PIN or the User Totals PIN before using it. Sections 4.2.2 and 4.3 describe where these PINs come from. This section will explain how the MR400 deals with totals information in general.
-
Page 55: The Totals Information Stored By The Mr400
© 2014 Cygnus Automotive Limited 6.4 The Totals Information Stored by the MR400 The MR400 has a large internal memory, which it uses to record totals information. The totals information that can be recorded, displayed or printed are as follows: •... -
Page 56: Totals "Banks
Cygnus MR400 Taximeter User Guide 6.5 Totals “Banks” The MR400 provides each user with 2 sets of totals: • The temporary “bank”, which he or she may reset as required. These can be used for short term monitoring. • The permanent “bank”. The Measuring Instruments Directive... -
Page 57: Reading The Totals
© 2014 Cygnus Automotive Limited 6.6 Reading the Totals To read the MR400’s totals, press the “TOTAL” button in ON or FOR HIRE modes. On some versions of the MR400, the display reverts back to the previous mode if you do not press a button for a certain period. -
Page 58: Displaying/Printing Journey Summary Information
Cygnus MR400 Taximeter User Guide 6.7 Displaying/Printing Journey Summary Information Individual journey information can be displayed on MR400 and printed out to a printer. Up to 600 most recent journeys are available. The exact number depends on factors such as the number of totals fields included in the tariff options. -
Page 59: Clearing The Totals
“REVERT”. Figure 48: Clearing the Totals 6.9 Totals Reorganisation Because the MR400 stores its totals one-journey after another, eventually it runs out of space. When this happens, the meter runs a Totals Reorganisation during which it adds up the totals so far and moves them to another area of memory. This... - Page 60 Cygnus MR400 Taximeter User Guide process takes a few seconds and normally happens immediately the meter enters FOR HIRE mode after a journey. During the reorganisation, the meter makes an intermittent beeping noise and scrolls the message “PLEASE WAIT >> REORGANISING TOTALS >>”...
-
Page 61: The Totals/Conditional Access Systems
• Log On/Off menu will be absent from the Info Menu. 7.2 Log on with Totals PIN This system provides you with a simple way to control the use of your MR400 and/or your taxi. In order to use the meter, you must first “Log On” to it using either the ‘Totals PIN’... -
Page 62: Other Features
Cygnus MR400 Taximeter User Guide 8 Other Features The MR400 includes some extra features that have not been mentioned yet in this User Guide and some functions that need further explanation. 8.1 Multiple Extras The MR400 supports up to four different named extras amounts which are programmed as part of the tariff. -
Page 63: Totalling The Fare And Extras
There are several options for totalling the fare and extras. These are set in the Tariff. As mentioned in Section 2.7, the MR400 can add the fare and extras together to display a Total Fare. To add the fare and extras together in “STOPPED” mode, press the “TOTAL”... -
Page 64: The Time Charging Symbol
Cygnus MR400 Taximeter User Guide 8.3 The Time Charging Symbol The clock symbol on the MR400’s display indicates that it is charging for time only, i.e.: the vehicle is travelling below the changeover speed between time and distance charging. 8.4 Progress Indicator f The Progress Indicator feature is an option selected in the Tariff. -
Page 65: Tariff Year" Indicator
Figure 52: Tariff Year Indicator in FOR HIRE Mode 8.6 Tip/Gratuity The MR400 allows you to keep a record of your tips received. If the feature is enabled in your tariff, you can enter the amount of the tip in STOPPED mode, and this value will be recorded in your totals. -
Page 66: Rate Selection
8.7 Rate Selection In addition to the normal use of the “SELECT” button to select the active rate in FOR HIRE, HIRED and STOPPED modes, the MR400 can be set up to use other buttons to select the rate. This can be used where there is a complex structure of rates in your local tariff. -
Page 67: Real Time Clock ("Calendar Control") Override
In areas where “Calendar Control” is mandatory, this option is not normally available. If this option is enabled in your tariff, the MR400 can allow you to choose any rate from the tariff, ignoring any date and time information. -
Page 68: Messages/Glossary
Cygnus MR400 Taximeter User Guide 9 Messages/Glossary If your MR400 produces a message or abbreviation that you do not understand, use this table for help. Text Notes Section(s) 12HR 12 hour clock format. 24HR 24 hour clock format. Speed alarm 1. - Page 69 © 2014 Cygnus Automotive Limited ERR 2 The software in the MR400 may be invalid. Try re- applying the power. (Invalid bank number.) ERR 3 Error during software upgrading. (Invalid command.) ERR 4 The software in the MR400 may be invalid. Try re- applying the power.
- Page 70 KM/H Kilometres per Hour. (Speedometer, speed alarms) 5.7.3,5.7.4 LOAD Software “Load” date. This is the date when your MR400’s software was programmed into it. LOG ON Prompt to Log On to the meter. March “Maximum” Speed (Totals) Medium brightness setting.
- Page 71 TOTALS THE TOTALS ARE In order to understand the totals information, the NOT READABLE MR400 needs to have a tariff installed. This is AS THERE IS NO because the tariff defines which items are stored TARIFF and where (e.g.: Fare, Extras etc.). You need to get INSTALLED - a dealer to install a tariff.
- Page 72 Software Version. 5.6.5 WAIT Fare in Waiting Mode (Totals) WARNING - If you have not set the MR400’s clock, it cannot CLOCK NOT SET - select “Calendar Controlled” or “Automatic Rates”. AUTOMATIC The clock also flashes if it is not set.
- Page 73 © 2014 Cygnus Automotive Limited INSTALLED - WARNING - Confirmation message before clearing the totals. PRESSING SELECT NOW WILL CLEAR ALL OF THE TOTALS Wednesday Message displayed during software programming. Indicates that data is being written to the memory.
- Page 74 Cygnus MR400 Taximeter User Guide 12 hour format (time), 22 mode software, 37 24 hour format (time), 22 For Hire, 5 Software Date, 40 Automatic Turn Off, 29 HIRED, 6 Software Information, 40 Battery, 3 indicator, 2 Software Version, 40...
Need help?
Do you have a question about the MR400 and is the answer not in the manual?
Questions and answers