Table of Contents
Advertisement
Advertisement
Table of Contents

Related Manuals for Blaupunkt Santa Cruz MP36


Summary of Contents for Blaupunkt Santa Cruz MP36
- Page 1 Radio CD MP3 WMA Santa Cruz MP36 7 646 070 310 Valencia MP36 7 646 080 310...
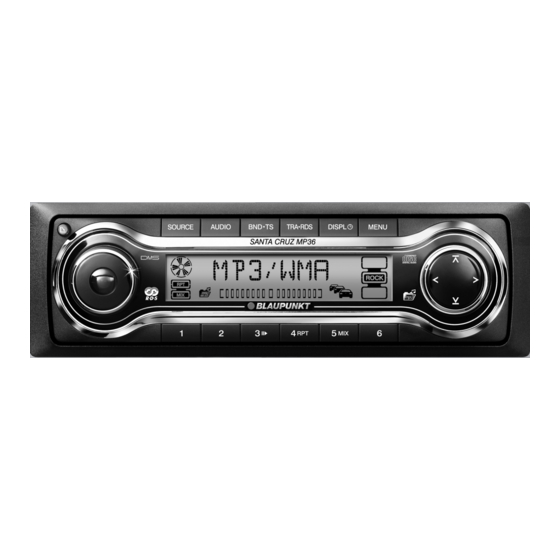
- Page 3 Controls On/Off button DISPL button Short press: Mutes the device. Short press: Briefly displays alternative Long press: Switches the device off. display contents (e.g. time). Long press: Changes display contents. button to open the flip-release con- trol panel. MENU button Short press: Calls up the menu for ba- Volume control sic settings.
-
Page 4: Table Of Contents
Contents Notes and accessories ...... 35 Traffic information ......45 Disposal of old unit Switching traffic information (EU countries only) ......35 priority on/off ....... 45 Installation ........35 Setting the volume for traffic Optional equipment(not part of the announcements ......46 scope of delivery) ...... - Page 5 Contents CD-changer mode ......53 Adjusting the display settings ... 58 Switching to CD-changer mode ..53 Adjusting the level display ....58 Selecting CDs ........ 53 Setting the display illumination Selecting tracks ......53 colour .......... 58 Fast searching (audible) ....53 External audio sources .....
-
Page 6: Notes And Accessories
You cannot switch the device on/off using able to dispose of the old device. the remote control. You can find out from your Blaupunkt dealer or on the Internet at www.blaupunkt.com which remote controls can be used with your car sound system. -
Page 7: Detachable Control Panel
Notes and accessories Control panel Amplifier Detachable control panel You can use all Blaupunkt and Velocity am- plifiers. Theft protection The device is equipped with a detachable CD changers control panel (flip-release panel) as a way You can connect the following Blaupunkt of protecting your equipment against theft. -
Page 8: Detaching The Control Panel
Control panel Detaching the control panel Press the button The control panel opens out towards you. Hold the control panel by its right side and then pull the control panel straight out of the bracket. If the device was still switched on when you detached the control panel, it will automati- cally switch on with the last setting activat- ed (radio, CD, CD changer or AUX) when... -
Page 9: Switching On/Off
Switching on/off Volume Switching on/off Adjusting the volume There are various ways of switching the de- You can adjust the volume in increments vice on/off: from 0 (off) to 66 (maximum). To increase the volume, Switching on/off using button turn the volume control clockwise. -
Page 10: Quickly Reducing The Volume (Mute)
Volume Note: When you have finished making your chang- To protect your hearing, the power-on volume is limited to the value "38". If press the MENU button twice the volume before switching off was higher and the "LAST VOL" setting was Muting during telephone mode selected, the device switches on again If your device is connected to a cell phone,... -
Page 11: Radio Mode
Radio mode To save the setting, Radio mode switch the device off and on again or This device is equipped with an RDS radio wait approx. 8 seconds. The radio receiver. Many of the receivable FM stations starts playing with the last setting se- broadcast a signal that not only carries the lected (radio, CD, CD changer or AUX). -
Page 12: Selecting The Waveband/Memory Bank
Radio mode Switching REGIONAL on/off Tuning into a station Press the MENU button There are various ways of tuning into a sta- Press the button repeated- tion. ly until "REG" appears on the display. Automatic station seek tuning "OFF" or "ON" is displayed alongside "REG". -
Page 13: Setting The Sensitivity Of Station Seek Tuning
Radio mode Browsing through broadcasting When you have finished making your chang- networks (FM only) If a radio station provides several pro- press the MENU button grammes, you have the option of browsing Note: through its so-called "broadcasting network". You can set different sensitivity levels Note: for FM and MW or LW (AM). -
Page 14: Listening To Stored Stations
Radio mode Listening to stored stations When you have finished making your chang- Select the memory bank or waveband. press the MENU button twice Press one of the station buttons 1 - 6 Note: The stored station is played if it can be re- The defined scanning time is also ap- ceived. - Page 15 Radio mode • If the tuned radio station or another When you have finished making your chang- station on the broadcasting network broadcasts your selected programme press the MENU button twice type at a later point in time, the radio will automatically switch from the cur- Selecting a programme type and rently tuned station or from CD mode...
-
Page 16: Optimising Radio Reception
Radio mode Traffic information Optimising radio reception Traffic information Your device is equipped with an RDS-EON Treble reduction feature during receiver. EON (Enhanced Other Network) interference (High Cut) ensures that whenever a traffic announce- The High Cut function results in an improved ment (TA) is broadcast, the system switch- reception in case of weak radio reception es automatically from a station that does... -
Page 17: Setting The Volume For Traffic Announcements
Compact-Disc logo. Copy-pro- also adjust the volume during a traf- tected CDs can cause playback problems. fic announcement for the duration of Blaupunkt cannot guarantee the proper that announcement. functioning of copy-protected CDs! • You can adjust the sound settings... -
Page 18: Selecting Tracks
CD mode The drive draws in the CD automatically. Fast searching (audible) You must not hinder or assist the drive as it To fast search backwards or forwards, draws in the CD. press and hold down the or button Gently close the control panel whilst until fast searching backwards / for- exerting a little pressure until you feel wards begins. -
Page 19: Repeating Tracks (Repeat)
CD mode Repeating tracks (REPEAT) Traffic announcements in CD mode If you want to repeat a track, If you wish to receive traffic announcements press the 4 RPT button in CD mode, "RPT TRCK" appears briefly on the display press the TRA•RDS button and the RPT symbol is displayed. -
Page 20: Mp3/Wma Mode
MP3/WMA mode This device supports as many subdirecto- MP3/WMA mode ries as your burner software can create de- You can also use this car sound system to spite the fact that the maximum directory play CD-Rs and CD-RWs that contain MP3 depth defined by the ISO 9660 standard music files. -
Page 21: Switching To Mp3 Mode
MP3/WMA mode If you like your files to be in the correct or- Switching to MP3 mode der, you should use burner software that MP3 mode is activated in the same way as places files in alphanumerical order. If your normal CD mode. -
Page 22: Configuring The Mp3 Scrolling Texts
MP3/WMA mode Configuring the MP3 scrolling Selecting a directory texts To move up or down to another directory, One of the following scrolling texts is press the button once or shown once on the display with every track several times. change. -
Page 23: Scanning Tracks - Scan
MP3/WMA mode Cancelling MIX Repeated playback of individual To cancel MIX, tracks or entire directories – REPEAT briefly press the 5 MIX button "MIX OFF" appears on the display and the To play the current track repeatedly, MIX symbol disappears. briefly press the 4 RPT button "RPT TRCK"... -
Page 24: Cd-Changer Mode
CD-changer mode Changing the display CD-changer mode Five options are available for the display in Note: CD changer mode: Information on handling CDs, inserting • Track number and playing time CDs and operating the CD changer can • Track number and time be found in the operating instructions supplied with your CD changer. -
Page 25: Random Track Play (Mix)
CD-changer mode Random track play (MIX) Note: You can set the scanning time. For To play the tracks on the current CD in ran- further information, please read the dom order, section entitled "Setting the scanning briefly press the 5 MIX button time"... -
Page 26: Clock Time
Clock time Clock time Press the button to switch between modes. Displaying the time When you have finished making your chang- To briefly display the time, press the MENU button briefly press the DISPL button The time appears on the display for several Displaying the time continuously seconds. -
Page 27: Sound
Sound Setting the left/right volume Sound distribution (balance) You can adjust the sound settings (bass and treble) separately for each source (radio, To adjust the left/right volume distribution CD, CD changer or AUX). (balance), The volume distribution settings (balance press the AUDIO button and fader) apply to all the audio sources "BASS"... -
Page 28: Amplifier/Sub-Out
Amplifier/Sub-Out X-Bass Amplifier/Sub-Out X-BASS The car sound system provides connec- X-Bass allows you to increase the bass at tions that allow you to connect external low volume. amplifiers. In addition, you can connect an The selected X-Bass setting is effective for amplifier to the integrated low-pass filter all audio sources (radio, CD, CD changer or of the device to operate a subwoofer. -
Page 29: Equalizer Presettings (Presets)
Equalizer Display Equalizer presettings Adjusting the display (Presets) settings This device features an equalizer in which Adjusting the level display the settings for the music genres "ROCK", "POP" and "CLASSIC" are already pro- The level display on your display briefly grammed. - Page 30 Display Press the repeatedly until To start the seek tuning again, "DISP COL" appears on the display. press the or button Press the or button If you found the desired colour, The menu for mixing your own colour is dis- press the MENU button twice played.
-
Page 31: External Audio Sources
If you want to connect an external audio 4 ohms. source, you will need an adapter cable. You can obtain this cable (Blaupunkt no.: 4 x 26 watts sine 7 607 897 093) from your authorised in accordance with Blaupunkt dealer. - Page 32 Bitte den ausgefüllten Gerätepass sicher aufbewahren! Please keep the filled-in radio pass in a safe place! Prière de conserver soigneusement la carte d’autoradio remplie ! Tenete per favore il libretto di apparecchio, debitamente riempito, in un posto sicuro! Bewaar de ingevulde apparaatpas op een veilige plaats! Vänligen förvara ifyllt apparatpass på...
- Page 33 Country: Phone: Fax: WWW: Germany 0180-5000225 05121-49 4002 http://www.blaupunkt.com Austria 01-610 39 0 01-610 39 391 Belgium 02-525 5444 02-525 5263 Denmark (DK) 44 898 360 44-898 644 Finland (FIN) 09-435 991 09-435 99236 France 01-4010 7007 01-4010 7320 Great Britain...
Need help?
Do you have a question about the Santa Cruz MP36 and is the answer not in the manual?
Questions and answers