Table of Contents
Advertisement
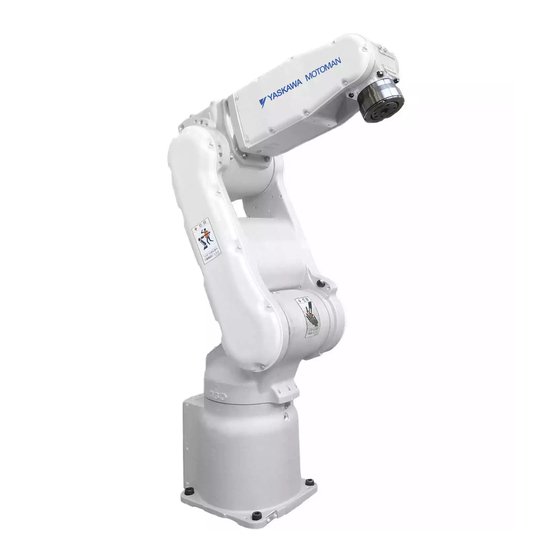
MOTOMAN-MH5
INSTRUCTIONS
TYPE:
YR-MH00005-C00 (STANDARD SPECIFICATION DX100)
YR-MH0005N-C00 (STANDARD SPECIFICATION NXC100)
Upon receipt of the product and prior to initial operation, read these instructions thoroughly, and retain
for future reference.
MOTOMAN INSTRUCTIONS
MOTOMAN-MH5 INSTRUCTIONS
DX100 INSTRUCTIONS
DX100 OPERATOR'S MANUAL
DX100 MAINTENANCE MANUAL
NXC100 INSTRUCTIONS
NX100 OPERATOR'S MANUAL
NXC100 MAINTENANCE MANUAL
The DX/NX100 Operator's Manuals above correspond to specific usage.
Be sure to use the appropriate manual.
Part Number:
171469-1CD
Revision:
1
MANUAL NO.
HW0485750
1 of 74
2
Advertisement
Table of Contents

Related Manuals for YASKAWA MOTOMAN-MH5


Summary of Contents for YASKAWA MOTOMAN-MH5
- Page 1 YR-MH00005-C00 (STANDARD SPECIFICATION DX100) YR-MH0005N-C00 (STANDARD SPECIFICATION NXC100) Upon receipt of the product and prior to initial operation, read these instructions thoroughly, and retain for future reference. MOTOMAN INSTRUCTIONS MOTOMAN-MH5 INSTRUCTIONS DX100 INSTRUCTIONS DX100 OPERATOR’S MANUAL DX100 MAINTENANCE MANUAL NXC100 INSTRUCTIONS NX100 OPERATOR’S MANUAL...
- Page 2 Copyright © 2017, 2014, Yaskawa America, Inc. Terms of Use and Copyright Notice All rights reserved. This manual is freely available as a service to Yaskawa customers to assist in the operation of Motoman robots, related equipment and software This manual is copyrighted property of Yaskawa and may not be sold or redistributed in any way.
- Page 3 If such modification is made, the manual number will also be revised. • If your copy of the manual is damaged or lost, contact a YASKAWA representative to order a new copy. The representatives are listed on the back cover. Be sure to tell the representative the manual number listed on the front cover.
- Page 4 ALLOW UNTRAINED PERSONNEL TO OPERATE, PROGRAM, OR REPAIR THE EQUIPMENT! We recommend approved Yaskawa training courses for all personnel involved with the operation, programming, or repair of the equipment. This equipment has been tested and found to comply with the limits for a Class A digital device, pursuant to part 15 of the FCC rules.
- Page 5 Failure to observe this caution may result in electric shock or injury. • For disassembly or repair, contact your YASKAWA representative. • Do not remove the motor, and do not release the brake. Failure to observe these safety precautions may result in death or serious injury from unexpected turning of the manipulator's arm.
- Page 6 171469-1CD Notes for Safe Operation WARNING • Before operating the manipulator, check that servo power is turned OFF pressing the emergency stop buttons on the front door of the DX100/NXC100 and the programming pendant. When the servo power is turned OFF, the SERVO ON LED on the programming pendant is turned OFF.
- Page 7 Read and understand the Explanation of Warning Labels in the DX100/NXC100 Instructions before operating the manipulator: Definition of Terms Used In this Manual The MOTOMAN is the YASKAWA industrial robot product. The MOTOMAN usually consists of the manipulator, the controller, the programing pendant, and supply cables.
- Page 8 171469-1CD Description of the Operation Procedure Description of the Operation Procedure In the explanation of the operation procedure, the expression “Select • • •” means that the cursor is moved to the object item and the SELECT key is pressed, or that the item is directly selected by touching the screen. Registered Trademark In this manual, names of companies, corporations, or products are trademarks, registered trademarks, or brand names for each company or...
- Page 9 Moving parts MOTOMAN- TYPE may cause injury PAYLOAD MASS ORDER NO. DATE SERIAL NO. WARNING Label B: WARNING YASKAWA ELECTRIC CORPORATION 2-1 Kurosakishiroishi, Yahatanishi-ku, Do not enter Kitakyushu 806-0004 Japan NJ3878 MADE IN JAPAN robot work area. 9 of 74 HW0485750...
- Page 10 171469-1CD Safeguarding Tips Safeguarding Tips All operators, programmers, maintenance personnel, supervisors, and anyone working near the system must become familiar with the operation of this equipment. All personnel involved with the operation of the equipment must understand potential dangers of operation. General safeguarding tips are as follows: •...
- Page 11 Do not make any modifications to the controller unit. Making any changes without the written permission from Yaskawa will void the warranty. • Some operations require standard passwords and some require special passwords.
- Page 12 Turn the power OFF and disconnect and lockout/tagout all electrical circuits before making any modifications or connections. Perform only the maintenance described in this manual. Maintenance other than specified in this manual should be performed only by Yaskawa- trained, qualified personnel. Summary of Warning Information This manual is provided to help users establish safe conditions for operating the equipment.
- Page 13 If you need assistance with any aspect of your MH5 system, please contact YASKAWA Customer Support at the following 24-hour telephone number: (937) 847-3200 For routine technical inquiries, you can also contact YASKAWA Customer Support at the following e-mail address: techsupport@motoman.com When using e-mail to contact YASKAWA Customer Support, please provide a detailed description of your issue, along with complete contact information.
-
Page 14: Table Of Contents
171469-1CD Table of Contents Table of Contents 1 Product Confirmation ........................1-1 1.1 Contents Confirmation ....................... 1-1 1.2 Order Number Confirmation....................1-2 2 Transporting ............................ 2-1 2.1 Transporting Method......................2-1 2.1.1 Using a Crane....................... 2-2 2.1.2 Using a Forklift...................... 2-3 2.2 Shipping Bolts and Brackets .................... - Page 15 171469-1CD Table of Contents 7 System Application ......................... 7-1 7.1 Peripheral Equipment Mounts ................... 7-1 7.1.1 Allowable Load ..................... 7-1 7.2 Internal User I/O Wiring Harness and Air Lines..............7-2 8 Electrical Equipment Specification....................8-1 8.1 Internal Connections......................8-1 9 Maintenance and Inspection ......................9-1 9.1 Inspection Schedule ......................
-
Page 16: Product Confirmation
171469-1CD Product Confirmation 1.1 Contents Confirmation Product Confirmation CAUTION • Confirm that the manipulator and the DX100/NXC100 have the same order number. Special care must be taken when more than one manipulator is to be installed. If the numbers do not match, manipulators may not perform as expected and cause injury or damage. -
Page 17: Order Number Confirmation
171469-1CD Product Confirmation 1.2 Order Number Confirmation Order Number Confirmation Check that the order number of the manipulator corresponds to the DX100/NXC100. The order number is located on a label as shown below. Fig. 1-1: Location of Order Number Labels Label (Enlarged View) THE MANIPULATOR AND THE CONTROLLER Check that the manipulator... -
Page 18: Transporting
171469-1CD Transporting 2.1 Transporting Method Transporting CAUTION • Sling applications and crane or forklift operations must be performed by authorized personnel only. Failure to observe this caution may result in injury or damage. • Avoid excessive vibration or shock during transportation. The system consists of precision components. -
Page 19: Using A Crane
171469-1CD Transporting 2.1 Transporting Method 2.1.1 Using a Crane As a rule, the manipulator should be lifted by a crane with two wire ropes when removing it from the package and moving it. Be sure the manipulator is fixed with the shipping bolts and brackets before transport, and lift it in the posture as shown in "Fig. -
Page 20: Using A Forklift
171469-1CD Transporting 2.1 Transporting Method 2.1.2 Using a Forklift When using a forklift, the manipulator should be fixed on a pallet with shipping bolts and brackets as shown in Fig. 2-2 “Using a Forklift”. Insert claws under the pallet and lift it. The pallet must be strong enough to support the manipulator. -
Page 21: Shipping Bolts And Brackets
171469-1CD Transporting 2.2 Shipping Bolts and Brackets Shipping Bolts and Brackets The manipulator is equipped with shipping bolts and brackets at A and B as shown in Fig. 2-1 “Transporting Position” to minimize external force during the transportation. • The shipping bolts and brackets are painted yellow Before turning ON the power, make sure that the shipping bolts and brackets are removed. -
Page 22: Installation
171469-1CD Installation Installation WARNING • Install the safeguarding. Failure to observe this warning may result in injury or damage. • Install the manipulator in a location where the tool or the workpiece held by its fully extended arm will not reach the wall, safeguarding, or controller. -
Page 23: Installation Of The Safeguarding
171469-1CD Installation 3.1 Installation of the Safeguarding Installation of the Safeguarding To insure safety, be sure to install safeguarding. They prevent unforeseen accidents with personnel and damage to equipment. The following is quoted for your information and guidance. Responsibility for Safeguarding (ISO10218) The user of a manipulator or robot system shall ensure that safeguarding is provided and used in accordance with Sections 6, 7, and 8 of this standard. -
Page 24: Mounting Example
171469-1CD Installation 3.2 Mounting Procedures for Manipulator Base 3.2.1 Mounting Example For the first process, anchor the base plate firmly to the ground. The baseplate should be rugged and durable to prevent shifting of the manipulator or the mounting fixture. It is recommended to be prepare a balseplate of 30 mm or more thick , and anchor bolts of M10 or larger size. -
Page 25: Types Of Mounting
Conical spring washer In case of using the wall-/ceiling-mounted type, inform YASKAWA of the matter when placing an order. Be sure to NOTE contact YASKAWA representative (listed on the back cover of this instruction manual) to execute a wall/ceiling installation on site. -
Page 26: Location
171469-1CD Installation 3.4 Location Location When installing the manipulator, it is necessary to satisfy the following environmental conditions: • Ambient Temperature: 0° to +45°C • Humidity: 20 to 80%RH (non-condensing) • Free from dust, soot, oil, or water • Free from corrosive gas or liquid, or explosive gas or liquid. •... -
Page 27: Wiring
171469-1CD Wiring 4.1 Grounding Wiring WARNING • Ground resistance must be 100 W or less. Failure to observe this warning may result in fire or electric shock. • Before wiring, make sure to turn the primary power supply OFF, and put up a warning sign. -
Page 28: Cable Connection
171469-1CD Wiring 4.2 Cable Connection Fig. 4-1: Grounding Method 5.5 mm or more Bolts M8 (for grounding) Delivered with the manipulator Cable Connection Two manipulator cables are delivered with the manipulator; an encoder cable (1BC) and a power cable (2BC). (Refer to Fig. 4-2(a) “Manipulator Cables for DX100”... -
Page 29: Connection To The Dx100/Nxc100
171469-1CD Wiring 4.2 Cable Connection 4.2.2 Connection to the DX100/NXC100 Before connecting cables to the DX100/NXC100, verify the numbers on both manipulator cables and the connectors on the DX100/NXC100. • DX100 When connecting, insert the cables in the order of X21, then X11, and depress each lever low until they click. - Page 30 171469-1CD Wiring 4.2 Cable Connection Fig. 4-2(b): Manipulator Cables for NXC100 The NXC100 side The Manipulator side 1BC Encoder cable The NXC100 side The Manipulator side 2BC Power cable 30 of 74 HW0485750...
- Page 31 171469-1CD Wiring 4.2 Cable Connection Fig. 4-3(a): Manipulator Cable Connection (Manipulator Side) AIR1 AIR2 AIR1 AIR2 Fig. 4-3(b): Manipulator Cable Connection (DX100 Side) Fig. 4-3(c): Manipulator Cable Connection (NXC100 Side) FAN2 FAN3 PPESP PPESP X64-X63 Details of Power Supply Ccable Cconnector (The NXC100 Side) 31 of 74 HW0485750...
-
Page 32: Basic Specifications
171469-1CD Basic Specifications 5.1 Basic Specifications Basic Specifications Basic Specifications Table 5-1: Basic Specifications Item Model MOTOMAN-MH5 Application Handling Structure Vertically Articulated Degree of freedom Payload 5 kg Repeatability ±0.02 mm Range of Motion S-Axis (turning) ±170° L-Axis (lower arm) +150°, -65°... -
Page 33: Part Names And Working Axes
171469-1CD Basic Specifications 5.2 Part Names and Working Axes Part Names and Working Axes Fig. 5-1: Part Names and Working Axes Wrist Upper arm (U-arm) Lower arm (L-arm) Wrist flange Rotary head Manipulator base Baseplate Dimensions Fig. 5-2: Manipulator Base Dimensions ±... -
Page 34: Dimensions And P-Point Maximum Envelope
171469-1CD Basic Specifications 5.4 Dimensions and P-Point Maximum Envelope Dimensions and P-Point Maximum Envelope Fig. 5-3: Dimensions and P-Point Maximum Envelope (mm) 59.5 50.5 34 of 74 HW0485750... -
Page 35: Allowable Load For Wrist Axis And Wrist Flange
Contact your YASKAWA representative beforehand when moment of inertia is the only load, or load moment is smaller than moment of inertia . Also contact your YASKAWA representative in advance in a case where the load mass is combined with an external force. -
Page 36: Wrist Flange
171469-1CD Allowable Load for Wrist Axis and Wrist Flange 6.2 Wrist Flange Wrist Flange The wrist flange dimensions are shown in Fig. 6-2 “Wrist Flange”. It is recommended that the attachment be mounted inside the fitting in order to identify the alignment marks. Fitting depth shall be 5 mm or less. Fig. -
Page 37: System Application
171469-1CD System Application 7.1 Peripheral Equipment Mounts System Application Peripheral Equipment Mounts The peripheral equipment mounts are provided on the U-axis (upper arm) as shown in Fig. 7-1 “Installing Peripheral Equipment” for easier installation of the user’s system applications. The following conditions shall be observed to attach or install peripheral equipment. -
Page 38: Internal User I/O Wiring Harness And Air Lines
171469-1CD System Application 7.2 Internal User I/O Wiring Harness and Air Lines Internal User I/O Wiring Harness and Air Lines Internal user I/O wiring harness (16 wires :0.2 mm ) and two air lines are incorporated in the manipulator for the drive of the peripheral devices mounted on the upper arm as shown in Fig. - Page 39 171469-1CD System Application 7.2 Internal User I/O Wiring Harness and Air Lines Fig. 7-2: Connectors for Internal User I/O Wiring Harness and Air Line Exhaust port 2: Exhaust port 1: Tapped hole M5 Tapped hole M5 with pipe plug with pipe plug Connector for internal user I/O wiring harness: HR10A-10R-10S (2 socket connectors ) Prepare pin connector HR10A-10P-10P*HIROSE*...
-
Page 40: Electrical Equipment Specification
171469-1CD Electrical Equipment Specification 8.1 Internal Connections Electrical Equipment Specification Internal Connections High reliability connectors are equipped on each connection part of the manipulator to enable easy removal and installation for maintenance and inspection. For the number and location of connectors, see Fig. 8-1 “Locations and Numbers of Connectors”. - Page 41 171469-1CD 8 Electrical Equipment Specification 8.1 Internal Connections Fig. 8-1(a): Internal Connection Diagram for DX100 POWER CABLE INTERNAL CABLE IN S-AXIS INTERNAL CABLE IN L-AXIS INTERNAL CABLE IN BT-AXIS Encoder power supply board 0BAT11 0BAT1 BAT11 BAT1 0BAT12 0BAT2 BAT12 BAT2 0BAT3 BAT3...
- Page 42 171469-1CD 8 Electrical Equipment Specification 8.1 Internal Connections Fig. 8-1(b): Internal Connection Diagram for DX100 2BC(6X6) CN1-1 CN1-1 CN1-2 CN1-2 CN1-3 CN1-3 CN1-4 CN1-4 No.20CN CN-1 CN1-5 CN1-5 S-AXIS CN1-6 CN1-6 CN-1 No.21CN CN2-1 CN2-1 No.22CN CN-1 CN2-2 CN2-2 L-AXIS CN2-3 CN2-3 CN2-4...
- Page 43 171469-1CD 8 Electrical Equipment Specification 8.1 Internal Connections Fig. 8-1(c): Internal Connection Diagram for NXC100 POWER CABLE INTERNAL CABLE IN S-AXIS INTERNAL CABLE IN L-AXIS INTERNAL CABLE IN BT-AXIS Encoder power supply board 0BAT11 0BAT1 BAT11 BAT1 0BAT12 0BAT2 BAT12 BAT2 0BAT3 BAT3...
- Page 44 171469-1CD 8 Electrical Equipment Specification 8.1 Internal Connections Fig. 8-1(d): Internal Connection Diagram for NXC100 2BC(6X6) CN1-1 CN1-2 CN1-4 No.20CN CN-1 CN1-5 S-AXIS CN1-6 CN-1 No.21CN No.22CN CN-1 CN2-1 CN2-2 L-AXIS CN2-3 CN-1 No.23CN CN3-1 No.24CN CN-1 CN3-2 U-AXIS CN3-3 CN3-4 CN3-5 CN-1...
-
Page 45: Maintenance And Inspection
The inspection may be conducted at shorter intervals if the manipulator is used very frequently for the application such as handling, in this case, contact your YASKAWA representative. 45 of 74 HW0485750... - Page 46 Table 9-1: Inspection Items (Sheet 1 of 2) Items Schedule Method Operation Inspection Charge • • • • Alignment mark Visual Check tram mark accordance and damage at the home position. • • • • Working area and Visual Clean the work area if dust or spatter is present. Check for manipulator damage and outside cracks.
- Page 47 Table 9-1: Inspection Items (Sheet 2 of 2) Items Schedule Method Operation Inspection Charge • • • R-axis speed reducer Grease Gun Check for malfunction. (Replace if necessary.) Supply grease (6000H cycle). See section 9.3.5 • • • BT-axes speed reducers Grease Gun Check for malfunction.
- Page 48 Fig. 9-1: Inspection Items R-axis B-axis Note: This figure shows the standard specification manipulator in the home position. T-axis R-axis U-axis T-axis U-axis B-axis L-axis S-axis S-axis AIR1 AIR2 48 of 74...
- Page 49 171469-1CD Maintenance and Inspection 9.1 Inspection Schedule Table 9-2: Inspection Parts and Grease Used Grease Used Inspected Parts 9,10,11, Harmonic Grease SK-1A S, L, U, R, B and T-axes speed reducers, T- and S-axes gears The numbers in the above table correspond to the numbers in Table 9-1 "Inspection Items".
-
Page 50: Notes On Maintenance Procedures
171469-1CD Maintenance and Inspection 9.2 Notes on Maintenance Procedures Notes on Maintenance Procedures 9.2.1 Battery pack Replacement The battery packs are installed in the position shown in Fig. 9-2 “Battery Location”. If the battery alarm occurs in the DX100/NXC100, replace the battery in accordance with the following procedure: Fig. - Page 51 171469-1CD Maintenance and Inspection 9.2 Notes on Maintenance Procedures Fig. 9-3: Battery Connection Battery pack before replacement See replacing step 5 Connector Board See replacing step 4 New battery pack 1. Turn OFF the DX100/NXC100 main power supply. 2. Remove the plate fastening screws and the plate on the connector base, then pull the battery pack put to replace it with the new one.
-
Page 52: Notes On Grease Replenishment/Exchange Procedures
171469-1CD Maintenance and Inspection 9.3 Notes on Grease Replenishment/Exchange Procedures Notes on Grease Replenishment/Exchange Procedures Make sure to follow the instructions listed below at grease replenishment/ exchange. Failure to observe the following notes may result in damage to motor and speed reducer. •... -
Page 53: Grease Replenishment For S-Axis Speed Reducer
171469-1CD Maintenance and Inspection 9.3 Notes on Grease Replenishment/Exchange Procedures 9.3.1 Grease Replenishment for S-Axis Speed Reducer Fig. 9-4: S-Axis Speed Reducer Diagram Exhaust port (hexagon socket head plug PT 1/8) Grease inlet (hexagon socket cap screw M6) S-axis speed reducer AIR1 AIR2 S-axis motor... -
Page 54: Grease Replenishment For S-Axis Gear
171469-1CD Maintenance and Inspection 9.3 Notes on Grease Replenishment/Exchange Procedures 9.3.2 Grease Replenishment for S-Axis Gear Fig. 9-5: S-Axis Gear Diagram Exhaust port (hexagon socket head plug PT 1/8) Grease inlet (hexagon socket head plug PT 1/8) S-axis motor AIR1 AIR2 S-axis motor 9.3.2.1 Grease Replenishment... -
Page 55: Grease Replenishment For L-Axis Speed Reducer
171469-1CD Maintenance and Inspection 9.3 Notes on Grease Replenishment/Exchange Procedures 9.3.3 Grease Replenishment for L-Axis Speed Reducer Fig. 9-6: -Axis Speed Reducer Diagram L-axis motor Exhaust port (Plug M5) L-axis speed reducer Grease inlet (Hexagon socket head cap screw M6) 9.3.3.1 Grease Replenishment (Refer to Fig. -
Page 56: Grease Replenishment For U-Axis Speed Reducer
171469-1CD Maintenance and Inspection 9.3 Notes on Grease Replenishment/Exchange Procedures 9.3.4 Grease Replenishment for U-Axis Speed Reducer Fig. 9-7: U-Axis Speed Reducer Diagram Grease inlet (Hexagon socket head cap screw M6) Exhaust port (Plug M5) U-axis speed reducer U-axis motor Cover 9.3.4.1 Grease Replenishment (Refer to "Fig. -
Page 57: Grease Replenishment For R-Axis Speed Reducer
171469-1CD Maintenance and Inspection 9.3 Notes on Grease Replenishment/Exchange Procedures 9.3.5 Grease Replenishment for R-Axis Speed Reducer Fig. 9-8: R-Axis Speed Reducer Diagram Grease inlet, Exhaust port (Plug M5) R-axis speed reducer Exhaust port (Plug M5) Grease inlet (Plug M5) R-axis motor 9.3.5.1 Grease Replenishment (Refer to Fig. -
Page 58: Grease Replenishment For B- And T-Axes Speed Reducers
171469-1CD Maintenance and Inspection 9.3 Notes on Grease Replenishment/Exchange Procedures 9.3.6 Grease Replenishment for B- and T-Axes Speed Reducers Fig. 9-9: B- and T-Axes Speed Reducers Diagram Exhaust port (B-axis speed reducer) Plug M5 Grease inlet (T-axis speed reducer) Low head socket head cap screw M6 B-axis speed reducer T-axis speed reducer Grease inlet (B-axis speed reducer) -
Page 59: Grease Replenishment For T-Axis
171469-1CD Maintenance and Inspection 9.3 Notes on Grease Replenishment/Exchange Procedures 9.3.6.2 Grease Replenishment for T-axis (Refer to Fig. 9-9 “B- and T-Axes Speed Reducers Diagram”.) 1. Remove the plug M5 from the exhaust port and the low head socket head cap screw M6 from the grease inlet. •... -
Page 60: Notes For Maintenance
171469-1CD Maintenance and Inspection 9.3 Notes on Grease Replenishment/Exchange Procedures 9.3.7 Notes for Maintenance 9.3.7.1 Wrist Unit The motor and encoder units are provided with the wrist unit. To prevent fumes from penetrating into the wrist unit, the jointed faces are sealed with sealing bond. -
Page 61: Recommended Spare Parts
10 Recommended Spare Parts It is recommended to keep the parts and components in the following table in stock as spare parts for the MOTOMAN-MH5. Product performance cannot be guaranteed when using spare parts from any company other than YASKAWA. The spare parts are ranked as follows: •... - Page 62 Recommended Spare Parts Table 10-1: Spare Parts for the YR-MH00005-C00/YR-MH0005N-C00 (Sheet 2 of 2) Rank Parts Name Type Manufacturer Remarks Unit T-Axis HW0388710-A YASKAWA Speed Reducer Wire Harness in HW0175096-A YASKAWA Manipulator S-and L-Axes HW0388651-A YASKAWA AC Servomotor SGMAV-04ANA-YR1* U-Axis...
-
Page 63: Parts List
171469-1CD Parts List 11.1 S-Axis Unit 11 Parts List 11.1 S-Axis Unit Fig. 11-1: S-Axis Unit 1027 1026 1020 1023 1023 1003 1001 1020 1049 1048 1013 1023 1040 1002 1005 1039 1025 1015 1024 1028 1029 1011 1034 1012 1017 1033 1009... - Page 64 171469-1CD Parts List 11.1 S-Axis Unit Table 11-1: S-Axis Unit (Sheet 1 of 2) DWG No. Name 1001 HW0102487-1 Base 1002 HW0102486-1 S head 1003 HW0314329-1 Cover 1004 HW0314328-1 Cover 1005 HW0414024-1 Collar 1006 HW0414025-1 B holder 1007 HW0414034-1 M base 1008 HW0314319-1 Shaft...
- Page 65 171469-1CD Parts List 11.1 S-Axis Unit Table 11-1: S-Axis Unit (Sheet 2 of 2) DWG No. Name 1047 SGMAV-04ANA-YR11 Motor 1048 HW0414483-1 Cover 1049 HW0414484-1 Packing 11-3 65 of 74 HW0485750...
-
Page 66: L-, U-Axes Unit
171469-1CD Parts List 11.2 L-, U-Axes Unit 11.2 L-, U-Axes Unit Fig. 11-2: L-, U-Axes Unit 2023 2018 2014 2030 2036 2028 2053 2035 2014 2013 2016 2023 2057 2017 2026 2055 2001 2014 2034 2033 2037 2002 2031 2032 2040 2039 2025... - Page 67 171469-1CD Parts List 11.2 L-, U-Axes Unit Table 11-2: L-, U-Axes Unit (Sheet 1 of 2) DWG No. Name 2001 HW0102585-1 L arm 2002 HW0414073-A Pulley 2003 HW0414072-A Pulley 2004 HW0414070-B Pulley 2007 HW0414071-B Pulley 2010 HW8411125-1 Collar 2011 HW0408927-2 Housing 2012 HW0408928-2...
- Page 68 171469-1CD Parts List 11.2 L-, U-Axes Unit Table 11-2: L-, U-Axes Unit (Sheet 2 of 2) DWG No. Name 2050 CDW4L Spring washer 2051 M4X16 Socket screw 2052 2H-4 Spring washer 2053 M4X10 GT-SA bolt 2055 M4X16 GT-SA bolt 2057 Washer 2058 M8X16...
-
Page 69: R-Axis Unit
171469-1CD Parts List 11.3 R-Axis Unit 11.3 R-Axis Unit Fig. 11-3: R-Axis Unit 3013 3029 3016 3019 3012 3004 3010 3005 3001 3006 3028 3014 3002 3018 3011 3003 3027 3030 3008 3007 3025 3026 3024 3021 3023 3022 3009 2001 11-7 69 of 74... - Page 70 171469-1CD Parts List 11.3 R-Axis Unit Table 11-3: R-Axis Unit DWG No. Name 3001 HW0102484-1 Casing 3002 HW0314334-1 Housing 3003 HW0414074-A Pulley 3004 HW0483421-B Pulley 3005 HW9406285-E Pipe 3006 HW9406278-2 Washer 3007 HW0388708-A Speed reducer 3008 6808ZZ Bearing 3009 6806ZZ Bearing 3010 060S3M219...
-
Page 71: Wrist Unit
171469-1CD Parts List 11.4 Wrist Unit 11.4 Wrist Unit Fig. 11-4: Wrist Unit 4023 4042 4098 4083 4096 4097 4085 4089 4090 4086 4081 4092-94 4075 3007 4091 4076 4071 4072 4053 4005 4080 4070 4082 4052 4054 4056 4051 4091 4082 4032... - Page 72 171469-1CD Parts List 11.4 Wrist Unit Table 11-4: Wrist Unit (Sheet 1 of 2) DWG No. Name 4001 HW0102483-1 U arm 4002 HW0313997-1 Wrist base 4003 HW0388712-A Gear 4004 HW0388711-A Gear 4005 HW0414075-A Pulley 4006 HW0414076-A Pulley 4007 HW0414078-A Pulley 4008 HW9406260-1 Housing...
- Page 73 171469-1CD Parts List 11.4 Wrist Unit Table 11-4: Wrist Unit (Sheet 2 of 2) DWG No. Name 4045 M3X10 Socket screw 4046 2H-3 Spring washer 4047 M4X10 GT-SA bolt 4048 M3X12 Socket screw 4049 2H-3 Spring washer 4050 M4X20 Socket screw 4051 2H-4 Spring washer...
- Page 74 INSTRUCTIONS HEAD OFFICE 2-1 Kurosakishiroishi, Yahatanishi-ku, Kitakyushu 806-0004, Japan Phone +81-93-645-7703 Fax +81-93-645-7802 YASKAWA America Inc. (Motoman Robotics Division) 100 Automation Way, Miamisburg, OH 45342, U.S.A. Phone +1-937-847-6200 Fax +1-937-847-6277 YASKAWA Europe GmbH Robotics Divsion ) Yaskawastrasse 1, 85391 Allershausen, Germany...
Need help?
Do you have a question about the MOTOMAN-MH5 and is the answer not in the manual?
Questions and answers