Table of Contents
Advertisement
Advertisement
Table of Contents

Related Manuals for L7 Networks L7-N-R2000

Summary of Contents for L7 Networks L7-N-R2000
-
Page 2: Table Of Contents
Advanced Network ............34 IPv6 Routing ..............35 Changing the Computer Name and Joining a Workgroup ... 59 Device Administration ........... 36 Save and Restore ............37 Configuring the IP Address in Vista ........61 System Check ............... 38 L7 Networks L7-N-R2000 User Manual... - Page 3 Connecting to an Unsecured Wireless Network....73 Troubleshooting ...............77 Wireless Basics ................81 What is Wireless? ..............82 Tips ..................84 Wireless Modes ..............85 Networking Basics ..............86 Check your IP address ............86 Statically Assign an IP address ...........87 Technical Specifications............88 L7 Networks L7-N-R2000 User Manual...
-
Page 4: Package Contents
• Warranty Card Note: Using a power supply with a different voltage than the one included with the L7-N-R2000 will cause damage and void the warranty for this product. Note: Always attach the power cord plug to the power supply, before inserting the power cord and connected power supply to the wall outlet. -
Page 5: Features
• Compatible with 802.11b and 802.11g Devices - The L7-N-R2000 is still fully compatible with the IEEE 802.11b and IEEE 802.11g standard, so it can connect with existing 802.11b and IEEE 802.11g PCI, USB and Cardbus adapters. -
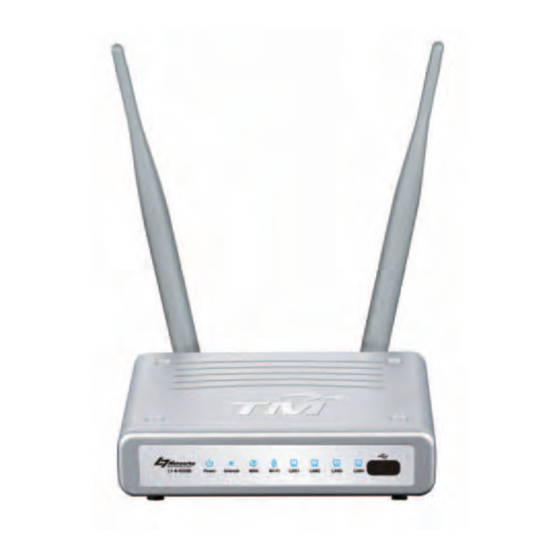
Page 6: Hardware Overview
LAN Ports the Ethernet cable to the factory default settings. Connect Ethernet devices such as Cable or DSL modem. computers, switches, and hubs. Receptor for the Power Adapter. L7 Networks L7-N-R2000 User Manual... -
Page 7: Leds And Usb Port
A solid light indicates a connection to an Ethernet- A solid light indicates a proper enabled computer on port 1-3 (Port 4 for IPTV). connection to the power supply. This LED blinks during data transmission. L7 Networks L7-N-R2000 User Manual... -
Page 8: Installation
This section will walk you through the installation process. Placement of the router is very important. Do not place the router in an enclosed area such as a closet, cabinet, or in the attic or garage. L7 Networks L7-N-R2000 User Manual... -
Page 9: Wireless Installation Considerations
1. Keep the number of walls and ceilings between the L7 Networks router and other network devices to a minimum - each wall or ceiling can reduce your adapter’s range from 3-90 feet (1-30 meters.) Position your devices so that the number of walls or ceilings is minimized. -
Page 10: Connect To Btu
If not, make sure your computer, modem, and router are powered on and verify the cable connections are correct. 9. Skip to page 16 to configure your router. L7 Networks L7-N-R2000 User Manual... -
Page 11: Connect To Another Router
Section 2 - Installation Connect to Another Router If you are connecting the L7 Networks router to another router to use as a wireless access point and/or switch, you will have to do the following before connecting the router to your network: •... - Page 12 7. Connect an Ethernet cable in one of the LAN ports of the router and connect it to your other router. Do not plug anything into the WAN port of the L7 Networks router. 8. You may now use the other three LAN ports to connect other Ethernet devices and computers. To configure your wireless network, open a web browser and enter the IP address you assigned to the router.
-
Page 13: Configuration
Section 3 - Configuration Configuration This section will show you how to configure your new L7 Networks wireless router using the web-based configuration utility. Web-based Configuration Utility To access the configuration utility, open a web-browser such as Internet Explorer and enter the IP address of the router (192.168.0.1). -
Page 14: Setup Wizard
Internet Setup window to quickly set up your router. Click Internet Connection Setup Wizard, and the first window of the wizard will open. Click Next to continue. Create a new password, and then click Next to continue. L7 Networks L7-N-R2000 User Manual... - Page 15 Section 3 - Configuration Select your time zone NTP Server from the drop-down menus, and then click Next to continue. L7 Networks L7-N-R2000 User Manual...
- Page 16 LAN Start IP and LAN End IP. Click Next to continue. Note: Make sure to remove your PPPoE software from your computer. The software is no longer needed and will not work through a router. L7 Networks L7-N-R2000 User Manual...
- Page 17 Click Wireless Connection Setup Wizard to open the wizard window of configuring wireless connection. Click Reboot to directly restart the Router. If clicking Wireless Connection Setup Wizard, this window will open. Click Next to continue. L7 Networks L7-N-R2000 User Manual...
- Page 18 Network Key box. Click Next to continue. This window displays a summary of your wireless security settings. Please print this out or record this information in a safe place and then click Save to continue. L7 Networks L7-N-R2000 User Manual...
- Page 19 Section 3 - Configuration The Router will save the new settings and reboot. Please allow 1-2 minutes for rebooting. When the router has finished rebooting, the opening Wireless Setup window is displayed. L7 Networks L7-N-R2000 User Manual...
-
Page 20: Internet Setup
Section 3 - Configuration Internet Setup If you want to configure the Router manually without using the wizard, click the Manual Internet Connection Setup button. This window will display for you configure the Internet connection manually. L7 Networks L7-N-R2000 User Manual... -
Page 21: Pppoe
Enter the IP netmask (Static PPPoE only). Netmask: LAN IP: Enter Start and End LAN IP address. DNS: Click Recieve DNS from ISP to get the DNS automatically. Click Enter DNS Manually to enter the DNS information below. L7 Networks L7-N-R2000 User Manual... - Page 22 Auto-reconnect. MTU: Maximum Transmission Unit - You may need to change the MTU for optimal performance with your specific ISP. 1492 is the default MTU. Connection Select either Always-on, Manual, or Connect-on demand. Mode Select: L7 Networks L7-N-R2000 User Manual...
-
Page 23: Wireless Setup
WEP, WPA, WPA2, and WPA/WPA2 wireless security mode options. If you want to have more wireless network name, also known as SSID, click the Multiple Wireless network Name Setup button. L7 Networks L7-N-R2000 User Manual... - Page 24 WPA. and then click Next to continue. If selecting Manually assign a network key in the previous window, this window will open. Enter a wireless security password in the Network Key box. Click Next to continue. L7 Networks L7-N-R2000 User Manual...
- Page 25 Save to continue. The Router will save the new settings and reboot. Please allow 1-2 minutes for rebooting. When the router has finished rebooting, the opening Wireless Setup window is displayed. L7 Networks L7-N-R2000 User Manual...
- Page 26 Status: wireless network to be broadcasted by the L7-N-R2000. If this option is checked, the SSID of the L7-N-R2000 will not be seen by Site Survey utilities so your wireless clients will have to know the SSID of your L7-N-R2000 in order to connect to it.
- Page 27 WPA, WPA2, or WPA/WPA2 (whichever of the three options you have selected above) on your adapter and enter the same network key as you did on the router. L7 Networks L7-N-R2000 User Manual...
- Page 28 5. Next to Port, enter the port you are using with your RADIUS server. 1812 is the default port. 6. Next to Shared Secret, enter the security key. 7. Click Save Settings to save your settings. L7 Networks L7-N-R2000 User Manual...
- Page 29 RADIUS server. 1812 is the default port. 6. Next to Shared Secret, enter the security key. 7. If you have a secondary RADIUS server, enter its IP address, port, and secret key. 8. Click Save Settings to save your settings. L7 Networks L7-N-R2000 User Manual...
-
Page 30: Network Settings
Check the box to transfer the DNS server Relay: information from your ISP to your computers. If unchecked, your computers will use the router for a DNS server. Refer to the next page for DHCP information. L7 Networks L7-N-R2000 User Manual... -
Page 31: Dhcp Server Settings
Section 3 - Configuration DHCP Server Settings DHCP stands for Dynamic Host Control Protocol. The L7-N-R2000 has a built-in DHCP server. The DHCP Server will automatically assign an IP address to the computers on the LAN/private network. Be sure to set your computers to be DHCP clients by setting their TCP/IP settings to “Obtain an IP Address... -
Page 32: Port Forwarding
Ports to Enter the port or ports that you want to open. If Open: you want to open one port, enter the same port in both boxes. Traffic Type: Select TCP, UDP, or Any L7 Networks L7-N-R2000 User Manual... -
Page 33: Qos Engine
Frame Relay Network causes the measured uplink speed to be reported slightly lower than before on such connections, but gives much better results. When Connection Type is set to Auto-detect, the automatically detected connection type is displayed here. L7 Networks L7-N-R2000 User Manual... -
Page 34: Network Filter
The Network Filter allows you to configure IP or MAC address of a network adapter and allow or deny its network access at certain time. MAC/IP Enter the MAC or IP address of a network Address: adapter for a filter rule. Action: Use the drop-down menu to select Allow or Deny the network access. L7 Networks L7-N-R2000 User Manual... -
Page 35: Firewall & Dmz
This section will allow you to set up inside and outside firewall. The outside firewall can choose various which part you want to prevernt from. DMZ: Tick DMZ Enable check box to enable DMZ, and enter an IP adrees of a computer in the IP field to be accessible to Internet traffic. L7 Networks L7-N-R2000 User Manual... -
Page 36: Advanced Wireless
Short GI: Check this box to reduce the guard interval time therefore increasing the data capacity. However, it’s less reliable and may create higher data loss. L7 Networks L7-N-R2000 User Manual... -
Page 37: Advanced Network
Tick the check box to allow multicast traffic to pass Enable through the router from the Internet. Multicast Streams: Tick the check box to allow wireless multicast Wireless traffic to pass through the router. Enhance Mode: L7 Networks L7-N-R2000 User Manual... -
Page 38: Ipv6 Routing
(Physical Port) Interface the IP packet must use to transit out of the Router. Destination The IP address of the packets that will take this route. IPv6: Gateway: Specifies the next hop to be taken if this route is used. L7 Networks L7-N-R2000 User Manual... -
Page 39: Device Administration
Remote Admin The port number used to access the L7-N-R2000. For Port: example: http://x.x.x.x:8080 whereas x.x.x.x is the WAN IP address of the L7-N-R2000 and 8080 is the port used for the Web-Management interface. L7 Networks L7-N-R2000 User Manual... -
Page 40: Save And Restore
If you want to save the current router configuration settings, use the Save button above. Reboots the Click the Reboot button on the left side of the device: window to restart the Router. L7 Networks L7-N-R2000 User Manual... -
Page 41: System Check
The Ping Test can be used to test the status of the Internet. Ping Test: The Ping Test is used to send Ping packets to test if a computer is on the Internet. Enter the IP Address that you wish to Ping, and click Ping. L7 Networks L7-N-R2000 User Manual... -
Page 42: Schedules
24-hour period. Start Time/ If the new schedule rule does not apply to the full End Time: 24-hour period, untick the previous checkbox and then enter a specific beginning and ending time. L7 Networks L7-N-R2000 User Manual... -
Page 43: Syslog
Section 3 - Configuration Syslog The system log displays chronological event log data specified by the router user. Syslog Server: click the checkbox to save the log in the log server in the LAN side. L7 Networks L7-N-R2000 User Manual... -
Page 44: Device Info
Device Info This window displays the current information for the L7-N-R2000. It will display the LAN, WAN, and Wireless information. If your WAN connection is set up for PPPoE, a Connect button and a Disconnect button will be displayed. Use Disconnect to drop the PPPoE connection and use Connect to establish the PPPoE connection. -
Page 45: Log
View the last page of the log. Previous: View the previous page. Next: View the next page. Clear: Clear the log. Link to Log Click this button to go directly to the Log Settings Settings: window (Maintenance > Log Settings). L7 Networks L7-N-R2000 User Manual... -
Page 46: Statistics
Section 3 - Configuration Statistics The window below displays the Traffic Statistics. Here you can view the amount of packets that pass through the L7-N-R2000 on both the WAN and the LAN ports. The traffic counter will reset if the device is rebooted. -
Page 47: Wireless
Section 3 - Configuration Wireless The wireless client table displays a list of current connected wireless clients. This table also displays the connection time and MAC address of the connected wireless client. L7 Networks L7-N-R2000 User Manual... -
Page 48: Help
Section 3 - Configuration Help Click the desired hyperlink to get more information about how to use the Router. L7 Networks L7-N-R2000 User Manual... -
Page 49: Wireless Security
Section 4 - Security Wireless Security This section will show you the different levels of security you can use to protect your data from intruders. The L7-N-R2000 offers the following types of security: • WPA2 (Wi-Fi Protected Access 2) • WPA2-PSK (Pre-Shared Key) •... -
Page 50: Configure Wep
6. Click Save Settings to save your settings. If you are configuring the router with a wireless adapter, you will lose connectivity until you enable WEP on your adapter and enter the same WEP key as you did on the router. L7 Networks L7-N-R2000 User Manual... -
Page 51: What Is Wpa
WPA/WPA2 incorporates user authentication through the Extensible Authentication Protocol (EAP). EAP is built on a more secure public key encryption system to ensure that only authorized network users can access the network. L7 Networks L7-N-R2000 User Manual... -
Page 52: Configure Wpa-Psk And Wpa2-Psk
6. Click Save Settings to save your settings. If you are configuring the Router with a wireless adapter, you will lose connectivity until you enable WPA-PSK or WPA2-PSK on your adapter and enter the same passphrase as you did on the Router. L7 Networks L7-N-R2000 User Manual... -
Page 53: Configure Wpa/Wpa2-Psk
6. Click Save Settings to save your settings. If you are configuring the Router with a wireless adapter, you will lose connectivity until you enable WPA/WPA2-PSK on your adapter and enter the same passphrase as you did on the Router. L7 Networks L7-N-R2000 User Manual... -
Page 54: Configure Wpa, Wpa2, And Wpa/Wpa2 (Radius)
RADIUS server. 1812 is the default port. 7. Next to Shared Secret, enter the security key. 8. If you have a secondary RADIUS server, enter its IP address, port, and secret key. 9. Click Save Settings to save your settings. L7 Networks L7-N-R2000 User Manual... -
Page 55: Connect To A Wireless Network
Click on a network (displayed using the SSID) and click the Connect button. If you get a good signal but cannot access the Internet, check you TCP/IP settings for your wireless adapter. Refer to the Networking Basics section in this manual for more information. L7 Networks L7-N-R2000 User Manual... -
Page 56: Configure Wep
XP Wireless Utility by right-clicking ® on the wireless computer icon in your system tray (lower-right corner of screen). Select View Available Wireless Networks. 2. Highlight the wireless network (SSID) you would like to connect to and click Connect. L7 Networks L7-N-R2000 User Manual... - Page 57 It may take 20-30 seconds to connect to the wireless network. If the connection fails, please verify that the WEP settings are correct. The WEP key must be exactly the same as on the wireless router. L7 Networks L7-N-R2000 User Manual...
-
Page 58: Configure Wpa-Psk
XP Wireless Utility by right-clicking ® on the wireless computer icon in your system tray (lower-right corner of screen). Select View Available Wireless Networks. 2. Highlight the wireless network (SSID) you would like to connect to and click Connect. L7 Networks L7-N-R2000 User Manual... - Page 59 It may take 20-30 seconds to connect to the wireless network. If the connection fails, please verify that the WPA-PSK settings are correct. The WPA-PSK passphrase must be exactly the same as on the wireless router. L7 Networks L7-N-R2000 User Manual...
-
Page 60: Setting Up Wi-Fi Protection
(WCN 2.0 in Windows Vista) The L7-N-R2000 supports Wi-Fi protection, referred to as WCN 2.0 in Windows Vista. The instructions for setting this up depend on whether you are using Windows Vista to configure the Router or third party software. -
Page 61: Setting Up A Configured Router
If you are using third party software, run the appropriate Wi-Fi Protected System utility. You will be asked to either use the push button method or to manually enter the PIN. Follow the on-screen instructions. L7 Networks L7-N-R2000 User Manual... -
Page 62: Changing The Computer Name And Joining A Workgroup
Section 7 - Changing the Computer Name and Joining a Workgroup Changing the Computer Name and Joining a Workgroup The following are step-by-step directions to change the computer name and join a workgroup. 1. Click on Properties. 2. Click on the Advanced system settings link. L7 Networks L7-N-R2000 User Manual... - Page 63 Change button. 4. Go to the Computer Name/Domain Changes window and click the radio button next to the Workgroup you want to join. When you are finished, click the OK button. L7 Networks L7-N-R2000 User Manual...
-
Page 64: Configuring The Ip Address In Vista
1. Click on Properties. 2. Go to the Network and Internet window and click the appropriate Local Area Connection icon. 3. Right-click the Local Area Connection icon and then select Properties from the drop-down menu. L7 Networks L7-N-R2000 User Manual... - Page 65 Local Area Connections Properties window and enter the desired IP address in the space offered. Then click the “Use the following DNS server adresses” option on the same tab and enter the desired DNS server information. L7 Networks L7-N-R2000 User Manual...
- Page 66 7. Go to the Local Area Connection Status window and click the Details button. 8. Confirm your new settings on the Network Connection Status window. When you are finished, click the Done button. L7 Networks L7-N-R2000 User Manual...
-
Page 67: Setting Up A Connection Or Network Wirelessly
2. Go to the Set up a connection or network window and choose the Set up a wireless router or access point Set up a new wireless network for your home or business option. Click the Next button. L7 Networks L7-N-R2000 User Manual... - Page 68 3. Click the Next button on the Set up a wireless router or access point window. 4. The following window displays the system progress. 5. This window confirms that you want to create wireless network settings that are savable to a USB flash drive. L7 Networks L7-N-R2000 User Manual...
- Page 69 Click the Show advanced network security options link. 8. Select security method on the Choose advanced network security options window in the Set up a wireless router or access point wizard. Click the Next button. L7 Networks L7-N-R2000 User Manual...
- Page 70 Insert the USB flash drive into this computer window in the Set up a wireless router or access point wizard to select a destination for your network settings. Click the Next button. L7 Networks L7-N-R2000 User Manual...
- Page 71 13.Once you are finished, the To add a device or computer, follow these instructions window in the Set up a wireless router or access point wizard opens. When you are finished, click the Close button. L7 Networks L7-N-R2000 User Manual...
-
Page 72: Connecting To A Secured Wireless Network (Wep, Wpa-Psk & Wpa2-Psk)
Connecting to a Secured Wireless Network (WEP, WPA-PSK & WPA2-PSK) The following are step-by-step directions to set up a wireless connection. 1. Click on Properties. 2. Click the Manage network connections link in the Network and Sharing Center window. L7 Networks L7-N-R2000 User Manual... - Page 73 4. Select a network to connect to in the Select a network to connect to window in the Connect to a network wizard and then click the Connect button. 5. The following Connect to a network wizard window displays the system progress. L7 Networks L7-N-R2000 User Manual...
- Page 74 Connect to a network wizard is displayed. Choose to save to the network and/or start the new connection automatically. When you are finished, click the Close button. 8. The successful connection is displayed at the bottom of the Windows start up menu. L7 Networks L7-N-R2000 User Manual...
- Page 75 Section 10 - Connecting to a Secured Wireless Network (WEP, WPA-PSK & WPA2-PSK) 9. Confirm your new settings by calling up the command prompt and then entering the ipconfig command. 10.To test the new IP address, use the Ping feature of the command prompt. L7 Networks L7-N-R2000 User Manual...
-
Page 76: Connecting To An Unsecured Wireless Network
Connecting to an Unsecured Wireless Network The following are step-by-step directions to set up an unsecured wireless connection. 1. Click on Properties. 2. Go to the Network and Sharing Center window and click the Manage Network Connections link. L7 Networks L7-N-R2000 User Manual... - Page 77 4. Select a network to connect to in the Select a network to connect to window in the Connect to a network wizard and then click the Connect button. 5. Confirm your desire to connect anyway on the following Network Connection Status window. L7 Networks L7-N-R2000 User Manual...
- Page 78 Connect to a network wizard is displayed. Choose to save to the network and/or start the new connection automatically. When you are finished, click the Close button. 8. The successful connection is displayed at the bottom of the Windows start up menu. L7 Networks L7-N-R2000 User Manual...
- Page 79 Section 11 - Connecting to an Unsecured Wireless Network 9. Confirm your new settings by calling up the command prompt and then entering the ipconfig command. 10.To test the new IP address, use the Ping feature of the command prompt. L7 Networks L7-N-R2000 User Manual...
-
Page 80: Troubleshooting
1. Why can’t I access the web-based configuration utility? When entering the IP address of the L7 Networks router (192.168.0.1 for example), you are not connecting to a website on the Internet or have to be connected to the Internet. The device has the utility built-in to a ROM chip in the device itself. - Page 81 • Close your web browser (if open) and open it. • Access the web management. Open your web browser and enter the IP address of your L7 Networks router in the address bar. This should open the login page for your the web management.
- Page 82 ® ® press Enter (or click OK). • Once the window opens, you’ll need to do a special ping. Use the following syntax: ping [url] [-f] [-l] [MTU value] Example: ping yahoo.com -f -l 1472 L7 Networks L7-N-R2000 User Manual...
- Page 83 • To change the MTU enter the number in the MTU field and click the Save Settings button to save your settings. • Test your email. If changing the MTU does not resolve the problem, continue changing the MTU in increments of ten. L7 Networks L7-N-R2000 User Manual...
-
Page 84: Wireless Basics
Strictly adhering to the IEEE standard, the L7 Networks wireless family of products will allow you to securely access the data you want, when and where you want it. You will be able to enjoy the freedom that wireless networking delivers. -
Page 85: What Is Wireless
L7 Networks is the worldwide leader and award winning designer, developer, and manufacturer of networking products. L7 Networks delivers the performance you need at a price you can afford. L7 Networks has all the products you need to build your network. - Page 86 Who uses wireless? Wireless technology as become so popular in recent years that almost everyone is using it, whether it’s for home, office, business, L7 Networks has a wireless solution for it. Home • Gives everyone at home broadband access •...
-
Page 87: Tips
The wireless connection in public places is usually called “hotspots”. Using a L7 Networks Cardbus Adapter with your laptop, you can access the hotspot to connect to Internet from remote locations like airports, hotels, coffee shops, libraries, restaurants, and convention centers. -
Page 88: Wireless Modes
An Infrastructure network contains an Access Point or wireless router. All the wireless devices, or clients, will connect to the wireless router or access point. An Ad-Hoc network contains only clients, such as laptops with wireless cardbus adapters. All the adapters must be in Ad-Hoc mode to communicate. L7 Networks L7-N-R2000 User Manual... -
Page 89: Networking Basics
Check your IP address After you install your new L7 Networks adapter, by default, the TCP/IP settings should be set to obtain an IP address from a DHCP server (i.e. wireless router) automatically. To verify your IP address, please follow the steps below. -
Page 90: Statically Assign An Ip Address
2000 - From the desktop, right-click My Network Places > Properties. ® Step 2 Right-click on the Local Area Connection which represents your L7 Networks network adapter and select Properties. Step 3 Highlight Internet Protocol (TCP/IP) and click Properties. Step 4 Click Use the following IP address and enter an IP address that is on the same subnet as your network or the LAN IP address on your router. -
Page 91: Technical Specifications
• WPA - Wi-Fi Protected Access (TKIP, MIC, IV Expansion, Shared Key Authentication) Wireless Operating Range2 • 802.1x • Indoors - up to 328 ft. (100 meters) • 64/128-bit WEP • Outdoors- up to 1312 ft. (400 meters) • PIN/PBC WPS L7 Networks L7-N-R2000 User Manual... - Page 92 * Maximum wireless signal rate derived from IEEE Standard 802.11b, 802.11g and 802.11n specifications. Actual data throughput will vary. Network conditions and environmental factors, including volume of network traffic, building materials and construction, and network overhead, lower actual data throughput rate. Environmental factors will adversely affect wireless signal range. L7 Networks L7-N-R2000 User Manual...
-
Page 93: Ce Mark Warning
Appendix C - Technical Specifications Copyright ©2012 by L7 Networks Corporation/L7 Networks Systems, Inc. All rights reserved. CE Mark Warning: This is a Class B product. In a domestic environment, this product may cause radio interference, in which case the user may be required to take adequate measures.
Need help?
Do you have a question about the L7-N-R2000 and is the answer not in the manual?
Questions and answers