Table of Contents
Advertisement
Quick Links
Advertisement
Table of Contents

Related Manuals for Dahua ASA1222E


Summary of Contents for Dahua ASA1222E
- Page 1 Time Attendance (Standalone) User’s Manual V1.0.0...
-
Page 2: Table Of Contents
Table of Contents Table of Contents ........................2 Cybersecurity Statement and Recommendations ..............4 Cybersecurity Statement ......................4 Cybersecurity Recommendations ..................... 4 Product Overview ....................... 1 Introduction ........................1 Device Installation ...................... 2 Checklist ......................... 2 Panel and Port ........................ 2 Dimensions ........................ - Page 3 3.5.2 Features ......................21 3.5.3 System ......................25 USB ..........................27 3.6.1 Import ....................... 27 3.6.2 Export ....................... 28 System Info ........................28 3.7.1 Log ........................28 3.7.2 Management ....................29 3.7.3 Registration Info ....................29 3.7.4 Device Info ......................30 Attendance Operation ....................
-
Page 4: Cybersecurity Statement And Recommendations
To the extent not prohibited by applicable laws, Dahua and its employees, licensees, and affiliates are not liable for personal injury, or any incidental, special, indirect, or consequential damages whatsoever, including, without limitation, damages for loss of... - Page 5 2. Change Default HTTP and TCP Ports: ● Change default HTTP and TCP ports for Dahua systems. These are the two ports used to communicate and to view video feeds remotely. ● These ports can be changed to any set of numbers between 1025-65535. Avoiding the default ports reduces the risk of outsiders being able to guess which ports you are using.
- Page 6 In the event that your social media, bank, email, etc. account is compromised, you would not want someone collecting those passwords and trying them out on your video surveillance system. Using a different username and password for your security system will make it more difficult for someone to guess their way into your system.
- Page 7 This will prevent any visitors or unwanted guests from getting access to the same network the security system needs in order to function properly. For latest information about Dahua the cybersecurity statement and recommendations, please visit www.dahuasecurity.com.
-
Page 8: Product Overview
1 Product Overview Introduction Time attendance is an attendance device signing by fingerprint and password. The device supports local attendance setup, USB attendance statistical export with no software. It has simple and neat appearance, suitable for commercial building, shop, factory and etc. The device mainly supports: ... -
Page 9: Device Installation
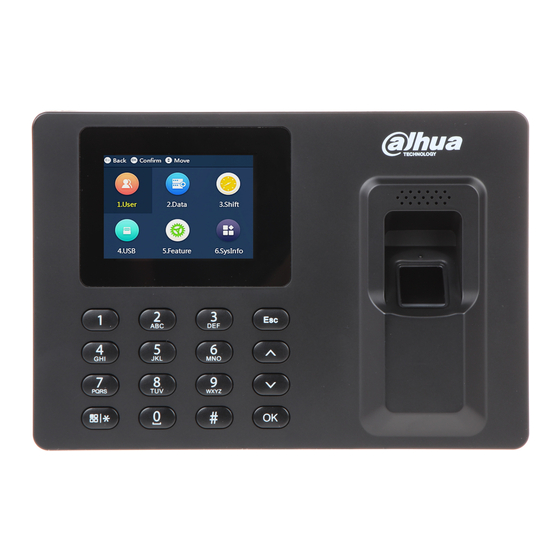
2 Device Installation Checklist Name Quantity Unit Power adaptor Power line Screw bag*1 Screw Expansion bolt*3 Quick Start Guide Chart 2-1 Panel and Port Access controller appearance is shown in Figure 2-1 and Figure 2-2. Figure 2-1 Icon Note Number key for input of number and letter 0~9... -
Page 10: Dimensions
Figure 2-2 Dimensions Figure 2-3 Installation Time attendance installation is shown in Figure 2-4. - Page 11 Figure 2-4 Installation steps: Step 1. Stick installation map on the surface you are going to install, and dig hole in accordance with hole position on the map. Insert expansion bolt into installation hole. Step 2. Fix screw on wall in accordance with the map, leave a space of 2mm~2.5mm between screw and wall.
-
Page 12: System Operation
3 System Operation Note: For fingerprint input, see Appendix 1. For language input, see Appendix 2. Main Menu Plug in power, the device enters running status, and you can see time display when it boots up, see Figure 3-1. Note: If you have no operation for a while in an interface, the system will go standby. -
Page 13: User
Figure 3-2 Press to select, click or directly click number key to enter each function. User You can add attendance user and department, and search and edit user and department info. You can link user to department as to set shift of the entire department. Enter main menu, click , select User , click . - Page 14 password and etc. A user can register for attendance by fingerprint and password. The system supports up to 1000 users and 5 admin users. Step 1. Select “User>Add New User”, click . See .Figure3-4 and Figure3-5 Figure 3-4 Figure 3-5 Step 2.
-
Page 15: Edit User
Parameter Note Collect fingerprint, one user can max collect 3 FP (fingerprint). Each FP1~FP 3 fingerprint requires three times of verification. Please operate according to audio prompt. Enter password, password supports 1~8 digits of number. Department Click to select preset department, see Ch 3.2.3. Click to select. -
Page 16: Set Department
Select user, click to delete. Select user, click to modify user name, department, schedule mode and user level. If fingetprint and password (PWD) exist, click and after it is deleted, you can input again. User ID cannot be modified. ... -
Page 17: Shift
Shift You can set shift schedule by attendance time, or allocate corresponding shift to department or user. Enter main menu, click to select Shift, click . Or directly click number 【3】. See Figure 3-8. Figure 3-8 3.3.1 Set Shift The system supports 24 shifts. You can set attendance period of shift. 3.3.1.1 Shift Step 1. - Page 18 Step 2. Select shift no., click Step 3. Click to select time you want to set. Step 4. When you click number keys to set time, or click to adjust time. Click to confirm. Select next setup position, see Chart 3-2. Parameter Note Duty T1, Duty T2...
-
Page 19: Schedule Setup
3.3.1.3 Export Schedule Table Warning Make sure you have inserted USB stick, and DO NOT eject USB stick during downloading or operate the system, otherwise, upgrading will fail and attendance cannot work properly. You can download schedule info in the system to USB stick. Select “Shift>Schedule Setup>Export Schedule, click The screen asks you to wait for a while and then it shows successfully downloaded. - Page 20 Figure 3-11 Step 3. Click to select date, click to edit shift. Step 4. Click number key to enter shift. You can click to select shift, click to confirm. 1-24 means shift in setup. Null and 0 are off duty. ...
- Page 21 Figure 3-12 Step 2. Click to select preset department, click , see Figure 3-13. Figure 3-13 Step 3. Click number key, input shift, as well as click to select shift. Click to confirm. 1-24 means shift in setup. Null and 0 are off duty.
- Page 22 3.3.2.3 Import Schedule Table Warning: Make sure you have inserted USB stick, and DO NOT eject USB stick during upgrading or operate the system, otherwise, upgrading will fail and attendance cannot work properly. According to downloaded schedule table, fill in data, and upload to corresponding device via USB.
-
Page 23: Set Late Time And Early Leave Time
3.3.3 Set Late Time and Early leave Time Set allowed late time and early leave time range. Within these time ranges, record of attendance is normal. The set late time and early leave time are valid for all shifts. Late time, which is sign in time later than general work start time, for example, work start at 8 AM, if the late time is 5 minutes, then sign in after 8:05 AM is being late and sign in before 8:05 AM is normal. -
Page 24: Query User Attendance Log
Figure 3-14 3.4.1 Query User Attendance Log . See Figure 3-15. Step 1. Select Data>Query User ATT. Log, click Figure 3-15 Step 2. Enter User ID, and you can see name item, click See Figure 3-16. -
Page 25: Export Monthly Attendance Log
Figure 3-16 Note: In standby interface click , enter password of fingerprint of user you want to search, to view attendance record of this user. 3.4.2 Export Monthly Attendance Log You can export attendance log of all users in the selected month into USB stick, including device no., work ID, name, attendance type and attendance time. -
Page 26: Export Monthly Att. Report
click to confirm. Step 4. Click to export file. Export folder named “import export file_00001”, stored in folder named “ATT file_00001”, while the number means device no. 3.4.3 Export Monthly ATT. Report You can export attendance record of the selected month into USB stick, including attendance detail, attendance record, abnormal attendance record and summary. -
Page 27: Feature
Feature Feature includes date and time, Feature and system. After you enter main menu, click to select Feature, click . Or directly click number 【5】. See Figure 3-19. Figure 3-19 3.5.1 Date and Time Set system time, date and display format of date. . -
Page 28: Features
Select “Date Format”, click Click to switch date format. Click to confirm. Set device displayed date. Select setup date, click Click to select set position, click Click number key to set period or click to adjust time, click to confirm. Select next position to set. Click . - Page 29 . See Figure 3-21. Step 1. Select Feature>Function>State Switch Time, click Figure 3-21 Step 2. Click to select setup position, click to edit. Step 3. Click number key to set period or click to adjust time, click to confirm. Step 4. Click to switch status, click to confirm status.
- Page 30 Figure 3-22 Step 2. Click to select bell you want to set, click to select row. Step 3. Click to select detail config item, such as bell time, bell time and bell delay, click to edit corresponding item. Parameter Note Time Bell scheduled time, when this time is reached, it auto bells.
- Page 31 3.5.2.4 Verification Method The system supports attendance by fingerprint, password, fingerprint or password. Please select attendance method, and meantime other methods are invalid. Fingerprint, only support fingerprint. Password, only support password. Password or fingerprint, password and fingerprint both are supported. Step 1.
-
Page 32: System
USB Self Check Step 1. Select Feature>Function>Self Check>USB Self Check, click Step 2. Insert USB stick, see if you can recognize USB stick and if yes, test is successful. 3.5.3 System 3.5.3.1 Tone Switch Enable or disable tone of key. Step 1. - Page 33 Step 1. Select Feature>System>Factory Restore, click Step 2. Click to execute. 3.5.3.5 Restore (Save User Info and Logs) After you execute this option, all parameters will be restored to default but user info and logs will be kept. Step 1. Select Feature>System>Restore (Save User Info and Logs), click Step 2.
-
Page 34: Usb
Step 1. Select Features>System>Device ID, click to edit. Step 2. Click number key or click to adjust device no., and click to confirm. You can export user, fingerprint, bell and auto switch time info to USB stick. After you enter main menu, click to select USB, click Or you can directly click 【4】key. -
Page 35: Export
Import bell info, please edit corresponding “bell period table.xls” file. Import auto switch time, please edit corresponding “auto switch time table.xls” file. Step 1. Import file and copy to USB stick. Step 2. Click to select corresponding import item, click Step 3. -
Page 36: Management
Figure 3-24 Step 2. Enter user IF, and you can see user name, click The screen shows user attendance time, attendance method and attendance status. 3.7.2 Management This function is for administrator only, used to search login info of user. Select Sys Info>Management, click 3.7.3 Registration Info It can show max capacity and current capacity of user, administrator, FP, PWD, ATT... -
Page 37: Device Info
Figure 3-25 3.7.4 Device Info You can view device type, version and device no. Select Sys Info>Device Info, click Attendance Operation When you complete setup of user management and attendance shift, you can execute attendance in standby interface. Password attendance Click number key, enter “user ID”, click , enter password. -
Page 38: Attendance Calculation
Chart 3-4 3.9.1 Attendance Calculation For example, there are three periods while calculation methods of one or two period are identical. Normal Attendance (all following periods included) 00:00~9:05 sign in 11:55~12:59 sign out 13:00~13:05 sign in 17:25~18:07 sign out Note: ... -
Page 39: Length Statistics
If time interval between two periods is odd, such as second period: 14:00~17:30, overtime work period: 18:45~20:00. Two periods are 17:30~18:45, interval is 75 minutes. Then 17:30~18:07 is sign out of second period, and the system only takes the last sign out as attendance in case you sign out more than once. -
Page 40: Faq
4 FAQ Q: When I sign, the system asks me to re-press my finger, and attendance failed. A: Check if you have recorded in your fingerprint already. Q: Bell does not work. A: Check if bell setup is correct. Q: I cannot update via USB. A: Check if device has recognized USB stick, and check update file name. -
Page 41: Appendix 1 Note Of Fingerprint
Appendix 1 Note of Fingerprint Warning Before you press your finger on the collector, please make sure your finger is clean without oil or water. When you record fingerprint, place finger flat at the center of collector. Recommended Fingerprint Index finger, middle finger and ring finger are recommended. - Page 42 Wrong method Figure A-3...
-
Page 43: Appendix 2 Text Input
Appendix 2 Text Input The device support text input of English, number and symbol. Click to switch. Number Step 1. Click to switch input, see Figure A2-1. Figure A2-1 Step 2. Enter number, click to confirm, see Figure A2-2. Figure A2-2 English Step 1. - Page 44 Step 2. Click number key, enter corresponding symbol. Click to flip page, see Figure A2-6. Figure A2-6 Step 3. Click to confirm. Note: This manual is for reference only. Slight difference may be found in user interface. All the designs and software here are subject to change without prior written notice.
Need help?
Do you have a question about the ASA1222E and is the answer not in the manual?
Questions and answers