Table of Contents
Advertisement
Advertisement
Table of Contents

Related Manuals for Stryker sdc classic


Summary of Contents for Stryker sdc classic
- Page 1 SDC Classic™ 240-050-989 User Guide...
-
Page 3: Table Of Contents
Contents Warnings and Cautions ............ 3 Symbols and Definitions ..........5 Product Description/Intended Use ......7 Indications/Contraindications ..........7 Operator Profile ...............7 Package Contents ..............8 Accessories ................8 System Overview ..............9 Setup and Interconnection .......... 13 Connecting a Printer .............15 Operation ................17 Powering the System On and Off .........17 Starting a New Case .............17 Capturing Images ..............17... -
Page 5: Warnings And Cautions
Install this device in an operating room that complies with all applicable IEC, CEC, and NEC requirements for safety of electrical devices. Use only clean, dry, undamaged Stryker brand media. The use of damaged, wet, or incompatible media will void the warranty and may result in the malfunctioning of this equipment. - Page 6 10. Ensure that all equipment connected to the SDC Classic™ has proper isolations. 11. To avoid risk of fire, do not use this device in the presence of flammable anesthetics. 12. Avoid direct exposure to the laser beam of the DVD/CD drive, as it is harmful to the eyes.
-
Page 7: Symbols And Definitions
Symbols and Definitions This device and its labeling contain symbols that provide important information for the safe and proper use of the device. These symbols are defined below. Warning Symbols Warning/Caution: See Hazardous voltage Instructions for Use present Device Symbols Mouse Keyboard Monitor... - Page 8 Ambient temperature Relative humidity range range Lot number Product number Denotes compliance to CSA C22.2 No. Serial Number 601.1-M90, and UL 2601-1. Protective earth Equipotentiality ground Denotes compliance to 93/42/EEC, Medical Device Directive This product contains electrical waste or electronic equipment. It must not be disposed of as unsorted municipal waste and must be collected separately.
-
Page 9: Product Description/Intended Use
Hard Drives, or USB dongles, for later viewing on a personal computer, a DVD player, or from the SDC Classic itself. The SDC Classic records images on a built-in hard drive, where they can be easily accessed after the surgical procedure. The images stored on the hard drive can be named and burned to a CD or DVD through a control panel located on the front of the unit. -
Page 10: Package Contents
Package Contents Carefully unpack the SDC Classic and verify that all components have been received intact. You should receive: 105-033-001 (1) Medical grade power cord 105-198-707 (1) 6-foot DVI-I cable 105-187-988 (1) 6-foot USB cable 105-198-102 (1) Blank DVD+RW 1000-401-087 (1) User guide Save all packing materials for future storage or transport. -
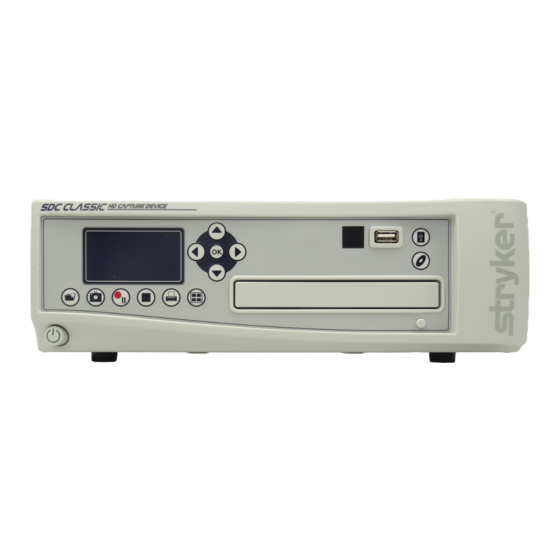
Page 11: System Overview
System Overview Front Panel 10 9 LCD status screen - see the “LCD Status Screen” section of this manual. Menu navigation - use the arrow keys to navigate through the menu. Remote control USB Port Write to USB drive Write to DVD drive DVD drive Preview previous four images Print... - Page 12 Stryker Endoscopy 5900 Optical Court San Jose, CA 95138 USA S-VID IN S-VID OUT COMP IN COMP OUT Stryker European Rep. - RA/QA Manager ZAC Satolas Green Pusignan Av. De Satolas Green 69881 MEYZIEU Cedex, France SIDNE IN MADE IN USA...
- Page 13 Remote Control Channel 1 video and image: capture, record, stop Channel 2 not available Print images Display previous image on OSD Voice annotation (reserved for future use) Navigation and Select (reserved for future use)
- Page 14 LCD Status Screen The status screen provides information about currently selected options for capturing and printing images. These options can be edited in the Printer Settings menu. Recording mode Non-recording mode Video timer Signal status Size of video Number of images captured Number of images captured Number of videos captured...
-
Page 15: Setup And Interconnection
Do not connect the SDC Classic to extension cords or multiple portable socket outlets (power strips) other than those built into the Stryker cart. Do not connect items to the SDC Classic that are not intended for use with the system. RF and other mobile communications equipment may affect the normal function of the SDC Classic. - Page 16 Warning When the SDC Classic is interconnected with other electrical devices, leakage currents may be additive, resulting in electromagnetic emissions that can interfere with the normal function of electronic medical equipment. To properly control electromagnetic emissions and avoid potential harm to the...
-
Page 17: Connecting A Printer
Connecting a Printer Warning The printer must be properly connected to the isolation transformer prior to use. Failure to do so may result in a higher leakage current for the printer. Note See the “Technical Specifications” for approved printers and transformers. - Page 18 Stryker Endoscopy 5900 Optical Court San Jose, CA 95138 USA S-VID IN S-VID OUT COMP IN COMP OUT Stryker European Rep. - SIDNE - AUDIO RA/QA Manager ® ZAC Satolas Green Pusignan Av. De Satolas Green 69881 MEYZIEU Cedex, France...
-
Page 19: Operation
Operation Powering the System On and Off Press the power button on the console to power the system on or off. Starting a New Case Press the New Case button. Select Yes or Cancel. Press OK. Capturing Images Press the Capture Image button. Recording Video Press the Record button to begin recording video. -
Page 20: Printing Images
Printing Images Select the images to be printed. • Press and hold the Preview Images button to see the image album. • To deselect an image, highlight the image number and press OK. Images with a checkmark next to the number indicates the image will be printed. Press the Print button. -
Page 21: Editing Device Settings
Editing Device Settings Editing Printer Settings To edit printer settings, use the navigational buttons on the control panel. Menu Sub-menu Options Description Print all Prints all selected images Print Reprints the previous print Print previous Cancel all Cancels all pending print jobs Select the number of images to be printed per page. - Page 22 Editing Video Settings To edit video settings, use the navigational buttons on the control panel. Menu Sub-menu Options Description Select the video input source for live video recording and RGBHV Video Source image capture. S-Video Composite NTSC Select NTSC or PAL mode Video Format 1188 Select the camera to be used...
- Page 23 Editing Save Settings To edit save settings, use the navigational buttons on the control panel. Menu Sub-menu Options Description Select the DVD format. If DVD Data is selected, the DVD Format DVD Data system will save the case as video and image data files. Bitmap Select the image format.
- Page 24 Editing System Settings To edit system settings, use the navigational buttons on the control panel. Menu Sub-menu Options Description English Select the language that will display on the LCD screen. French German Spanish Language Italian Chinese Japanese mm/dd/yyyy Select the date format to be printed on each page.
-
Page 25: Troubleshooting
Image limit reached Begin a new case to capture more images. SIDNE® comm error Ensure that SIDNE is connected properly. Reboot the SDC Classic™ and SIDNE. Error printing. No image captured/ Capture images and then select them selected to print. - Page 26 No live video on the monitor • Check the cable connections. • Ensure that the camera is powered on. • Ensure that the proper video source is selected. • If the video is routed through SIDNE®, ensure that SIDNE is powered on. Print errors • Ensure there aren’t any paper jams. • Ensure the printer has enough ink. • Ensure the printer door is closed. • Ensure the printer has paper. • Ensure the printer is powered on. • Ensure the printer cable is connected.
-
Page 27: Cleaning And Maintenance
Caution Do not sterilize the unit as product damage may result. Maintenance SDC Classic requires no preventative or periodic maintenance. However, Stryker recommends you reboot the system daily for best performance. Disposal This product contains electrical waste or electronic equipment. -
Page 28: Technical Specifications
Technical Specifications Environmental Specifications Operating temperature: 10 – 40°C Operating humidity: 30 – 75% RH Transport/storage temperature: -20° – 60°C Transport/storage humidity: 10 – 85% RH System Type MPEG -1 or -2 compression engine with full IP encoding Video Inputs Input Resolution (1) S-Video:... -
Page 29: Equipment Classification
Disc Recording Formats CD-R, DVD-R, DVD+R (single session), DVD+RW NTFS format supported MAC users will only have read capabilities Remote Control Wireless infrared, camera-head triggering Power Consumption 100 – 240VAC~ 50/60Hz, 4A maximum Safety and EMC Compliance IEC 60601-1:1988 + A1:1991 + A2:1995 CAN/CSA C22.2 No.601.1-M90 UL 60601-1:2003 AS/NZS 3200.1.0:1998... - Page 30 Printers Supported HP D7260 HP D5460 Stryker SDP1000 Kodak ESP 7250 HP Photosmart Premium C310 Isolation Transformer Stryker 240-099-050 (2KVA transformer) Stryker 240-050-705 (180VA transformer) Display 128 × 64 pixel LCD screen...
-
Page 31: Electromagnetic Compatibility
Caution If the SDC Classic is used adjacent to or stacked with other equipment, observe and verify normal operation of the SDC Classic in the configuration in which it will be used prior to using it in a surgical procedure. - Page 32 Guidance and Manufacturer’s Declaration: Electromagnetic Emissions SDC Classic™ is intended for use in the electromagnetic environment specified below. The customer or the user of SDC Classic should ensure that it is used in such an environment. Emissions test Compliance Electromagnetic Environment - guidance SDC Classic uses RF energy only for its internal function;...
- Page 33 Guidance and Manufacturer’s Declaration--Electromagnetic Immunity The SDC Classic™ system is intended for use in the electromagnetic environment specified below. The user of the SDC Classic system should ensure that it is used in such an environment. IEC 60601 Test Compliance...
- Page 34 RF transmitters, an electromagnetic site survey should be considered. If the measured field strength in the location in which the SDC Classic system is used exceeds the applicable RF compli- ance level above, the SDC Classic system should be observed to verify normal operation. If abnormal performance is observed, additional measures may be necessary, such as reorienting or relocating the SDC Classic unit.
- Page 35 The SDC Classic™ system is intended for use in an electromagnetic environment in which radiated RF disturbances are controlled. The user of the SDC Classic system can help prevent electromagnetic interference by maintaining a minimum distance between portable and mobile RF communications equipment (transmitters) and the SDC Classic system as recommended below, according to the maximum output power of the communications equipment.
-
Page 36: Warranty
Stryker Endoscopy. If a valid warranty claim is received within the Warranty Period, Stryker will, in its sole discretion: (1) repair the product at no charge, (2) replace the product at no charge with a product that is at least functionally equivalent to the original product, or (3) refund the purchase price of the product. In any event, Stryker’s... -
Page 37: Return Policy
Return Policy A Returned Merchandise Authorization (“RMA”) number must be obtained from Stryker Endoscopy before returning product. To obtain an RMA number, please contact Stryker Endoscopy Customer Service at 1-800-624-4422. Please send any returned products to: Stryker Endoscopy, Attn: Service Unit, 5900 Optical Court, San Jose, CA 95138. - Page 40 Stryker Endoscopy 5900 Optical Court San Jose, CA 95138 USA 1-800-624-4422 U.S. Patents: www.stryker.com/patents 2016/02...
Need help?
Do you have a question about the sdc classic and is the answer not in the manual?
Questions and answers