Table of Contents
Advertisement
Advertisement
Table of Contents

Summary of Contents for Travelux Quest
- Page 1 User Manual Travelux Quest Mid-Wheel...
- Page 2 General information You have just purchased an Van Os Medical UK ltd. power chair and we want to thank you for the confidence in our Travelux products. The power chair is a quality product. The policy of Van Os Medical UK ltd. is to continually improve the quality and reliability of our products.
- Page 3 User Manual Fill out the information on your authorized dealer below: Company: Address: Telephone number: Fax number: Email address: Website: ~ 2 ~ © 2013 VAN OS MEDICAL B.V., Koperslagerij 3, 4651 SK, Steenbergen, Nederland Tel. +31-(0)167-573020, Fax +31-(0)167-573381, E-mail: info@vanosmedical.nl, www.vanosmedical.nl...
-
Page 4: Table Of Contents
User Manual IDENTIFICATION ......................4 GENERAL EXPLANATION CONCERNING YOUR POWER CHAIR ........5 2.1 C OMPONENTS OF THE POWER CHAIR ........................2.2 G ENERAL EXPLANATION OF THE FUNCTION AND POSSIBILITIES OF YOUR POWER CHAIR ........SAFETY REGULATIONS ....................6 3.1 G ENERAL SAFETY REGULATIONS .......................... -
Page 5: Identification
User Manual IDENTIFICATION Your Travelux Quest power chair is equipped with a unique serial number. You can find this number on the frame of your power chair. Below is an example of the frame label on which you can find the serial number. Furthermore you will find the explanation of the various data stored on the frame label listed below. - Page 6 ~ 4 ~ © 2013 VAN OS MEDICAL B.V., Koperslagerij 3, 4651 SK, Steenbergen, Nederland Tel. +31-(0)167-573020, Fax +31-(0)167-573381, E-mail: info@vanosmedical.nl, www.vanosmedical.nl...
-
Page 7: General Explanation Concerning Your Power Chair
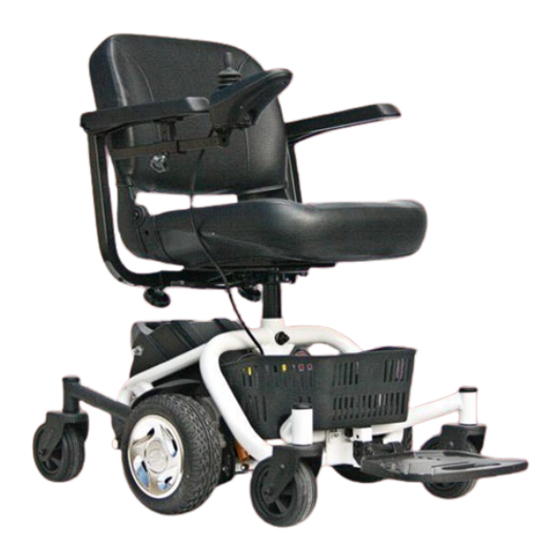
User Manual GENERAL EXPLANATION CONCERNING YOUR POWER CHAIR 2.1 Components of the power chair Armpad Front wheel Seat Middle Wheel (Drive wheel) Seat post Rear wheel Frame Battery pack Basket Armrest Ball head Joystick Footplate Backrest Your power chair is equipped with a number of elements and parts. You should know these before continue reading this user manual. -
Page 8: General Explanation Of The Function And Possibilities Of Your Power Chair
If used correctly, the Travelux Quest is an utmost safe and stable product, if the instructions for use as described in this manual are followed. -
Page 9: Instructions For Use
INSTRUCTIONS FOR USE Your Travelux Quest is a battery working personnel mobility vehicle. Before you take your first trip, you should familiarize yourself well with the operation of the vehicle and with all operating elements. Take your time to test all functions and driving modes. To guarantee your and others safety. -
Page 10: Joystick
User Manual 4.1 Joystick Battery indicator / Joystick display On/Off Button Horn Speed Setting indicator Speed Setting SLOWER Speed Setting FASTER Joystick Picture 1 On / off button Push the on / off button to turn on the power, see picture 1. The 10 LED lights will flash once and a number of LED lights will remain depending on the state of the battery charge. - Page 11 The joystick has been displaced out of the neutral position while the control system is switched on. Release the joystick to clear the fault. Note that this is not a fault. If the condition persists after removing your hand, the joystick may be damaged. Contact your Travelux dealer.
- Page 12 ~ 9 ~ © 2013 VAN OS MEDICAL B.V., Koperslagerij 3, 4651 SK, Steenbergen, Nederland Tel. +31-(0)167-573020, Fax +31-(0)167-573381, E-mail: info@vanosmedical.nl, www.vanosmedical.nl...
-
Page 13: Getting On And Off
Switch on the control system again and try to drive the power chair. If the safety circuits operate again, switch off and do not try to use the power chair. Contact your Travelux dealer. 4.2 Getting on and off W Warning: When getting on or off your power chair, keep your weight toward the middle of the deck. - Page 14 ~ 10 ~ © 2013 VAN OS MEDICAL B.V., Koperslagerij 3, 4651 SK, Steenbergen, Nederland Tel. +31-(0)167-573020, Fax +31-(0)167-573381, E-mail: info@vanosmedical.nl, www.vanosmedical.nl...
-
Page 15: Freewheel Mode
User Manual Getting off your power chair: Make certain that the power is turned off; Flip up the armrests; Unfasten the seat belt (if your power chair is equipped with one); Flip up the footplate; Carefully stand and step away from the power chair. 4.3 Freewheel mode To disengage the brakes and to put your power chair in the freewheel position, push the freewheel levers down, see picture 2;... - Page 16 ~ 11 ~ © 2013 VAN OS MEDICAL B.V., Koperslagerij 3, 4651 SK, Steenbergen, Nederland Tel. +31-(0)167-573020, Fax +31-(0)167-573381, E-mail: info@vanosmedical.nl, www.vanosmedical.nl...
-
Page 17: Locking / Unlocking The Power Chair
Maximum speed / profile indicator flashes This indicates the speed of the power chair is being limited for safety reasons. Contact your Travelux dealer. 4.5 Locking / unlocking the power chair The VR2 control system can be locked to prevent unauthorized use. - Page 18 ~ 12 ~ © 2013 VAN OS MEDICAL B.V., Koperslagerij 3, 4651 SK, Steenbergen, Nederland Tel. +31-(0)167-573020, Fax +31-(0)167-573381, E-mail: info@vanosmedical.nl, www.vanosmedical.nl...
-
Page 19: Motor Braking System
User Manual If the door opens away from you Use one hand to turn the door knob or to operate the push bar; Use your other hand to control the power chair by gently operating the joystick to move your power chair slowly forward; Use your arm to push the door gently open;... - Page 20 ~ 13 ~ © 2013 VAN OS MEDICAL B.V., Koperslagerij 3, 4651 SK, Steenbergen, Nederland Tel. +31-(0)167-573020, Fax +31-(0)167-573381, E-mail: info@vanosmedical.nl, www.vanosmedical.nl...
- Page 21 User Manual EMI / RFI and your power chair electrically powered vehicles, including power chairs are susceptible to electromagnetic interference / radio frequency interference (EMI / RFI). This interference could result in abnormal, unintended movement of your power chair. W Warning: Unintended movement or brake release could cause an accident or injury.
- Page 22 ~ 14 ~ © 2013 VAN OS MEDICAL B.V., Koperslagerij 3, 4651 SK, Steenbergen, Nederland Tel. +31-(0)167-573020, Fax +31-(0)167-573381, E-mail: info@vanosmedical.nl, www.vanosmedical.nl...
-
Page 23: Instructions For Use And Mounting Options
User Manual MAKING ADJUSTMENTS TO YOUR POWER CHAIR CAN CAUSE BIG RISKS FOR YOUR SAFETY AND THE FUNCTION OF YOUR POWER CHAIR. ADJUSTMENTS MADE BY YOURSELF ARE STRONGLY ADVISED AGAINST AND CARRIED OUT AT YOUR OWN RISK. INSTRUCTIONS FOR USE AND MOUNTING OPTIONS 5.1 Technical information Length 98 cm... - Page 24 User Manual Armrest angle Lift the armrest up, see picture 6; To loosen turn the jam nut counter clockwise; Turn the adjustment bolt using a 5mm Allen wrench to raise or lower the armrest angle. Turning the bolt counter-clockwise will raise the angle. Turning the bolt clockwise will lower the angle.
- Page 25 ~ 16 ~ © 2013 VAN OS MEDICAL B.V., Koperslagerij 3, 4651 SK, Steenbergen, Nederland Tel. +31-(0)167-573020, Fax +31-(0)167-573381, E-mail: info@vanosmedical.nl, www.vanosmedical.nl...
-
Page 26: Seat Adjustments
User Manual 5.3 Seat adjustments W Warning: Be sure the seat is correctly locked before seating! Seat rotation lever Push down the seat rotation lever and rotate the seat to the desired position; Release the handle to lock the seat. Seat height adjustment The height of the seat is easy to adjust. - Page 27 ~ 17 ~ © 2013 VAN OS MEDICAL B.V., Koperslagerij 3, 4651 SK, Steenbergen, Nederland Tel. +31-(0)167-573020, Fax +31-(0)167-573381, E-mail: info@vanosmedical.nl, www.vanosmedical.nl...
-
Page 28: Footplate Adjustments
User Manual 5.4 Footplate adjustments Footplate angle adjustment Fold the footplate upward for easy access to the angle adjustment bolt, see picture 9; Turn the jam nut counter clockwise with a 17mm wrench to loosen; Use an 8mm Allen wrench to turn the adjustment bolt. Turn the adjustment bolt counter-clockwise to increase the footplate angle. -
Page 29: Joystick Adjustments
User Manual 5.5 Joystick adjustments Joystick bracket length adjustment Loosen the adjustment knob, see picture 11; Slide the joystick holder in or out to the desired position; Tighten the adjustment knob. Picture 11 Joystick position Loosen the joystick adjustment screw, see picture 12; Slide the joystick forward and remove the joystick;... - Page 30 ~ 19 ~ © 2013 VAN OS MEDICAL B.V., Koperslagerij 3, 4651 SK, Steenbergen, Nederland Tel. +31-(0)167-573020, Fax +31-(0)167-573381, E-mail: info@vanosmedical.nl, www.vanosmedical.nl...
-
Page 31: Disassembly
Connect the joystick control to the VR2 power module, see picture 13; Picture 13 Battery replacement If your batteries need replacement, contact your Travelux dealer. Removing the seat Fold the backrest down; Grasp the seat firmly on each side, lift the seat upwards until the seat is out of the seat post;... - Page 32 User Manual Removing armrest Loosen the armrest width adjustment screw of the armrest receiver tube at the bottom rear of the seat frame, see picture 14; Move the armrest outside, so that the armrest can be removed from the power chair see picture 15.
-
Page 33: Assembly
User Manual 5.7 Assembly Battery pack Disconnect the joystick cable from the VR2 controller; Lift the battery pack upwards and replace it back onto the power chair. Placing the seat Fold down the backrest; Grasp the seat firmly on each side, lift the seat and align the seat pin with the hole in the seat post receiver, see picture 17;... -
Page 34: Transport And Transit In Car
Picture 20 TRANSPORT AND TRANSIT IN CAR Your Travelux Quest is designed to be easily transported by car. See §5.6 how to disassemble your power chair and see §5.7 how to assemble your power chair. Disassemble the seat or fold down the backrest depending on the loading area of the vehicle which will be used for transporting your power chair;... -
Page 35: Care And Maintainance
CARE AND MAINTAINANCE Regular maintenance The Travelux Quest is virtually maintenance free. All off the bearings on your power chair are permanently lubricated and sealed. No additional lubrication is required. There are however several things that you can do to help keep up the appearance and maintain the performance of your power chair. - Page 36 User Manual Because your batteries may only be a partial charged when you first receive your power chair, you may not experience full riding time until you have fully charged ” ” them. Your power chair is equipped with an off-board charger .
- Page 37 User Manual Operational range Depending on the use, the terrain and the driving conditions, the battery pack will provide up to 26 km of operation on your power chair. Charging guidelines checklist to maximize battery life Only use the supplied charger; Never use an car or wet type charger;...
- Page 38 ~ 26 ~ © 2013 VAN OS MEDICAL B.V., Koperslagerij 3, 4651 SK, Steenbergen, Nederland Tel. +31-(0)167-573020, Fax +31-(0)167-573381, E-mail: info@vanosmedical.nl, www.vanosmedical.nl...
-
Page 39: Problem Analysis And Solutions
LEDs on the battery gauge that are flashing. Diagnostics Below are a list of fault codes. Try to use this list before you contact your Travelux dealer. Find the number of flashes below which matches the number of flashing LEDs and follow the instructions. -
Page 40: Warranty
WARRANTY 9.1 Warranty application Together with your Travelux Quest power chair you get the factory warranty. This warranty is only granted to you as the consumer. It is not intended to be used commercially (like hiring or institutional use). The warranty is limited to defects to materials and possible hidden shortages. - Page 41 ~ 28 ~ © 2013 VAN OS MEDICAL B.V., Koperslagerij 3, 4651 SK, Steenbergen, Nederland Tel. +31-(0)167-573020, Fax +31-(0)167-573381, E-mail: info@vanosmedical.nl, www.vanosmedical.nl...
-
Page 42: Warranty Definition
User Manual 9.2 Warranty definition Your manual is also the warranty form fill in the relevant details on page 2 and store it carefully. Warranty conditions The warranty period commences upon the date of purchase. If within the warranty period, your power chair will be defect, it will be repaired or replaced. However you do need to provide to Van Os Medical UK ltd. - Page 43 User Manual 10 GENERAL MAINTENANCE INSTRUCTIONS Your Travelux Quest power chair needs periodical maintenance. A badly maintained power chair will give more technical problems, turn less flexible and fall out the warranty terms. Preventive maintenance is most important and many of these things you can easily do yourself or a friend or family member can help you.
- Page 44 ISO 7176-15 Product identification Product: Electrically power chairs, scooters and their chargers Brand: Travelux Model/type: Quest Version: Manufacturer: Name Van Os Medical B.V. Address Koperslagerij 3 4651 SK Steenbergen Country The Netherlands EU Representative: Name W. van Os Address Koperslagerij 3...
- Page 45 Van Os Medical UK Ltd. Excel House Escrick Business Park Escrick, York Y019 6FD J VEL Tel.+44 (0) 1904 720170 Fax. +44 (0) 1904 720398 E-mail: salesevanosmedical.com www.vanosmedical.com...
Need help?
Do you have a question about the Quest and is the answer not in the manual?
Questions and answers