
Subscribe to Our Youtube Channel
Related Manuals for Schacht LADYBUG


Summary of Contents for Schacht LADYBUG
- Page 1 LADYBUG SPINNING WHEEL nstructIons aIntenance arranty Find out more at schachtspindle.com Schacht Spindle Company 6101 Ben Place Boulder, CO 80301 p. 303.442.3212 800.228.2553 f. 303.447.9273 © 2017 Schacht Spindle Company, Inc. 04.17...
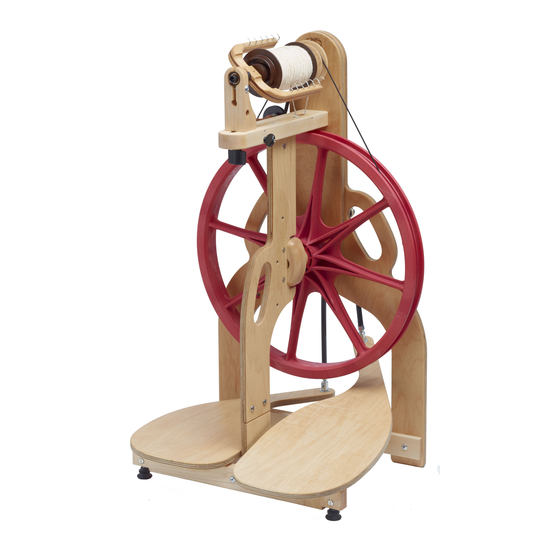
- Page 2 rear maiden bobbin orifice and orifice bearing flyer flyer hooks front maiden drive band tensioner drive band scotch tension knob mother-of-all carrying handle front maiden knob drive wheel drive wheel hub optional lazy kate rear leg footman front leg center brace treadle barrel nut barrel nut...
-
Page 3: Maintenance
HARDWARE FOR ATTACHING quietly at home. Because we’ve put the TREADLE BAR TO FRONT LEG: ladybug in a different place on every 1 - 2" trusshead machine screw wheel, you can be assured that there HARDWARE FOR ATTACHING THE... - Page 4 ASSEMBLING YOUR center brace LADYBUG tenon It will be easiest to assemble your wheel on a table. Cover the table to treadle bar protect it from scratches. STEP 1: INSTALL THE TREADLE BAR treadle WITH ATTACHED TREADLES ■ Place the mortise (hole) in the trea- dle bar onto the tenon of the center brace (1A).
- Page 5 ■ Line up the threads of the footman footman linkage with the bolt and hand tighten. ■ To secure, place the Phillips screw- driver into the linkage hole to keep it from turning and tighten the bolt with a ½" wrench. ■...
- Page 6 yarn leader STEP 4: ATTACH YARN LEADER TO THE BOBBIN CORE bobbin ■ Cut a 24" length of strong yarn and core fold it in half. ■ Place the folded yarn under the bob- bin core (4A). ■ Thread the cut ends through the loop, encircling the core (4B).
- Page 7 INSTALLING A NEW DRIVE BAND phillips head screws ■ Remove the flyer assembly (see instructions for changing bobbins and front leg whorls). ■ Remove the two Phillips head screws from the lower side of the front leg (6A). ■ Separate the leg slightly and slip the new drive band through the space (6B).
- Page 8 CARRYING HANDLES Your Ladybug features three carry- ing handles: one on the front leg and one on each rear leg. Simply pick up your Ladybug by whichever handle is most comfortable and carry the wheel as you would a briefcase.
- Page 9 No oil or lubricant should be used You may use any of the available in the spinning wheel hub or on the whorls with your Ladybug. The high plastic drive wheel. speed bobbin is needed when you use the high or super high whorls in If a squeak develops elsewhere on double drive.
- Page 10 sary adjustments. When everything SPINNING RESOURCES is in harmony, you will be able to spin Books comfortably for long periods of time The Intentional Spinner by Judith and spin the yarn you want to create. MacKenzie Your spinning wheel comes with Spin Control: Techniques for two flyer whorls: medium and fast.
- Page 11 LADYBUG BULKY PLYER FLYER Add plying and bulky yarn capa- bilities to your Schacht Ladybug Spinning Wheel. Features include a generously-sized 7/8" orifice, large capacity bobbin (about 8 oz), sliding flyer hooks with incremental stops, and large round guide hooks. The...
- Page 12 If you need mother-of-all further assistance, please contact our Customer Service Department at Schacht Spindle Co., Inc. At our option, it may be required that the product be returned to our factory freight prepaid for inspection and repair and/or replacement.
Need help?
Do you have a question about the LADYBUG and is the answer not in the manual?
Questions and answers