Table of Contents
Advertisement
Advertisement
Table of Contents

Related Manuals for TimerGPS TimerGPS+

Summary of Contents for TimerGPS TimerGPS+
- Page 1 TIMERGPS+ USER MANUAL, ENGLISH EDITION SEPTEMBER, 2014...
-
Page 2: Table Of Contents
Power button (ON/OFF) ......................8 START/STOP button ........................ 8 INT/BACK button ........................8 UP button ..........................8 DOWN button ........................... 9 Startup and initialisation of the TimerGPS+ ................9 Exercise functions ........................10 Basic exercise .......................... 10 4.1.1 Basic exercise standby mode ..................... 10 4.1.2... - Page 3 Starting and ending race exercise ..................17 4.5.3 Summary of race exercise....................18 Connecting to the HR-Check ....................19 Using the HR-Check without he TimerGPS+ ................19 Stopwatch ..........................19 Exercise log ..........................20 Browse the log ........................20 Select a horse .......................... 21 Add a horse ..........................
- Page 4 Log management ........................22 Space left ..........................22 Remove an exercise ......................... 22 Empty the log .......................... 23 Settings ............................ 23 Backlight ..........................23 Display contrast ........................24 Sound ............................24 Localization ..........................24 8.4.1 Language ........................... 24 8.4.2 Units of measurement ......................24 8.4.3 Time zone ..........................
- Page 5 Technical description of main components ................29 Terms and limitations for the use of the product ..............29 13.1 Terms for end use agreement ....................29 13.2 Warnings and important safety instructions ................30 13.3 Declaration of conformity ....................... 32 13.4 FCC Compliance ........................
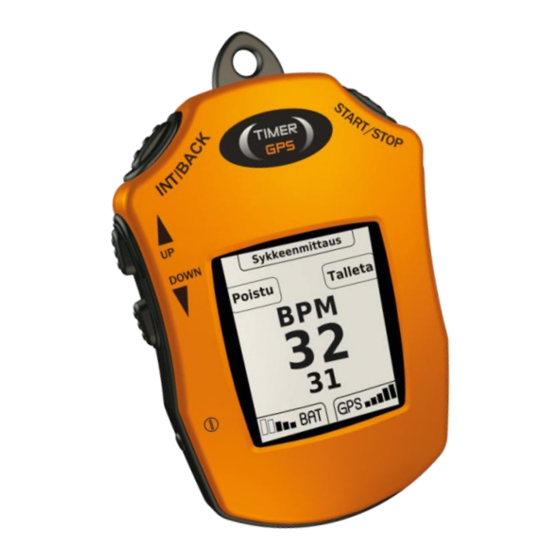
- Page 6 Buttons of the device. 2. START/STOP -button 1. INT/BACK -button 3. UP -button 4. DOWN -button 5. ON/OFF power button 6. USB-charging and data-transfer port...
-
Page 7: Timergps+ (Product) User Instructions
Use in such conditions or applications is done so at the sole discretion of the customer. TIMERGPS Europe Ltd. will not warrant the use of its products in such conditions or applications. -
Page 8: Buttons And Operation Principles Of The User Interface
Buttons and operation principles of the user interface 2.1 Power button (ON/OFF) Press and hold the power (ON/OFF) button to turn the product on. To turn the product off, press and hold the power button for two (2) seconds. 2.2 START/STOP button Press the START/STOP button to start and stop an exercise. -
Page 9: Down Button
Startup and initialisation of the TimerGPS+ Press and hold the power button switch the product on. The first time the product is switched on, one must select a language with the UP and DOWN buttons and press the START/STOP button to confirm language (language can be changed later from the settings menu). -
Page 10: Exercise Functions
the settings of the product. To begin searching for a satellite, press the START/STOP button in the start mode. 'Searching GPS- satellites' will appear on the display and the percentage level will increase until the process is complete. After the search is complete, the basic exercise standby mode will be resumed. -
Page 11: Starting And Ending In Basic Exercise Mode
4.1.2 Starting and ending in basic exercise mode Press the START/STOP button once in the basic exercise standby mode to begin the exercise. The product will now start measuring the pace, distance and time. During a basic exercise, press the UP button to select either time, average pace or overall time on the top part of the display. -
Page 12: Starting And Ending In Track Exercise Mode
measurement for pace, refer to section 8.4.2). Measuring is not yet enabled however, and exercise data will not be saved in the exercise log. If one is moving with the product when in standby mode, the pace when the first lap was started will be shown on display. -
Page 13: Setting A Countdown Optimum Time For The Competition Function
4.3.1 Setting a countdown optimum time for the competition function Set the optimum time in minutes using the UP and DOWN buttons. Once you have set the desired minutes, press the START/STOP button to proceed to the setting the time in seconds. When both times have been set, press the START/STOP button again to proceed to the minute alarm menu, where the minute alarm time can be set. -
Page 14: Summary Of Competition Function
minutes by beeping and vibrating. End the competition function by pressing the START/STOP button. 'Exercise saved' will be shown on the display, and the product will price to competition exercise summary data. 4.3.5 Summary of competition function On the first competition exercise summary screen, the summary data of the total exercise is shown. Press the DOWN and UP buttons to check each competition data. -
Page 15: Setting A Minute Alarm Time For Countdown Function
button again to proceed to the minute alarm menu, where the minute alarm time can be set. Press the INT/BACK button to cancel all and return to the previous menu. 4.4.2 Setting a minute alarm time for countdown function After setting the optimum time, the minute alarm time can be set. Set the minute alarm time (0-59 minutes) using the UP and DOWN buttons. -
Page 16: Summary Of Count Function
the field on the top part of the display to show either the countdown time, time or average pace. Press the DOWN button, to display the distance, overall time and average page at the bottom part of the display. Press the START/STOP button to stop the countdown exercise. -
Page 17: Standby Mode Of Race Exercise
4.5.1 Standby mode of race exercise In the standby mode the time and pace information is shown on display (to set the unit of measurement for pace, see section 8.4.2). Measuring is not active yet and the exercise data will not be saved in the exercise log. 4.5.2 Starting and ending race exercise Press the START/STOP button in the race exercise standby mode to start the exercise. -
Page 18: Summary Of Race Exercise
Race distance Interval 1 Interval 2 Interval 3 Interval 4 Interval 5 Last 1. 500m 1. 1000m 1600m 500m Last 2100m 1. 500m 1. 1000m 3. 500m 500m Last 2600m 1. 500m 1. 1000m 2. 1000m 500m Last 3100m 1. 500m 1. -
Page 19: Connecting To The Hr-Check
5.1 Using the HR-Check without he TimerGPS+ After a connection has been established, the TimerGPS+ will enter the heart rate check standby mode. In the standby mode, the TimerGPS+ will be ready to receive heart rate data from the HR-Check. To save the data, press the START/STOP button, otherwise press the INT/BACK button to return to the heart rate check standby mode. -
Page 20: Exercise Log
pressing the INT/BACK button when timing is paused. Exercise log In the exercise log it is possible to: - browse the data saved in the exercise log - switch a horse for the next exercise that will be saved - add or delete a horse - change the name of a horse - check the memory capacity of the product, view and delete saved exercise data, or delete all the data in the log - browse heart rate data (if paired with a HR-Check) -
Page 21: Select A Horse
7.2 Select a horse Use the select a horse function to select the horse whose exercises will be saved. In the exercise log, highlight select a horse and press the START/STOP button to confirm. The selected horse will be marked with a triangle (▸) next to its name. Select a horse with the UP and DOWN buttons and press START/STOP to view a selected horse's exercise data. -
Page 22: Log Management
horse. The product will then return to the remove horse menu. If all the horse's names are deleted, the product will prompt to name new horse. To return to the previous menu, press the INT/BACK button. NOTE: Once a horse has been removed, all the exercise data saved for that horse will also be deleted permanently. -
Page 23: Empty The Log
7.9 Empty the log To remove all the exercise data for a horse, select clear log from the log management menu. A list of horse names with saved exercise data will appear on the display. Select horses individually by name or select ALL HORSES to remove the exercise data for every horse at once. -
Page 24: Display Contrast
8.2 Display contrast From the “Display contrast”-menu you can adjust the contrast of the display. If the graphics of the display seems to be too light or dark, adjust the counter by using UP and DOWN keys. 8.3 Sound In the sound menu, sounds can be enabled and disabled. 8.4 Localization The localization menu includes: -Language... -
Page 25: Time Zone
8.4.3 Time zone By default, the product uses the time zone given by the GPS satellites, but the time zone can be set manually to correspond with things such as an official race watch etc. Use the UP and DOWN buttons to set the hour and press the START/STOP button to confirm the selection. -
Page 26: Exercise Saving
distance has been surpassed. If the interval length is set at zero (0), it is removed from the interval exercise and the interval exercise will function normally. 8.5.3 Exercise saving In the exercise saving menu, exercise saving can be enabled or disabled, according to whether or not the product saves exercise data in its own memory or in the exercise log. -
Page 27: Exercise Autostart -Function
8.5.5 Exercise Autostart -function When the Autostart-function is enabled the driver can set a time of how long TimerGPS+ waits until the exercise will start automatically. If the Autostart-feature is enable the timer will ask minutes and seconds for the Autostart-function every time before the exercise is started. -
Page 28: Resetting The Product In Case Of Problems
Should the product require service, contact a TimerGPS Europe Ltd Product Service Centre. Check where the nearest service center is by visiting www.timergps.com. Product warranty does not cover direct or indirect damages incurred by service that has not been authorized by TimerGPS Europe Ltd. -
Page 29: Technical Description Of Main Components
Technical description of main components Product dimensions: Battery: 3.7 V, Li-ion(Li-Po) (Heigh / Weight / Thickness) 98mm / 64 mm / 18 DC Output 3.1-4.2 V, 900 mAh Operating time: 10-20 hours Product weight: 70 Grams Display: Transflective display Charger: Included in the package GPS:... -
Page 30: Warnings And Important Safety Instructions
THIS AGREEMENT, UNDERSTAND AND AGREE TO BE BOUND BY THE TERMS AND CONDITIONS OF THIS AGREEMENT. 13.2 Warnings and important safety instructions Read before using the product. Failure to avoid potential hazardous situations could result in an accident or collision resulting in death or serious injury. •... - Page 31 Follow the instructions on how to repair or ask further instruction from TimerGPS Europe Ltd. Product Service. • Do not use the product for horse training purpose if the outside temperature is too high or too low or there is any possibility that you would put yourself or your horse in an unsafe situation.
-
Page 32: Declaration Of Conformity
DAMAGES OR INJURIES THAT MAY BE INCURRED AS A RESULT OF ANY STATE OR LOCAL LAW OR ORDINANCE RELATING TO THE USE OF YOUR PRODUCT. 13.3 Declaration of conformity Hereby, TimerGPS Europe Ltd. declares that the product is in compliance with the essential requirements and other relevant provisions of Directive 1999/5/EC. 13.4 FCC Compliance The product complies with part 15 of the FCC Rules. -
Page 33: International Limited Warranty
The product is warranted to be free from defects in materials or workmanship for one (1) years from the date of purchase. Within this period TIMERGPS Europe Ltd. will, at its sole option, repair or replace any components that fail in normal use. Such repairs or replacement will be made at no charge to the customer for parts of labour, provided that the customer shall be responsible for any transportation cost. - Page 34 The product is intended to be used only as a training aid for horse trainers and must not be used for any purpose requiring precise measuring of pace, speed, time or distance. TIMERGPS Europe Ltd. makes no warranty as to the accuracy or completeness of measurement data of the product.
-
Page 35: Terms For End User License Agreement
Product Service Centre for shipping instructions. Securely pack the product and a copy of the original sales receipt, which is required as the proof for warranty repairs. Write the tracking number clearly on the outside of the package. Send the product, freight charges prepaid, to any TIMERGPS Europe Ltd. warranty service station. Contacting TIMERGPS Europe Ltd. main Product Service: TIMERGPS Europe Ltd. -
Page 36: Single Product
(including but not limited to any images, photographs, animations, video, audio, music, test and 'applets' incorporated into the firmware), the accompanying printed materials and any copies of the firmware are owned by the TimerGPS Europe Ltd. or its licensors. The firmware is protected by copyright laws and international treaty provisions. You shall not copy the printed materials accompanying the firmware. -
Page 37: Your Remedies
error-free. The reseller furthermore states that not all errors in the firmware or its media can be corrected or need correction, nor does the reseller warrant that all defects in the firmware or its media will be corrected. The reseller has no control over the conditions under which you use the firmware or media and do not and cannot warrant the results obtained by such use. -
Page 38: Disclaimer Of Liability
The provisions contained in the agreement that protect the interests of the reseller or TimerGPS Europe Ltd. in the firmware shall survive the termination of this agreement. -
Page 39: Export
Export You agree to comply with all applicable export and re-export restrictions. Copyrights: ©2010-2014 TIMERGPS Europe Ltd. Contact your local waste disposal department to dispose of the product/battery in accordance with applicable local laws and regulations. The product complies with EU directives.
Need help?
Do you have a question about the TimerGPS+ and is the answer not in the manual?
Questions and answers