
Related Manuals for ApexDesk AL4628-2M


Summary of Contents for ApexDesk AL4628-2M
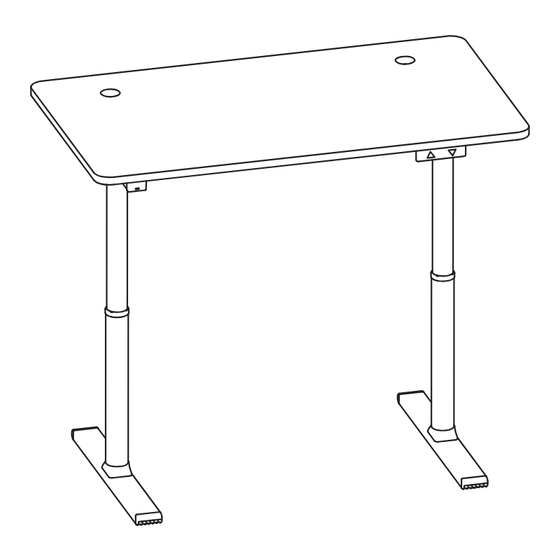
- Page 1 ApexDesk ELECTRIC HEIGHT-ADJUSTED SIT TO STAND DESK Vortex Series 2-leg Desk Assembly Guide For desk with underframe Model No. AL4628-XX REV-1509A...
-
Page 2: Table Of Contents
Table of Contents IMPORTANT SAFETY INSTRUCTIONS..........3 CAUTION, USE & LIABILITY.............4 PARTS & HARDWARE..............5 ASSEMBLY INSTRUCTIONS............6 CARE INSTRUCTIONS............11 TECHNICAL SPECIFICATIONS.............11 WARRANTY INFORMATION .............12 CONTACT INFORMATION .............1 2 | Page... -
Page 3: Important Safety Instructions
IMPORTANT SAFETY INSTRUCTIONS WARNING -When using electric appliances, basic precautions should always be followed, including the following: A) Read all the instructions before using the appliance. B) To reduce the risk of injury, close supervision is necessary when an appliance is used near children. C) Do not contact moving parts. -
Page 4: Caution Use & Liability
CAUTION USE & LIABILITY CAUTION Make sure no obstacles are in the desk's path. Make sure the desk is not touching any walls. Make sure all cords are of appropriate lengths to accommodate the change in desk height. Keep children away from electric sit to stand desks, control units and handsets. Keep all electrical components away from liquids. -
Page 5: Parts & Hardware
PARTS & HARDWARE PARTS DIAGRAM Tabletop Upper Support Controller Foot PARTS LIST Foot 2 Leg 2 Beam 1 Controller 1 Upper Support 2 HARDWARE LIST (ForMemory Controller) M3x12(2) M6x18Screw(22) Washer(32) TensionString(32) 4mmAllenWrench M6x20Screw(10) M3x30(2) 5mmAllenWrench 5 | Page... -
Page 6: Assembly Instructions
ASSEMBLY INSTRUCTIONS BEFORE YOU BEGIN 1. Lay out all components and hardware to ensure that you have all the parts listed on the parts on page 5. 2. Desk weighs close to 100 lbs. Two people are needed to turn or move desk and some of its components. - Page 7 STEP 2 Remove the protective cap and insert the hexagon spindle into gear box on the beam. Please note the marking R and L on the beam and legs. Right leg should connect to right side of the beam, and left leg to left side of the beam. VERY IMPORTANT: Minor adjustment may be needed to set the hexagon spindle properly into gear box.
- Page 8 STEP 3 Use Screw A to secure two upper supports to the beam. STEP 4 Lay the tabletop on a soft and non-abrasive surface. Carefully move the underframe onto the top, align the holes on the upper supports to the pre-drilled anchors on the top.
- Page 9 STEP 4-1 (Memory Controller Option) Use Screw A to secure top and Screw F2 to secure controller. STEP 5 Connect controller to control box. Connect power to a wall plug. If the desk is unsteady, check all screws and make sure they are all tight, and make adjustment to the leveling studs.
- Page 10 Memory Function Controller for Desk Underframe Model# AL4628-2M LED Display Up Button Down Button Preset 1 Preset 2 Preset 4 Preset 3 a. LED panel displays minimum height of 28.5” and maximum height of 46.6” b. Factory default settings for four memory buttons are 32.1”, 35.7”, 39.3” and 42.9”...
-
Page 11: Care Instructions
Make sure BOTH spindles are set properly into the gear boxes. Unplug the power from the source to reset controller. If the problem persists, send an email to support@apexdesk.com. CARE INSTRUCTIONS Recommend checking the screws and bolts several times a year to ensure they stay tight. -
Page 12: Warranty Information
ApexDesk's obligation under this warranty is limited to the repair or replacement, at ApexDesk's sole option, of the parts or products the defect of which are reported to ApexDesk within the applicable warranty period and which, upon examination by ApexDesk, prove to be defective.
Need help?
Do you have a question about the AL4628-2M and is the answer not in the manual?
Questions and answers