Advertisement
Quick Links
Imported by
6061816, 6061027 - Aug 30, 2016
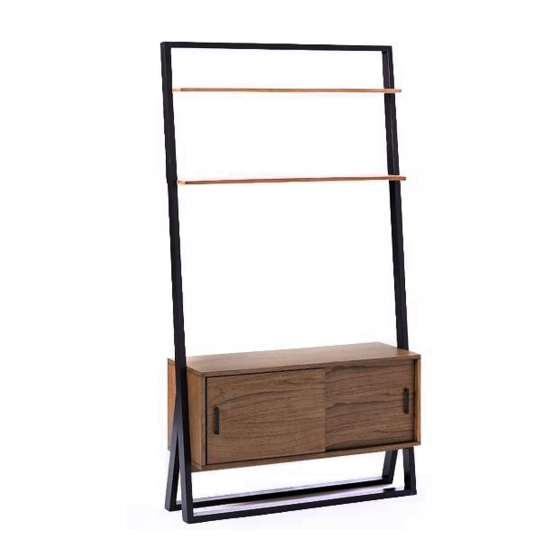
Consola de estantería de escalera
Product weighing 20 pounds (9 kgs) maximum per shelf.
Poids supporté par une étagère : 20 livres (9 kg) maximum
Producto con un peso máximo de 20 libras (9 kgs) por
estante.
Product weighing 135 pounds (61.4 kgs) maximum per
shelf.
Poids supporté par une étagère : 135 livres (61.4 g)
maximum
Producto con un peso máximo de 135 libras (61.4 kgs) por
estante.
Product weighing 25 pounds (11.3 kgs) maximum per shelf.
Poids supporté par une étagère : 25 livres (11.3 kg)
maximum
Producto con un peso máximo de 25 libras (11.3 kgs) por
estante.
Ladder Shelf Media Console
Échelle Console
Page 1 of 19
Advertisement

Related Manuals for West Elm 6061027


Summary of Contents for West Elm 6061027
- Page 1 Product weighing 25 pounds (11.3 kgs) maximum per shelf. Poids supporté par une étagère : 25 livres (11.3 kg) maximum Producto con un peso máximo de 25 libras (11.3 kgs) por estante. Imported by 6061816, 6061027 - Aug 30, 2016 Page 1 of 19...
- Page 2 AVERTISSEMENT! NE PAS MONTER CET ARTICLE AU-DESSUS DES BERCEAUX, DES LITS OU DES TABLES À LANGER. ADVERTENCIA! NO ENSAMBLAR ESTE ARTÍCULO SOBRE CUNAS, CAMAS O CAMBIADORES DE BEBÉ. Importé par 6061816, 6061027 - Aug 30, 2016 Page 2 of 19...
- Page 3 AVERTISSEMENT! NE PAS MONTER CET ARTICLE AU-DESSUS DES BERCEAUX, DES LITS OU DES TABLES À LANGER. ADVERTENCIA! NO ENSAMBLAR ESTE ARTÍCULO SOBRE CUNAS, CAMAS O CAMBIADORES DE BEBÉ. Importado por 6061816, 6061027 - Aug 30, 2016 Page 3 of 19...
- Page 4 AVERTISSEMENT! NE PAS MONTER CET ARTICLE AU-DESSUS DES BERCEAUX, DES LITS OU DES TABLES À LANGER. ADVERTENCIA! NO ENSAMBLAR ESTE ARTÍCULO SOBRE CUNAS, CAMAS O CAMBIADORES DE BEBÉ. ! Tools required : 6061816, 6061027 - Aug 30, 2016 Page 4 of 19...
- Page 5 Si se derrama cualquier tipo de líquido en la estantería se debe limpiar de inmediato con un paño húmedo. COMPONENT OF SKU # 6061816, 6061027. 6061816, 6061027 - Aug 30, 2016...
- Page 6 Rear R Post –1x Bottom Panel Crossbar – 2x Top Panel Crossbar – 1x Rear L Post–1x Rear R Post –1x Bottom Panel Crossbar – 2x Top Panel Crossbar – 1x HARDWARE 6061816, 6061027 - Aug 30, 2016 Page 6 of 19...
- Page 7 Wooden Dowel 8 x 30mm – 28x Handle – 2x Bolt – 4x Mounting Screw – 6x JF Bolt – 6x Pin Shelf – 8x Allen Key 5 mm – 1x 6061816, 6061027 - Aug 30, 2016 Page 7 of 19...
- Page 8 Bottom Panel Crossbar (M) Front Bottom Bar (K) 1. Take the Top Panel (D) and then attach the Mounting Screw (14) on predrill according to the image using a Screwdriver. 6061816, 6061027 - Aug 30, 2016 Page 8 of 19...
- Page 9 3. Attach the Top Crossbar (N) by sliding it to left or right side enter through the notch on Center Divider (F) 3. Attach the Top Crossbar (N) by sliding it to left or right side enter through the hole Devider (F). 6061816, 6061027 - Aug 30, 2016 Page 9 of 19...
- Page 10 (D), then tightly secure it by sliding it forward. E – left Right enter Left slide Right locked 5. Tightly secure Top Panel Crossbar (N) using 4pcs of Screw (7), ensure the Screw (7) goes through predrilled hole. 6061816, 6061027 - Aug 30, 2016 Page 10 of 19...
- Page 11 8pcs of Allen Bolt (1) and tighten with Allen Key (6). Install 2 pcs of Bottom Panel Crossbar (M) to the Bottom Panel (H), fasten it with 3 pcs of Screw (7) on each crossbar and tighten with a Screwdriver. 6061816, 6061027 - Aug 30, 2016 Page 11 of 19...
- Page 12 Attach Right & Left Rear Post (O&P) to Right & Left Post (O&P) by inserting a Dowel (11) into the hole then fasten with Allen Bolt (1) and tighten with Allen Key (6). Prepare assembled Left Post (O) by installing 10pcs of Dowel (11) into the holes as shown below. 6061816, 6061027 - Aug 30, 2016 Page 12 of 19...
- Page 13 11. Insert 10pcs of Dowel (11) into the hole as per shown on below images. 11. Insert 10pcs of Dowel (11) into the hole as per shown on below images. 6061816, 6061027 - Aug 30, 2016 Page 13 of 19...
- Page 14 Push up the button on the door hardware into the top rail to hold & lock the door in place. 6061816, 6061027 - Aug 30, 2016 Page 14 of 19...
- Page 15 15. Attach the Handle (12) to both doors, lock handle using 2pcs of Bolt (13) and tighten it using Screwdriver. 15. Attach the Handle (12) to both doors, lock handle using 2pcs of Bolt (13) and tighten it using Screwdriver. 6061816, 6061027 - Aug 30, 2016 Page 15 of 19...
- Page 16 16. Attach 8pcs of Pin Shelf (16) into the Side Panels and Divider. 17. Put the adjustable Shelf (G) inside storage/ Put the adjustable Shelf (G) inside storage/ Put the adjustable Shelf (G) inside storage. 6061816, 6061027 - Aug 30, 2016 Page 16 of 19...
- Page 17 Drill the wall with 1/4” Drill Bit and install the Stud-Solver Anchor (4), align the Mounting Plate (5) on the Middle Shelf (C) to the Stud-Solver Anchor (4) on the wall. 6061816, 6061027 - Aug 30, 2016 Page 17 of 19...
- Page 18 Drill the wall with 1/4” Drill Bit and install the Stud-Solver Anchor (4), align the Mounting Plate (5) on the Middle Shelf (C) to the Stud-Solver Anchor (4) on the wall. Secure using Screws (8) and tighten with Screwdriver. MULTIPLE LEANING WALL SHELVES/DESK ASSEMBLY 6061816, 6061027 - Aug 30, 2016 Page 18 of 19...
- Page 19 à l’aide des vis et serrer à l’aide du tournevis. Desde la parte trasera, alinear los orificios en la placa de metal con los orificios correspondientes en la estructura trasera, asegurar con tornillos y ajustar con un destornillador. 6061816, 6061027 - Aug 30, 2016 Page 19 of 19...
Need help?
Do you have a question about the 6061027 and is the answer not in the manual?
Questions and answers