Avaya 5420 User Manual
Ip office
Hide thumbs
Also See for 5420:
- User manual (3 pages) ,
- Quick reference manual (2 pages) ,
- How to use manual (8 pages)
Table of Contents
Advertisement
Advertisement
Table of Contents

Subscribe to Our Youtube Channel
Related Manuals for Avaya 5420


Summary of Contents for Avaya 5420
- Page 1 IP Office 5420/2420 Phone User Guide Issue 6d (15 September 2005)
-
Page 2: Table Of Contents
Making Calls ... 24 Answering Calls... 24 Call Forwarding ... 25 Diverting Calls ... 25 Do Not Disturb ... 25 Voicemail ... 26 Default Feature Codes ... 27 5420/2420 Phone User Guide Page ii IP Office Issue 6d (15th September 2005) - Page 3 Using the EU24 Expansion Module... 30 Viewing the Alternate Display ... 30 Selecting a Call Appearance/Feature Button... 30 Understanding Call Appearance/Feature Button Status Icons ... 30 Index... 31 5420/2420 Phone User Guide IP Office Page iii Issue 6d (15th September 2005)
-
Page 4: The Telephone
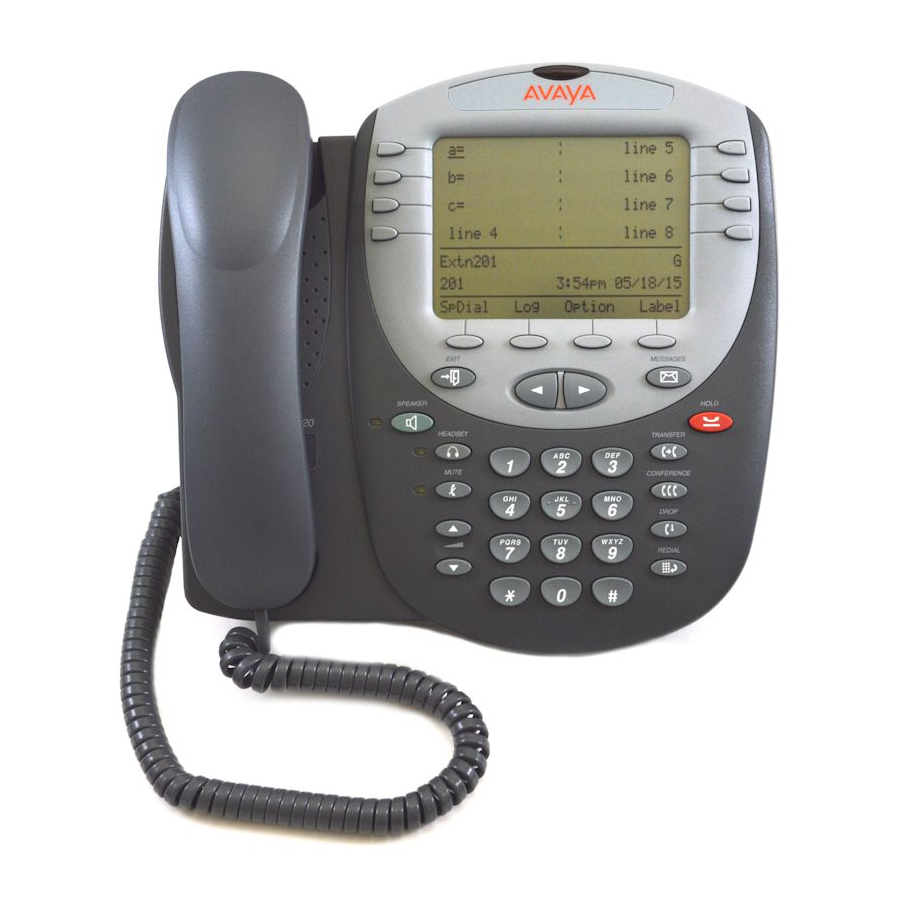
The Telephone Overview This guide covers the use of the Avaya 5420 and 2420 phones on Avaya IP Office. Both phones are similar, however the 5420 is only supported on the IP Office whereas the 2420 is supported on a range of Avaya phone systems. - Page 5 12. Softkeys: Used to navigate to or initiate certain features, such as Speed Dial or Call Log, as well as control certain actions within the features. These keys correspond to the text prompts in the display screen immediately above them. 5420/2420 Phone User Guide IP Office Page 5...
-
Page 6: Call Appearance Keys
System Features This would severely restrict the use of features such as conference and transfer. It is for these reasons that it is strongly recommended that all Call Appearance keys remain at their 5420/2420 Phone User Guide IP Office default settings. -
Page 7: Call Appearance Keys Icons
Refer to System Features Introduction for details of System Features that you can always access yourself by dialing short codes, for example *17 to listen to your voicemail messages. 5420/2420 Phone User Guide IP Office key puts the... -
Page 8: Basic Call Handling Features
Access the Speed Dial List in your personal directory and initiate a call to a specific entry. See Dialing a Speed Dial Number. • When the call is answered, either speak or pick up the handset and speak to the called party. 5420/2420 Phone User Guide IP Office buttons. The display shows the volume level. Speaker or... -
Page 9: Clearing A Call
Access the Speed Dial List in your personal directory and initiate a call to a specific entry. See Dialing a Speed Dial Number. • When the call is answered, speak to the called party. 5420/2420 Phone User Guide IP Office Headset. The lamp beside the button is next to the flashing bell icon ( ):... -
Page 10: Speakerphone
To redial previously dialed number: 1. Press Redial. Use required number, press the associated key. 5420/2420 Phone User Guide IP Office Headset) and talk. SpDial softkey. The Speed Dial screen is displayed. to cycle through the entries or key the first to step through the entries. -
Page 11: Mute
Note: After a pre-set time (defined by your System Administrator), you are reminded that you have a call on hold by the hold icon changing for a few moments to and the phone ringing. 5420/2420 Phone User Guide IP Office Mute again. -
Page 12: Transfer
Hold. Make or answer the second call. The second call requires to be transferred to the first held call. 2. To transfer the new call to the held call, press complete. 5420/2420 Phone User Guide IP Office Transfer or Hold. -
Page 13: Conference
Your Message lamp turns on when a caller has left a message for you. Press the Message button to retrieve your messages, and follow the prompts. 5420/2420 Phone User Guide IP Office Conference again. You can return to the held call by Drop. -
Page 14: Using Speed Dials
3. When the required entry is displayed, press the adjacent 5420/2420 Phone User Guide IP Office Exit top exit the current screen. -
Page 15: Deleting A Speed Dial
You can create a new speed dial from a call log entry. See Saving a Call Log Entry to Your Speed Dial List. This process will start the normal speed entry screen but pre-filled with the name and number from the call log entry. 5420/2420 Phone User Guide IP Office SpDial is not shown, press Cancel to exit without deleting. -
Page 16: Adding A New Speed Dial
5. To save the speed dial and return to the speed dial list, press 6. To return to the speed dial list without saving the changes press 7. To return to the call handling screen without saving the changes press 5420/2420 Phone User Guide IP Office SpDial is not shown, press options also change accordingly. -
Page 17: Using The Call Log
• keys provide a number of actions. 5420/2420 Phone User Guide IP Office Log. This log can store up to 100 entries. key next to a log entry display further details of that particular call. -
Page 18: Using The Call Log
5. Press Save. The speed dial editing screen appears, pre-filled with the details from the call log entry. See Adding a New Speed Dial. 5420/2420 Phone User Guide IP Office Log is not shown press any soft key Log is not shown press any soft key Log is not shown press any soft key Done. -
Page 19: Deleting A Call Log Entry
To return to the Options menu without saving any changes, press Cancel. • To return to the call handling screen without saving any changes, press 5420/2420 Phone User Guide IP Office Log is not shown press any soft key Option is not shown, press key next to the entry. -
Page 20: Changing Options
Ring Options and set Show Phone Screen to Yes or No. If set to Yes then, when you are setting up/using Speed Dial, Call Log, etc, you are automatically returned to the call handling screen when you receive a call. 5420/2420 Phone User Guide IP Office keys below the display. -
Page 21: Adjusting The Display Contrast
• To return to the options menu, press • To return to the call handling screen, press Selecting the Display Mode See Display Mode. 5420/2420 Phone User Guide IP Office Option. Done. Option.. Option. Test key. The screen lines should all go black and all the phone lamps Done. -
Page 22: Default Phone/Erase All Settings
• To return to the options menu without saving any changes, press • To return to the call handling screen without saving any changes, press 5420/2420 Phone User Guide IP Office Erase... Cancel. Option. Save. You will hear a Cancel. -
Page 23: Automatic Gain Control (Agc)
To return to the options menu without saving any changes, press • To return to the call handling screen without saving any changes, press 5420/2420 Phone User Guide IP Office Option. key next to a call type to underline its current setting and then Issue 6d (15th September 2005) key next to it. -
Page 24: System Features
Note: If your phone rings for any longer than a specified period (15 seconds in default), any re-direction feature that you have activated, such as voicemail or call forwarding, will come into effect. 5420/2420 Phone User Guide IP Office RBak feature key to... -
Page 25: Call Forwarding
• *11*N# to delete a number from the exception list. Note: Your callers, other than your exceptions, either hear busy tone or are re-directed to your voicemail. 5420/2420 Phone User Guide IP Office Page 25 Issue 6d (15th September 2005) -
Page 26: Voicemail
1 to retrieve your mail. The System Administrator also specifies the reception number, to which the call is diverted if the caller dials 0, and your email address if your voicemail and email are integrated. 5420/2420 Phone User Guide IP Office Page 26... -
Page 27: Default Feature Codes
Voicemail Off *20*N# Set Hunt Group Night Service *21*N# Clear Hunt Group Night Service Toggle Calls Call Pick Up Any Call Pick Up Group 5420/2420 Phone User Guide IP Office *32*N# Call Pick Up Extension *33*N# Call Queue Hold Music *35*N#... -
Page 28: Ip Office Issue 6D (15Th September
EU24 Expansion Module EU24 Overview The EU24 Expansion Module is an optional device that can be connected to your 2420/5420 phone to extend the number of call appearance and feature buttons available on the telephone. The expansion module has 24 buttons arranged in two columns. Depending on how they have been programmed by your System Administrator, these buttons can be used for call appearances or features. -
Page 29: Connection
Before you can begin using the EU24 Expansion Module, the module must be connected to the phone according to the instructions in the EU24 Expansion Module Installation and Safety Instructions (555- 233-136). 5420/2420 Phone User Guide Page 29 IP Office... -
Page 30: Using The Eu24 Expansion Module
EU24 Expansion Module. Icons also indicate whether a feature has been administered for a particular button on the EU24 Expansion Module. For an explanation of these icons see Call Appearance Keys. 5420/2420 Phone User Guide Page 30 IP Office... -
Page 31: Index
Administrator’ 7 Keys 4 Affect Call Appearance voicemail 20 Keys 6 Affect 20 Call Appearance AGC 23 Keys 11 5420/2420 Phone User Guide IP Office Call Appearance Keys Icons 7 Erasing 19 Call Appearance/Feature Button Viewing 30 Selecting 30 Call... - Page 32 Flash Message Log 18 Lamp 20 Log 18 Follow Me Here 27 Log 18 Follow Me Here Log 19 Cancel 27 5420/2420 Phone User Guide IP Office Log 19 Park Call 27 Pause 16 Making Personalization 19 Call 8 PIN 26...
- Page 33 Speed Dial List 9 Flash Message Speed Dial List 21 Lamp 20 Speed Dial Number Show Phone Dialing 14 Screen 20 5420/2420 Phone User Guide IP Office Speed Dial Number Using The Call Log Speed Dials Deleting 15 Viewing Editing 15...
- Page 34 Performance figures and data quoted in this document are typical, and must be specifically confirmed in writing by Avaya before they become applicable to any particular order or contract. The company reserves the right to make alterations or amendments to the detailed specifications at its discretion.
Need help?
Do you have a question about the 5420 and is the answer not in the manual?
Questions and answers
How do you change the time displayed?