Table of Contents
Advertisement
Quick Links
Advertisement
Table of Contents

Related Manuals for Sepura SC20 series


Summary of Contents for Sepura SC20 series
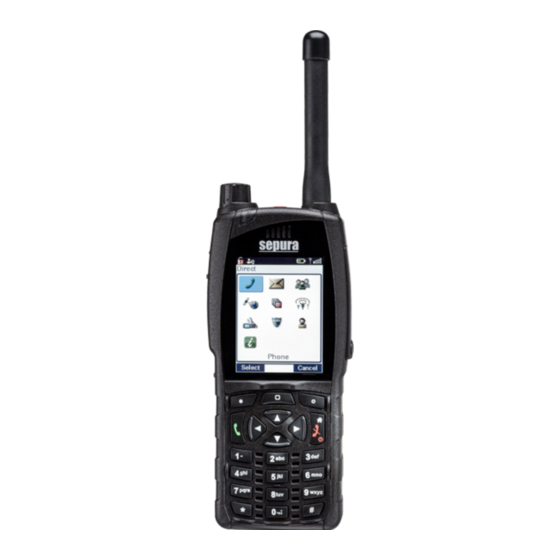
- Page 1 User Guide SC20 series hand-portable radio...
- Page 2 © Sepura plc. 2002–2016 All rights reserved. This document is intended for the use of Sepura plc’s customers and/or other parties only for the purposes of the agreement or arrangement under which this document is submitted, and no part of it may be reproduced or transmitted in any form or means without the prior written permission of Sepura plc.
-
Page 3: Table Of Contents
CONTENTS General information Your radio at a glance Battery Charging the battery Charging a 'flat' battery Fitting the battery Removing the battery Using Sepura approved batteries Controls & indicators Navi-knob Navigation Keys Soft keys Context keys Status icons LED indicators... - Page 4 Menu style Time and Date Talkgroups and folders Typical folder arrangement Select a talkgroup Working with folders Special folders User Defined Scan Lists Quick Groups Contacts Searching and filtering contacts View contact details Creating contacts Editing contacts SC20 series – 04/2016...
- Page 5 Delete all contacts Calls Call types Call History Group calls Individual calls Broadcast calls Missed events Quick Calls Smart Calls Modifying your call setup Text entry Cursor movement Character sets Messages Message Inbox Opening messages View message details Reply to a message Saved messages Picture messages Paging alerts...
- Page 6 User profiles Man Down Lone Worker Using WAP Browser menu Navigation menu Settings History menu Using bookmarks Call handling GPS position GPS direction GPS reporting options Bluetooth® Bluetooth® on/off Audio devices Data devices Modify connected devices Security SC20 series – 04/2016...
- Page 7 PIN entry Change PIN Unlocking the radio after incorrect PIN entry End-to-End Encryption Zeroising Asset management Labelling RFID tag Customising your radio Accessories Belt clip Klick fast stud Fit an accessory GLOSSARY User Guide...
- Page 8 SC20 series – 04/2016...
-
Page 9: General Information
General information This user guide describes the default operation and features of the SC20 series radio mobile radio. Your service provider or organisation may have customised your radiomobile radioto optimise its performance to suit your individual needs. There may be differences between this guide and the way your product operates. - Page 10 Indicates navigation through the menu structure to Menu > Phone > the desired option based on the default language Contacts strings. Note: your radio may be customised to use different language strings. SC20 series – 04/2016...
-
Page 11: Your Radio At A Glance
Your radio at a glance Item Description Antenna. Programmable Emergency Button. Press and hold (2 seconds) to initiate an Alarm call. Rugged Accessory Connector (sRAC). Provides connection for accessories. Centre context key. Press to activate the feature or option that appears directly above the key. - Page 12 External Antenna Connector used with a car kit to attach an external antenna to the radio. Radio ID Label for attaching an asset label (optional). RFID tag for monitoring and auditing purposes. SC20 series – 04/2016...
-
Page 13: Battery
Fit a new battery if there are any signs of damage. Warning: Risk to personal safety. Sepura TETRA radios have been tested and certified using Sepura approved batteries. The use of non- approved batteries may damage the product, will result in non-... - Page 14 Reduce the length of time the radio is transmitting and keep DMO or telephone type calls to a minimum because they cause higher current consumption. Shorten the GPS reporting intervals if enabled (see GPS reporting options on page 124). SC20 series – 04/2016...
-
Page 15: Charging The Battery
Battery chargers Only use Sepura approved battery chargers. Use of non-approved chargers may not fully charge the battery or damage it. Always read the user documentation supplied with the charger for additional safety instructions and how to use it. -
Page 16: Charging A 'Flat' Battery
This may result in damage to the radio and the belt clip. To attach the battery, insert the battery into the battery compartment as shown. Press the battery downwards until it clicks into position. Removing the battery Always power off before removing the battery. SC20 series – 04/2016... -
Page 17: Using Sepura Approved Batteries
Push the safety latch on the bottom of the battery. Lift the battery upwards and remove. Using Sepura approved batteries Your radio checks the authenticity of the battery when it is powered on and has a number of battery management features that only work when a genuine... - Page 18 Authenticated/Unauthenticated—a Sepura/non-Sepura battery is fitted <serial number>—the serial number of the battery Note: If a non-Sepura battery is fitted, the Charge is reported as 0%, the battery is marked as Unauthenticated and the serial number is not shown. SC20 series – 04/2016...
-
Page 19: Controls & Indicators
Controls & indicators Your radio has a number of controls and indicators. Navi-knob The Navi-knob is a continuous rotating knob that in its normal mode is used to adjust the volume. The Navi-knob can also be used to perform various other functions. - Page 20 Moves between options on the top level menu. Left/Right Moves through the text characters for selection when writing. Tip: When the display is inverted (flipped upside down) the left and right navigation keys work in opposite directions. SC20 series – 04/2016...
-
Page 21: Soft Keys
Soft keys Some keys on your radio may be customised to provide one-touch access to regularly used features. These programmable keys are referred to as soft keys. To activate the soft key function: assigned to a programmable soft key, press and release assigned to other keys (such as the keypad, Cancel/Home and Select/Send keys), press and hold for one second The following keys can be customised as soft keys:... -
Page 22: Context Keys
Press 3 times to select a user profile. See User Profiles profiles on page 107 Press to open the Shortcut Bar to quickly access regularly used features or clear a Right Shortcut notification. See Notifications on page 27 Shortcut Bar on page 27 SC20 series – 04/2016... -
Page 23: Status Icons
Status icons Icons appear on the status line (at the top of the screen) when the radio is engaged in certain activities or when certain functions are active. Icon Description Security and Emergency Emergency Appears when emergency operation mode is active on your radio and an Alarm call is in progress. - Page 24 Shows the current signal strength. More bars indicate a stronger signal. Good radio coverage Indicates good radio coverage. No service Indicates poor signal or no radio coverage. Battery Strength Indicates the level of charge in your battery. More bars indicates more charge. SC20 series – 04/2016...
- Page 25 Icon Description Low battery warning Appears when there is less than 12% charge remaining in the battery. Charging Appears when the battery is attached to the radio during charging and the radio is powered on. Keypad locked Transmit Inhibit Indicates that you have activated transmit inhibit and the radio is unable to transmit (overridden when Emergency mode is activated).
- Page 26 Man Down motion sensor active You have enable the Man Down feature, but only the motion sensor is activated. GPS tracking enabled Indicates that the GNSS (Global Navigation Satellite System) function has been enabled. GPS tracking not available SC20 series – 04/2016...
-
Page 27: Led Indicators
LED indicators Blue LED The blue LED indicates either a missed event, such as a missed call or unread ® message, or your Bluetooth status (if enabled). A notification alerting you to the missed call, Callout or unread message appears in the Shortcut Bar. See Notifications on page LED Indication Description... -
Page 28: Getting Started
2. Carefully lift the metal retainer and insert the card as shown. Caution: Use care when opening/closing the metal card retainer. If it becomes detached, it can be clipped back into place. 3. Carefully close the metal retainer. SC20 series – 04/2016... -
Page 29: Fitting A Smart Card
4. Close the cover. Using your thumbs, press downward firmly on either side of the cover as shown to secure each tab. You must ensure that the compartment cover is secured. Not securing the cover will affect your radio's IP rating. Fitting a Smart card If required by your network operator, you may need to fit a Smart card to your radio. - Page 30 RSM) during operational periods. Transmitting without an antenna attached my damage the product. Your radio is designed for use with Sepura approved antennas. Always ensure that the seal between the antenna and the radio is maintained.
-
Page 31: Power On
See Authentication on page Note: Transmitting in 3W RF is only available when using a Sepura 3W battery. During power on the radio checks the authenticity of the battery and whether it has the capacity for the radio to transmit 3W RF. A message displays and the power may be limited if the radio cannot transmit in 3W RF when licensed to do so. -
Page 32: Locking And Unlocking The Keypad
To lock/unlock the keypad: Press the * (star) key (or a designated soft key), then press the OK context key to lock/unlock the keypad. SC20 series – 04/2016... - Page 33 Tip: To quickly lock and unlock the keypad, press and hold (2 seconds) the * (star) key. If you press any other key while the keypad is locked no action is taken. The Navi-knob remains unlocked when the keypad lock is enabled. A message is displayed to remind you that the keypad is locked.
-
Page 34: Home Screen
Information area containing information that only appears on the Home screen. This is customised by your service provider or organisation. It may show your selected talkgroup, date and time. Context key options (available in the Home screen). SC20 series – 04/2016... -
Page 35: Shortcut Bar
Shortcut Bar You can easily access commonly used radio features such as your Inbox, and turn features on and off using the Shortcut Bar. The Shortcut Bar can contain up to 5 radio features and some of these can be paired with notifications to alert you to a missed call or a new message in your Inbox. -
Page 36: Menu
To return to the Home screen at any time within the menu hierarchy, press and hold (2 seconds) the Cancel/Home key. Menu options The following icons are used to identify the sub-menus that provide access to further options. Icon Menu option SC20 series – 04/2016... - Page 37 Phone Add, edit and delete your personal contacts within your personal folder. Search (or filter) your contacts to locate the contact you want and initiate a call. Review you call history. Messages Read, create, save and send text (SDS) messages. View picture messages (if customised).
-
Page 38: Smartmenus
Menu Structure SmartMenus SmartMenus are designed to provide quick access to regularly used radio features, usually with a common theme. Your service provider or SC20 series – 04/2016... -
Page 39: Help
organisation may customise your radio with a number of SmartMenus, for example you may have a SmartMenu containing all your Quick Status messages, another for user profiles and another for selecting operational modes such as toggling on/off covert mode, Transmit Inhibit, loudspeaker mute and so on. - Page 40 Press a dedicated soft key (Sepura default is normally key ‘0’ zero). Press Menu > Help. SC20 series – 04/2016...
-
Page 41: Emergency Operation
Emergency operation Emergency operation is available in TMO and DMO if the radio is in service. If your radio is customised for Gateway and Repeater modes, it will make an Alarm call in TMO. If it cannot make the call in TMO the radio will automatically switch to DMO to make the call. -
Page 42: Making An Alarm Call
PTT button (customisable) the LED illuminates solid red your radio sounds audible tones a large emergency symbol appears on the screen your identity and talkgroup appears on the display of those receiving the Alarm call SC20 series – 04/2016... -
Page 43: Receiving An Alarm Call
Receiving an Alarm call An Alarm call overrides any existing calls on the talkgroup. You know you are receiving an Alarm call when: your radio sounds an audible tone the LED flashes red the emergency symbol appears on the screen your radio status changes to Emergency Clearing an Alarm call You can only clear an Alarm call that you have initiated. - Page 44 Note: If your radio supports Radio User Assignment (RUA), which authenticates your radio on the network, you may be prompted to log on to your network before the Alarm call is initiated. Contact your service provider for information. See Authentication on page SC20 series – 04/2016...
-
Page 45: Sound
Sound Your radio is equipped with a loudspeaker for use during PTT calls and a low level speaker for use during telephone calls. You can adjust the volume of the speaker and increase the sensitivity of the microphone (see Whisper mode below) so that you can speak more quietly. -
Page 46: Audible Tone Alerts
2. Select Menu > Options > Alerts > Audio Alerts. 3. Press Toggle (or the Select/Send key) to toggle alerts on/off. Note: If your radio is turned off with Audio Alerts disabled they remain disabled when the radio is next switched on. SC20 series – 04/2016... -
Page 47: Vibration Alerts (Haptics)
Vibration alerts (Haptics) Your radio can provide vibration alerts and haptic feedback to help you recognise certain events, such as when a key is pressed, for example in a dark environment, or when you are wearing gloves. To toggle vibration alerts 1. -
Page 48: Personalising Your Radio
The Right key to scroll left and the Left key to scroll right. Adjusting the backlight When a call or message is received, and when you press any key, the backlight lights up the display and keypad. The length of time the backlight illuminates is set during customisation. SC20 series – 04/2016... -
Page 49: Day/Night Mode
To adjust the backlight: You can toggle the backlight on/off from the Shortcut Bar, by using a soft key or from a SmartMenu (if customised). Alternatively: 1. Select Menu > Options > Settings > Display Settings > Backlight. 2. Press the Toggle context key. To adjust brightness: 1. -
Page 50: Adjusting Text And Icon Size
1. Select Menu > Options > Settings > Display Settings > Text Size. 2. Use the Up and Down Navigation keys to highlight the mode and then press the Select context key. The radio displays the Home screen, with the text and icons appearing in the chosen mode. SC20 series – 04/2016... -
Page 51: Setting The Display Language
Setting the display language Your radio operates in the language chosen during customisation and can support two display languages. The display uses the default language if the radio is only customised for a single language, or the currently selected language if two languages are programmed. To change the language: Tip: Your radio may be customised with a soft key or provide an option on a SmartMenu to change the display language. -
Page 52: Menu Style
List—set List menu style Card—set Card (Compatibility) menu style Grid style highlight items using the four navigation keys to open an item press Select to return to the top level screen press Cancel or Cancel/Home key. List style SC20 series – 04/2016... -
Page 53: Time And Date
highlight items using the Down and Up navigation keys. to open an item press Select to return to the top level screen press Cancel or the Cancel/Home key. Compatibility style (card) highlight items using the Left and Right navigation keys to open an item press Select to return to the top level screen press Cancel or Cancel/Home key. -
Page 54: Talkgroups And Folders
The folders available depend on the customisation of your radio; various ‘special’ folders are also programmed into your radio (see Special folders on page 51). Description Header (customisable) Folder level Folder name Talkgroup Information SC20 series – 04/2016... - Page 55 Tip: Select the ‘All’ folder to select a talkgroup from a single list of all talkgroups. Note: Talkgroups in the Smart Call Folder-1 or Smart Call Folder-2 folders can only be accessed when the appropriate Smart Call mode has been selected from the Speech Call Settings screen or by using a soft key.
-
Page 56: Typical Folder Arrangement
Typical folder arrangement The following illustration shows how the folders can be used to organise talkgroups: SC20 series – 04/2016... -
Page 57: Select A Talkgroup
Select a talkgroup You can use one of the following methods to select a talkgroup: From the Home screen, press the Groups context key. From the Menu navigate to the Groups menu. Use a soft key to return to your Home Group. Centre context key (Groups) 1. -
Page 58: Working With Folders
If a folder is editable you can use the Delete option to remove a talkgroup from it. The talkgroup can still be selected from the All folder if customised, or by entering the talkgroup number directly in the Talkgroup Selection box. SC20 series – 04/2016... -
Page 59: Special Folders
Create a ‘favourite’ talkgroup To quickly access frequently used talkgroups, you can add them to the Favourites folder. 1. Select Menu > Groups > Folders > Favourites. 2. Press Options, then select Open. 3. Navigate to the New Group option then press Options. 4. -
Page 60: User Defined Scan Lists
The scan priority of each talkgroup in a UDSL is shown at the right hand side of the screen as (High), (Normal) or (Low). You can designate a selected talkgroup in each UDSL. You can add and remove talkgroups from a UDSL. SC20 series – 04/2016... - Page 61 View and edit scan list 1. Select Menu > Groups > Scan Lists. 2. Use the Up and Down navigation keys to select one of the UDSLs and press Open. 3. Press Edit. Change default (selected) talkgroup 1. Use the Up and Down navigation keys to select one of the talkgroups in the UDSL.
-
Page 62: Quick Groups
To associate to your current talkgroup Select and view a Quick Group (described in To view your Quick Groups above) then: Select Options > Change > Current. Your current talkgroup is now associated with the selected Quick Group. SC20 series – 04/2016... -
Page 63: Contacts
Contacts Details of regularly used contacts are stored in a phone book. The phone book has a series of folders labelled Menu, Search, All and Personal. Your radio may have additional folders containing contacts programmed into your radio during customisation. The Personal folder contains contacts you create (personal contacts). -
Page 64: Searching And Filtering Contacts
4. Any contact in the folder that is a possible match to your search criteria appears at the top of the contact list. To view the contact's details, select the contact and press the Open context key. SC20 series – 04/2016... -
Page 65: View Contact Details
5. To clear the search string, press the Delete context key to delete each character in the search string, then press the Cancel context key, then the OK context key. View contact details 1. Select Menu > Phone > Contacts. 2. -
Page 66: Editing Contacts
2. Make changes: to add additional digits press the number keys; to delete digits press the Left navigation key. 3. After making changes press Save. To delete a contact: 1. Select the contact and press Open. 2. Press Options. 3. Select Edit > Delete contact, then press Select. SC20 series – 04/2016... -
Page 67: Delete All Contacts
Delete all contacts You can delete all contacts in your Personal folder. Tip: You can also delete individual contacts or numbers associated with them, see Editing contacts on the previous page. To delete all contacts 1. Select Menu > Phone > Contacts. 2. -
Page 68: Calls
The various types of voice and data calls that are supported by your radio, and the acoustic and visual alerts that accompany a call, depend on your radio's customisation. Call types Sepura radios support the following voice- and data call types: Voice call types Voice call type Description A call between you and a group of other radio users in your attached talkgroup. -
Page 69: Call History
Voice call type Description A special type of group call, which is received by all terminals in the system (system-wide broadcast call) or Broadcast by a specific group. The originator of a Broadcast call is usually a dispatcher. The receiving members cannot talk. A special individual call configured on a soft key to request help or information from a pre-configured individual or talkgroup destination in a non-emergency... -
Page 70: Group Calls
1. Press and hold the PTT button and speak into the top microphone. The LED changes to solid red to indicate that your radio is transmitting, and an audible tone is heard and your radio status text changes to 'Talk'. SC20 series – 04/2016... - Page 71 2. When you have finished talking, release the PTT button and listen to audio received, through the loudspeaker. The LED changes to solid green whilst the group call is active and your radio status text changes to ‘Group Call’. 3. You can also clear the group call by pressing: Clear Call soft key (if customised) Cancel/Home key Receiving a group call...
-
Page 72: Individual Calls
When the call is connected (the tri-colour LED illuminates green and a confirmation tone sounds). 4. To speak, press the PTT button; release the PTT button to listen. 5. To end the call, press the Clear context key or the Cancel/Home key. SC20 series – 04/2016... - Page 73 Note: If your radio has been customised with a single dial mode for TETRA, PBX and PSTN numbers, the dial mode icon cannot be changed. Calling by dialling: 1. From the Home Screen, dial the number of the person you are calling. 2.
-
Page 74: Broadcast Calls
(also known as a Site Wide Call) to all network users. These calls take priority over any lower priority on-going calls, and you cannot respond to them: pressing the PTT key has no effect during a broadcast call. SC20 series – 04/2016... -
Page 75: Missed Events
During a broadcast call the display changes to ‘Broadcast Call’ and the Broadcast Call icon is displayed. Missed events The Missed Events screen shows the number of Messages, Calls and Callouts that have been missed. Items in Bold are unread. Warning: If your radio has the user profile Group Focus selected, any calls to it are not recorded as Missed Calls. -
Page 76: Smart Calls
PTT to transmit to a chosen talkgroup in the Smart Call Folder. Note: Broadcast calls cannot be made from a radio which is in DMO. Attempting to make a Smart Call in DMO initiates a group call to the attached talkgroup. SC20 series – 04/2016... -
Page 77: Modifying Your Call Setup
Make a Smart Call 1. Open the Smart Call menu either of the following: Press a preconfigured soft key. Use the Speech Call Settings menu (see Speech call settings below. 2. Select mode Smart Call A or Smart Call B. Your radio goes into Smart Call Mode. - Page 78 (resulting from a half-duplex call modification) as if they are half-duplex calls, i.e. using PTT before speaking and releasing it to hear the other party. (Making individual phone calls (full-duplex mode) on page 65.) SC20 series – 04/2016...
-
Page 79: Text Entry
Text entry Writing and editing text on your radio is similar to most smart phones. Text edit mode is automatically activated when you select certain functions, such as creating a message or adding a contact to your phone book. To enter characters: Press a key repeatedly to highlight a character in its Character Selection Box at the bottom of the screen, then press the Select context key (or wait for the character to be auto-inserted). -
Page 80: Character Sets
Battery Charge icon. Chinese character sets Simplified Chinese You can build up Simplified Chinese characters by pressing the appropriate keys on the keypad to input strokes. As strokes are entered they display in SC20 series – 04/2016... - Page 81 the top left of the character selection box and the set of possible matching characters is displayed above the Context keys. You can also use pinyin to enter a phonetic version of a Simplified Chinese character (e.g. ‘Lu’) which is displayed in the top left of the character selection box—in the same place as the strokes described above—and the set of possible matching characters is displayed above the Context keys.
-
Page 82: Messages
(SDS message) or image (Picture message) is displayed on the screen as soon as it is received To open the Inbox: Choose one of the following methods: SC20 series – 04/2016... - Page 83 Press a customised soft key Open the Shortcut Bar (in the Home screen press the Shortcut context key or the Up navigation key) then navigate to the Inbox shortcut and press the Select context key. Message icons Various icons are used to identify the type of message received: Icon Description Status message...
-
Page 84: Opening Messages
Size. Note: this is a relative measure of the message size (not number of characters). You can use Size to decide which message(s) to delete if Saved Messages becomes full (see Message Inbox on page Sender Time received Dial mode Date received SC20 series – 04/2016... -
Page 85: Reply To A Message
Reply to a message To reply to a message: 1. From an open message, select Reply. 2. From Inbox, select a message then select Options > Reply. 3. Create your response (see Text entry on page 71.) 4. When you have finished, press Send. 5. - Page 86 Tip: You can set an option to confirm that the message has been delivered, see SDS Report Request on page To save the message Select Options > Save. To edit a saved text message 1. View Saved Messages and select the saved message. 2. Select Options > Edit. SC20 series – 04/2016...
- Page 87 3. Edit the message as required. (See Text entry on page 71.) 4. EITHER: send the message immediately save the updated message To send the message immediately Sending messages below To save the updated message Select Options > Save. Sending messages You can send text (SDS) and status messages to: the currently selected talkgroup the default destination customised in your radio (for example, the message...
- Page 88 Note: During a Group Call with the call dialogue screen displayed, you cannot send Quick Status messages using the Select/Send key or the Cancel/Home key. Instead, first press the Down Navigation key to clear the call dialogue screen, or exit the call. SC20 series – 04/2016...
- Page 89 Menu 1. Select Menu > Messages > Send Status. 2. Use the Up and Down navigation keys to highlight the status and then select Options > Send. 3. Select a destination. Edit status messages before sending You can edit the text label of a status message prior to sending it. When the message is edited, it is sent as a text message, rather than as a status message code.
-
Page 90: Picture Messages
When the Paging Alert is triggered you hear a discordant two tone alarm and the tri-colour LED flashes amber to indicate that a Status message has been received. To stop the two tone alert press any key. SC20 series – 04/2016... - Page 91 Tip: Your radio can be customised so that a Paging Alert automatically makes it fully operational on receipt of the Status message which triggered the Paging Alert. User Guide...
-
Page 92: Networks
Alternatively select Menu > Networks > Log ON/OFF. A screen appears: Log On—enter you user ID and password then press Confirm. Log Off—press Confirm. Details—indicates the current log on state of the radio. and displays the user's network identity. SC20 series – 04/2016... -
Page 93: Change Network
Change Network You radio may be customised to use other networks when you move into their coverage area. To change network 1. Select Menu > Networks > Change Network. 2. Navigate to the required network then press Select or the Select/Send key. Tip: To select the local network automatically, select the Automatic check box. -
Page 94: Fallback Mode
When your radio leaves Fallback Mode: the radio status bar returns to normal (Ready… or similar) RSSI antenna icon stops flashing the tri-colour LED stops flashing a text box pops up indicating normal operation. the radio generates a warning tone. SC20 series – 04/2016... -
Page 95: Operating Modes
Operating Modes Your radio supports the following operating modes: In Trunked Mode Operation (TMO Mode) your radio operates on the network infrastructure supplied by your service provider. In Direct Mode Operation (DMO Mode) your radio can transmit directly to another radio (antenna to antenna). In DMO Mode radio coverage depends on the position of the caller and the receiving radio. -
Page 96: Dmo Mode
Tip: You can enable Presence Checking so that your radio checks whether the receiving radio is available to receive when you attempt an Individual call. See DMO options on page SC20 series – 04/2016... - Page 97 Using a DMO gateway A DMO gateway (or gateway) is a device which allows users working in Direct Mode to communicate with users in Trunked Mode effectively extending the working range of a radio. When your radio is in DMO Mode and it is in range of a DMO gateway the gateway icon appears and, if customised, an audible alert is generated.
- Page 98 Therefore when you are making a call look at the display to understand how it will be made. Take care if a repeater and a gateway are using the same frequency and your radio is configured to use both devices (that is, option Use GW/Rep is selected). SC20 series – 04/2016...
-
Page 99: Repeater Mode
Repeater Mode A radio acting as a repeater provides a service to other radio users. It extends the range and enhances the reliability of Direct Mode communication compared with basic direct communication between radios. You can use a repeater to enable communication between radios which are out of range of each other. - Page 100 Participation you can take part in the calls which are being relayed through it if the call participants are on the same DMO talkgroup as you. To stop participating in a call, press the Clear context key; you radio continues to act as a Repeater. SC20 series – 04/2016...
- Page 101 Note: You cannot switch to Repeater Mode if the radio is in Transmit Inhibit on page 85 or if the radio has initiated an alarm call (see Emergency operation on page 33) which has not been cleared. Caution: If you select Transmit Inhibit Mode while your radio is operating in Repeater Mode, the radio leaves Repeater Mode and it stops functioning as a Repeater.
- Page 102 The repeater has detected that the DMO channel is Busy DMO being used. In this case repeater operation is Channel suspended. In Call: Repeater A call is in progress through the repeater. Talk Repeater Participating in a call and transmitting SC20 series – 04/2016...
-
Page 103: Callout Alerts
Callout alerts Your radio can receive Callout Alerts sent over the network to inform you of incidents. When a Callout Alert arrives the radio sounds an audible alarm and a Callout message is displayed on the screen. To silence this alarm press any key. -
Page 104: Responding To Callouts
Your radio exits from the Callout and Protected Callout Mode and the top level screen is displayed. Standby Select Standby to acknowledge receipt of the Callout and to indicate that you are “standing by” for further information before accepting or rejecting. SC20 series – 04/2016... - Page 105 During standby the Callout goes into its Information Phase during which information may be sent to and received from the originator of the Callout. During standby you can also accept or reject the Callout and—if use of the PTT is permitted—make group calls to the Callout group (See Group calls to Callout group on page 102.)
- Page 106 The Callout Test exits and the top level screen is displayed. User Response (If customised) allows you to compose and send a free-form text message to the originator of the Callout. When the message has been sent the Callout SC20 series – 04/2016...
- Page 107 Test exits and the top level screen is displayed. Details The Details screen is displayed showing: the Callout Test icon an indication that the Callout Test has been sent to an individual the originator of the Callout Test message time and date when the message was received the severity of the Alert the Message ID icons to show :...
- Page 108 Privacy Mode Man Down Lone Worker When the higher priority function ends, the radio notifies you of the missed Callout by sounding an audible alert, flashing a blue LED (missed event) and displaying a Missed Callout icon. SC20 series – 04/2016...
-
Page 109: Callout Display
Callout display A typical Callout screen looks as follows: Item Description Message location (Inbox) Callout type, see Callout icons below. Callout group or Callout originator Time received Callout message header text (customisable) Information icons Backdrop image (customisable, radios with colour display only). Indicates severity of the Callout. -
Page 110: Group Calls To Callout Group
You can only make group calls if PTT use is permitted during the Callout. For some Callouts your radio can make and/or receive group calls to a specially configured Callout group when it is in Protected Callout Mode. This SC20 series – 04/2016... -
Page 111: Information Phase
group may be the group the radio is attached to when the Callout is received, or a different group which the radio is configured to connect to on receipt of the Callout or when an acceptance message is sent. While the PTT is pressed and the radio is transmitting the text “Talk” is displayed in place of “CALLOUT”... - Page 112 Callout Alert the Callout ID icons to show: whether the Callout is to a group or an individual whether the Callout is incoming or outgoing whether or not the Callout is End-to-End Encrypted SC20 series – 04/2016...
-
Page 113: Features
Features Your radio can be customised for various advanced features and can have various soft keys assigned to frequently used features. Privacy Screen Your radio can be customised to display a picture when the screen is inactive for a specified period of time. This helps protect the privacy of any displayed information. -
Page 114: Connector Protector
Note: A cover must be fitted to the Rugged Accessory Connector (RAC) (on the side of the radio) if an accessory is not attached. This feature can be enabled by: a Soft key selection of an option on a SmartMenu SC20 series – 04/2016... -
Page 115: User Profiles
selection of a user profile automatically at power on after a configured time delay selecting Connector Protection from the Options menu To enable Connector Protector: 1. Press Menu then select Options > Settings > Connector Protection. 2. To toggle protection on/off press the Toggle context key. When the CP Enable check box is ticked, Connector Protector is enabled, and when the check box is empty it is disabled. - Page 116 In this profile is selected you cannot select Transmit Inhibit (see Transmit Inhibit on page 85 Connector Protector This user profile activates the Connector Protector feature when working in salt water environments. See Connector Protector on page 106. SC20 series – 04/2016...
-
Page 117: Man Down
Man Down Man Down is a licensed customisable feature which uses motion sensors to detect motion in three dimensions. When your radio is powered on it stores it's current angle of inclination (orientation). If it moves more than a customised angle from the original inclination or is stationary for more than a customised length of time, the radio sounds an alarm and displays a ‘Man Down Alarm’... - Page 118 Note: After the Man Down Alert is switched off your radio may be customised to start recording and storing the current position and/or angle to use as the new ‘steady’ position. SC20 series – 04/2016...
- Page 119 Man Down options 1. Press Menu then select Applications > Man Down. 2. Select the Man Down sensors to use: Motion & Tilt sensors, Motion Sensor only, or Tilt Only sensor. If you enable Man Down from a User Profile, the Man Down Settings screen updates to reflect the sensors defined as active in the Profile.
-
Page 120: Lone Worker
To enable Lone Worker, scroll to a user profile which has Lone Worker enabled, then press the Select context key. See User profiles on page 107. To disable Lone Worker mode, repeat the process and but choose a different user profile. SC20 series – 04/2016... -
Page 121: Wap
Your radio may be configured to browse WAP websites. The browser options are customised using Radio Manager, and some WAP pages may be stored locally on the radio's microSD card. Starting the WAP browser To open activate the WAP browser: EITHER press the Up navigation key (or Shortcut) to open the Shortcut Bar, then select WAP Homepage. -
Page 122: Browser Menu
Select to view and edit your browser options. You can set the URL of the home page, enable/disable downloading of image files, change the scrolling method and the network connection timeout. There are also options to change security settings. See Settings on the facing page. SC20 series – 04/2016... -
Page 123: Navigation Menu
Help Select when the browser is active to view any customisable help stored on your radio. Navigation menu Press Homepage > Menu from the WAP browser screen to access the Navigate options: Home Returns to the Home page on the WAP browser. Open Page Displays the 'Go to URL' screen (if customised). - Page 124 Security settings Secure Prompt Select this option to set (on/off) whether the radio displays a warning message when it is changing from a secure connection to a non-secure SC20 series – 04/2016...
- Page 125 connection and vice versa. Current Certificate If this option is selected, information about the digital certificate associated with the server which delivered the current document is displayed. CA certificates A certificate is a digital ID that is issued by a trusted third party known as a certificate authority (CA).
-
Page 126: History Menu
If you have no saved bookmarks or folders, the screen displays the message 'No saved bookmarks'. You can create up to 100 bookmarks and up to 10 folders (a single folder can contain 100 bookmarks). Press Bookmarks > Menu to create your bookmarks. SC20 series – 04/2016... - Page 127 New Bookmark Select this option to create a new bookmark. Press the Edit key and enter the title of the bookmark, URL and select the folder. Select Save when done. Tip: If you want to create a new folder for this bookmark, select the Bookmark option and press Select.
-
Page 128: Call Handling
If an Alarm Call is received the browser closes and the radio displays the Home screen, allowing you to respond to the call. You can still make a group SC20 series – 04/2016... - Page 129 call attached to a talkgroup but not a telephone type call whilst the browser is open. SDS messages If an incoming SDS message is received while the browser is active and the message is marked for immediate display then the browser will close and the SDS message is displayed.
-
Page 130: Gps
To locate your GPS position 1. Select Menu > GPS > Position> Locate. While the position is being calculated the GPS icon flashes. Position information When the position has been determined the following information is displayed: SC20 series – 04/2016... -
Page 131: Gps Direction
Latitude and Longitude values. Fix indicates how accurate the reading is: 2D indicates that less than four satellites were used to determine the position 3D indicates that at least four satellites were used. The first number in brackets reports how many GPS satellites were used. -
Page 132: Gps Reporting Options
Always Send – GPS reporting is enabled regardless of any instructions sent over the air. No Override – your radio will respond to instructions sent over the air. GPS reports are sent if requested and is switched off if requested. SC20 series – 04/2016... -
Page 133: Bluetooth
Your radio may be paired with up to ten different devices at any one time. A device only needs to be paired with the Sepura radio the first time it (the device) is used. The pairing is remembered until the device is deleted from the list of paired devices. -
Page 134: Audio Devices
Connect with audio devices: 1. Press Menu then select Options > Bluetooth > Devices. 2. Select Search. (Search is prevented if the Bluetooth® is switched off or if the maximum number of devices (ten) have already been paired.) SC20 series – 04/2016... - Page 135 Tip: If a device is not found, check that the data device is switched on, is set to the discoverable (visible) state and is close enough to your Sepura radio before attempting a new search. Any audio devices found are listed on the screen as they are found. Audio...
-
Page 136: Data Devices
Tip: When a device has been disconnected it may be reconnected by selecting Connect. Data devices You can pair your radio with dataa devices such as a laptop or PDA. When you pair to a dat device, the data device 'discovers' your radio. SC20 series – 04/2016... - Page 137 To pair with an incoming data device: 1. Press Menu then select Options > Bluetooth > Devices. 2. Select Discoverable. If your radio has been customised not to allow any incoming pairing operations ‘Cannot Add Device’ is displayed on the Devices screen. 3.
- Page 138 Tip: If a device is not found, check that the data device is switched on, is set to the discoverable (visible) state and is close enough to your Sepura radio before attempting a new search. Any PCs (laptop, desktop, or server) found show a...
-
Page 139: Modify Connected Devices
Tip: When a device has been disconnected it may be reconnected by selecting Connect. Modify connected devices Any Bluetooth® devices that have been paired with the radio are listed on the Devices screen. You can edit the name of these devices or delete them. 1. -
Page 140: Security
Unlocking the radio after incorrect PIN entry on the facing page. To unlock your radio: 1. Enter your PIN. 2. Press OK. Tip: If you make a mistake you can use the Left navigation key to delete the last digit entered. SC20 series – 04/2016... -
Page 141: Change Pin
Change PIN You can change your radio's PIN required at power on. 1. Select Menu > Options > Settings > Change PIN. 2. Enter your current PIN, then press OK. 3. At the prompt ' Change PIN?' press OK. 4. Enter your new PIN twice to confirm. A large tick displays to confirm that the PIN is changed. -
Page 142: Zeroising
In such cases, please contact technical support in your organisation. Zeroising Radios that support End-to-End Encryption are loaded with sensitive cryptographic keys. To avoid a potential security compromise, you may be able to delete (zeroise) these cryptographic keys if permitted by your operational procedures. SC20 series – 04/2016... - Page 143 Please refer to your Security Officer for details on how to zeroise your radio as well as related operational procedures. User Guide...
-
Page 144: Asset Management
3M™ Thermal Transfer Polyester label material 7815. Your radio and Sepura battery provide an area for attaching an asset label. Placing the label here will prevent it interfering with the way the product is used. -
Page 145: Rfid Tag
Caution: Do not use paint, correction fluid or other forms of liquid or aerosol to write or mark the radio or an accessory. Chemicals may affect the radio's casing and invalidate the compliance ratings and product warranty. Place a label on the back of the radio in the label ID area above the carrying aid attachment point as shown. -
Page 146: Customising Your Radio
A complete set of parameters for your radio is called a customisation. Radios can be customised either in bulk, by fitting them into a Sepura programming pod which can accommodate 4 or 8 radios at a time, or individually by directly connecting them to a computer running Radio Manager 2 software using a Sepura Data/Programming Cable. - Page 147 To program a single radio A data/programming cable, with either an RS232 (D-type) connector or a USB connector, is available from Sepura for customising a single radio. 1. Connect the USB programming cable to the computer. 2. Connect the cable to the radio by inserting the hook on the connector into the slot as shown.
-
Page 148: Accessories
Only use Sepura approved accessories with your radio. Sepura products have been tested to meet strict guidelines for personal safety and operational conditions. The use of non-approved accessories may damage... -
Page 149: Belt Clip
Always read the instructions supplied with the accessory for operating instructions and safety information. Belt clip The belt clip is used to attach your radio to clothing or to a belt. The clip is fitted to the carrying aid attachment recess on the back of your radio. Caution: Damage to product. -
Page 150: Klick Fast Stud
The Klick fast stud is used to attach your radio to clothing. The stud is fitted to the carrying aid attachment recess on the back of your radio. Caution: Damage to product. Always remove the battery before fitting or removing the stud. SC20 series – 04/2016... - Page 151 Fit the stud 1. Remove the battery. 2. Slide the stud into the carrying aid attachment recess. 3. Slide until it clicks into place. Remove the stud 1. Remove the battery. 2. Lift the spring. Caution: Failure to compress the spring sufficiently to remove the stud, will result in damage to your radio or the stud.
-
Page 152: Fit An Accessory
2. Insert the hook on the accessory connector into the slot as shown. 3. Secure the accessory by rotating the screw clockwise. Fit an accessory to the sDAC 1. Connect the cable to the radio by inserting the hook on the connector into the slot as shown SC20 series – 04/2016... - Page 153 2. Secure the accessory in position by rotating the screw clockwise. Do not over tighten. User Guide...
-
Page 154: Glossary
Connector Protection PSTN and ISDN. See also DMO gateway and GMO. (T) A Sepura feature that allows a radio to be used in a salt water environment or an area with high salt laden group call... - Page 155 (S) Mode key repeater A key on a Sepura radio or mobile that activates various A device that is installed at a fixed location and whose functions when pressed or when pressed together with sole purpose is to receive a signal and then retransmit the the Navi-knob or Navi-keys.
-
Page 156: Telephone Call
If the User Profiles feature has been customised it allows you to switch easily On Sepura radios, a Smart Call is a call to an address between user profiles. When a user profile is selected, an other than the selected talkgroup. (S) icon is displayed on the status line at the top right of the display to indicate which user profile is active. - Page 157 Sepura plc 9000 Cambridge Research Park Beach Drive Waterbeach Cambridge CB25 9TL United Kingdom sepura.com...
Need help?
Do you have a question about the SC20 series and is the answer not in the manual?
Questions and answers