Table of Contents
Advertisement
REMOTE CONTROLLER (WIRED TYPE)
UTY-RVN * M
BEDIENUNGSANLEITUNG
BEWAHREN SIE DIESES HANDBUCH ZUM SPÄTEREN NACHSCHLAGEN AUF
CONSERVEZ CE MANUEL POUR RÉFÉRENCE ULTÉRIEURE
MANUAL DE FUNCIONAMIENTO
CONSERVE ESTE MANUAL PARA SU FUTURA CONSULTA
MANUALE DI ISTRUZIONI
CONSERVARE IL PRESENTE MANUALE PER FUTURE CONSULTAZIONI
ΕΓΧΕΙΡΙΔΙΟ ΛΕΙΤΟΥΡΓΙΑΣ
ΦΥΛΑΞΤΕ ΤΟ ΕΓΧΕΙΡΙΔΙΟ ΓΙΑ ΜΕΛΛΟΝΤΙΚΗ ΑΝΑΦΟΡΑ
MANUAL DE INSTRUÇÕES
GUARDE ESTE MANUAL PARA REFERÊNCIA FUTURA
РУКОВОДСТВО ПО ЭКСПЛУАТАЦИИ
BU KILAVUZU, DAHA SONRA BAŞVURMAK ÜZERE SAKLAYIN
OPERATING MANUAL
KEEP THIS MANUAL FOR FUTURE REFERENCE
MODE D'EMPLOI
РУКОВОДСТВО ДЛЯ СПРАВОК В БУДУЩЕМ
KULLANIM KILAVUZU
PART No. 9380221043
Advertisement
Table of Contents

Related Manuals for Fujitsu UTY-RVN*M


Summary of Contents for Fujitsu UTY-RVN*M
- Page 1 REMOTE CONTROLLER (WIRED TYPE) OPERATING MANUAL KEEP THIS MANUAL FOR FUTURE REFERENCE BEDIENUNGSANLEITUNG BEWAHREN SIE DIESES HANDBUCH ZUM SPÄTEREN NACHSCHLAGEN AUF UTY-RVN * M MODE D’EMPLOI CONSERVEZ CE MANUEL POUR RÉFÉRENCE ULTÉRIEURE MANUAL DE FUNCIONAMIENTO CONSERVE ESTE MANUAL PARA SU FUTURA CONSULTA MANUALE DI ISTRUZIONI CONSERVARE IL PRESENTE MANUALE PER FUTURE CONSULTAZIONI ΕΓΧΕΙΡΙΔΙΟ...
-
Page 2: Table Of Contents
OPERATING MANUAL PART No. 9380221043 REMOTE CONTROLLER (WIRED TYPE) Contents 5-4. Filter sign setting ........... 19 1. INTRODUCTION ............2 5-4-1. Filter sign reset setting ......... 20 1-1. Safety precautions ........... 2 5-4-2. Display setting ............20 1-2. Remote controller overview ........3 5-5. -
Page 3: Introduction
1. INTRODUCTION CAUTION Do not touch the switches with sharp objects. Doing so will 1-1. Safety precautions cause injury, trouble, or electric shock. Do not insert articles into the slit parts of this unit. Doing so • The “SAFETY PRECAUTIONS” indicated in the manual con- will cause trouble, heating, or electric shock. -
Page 4: Remote Controller Overview
(4) Cancel button 1-2. Remote controller overview Cancels the current selection and return to previous screen. CAUTION Operable control at the setting is displayed in the lower Press the button lightly with a finger. It may cause a failure left of each setting screen as follows: if pressed with excessive force. -
Page 5: About "Monitor" Screen
About “Icon check” function: 1-3. About “Monitor” screen In “Monitor” screen, you can check the name of the icon that indicates function currently set. “Monitor” screen shows several statuses such as the operat- NOTE: This function is only available when at least 1 icon ing status of the air conditioner, function setting, or other cur- is displayed on the icon display. -
Page 6: Basic Operations
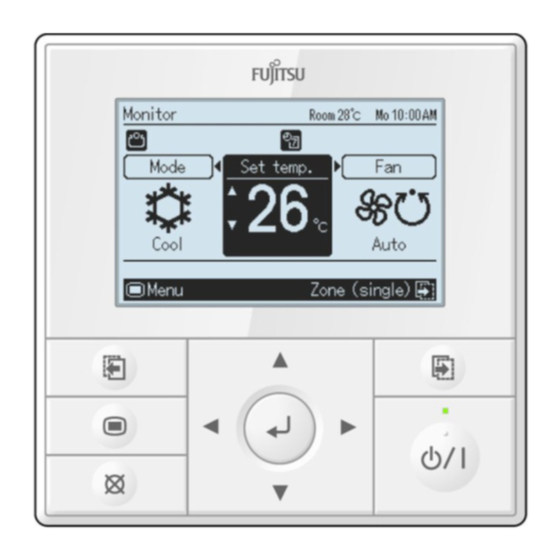
2-1-3. Set temperature adjustment 2. BASIC OPERATIONS In “Monitor” screen, select [Set temp.] with the [Cursor button 2-1. Starting the operation (Left/Right)], and adjust the room temperature with the [Cursor button (Up/Down)]. PREPARATION: Monitor Mo 10:00 Check whether the current time is displayed correctly on the screen. -
Page 7: Setting Items In Menu
2-2. Setting items in Menu Monitor Menu Submenu Mo 10:00 Mo 10:00 Mo 10:00 Function Date and time Mode Set temp. Timer Screen Filter sign R.C. sensor control ° C Room temp. display Cool High Back: Setting: Setting: Back: Menu Submenu Monitor Following items can be adjusted in Menu. -
Page 8: Setting Items In Submenu
2-3. Setting items in Submenu Monitor Menu Submenu Mo 10:00 Mo 10:00 Mo 10:00 Function Date and time Mode Set temp. Timer Screen Filter sign R.C. sensor control ° C Room temp. display Cool High Back: Setting: Back: Setting: Submenu Menu Monitor Submenu... -
Page 9: Function Setting
“Air flow direction” screen opens. In “Air flow direction” 3. FUNCTION SETTING screen, adjustable airflow direction on the relevant indoor unit and its current specified movement are dis- 3-1. Switching to the “Function” screen played. Select [Vertical] or [Horizontal] with the [Cursor button In “Menu”... -
Page 10: Economy Setting
3-2-2. Economy setting “Set temp. auto return” screen is displayed. Set temp. auto return Mo 10:00 In “Function” screen, select [Economy] with the [Cursor Enable/Disable setting Disable button (Up/Down)]. Return time and temp. setting Function Mo 10:00 Time Temp. Air flow direction Cool/Dry 30min. -
Page 11: Set Temp. Range Limitation Setting
When you return to the “Monitor” screen, the icon is displayed. For [Temp. setting], select mode with the [Cursor but- To check the function, press the [Enter button] and select the ton (Up/Down)] and press the [Enter button]. icon. Adjust [Lower] and [Upper] value with the [Cursor but- ton (Up/Down)]. -
Page 12: Timer Setting
For [Enable/Disable setting], select [Enable] or [Disable] 4. TIMER SETTING with the [Cursor button (Up/Down)], and press the [Enter button] to complete the setting. 4-1. Switching to the “Timer” screen On timer Mo 10:00 In “Menu” screen, select [Timer] with the [Cursor button Enable/Disable setting Enable (Up/Down)], and press the [Enter button]. -
Page 13: Off Timer Setting
4-2-2. Off timer setting For [Time setting], adjust the time with the [Cursor but- ton (Up/Down)], and press the [Enter button] to com- plete the setting. In “Timer” screen, select [Off timer] with the [Cursor Off timer Mo 10:00 button (Up/Down)], and press the [Enter button]. Enable/Disable setting Enable Timer... -
Page 14: Weekly Timer Setting
4-2-3. Weekly timer setting Day off setting: In [Day off] setting, select the inapplicable days of the week if there are any days that you want to skip the weekly timer op- In “Timer” screen, select [Weekly timer] with the [Cursor eration. - Page 15 Note (3) Select applicable day of the week with the [Cursor button (Left/Right)], and press the [Cursor button (Up/ “Weekly timer setting” screen consists of 2 pages “Time Down)]. Selected day of the week is highlighted. 1-4” and “Time 5-8”. You can set 4 patterns per page, and with pressing the [Screen switch button (Left/ Weekly timer setting Mo 10:00...
-
Page 16: Auto-Off Timer Setting
(3) Adjust time setting of On/Off timer with the [Cursor but- (7) To complete the [Time] setting, press the [Enter button]. ton (Up/Down)]. When setting the other days of the week continually, perform procedures in step 4 and 5. Weekly timer setting Mo 10:00 6. - Page 17 Notes “Auto-off timer” screen is displayed. • Counting down of the Auto-off timer is valid only if the Auto-off timer Mo 10:00 air conditioning operation has been started with the Enable/Disable setting Disable [On/Off button] of this remote controller. When Auto-off timer become active, following message is displayed Stop in 30min.
-
Page 18: Submenu Setting
“Date” screen is displayed. 5. SUBMENU SETTING Date Mo 10:00 5-1. Switching to the “Submenu” screen Month Year When [Menu button] is pressed twice while “Monitor” screen 2012 is displayed, it switches to the “Submenu” screen. (If [Menu button] is pressed while the “Submenu” screen is displayed, Monday the display returns to the “Monitor”... -
Page 19: Summer Time (Daylight Saving Time) Setting
5-2-3. Summer time (Daylight saving time) 5-2-4. Change display format setting setting In “Date and time” screen, select [Change display for- mat] with the [Cursor button (Up/Down)], and press the Note [Enter button]. Set only for users in an area where summer time (daylight Date and time Mo 10:00 saving time) is applicable. -
Page 20: Screen Setting
5-3-2. Brightness setting 5-3. Screen setting In “Submenu” screen, select [Screen] with the [Cursor button In “Screen” screen, select [Brightness] with the [Cursor (Up/Down)], and press the [Enter button]. button (Left/Right)], and set with the [Cursor button (Up/ Down)]. Submenu Mo 10:00 Screen Mo 10:00... -
Page 21: Filter Sign Reset Setting
In “Submenu” screen, select [Filter sign] with the [Cursor but- Select [Yes] or [No] with the [Cursor button (Left/Right)], ton (Up/Down)], and press the [Enter button]. and press the [Enter button]. When [Yes] is selected, the filter sign icon on the dis- Submenu Mo 10:00 play is turned off. -
Page 22: Sensor Control Setting
5-5. R.C. sensor control setting 5-6. Room temp. display setting Note In “Submenu” screen, select [Room temp. display] with the [Cursor button (Up/Down)], and press the [Enter This function can be used only if the setting is activated button]. in the installation. To activate this function, consult au- thorized service personnel. -
Page 23: Initial Setting
Following key lock functions are available: 5-8. Initial setting •Child lock: Restricts all the button operation •Part lock: Restricts the [Menu button] operation In “Submenu” screen, select [Initial] with the [Cursor button (Up/Down)], and press the [Enter button]. When [Child lock] is set Submenu Monitor Mo 10:00... -
Page 24: Temperature Unit Setting
5-8-2. Temperature unit setting 7. SPECIFICATION In “Initial” screen, select [Temp. unit] with the [Cursor Operating temperature range button (Up/Down)], and press the [Enter button]. Indoor temperature 0 °C to 46 °C (32 °F to 114 °F) Initial Indoor humidity 90 % or less Mo 10:00 (Relative Humidity) -
Page 25: Troubleshooting
8-2. Troubleshooting WARNING In the event of a malfunction (burning smell, etc.), immediately stop operation, turn off the electrical breaker and consult authorized service personnel. Merely turning off the unit’s power switch will not completely disconnect the unit from the power source. Always be sure to turn off the electrical breaker to ensure that power is completely off.
Need help?
Do you have a question about the UTY-RVN*M and is the answer not in the manual?
Questions and answers