Advertisement
Quick Links
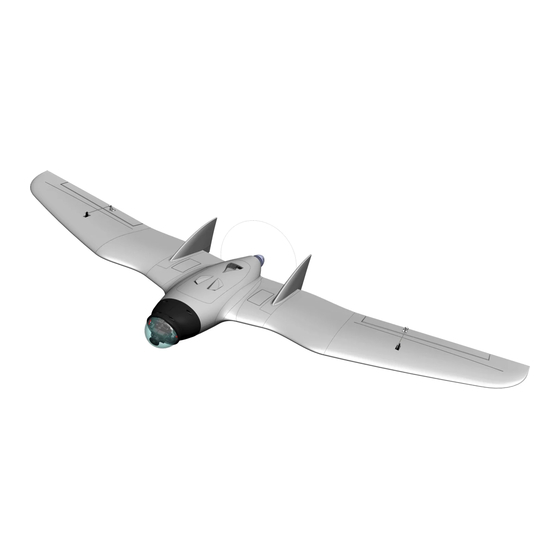
RVJET - Specially designed for UAS/FPV
Features:
Durable EPO
Variable wing span 1.55m/1.95m
Compact during transport (original packaging can be re-used)
Included anti-vibration mount for Autopilot/RVOSD
Internal pockets and cable channels enables easy installation
Durable skid to protect the fuselage on rough surfaces
Easy and safe to launch by hand
Integrated hook for bungee launch
Advanced nose gimbal for Gopro or micro cameras
Choose between foam nose or gimbal nose
RangeVideo
30th January 2015
RVJET Manual v2.0
Wireless Video Solutions
Advertisement

Summary of Contents for RangeVideo RVJET
- Page 1 RVJET - Specially designed for UAS/FPV Features: Durable EPO Variable wing span 1.55m/1.95m Compact during transport (original packaging can be re-used) Included anti-vibration mount for Autopilot/RVOSD Internal pockets and cable channels enables easy installation Durable skid to protect the fuselage on rough surfaces...
- Page 2 TABLE OF CONTENTS PLEASE READ THIS FIRST RVJET PARTS LIST AIRFRAME CONFIGURATION OVERVIEW FUSELAGE ASSEMBLY LONG WING ASSEMBLY SHORT WING ASSEMBLY GIMBAL CONFIGURATION OVERVIEW GIMBAL GOPRO PAN & TILT ASSEMBLY GIMBAL MICRO CAMERA PAN & TILT ASSEMBLY GIMBAL MICRO CAMERA TILT & PAN ASSEMBLY...
-
Page 3: Please Read This First
We recommend usage of the foam nose during the first flights to protect the PnT from unnecessary damage Before flying the long wing configuration, learn and memorize how to exit the turning dive (ref: Q&A) Do not exceed VNE of 100kph when flying the long wing configuration RangeVideo 30th January 2015 RVJET Manual v2.0 Wireless Video Solutions... - Page 4 RVJET – Parts overview 1/3 (airframe) BOTTOM FUSELAGE TOP FUSELAGE FUSELAGE RIGHT COVER FUSELAGE LEFT COVER FUSELAGE TOP HATCH RIGHT FIN RIGHT WING RIGHT WING RIGHT WING RIGHT WING COVER LEFT FIN EXTENSION EXTENSION COVER LEFT WING LEFT WING NOSE...
-
Page 5: Motor Mount
RVJET – Parts overview 2/3 (airframe) WING SERVO SERVO CABLE PUSHROD MOTOR MOUNT CONTROL LINK HORNS STOPPER FUSELAGE CF TUBE WING REAR CF TUBE WING FRONT CF TUBE CF ROD CF STRIP SQUARE CF ROD (D10x486MM) (D10x286MM) (D8x70MM) (D10x416MM) (1x3x472MM) - Page 6 RVJET – Parts overview 3/3 (gimbal) BASE PLATE RIGHT SERVO HOLDER LEFT SERVO HOLDER RIGHT MAIN HOUSING LEFT MAIN HOUSING CLEAR DOME GIMBAL RING GOPRO 1&2 HOLDER BOTTOM GOPRO 1&2 HOLDER TOP CAMERA BRACKET PIVOT CLIP GOPRO 3 HOLDER BOTTOM...
- Page 7 (>170kph) Transport and store The RVJET comes packed in a foam interior which can be re-used for transport and storage of your model in between flights (when used with the long wings small adjustments are required)
- Page 8 RVJET – Fuselage Assembly 1/6 Assembly Instructions for the RVJET FUSELAGE RangeVideo 30th January 2015 RVJET Manual v2.0 Wireless Video Solutions...
- Page 9 RVJET – Fuselage Assembly 2/6 1. Route servo cables from the inside of the bottom fuselage to the wings ! The cable is thicker than the slot in the foam requiring the 2. Glue the skid to the bottom fuselage...
- Page 10 RVJET – Fuselage Assembly 3/6 6. Glue the CF-tubes to the fuselage ! Make sure the tube does not stick out on the sides 4. Glue the motor mount to the bottom fuselage ! Make sure the whole surface between the parts is glued 5.
- Page 11 RVJET – Fuselage Assembly 4/6 8. Glue the square CF-tube into the recess in the front of the bottom fuselage (repeat for the other side) 9. Install the motor on the motor mount ! Any adjustments to the thrust angle are easiest to do now ! Hex screws are recommended for easier access to motor 7.
- Page 12 RVJET – Fuselage Assembly 5/6 10. Install the ESC between the CF-tube and motor mount 11. Connect the ESC to the motor, route power and signal cable ! Test run the motor with the PROPELLER OFF to ensure the motor is spinning in the correct direction 12.
- Page 13 RVJET – Fuselage Assembly 6/6 16. Glue magnets horizontally 15. Glue the top fuselage to the bottom fuselage ! Make sure the whole surface between the parts is glued ! Ensure the motor mount is also glued to the top fuselage 17.
- Page 14 RVJET – Long Wing Assembly 1/4 Assembly Instructions for the LONG RVJET WING (SPAN 1.95M) RangeVideo 30th January 2015 RVJET Manual v2.0 Wireless Video Solutions...
- Page 15 RVJET – Long Wing Assembly 2/4 20. Remove the foam on the sides of the elevons 21. Glue CF-strip in the top slot of the wing ! Ensure that the strip fits fully before applying glue ! Ensure that the strip is flush to the surface of the wing 22.
- Page 16 RVJET – Long Wing Assembly 3/4 23. Glue wing extension to wing ! If you want to fly with the short wing, skip to instructions for SHORT RVJET WING 25. Install servo in servo tray ! Make sure the servo is centred and the control arm installed...
- Page 17 RVJET – Long Wing Assembly 4/4 27. Install control horn and pushrod 26. Glue covers onto wing and wing extension ! If the servo is centred you can adjust reflex (ref: Setup) ! Do not place glue on the servo cable 29.
- Page 18 RVJET – Short Wing Assembly 1/5 Assembly Instructions for the SHORT RVJET WING (SPAN 1.55M) (NOTE: THIS REQUIRES SOME MODIFICATIONS OF THE STANDARD KIT) RangeVideo 30th January 2015 RVJET Manual v2.0 Wireless Video Solutions...
- Page 19 RVJET – Short Wing Assembly 2/5 30. Remove the foam on the sides of the elevons 31. Glue CF-strip in the top slot of the wing ! Ensure that the strip fits fully before applying glue ! Ensure that the strip is flush to the surface of the wing 32.
- Page 20 RVJET – Short Wing Assembly 3/5 33. Cut the wing CF tubes, trim to fit the wing (approx 86mm and 286mm) ! Take care not to crack the tubes when cutting ! Adding glue to the newly cut edges can reduce the risk of cracking 35.
- Page 21 RVJET – Short Wing Assembly 4/5 38. Install control horn and pushrod 37. Glue covers onto wing and wing extension ! If the servo is centred you can adjust reflex (ref: Setup) ! Do not place glue on the servo cable...
- Page 22 RVJET – Short Wing Assembly 5/5 OPTIONAL OPTIONAL 44. Repeat steps 30-43 for the other wing 43. Glue the CF-rods in the CF-tubes 42. Glue cover onto wing extension ! Some sanding might be required on the rods ! Do not place glue on the servo cable 45.
- Page 23 RVJET – Gimbal Configuration Overview GoPro Pan&Tilt Mico Camera Pan&Tilt Micro Camera Tilt&Pan Primary axis: Pan Primary axis: Pan Primary axis: Tilt Secondary axis: Tilt Secondary axis: Tilt Secondary axis: Pan GoPro Hero 1, 2 & 3 Fits most common micro cameras...
- Page 24 RVJET – Gimbal GoPro Pan&Tilt Assembly 1/7 Assembly Instructions for the RangeVideo GoPro Pan&Tilt Module RangeVideo 30th January 2015 RVJET Manual v2.0 Wireless Video Solutions...
- Page 25 RVJET – Gimbal GoPro Pan&Tilt Assembly 2/7 50. Mount servo and secure with clip and screw 51. Assemble link stopper on servo horn and secure with circlip ! Do not over-tighten ! Pre-assemblesd 53. Assemble cover and secure with 3 screws 52.
- Page 26 RVJET – Gimbal GoPro Pan&Tilt Assembly 3/7 55. Assemble 18mm push rod 54. Assemble 3 link stoppers to gimbal ring and secure with circlip according to picture5 ! Install flush with link stopper body ! Pre-assembled 56. Snap GoPro holder into ring 57.
- Page 27 RVJET – Gimbal GoPro Pan&Tilt Assembly 4/7 57. Assemble link stoppers to V-shaped servo horn secure with circlips 59. Insert servo into holder and secure with 2 screws ! Pre-assembled ! Be careful with cable 58. Install servo horn on servo ! Servo must be centred 60.
- Page 28 RVJET – Gimbal GoPro Pan&Tilt Assembly 5/7 62. Attach the 2 pivot clips to the gimbal ring and insert into left housing 63. Insert the push rods into the link stoppers and tighten screws ! Make sure everything turns smoothly 64.
- Page 29 RVJET – Gimbal GoPro Pan&Tilt Assembly 6/7 Features for cable ties 65. Route cables 66. Slide the complete assembly carefully onto the fuselage ! If needed use cable ties to fix cables ! If needed use some CA-glue to fix housing to fuselage ! Make sure you allow enough slack for movement 67.
- Page 30 RVJET – Gimbal GoPro Pan&Tilt Assembly 7/7 68. Attach the dome and rotate clockwise until it securely snaps into place. Congratulations, you have successfully assembled your RV-GoPro Pan & Tilt! RangeVideo 30th January 2015 RVJET Manual v2.0 Wireless Video Solutions...
- Page 31 RVJET – Gimbal Micro Camera Pan&Tilt Assembly 1/6 Assembly Instructions for the RangeVideo MicroCam Pan&Tilt Module RangeVideo 30th January 2015 RVJET Manual v2.0 Wireless Video Solutions...
- Page 32 RVJET – Gimbal Micro Camera Pan&Tilt Assembly 2/6 Video up Video up 70. Mount your micro camera between the brackets and tighten the 4 screws 71. Push assembled camera bracket onto base plate and insert 2 screws ! Make sure the video orientation is correct ! Make sure the video orientation is correct 73.
- Page 33 RVJET – Gimbal Micro Camera Pan&Tilt Assembly 3/6 75. Assemble 3 link stoppers to gimbal ring and secure with circlip according to picture 76. Assemble 26mm push rod ! Pre-assembled ! Install flush with link stopper body 77. Snap camera assembly into ring. Do not to over-stress the snap features 78.
- Page 34 RVJET – Gimbal Micro Camera Pan&Tilt Assembly 4/6 79. Assemble link stoppers to V-shaped servo horn secure with circlips 81. Insert servo into holder and secure with 2 screws ! Pre-assembled ! Be careful with cable 80. Install servo horn on servo ! Servo must be centred 82.
- Page 35 RVJET – Gimbal Micro Camera Pan&Tilt Assembly 5/6 84. Attach the 2 pivot clips to the gimbal ring and insert into left housing 85. Insert the push rods into the link stoppers and tighten screws ! Make sure everything turns smoothly Features for cable ties 86.
- Page 36 RVJET – Gimbal Micro Camera Pan&Tilt Assembly 6/6 88. Re-check the cables assemble the right housing half and secure with 4 screws 89. Attach the dome and rotate clockwise until it securely snaps into place. Congratulations, you have successfully assembled your RV-MiniCam Pan & Tilt!
- Page 37 RVJET – Gimbal Micro Camera Tilt&Pan Assembly 1/7 Assembly Instructions for the RangeVideo MicroCam Tilt&Pan Module RangeVideo 30th January 2015 RVJET Manual v2.0 Wireless Video Solutions...
- Page 38 RVJET – Gimbal Micro Camera Tilt&Pan Assembly 2/7 Video up Video up 90. Mount your micro camera between the brackets and tighten the 4 screws 91. Push assembled camera bracket onto base plate and insert 2 screws ! Make sure the video orientation is correct ! Make sure the video orientation is correct 93.
- Page 39 RVJET – Gimbal Micro Camera Tilt&Pan Assembly 3/7 95. Assemble 3 link stoppers to gimbal ring and secure with circlip according to picture 96. Assemble 26mm push rod ! Pre-assembled ! Install flush with link stopper body 97. Snap camera assembly into ring. Do not to over-stress the snap features 98.
- Page 40 RVJET – Gimbal Micro Camera Tilt&Pan Assembly 4/7 99. Insert servo into holder and secure with 2 screws 100. Insert servo assembly into right main housing and secure with 2 screws ! Be careful with cable ! Be careful with cable 101.
- Page 41 RVJET – Gimbal Micro Camera Tilt&Pan Assembly 5/7 104. Mount push rods according to pictures 103. Mount pivot clip to right housing and secure with screw 105. Insert the gimbal assembly into Right housing 106. Insert the push rods into the link stoppers and tighten screws...
- Page 42 RVJET – Gimbal Micro Camera Tilt&Pan Assembly 6/7 107. Mount pivot clip to left housing and secure with screw 108. Slide the complete assembly carefully onto the fuselage ! If needed use some CA-glue to fix housing to fuselage 109. Check the cables assemble the right housing half and secure with 4 screws...
- Page 43 RVJET – Gimbal Micro Camera Tilt&Pan Assembly 7/7 110.Attach the dome and rotate clockwise until it securely snaps into place. Congratulations, you have successfully assembled your RV-MiniCam Tilt & Pan! RangeVideo 30th January 2015 RVJET Manual v2.0 Wireless Video Solutions...
- Page 44 RVJET – Dimensions 1950 [mm] 1550 RangeVideo 30th January 2015 RVJET Manual v2.0 Wireless Video Solutions...
- Page 45 RVJET – Setup 1/2 RC SETUP Reflex +6mm Aileron expo -40% (Futaba) 40% (OpenTX/JR/Spektrum) Elevator expo -40% (Futaba) 40% (OpenTX/JR/Spektrum) RC receiver Aileron + 25mm (1”) -13mm (1/2”) Elevator +19mm (3/4”) -10mm (2/5”) RVOSD / AP / GPS (Note: The above throws include the +6mm reflex)
- Page 46 Toggle ON the AUX autopilot mode fly by wire Set airplane mode to WING Smile, the RVJET should be a dream to fly now Go to R/C wizard and follow it, setting the correct throw directions. Set ‘cruise throttle’ to ½...
- Page 47 The short wing is more agile especially round the roll axis. There are several ways. Important for all of these is to let the RVJET gain The short wing can fly a lot faster, we have flown in excess of 170kph with speed until you give control inputs.
- Page 48 Look for slack in the gimbal links Make sure the Gimbal housing is securely attached If the Gimbal housing has slack, fix it in place with drops of CA glue The RVJET turns too slow in RVOSD AP-modes Decrease “Waypoint loitering radius Decrease “RTH loitering radius”...
Need help?
Do you have a question about the RVJET and is the answer not in the manual?
Questions and answers