Advertisement
Quick Links
Soho Wooden Highchair
Assembly Instructions
Thank you for your purchase.
Please follow the instructions below for correct assembly.
IMPORTANT!
KEEP FOR FUTURE REFERENCE:
WARNING: Never leave your child unattended in the highchair. Strict
adult supervision is required at all times.
WARNING: Ensure the safety strap is in use at all times to avoid the
child slipping downwards and causing injury. We recommend the use of
the shoulder and waist harness at all times to avoid injury caused by
falls.
WARNING: Do not use the highchair unless components are correctly
fitted and adjusted.
WARNING: Ensure the highchair is positioned away from objects or
structures that can cause injury. Be aware of the risk of open fire and
other sources of strong heat, such as electric bar fires, gas fires etc, in
the vicinity of the highchair.
WARNING: Ensure both the seat and footrest are clicked into position
and cannot be moved by hand, before placing the child in the highchair.
WARNING: For babies/toddlers under 2 years old, please ensure the
seat is positioned on the 1st or 2nd level from the top ONLY.
Do not tighten all screws until all components have been assembled.
The highchair should not be used until the child can sit up unaided.
Do not use the highchair if any part is broken, torn or missing.
mocka.co.nz | mocka.com.au
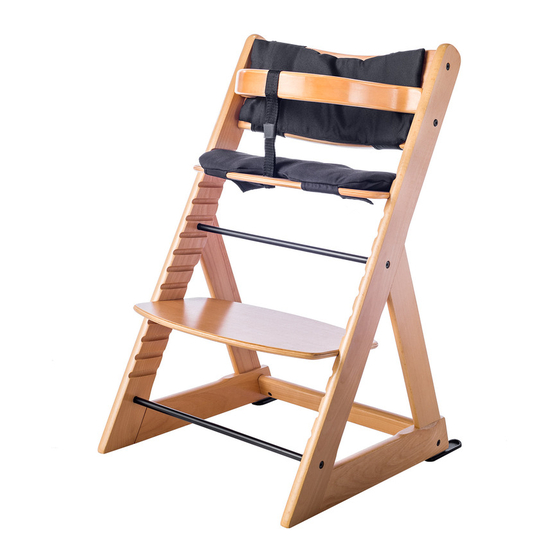
Safety Rail
Seat board
Footboard
metal rod
Only use the highchair on a flat, even and horizontal floor.
Do not elevate the highchair on any structure or table.
Backboard Upper
Safety strap
Highchair Leg
Support brace
1
Advertisement

Related Manuals for Mocka Soho Wooden Highchair


Summary of Contents for Mocka Soho Wooden Highchair
- Page 1 Soho Wooden Highchair Assembly Instructions Thank you for your purchase. Please follow the instructions below for correct assembly. IMPORTANT! KEEP FOR FUTURE REFERENCE: Backboard Upper Safety Rail WARNING: Never leave your child unattended in the highchair. Strict adult supervision is required at all times.
- Page 2 Soho Wooden Highchair Assembly Instructions The best way to clean your highchair – especially the tray is with a clean damp cloth, and then wipe completely dry. We recommend you DON’T use household cleaners as these could lift the varnish and upset the wood finish.
- Page 3 Soho Wooden Highchair Assembly Instructions To begin assembly, line up backboards, iron rods, and support brace between both legs of the highchair. Ensure all components slot into the corresponding grooves on the inside of the legs. Loosely fasten rods to the highchair legs using screws (A) and allen key (E) provided.
- Page 4 Soho Wooden Highchair Assembly Instructions Note: It is important to ensure that the foot board is inserted at least three rungs below the top metal rod. Loosely fasten upper and lower backboards to legs Slide seat board and foot board into slots in the using long screws (B) and bolt nuts (C).
- Page 5 Soho Wooden Highchair Jolt Wardrobe Assembly Instructions ASSEMBLY INSTRUCTIONS Thread safety strap through the opening in the seatboard IMPORTANT - To ensure the highchair is 100% safe for your child and over the safety rail. Pull the strap tight and fold the please read this important information.
- Page 6 Soho Wooden Highchair Assembly Instructions LEG EXTENDERS To attach the leg extenders, remove white Attach leg extender (G) at the desired point using a plastic footpad (D). 15mm small screw (H) & screwdriver. All done! mocka.co.nz | mocka.com.au...
- Page 7 Tie to high-chair frame by clipping together both buckles as s hown. Keep the by passing each clip through the loop in the straps. harness and middle buckle loose and open for now. mocka.co.nz | mocka.com.au...
- Page 8 To take the child out of the chair, B. Slip child’s second arm through the harness loop. C. With the harness sitting over the shoulders, clip the front buckles together as shown. All done! Enjoy! mocka.co.nz | mocka.com.au...
Need help?
Do you have a question about the Soho Wooden Highchair and is the answer not in the manual?
Questions and answers