Table of Contents
Advertisement
Digital Radio-controlled weather station
User´s Guide
Now you have purchased an Ascot product.
After Sales Support
Now you have purchased a Ascot product you can rest
assured in the knowledge that as well as your 3 year parts
and labour warranty you have the added peace of mind of
dedicated helplines and web support.
MODEL No.:
GT-WS-07s. GT-WS-07w, GT-WS-06s
GT-WS-06w, GT-WT-01
Advertisement
Table of Contents

Summary of Contents for Ascot GT-WS-07s
- Page 1 Now you have purchased an Ascot product. After Sales Support Now you have purchased a Ascot product you can rest assured in the knowledge that as well as your 3 year parts and labour warranty you have the added peace of mind of dedicated helplines and web support.
-
Page 2: Table Of Contents
Contents Introduction Safety This is what the weather station offers Overview of weather station Initial use About the time signal Select location Displays Time functions Weather data Moon phases Other functions Cleaning Faults and rectification Technical data Conformity declaration Disposal Warranty card HELPLINE No. -
Page 3: Introduction
Europe´s leading manufacturer. All products brought to you by Ascot are manufactured to the highest standards of performance and safety, an, as part of our philosophy of customer service and satisfaction, are backed by our comprehensive 3 Year Warranty. - Page 4 Hazards for children Batteries can be life-endangering if swallowed. Therefore, keep the weather station, radio sensor and batteries out of reach of small children. If a battery has been swallowed, medical assist- ance must immediately be sought. Keep children away from packaging material and the small parts in the scope of delivery.
- Page 5 Remove the batteries from the base station and radio sensor, if they become depleted or if you are not using the weather station for a longer period of time. This way, you avoid damage that could result from leakage. Do not expose the batteries to any extreme conditions by e.g. laying them on a radiator or under direct sunlight.
-
Page 6: This Is What The Weather Station Offers
This is what the weather station offers Weather station Precise time through reception of a time indicator signal 12-hour or 24-hour display for two time zones Date and day of week display Inside temperature display in °C/°F Outside temperature display in °C/°F with up to three sensors at various measuring points Inside and outside humidity display Minimum/maximum display for temperature, atmospheric... -
Page 7: Overview Of Weather Station
Overview of weather station Base station - view from front and top Display, see page 21 Illuminate display / activate alarm repeat function HELPLINE No. U K / N.IRELAND 0800 328 60 20 REP. IRELAND 00 800 44 67 58 88 WEB SUPPORT info@dariolondon.com... - Page 8 Base station - right side view Display stored MIN and MAX data Set values (reduce) Start radio reception manuall Set values (increase) Switch alarm function on and off Activate setting mode Save entered settings Query weather data from the existing radio sensors HELPLINE No.
- Page 9 Base station - back Set air pressure at location (reduce) Activate setting mode for air pressure Set air pressure at location (increase) Battery compartment With the other type of weather station, BARO buttons are on the left side. HELPLINE No. U K / N.IRELAND 0800 328 60 20 REP. IRELAND 00 800 44 67 58 88 WEB SUPPORT info@dariolondon.com...
-
Page 10: Initial Use
Radio sensor Battery compartment Change degree of measurement for temperature Accelerate radio Set sensor number transmission to (transmission channel) base station manually Initial use Inserting batteries Proceed in the order shown and first insert the batteries into the radio sensor and only afterwards into the base station. - Page 11 Radio sensor 1. Remove the battery compartment lid on the back of the radio sensor. 2. Insert two type R03 (AAA) / 1.5 V batteries, as shown on the base of the battery compartment. Pay attention to the correct polarity (+/-) of the batteries. 3.
- Page 12 Procedure: 1. Remove the battery compartment lid on the back of the radio sensors. 2. Set a dedicated sensor number for each radio sensor using the slide switches. 3. Reattach the battery compartment lids onto the radio sensors. 4. Keep the CHANNEL button pressed on the base station until the display for weather data OUT flashes.
-
Page 13: About The Time Signal
2. Using the BARO- / BARO+ buttons, set the air pressure. Pay attention to what is shown in the display. 3. Then, press SET/BARO again. If you keep the BARO- / BARO+ pressed, the values move forward more quickly. About the time signal General The radio-controlled clock that is integrated into the weather station receives its radio signals from the time indicator signal MSF. - Page 14 After this, the device switches to receiving, whereby the radio wave number shows the quality of the reception: The more radio waves are displayed, the better the reception. As soon as the signal is received with sufficient strength, the relevant data is shown in the display and the transmitter tower symbol is constantly displayed.
- Page 15 5. Press the MODE/SET. button to save the setting. The date flashes in the display. 6. Using the +/ or -/ /ZONE buttons, set the date. 7. Press the MODE/SET. button to save the setting. The hour flashes in the display. 8.
-
Page 16: Select Location
In order to start the reception of the time signal manually, keep the /ZONE button pressed until the radio signal symbol is displayed again and the weather station is switched to reception. Please note: If the reception was not successful, the reception symbol disap- pears after several minutes and the time in the display continues to run normally. - Page 17 Please note: The maximum allowable distance between the base station and the sensor is 100 metres. However, this range is only possible with "direct visible contact". Blocking building materials, e.g. reinforced concrete reduce or prevent radio reception between the base station and radio sensor.
- Page 18 Base station DANGER When installing on a wall, please ensure that no electric cables, gas and water pipes are not buried beneath the wall surface before drilling any holes. HELPLINE No. U K / N.IRELAND 0800 328 60 20 REP. IRELAND 00 800 44 67 58 88 WEB SUPPORT info@dariolondon.com...
- Page 19 The base station can be stood up or suspended. The base station has a fold-down stand (A) and two suspension loops (A) for this purpose. The stand has three locking positions. Preferably set up or suspend the base station near a window. This is usually the best reception site.
- Page 20 Radio sensor Stand or suspend the radio sensor at a location where it is protected from direct weather influences (rain, sun, wind, etc.). Suitable locations are e.g. below a canopy or in a carport. HELPLINE No. U K / N.IRELAND 0800 328 60 20 REP. IRELAND 00 800 44 67 58 88 WEB SUPPORT info@dariolondon.com...
-
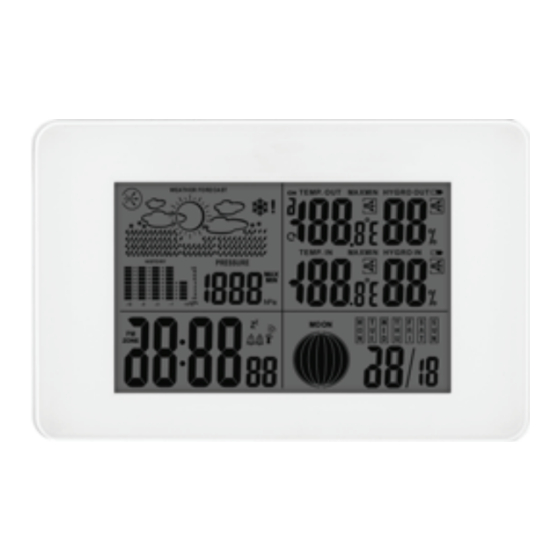
Page 21: Displays
Displays Base station HELPLINE No. U K / N.IRELAND 0800 328 60 20 REP. IRELAND 00 800 44 67 58 88 WEB SUPPORT info@dariolondon.com... - Page 22 Display, see page 25 Date and day of week display, see page 23 Moon phase display, see page 31 Date and alarm time display, see page 23 Air pressure display, see page 28 Weather forecast, see page 29 Radio sensor Symbol for radio link between base station and radio sensor (displayed only during radio transmission) Temperature...
-
Page 23: Time Functions
Time functions Time and date Symbol for radio reception from time signal transmitter 12-hour format Time zones Time in hours, minutes + seconds Current day of week Day and month Alarm function You can set two different alarm times with the base station For example, you can be woken up in the morning and after your after- noon nap, by activating both alarms. - Page 24 2. Keep the MODE/SET. pressed for approx. 2 seconds, when you have selected the required alarm time. The hour display of the alarm time (A1 or A2) flashes. 3. Using the +/ or -/ /ZONE buttons, set the required alarm hour.
-
Page 25: Weather Data
Switch off alarm completely - Press any button on the base station in order to end the alarm. Autostop function - If you do not press any button, the alarm will switch off automatically after 2 minutes. After 24 hours, the alarm will sound again. Alarm repeat Press the LIGHT/SNOOZE button 1x. - Page 26 Display area Radio sensor Current transmission channel to the base station Stored maximum and minimum values Trend for temperature, see page 28 Battery replacement display, see page 32 Trend for humidity, see page 28 Humidity in % Degree of measurement for temperature °C or °F Temperature Indication that the sensors are automatically checked sequentially (only if more than one sensor is being used)
- Page 27 Display area Base station Stored maximum and minimum values Trend for temperature, see page 28 Battery replacement display, see page 32 Trend for humidity, see page 28 Humidity in % Degree of measurement for temperature °C or °F Temperature With the MIN/MAX button, you can obtain a display of the highest and lowest values for the last 24 hours in relation to the temperature and humidity.
- Page 28 The weather station also has a frost alarm. For additional information on this, see page 30. Weather trend For the temperature and humidity values measured by the base station and radio sensor, the trend is shown in the form of an arrow. trend rising constant...
-
Page 29: Weather Forecast
The MAX and MIN values are continuously measured and stored. It is therefore not possible to manually delete these values. In conjunction with the weather forecast, see next chapter, other weather indications are possible. Two examples: Weather forecast shows rain, the air pressure is falling quickly and intensively >>... - Page 30 cloudy rainy snowfall Frost warning - When the radio sensor measures a temperature of between + 1 °C and -1 °C, a risk of frost exists and a snowflake symbol flashes. If the temperature falls below -1 °C for a constant period of time, the snowflake symbol is displayed steadily.
-
Page 31: Moon Phases
When the air pressure rises again, the symbols are displayed constantly again. In the top section, an arrow indicates the weather trend. If it points up or down, the air pressure has risen or fallen by more than 1 hPa within one hour. -
Page 32: Other Functions
Other functions Switch light on Press the LIGHT/SNOOZE button in order to switch on the display lighting for several seconds. Battery replacement display There is a battery change display for each of the base station and radio sensor. When the symbol for the battery change is displayed, the inserted batteries in the base station (symbol next to IN)/radio sensor (symbol next to OUT) need to be replaced with new ones. - Page 33 Change degree of measurement for temperature The temperature can only be displayed in either °C or in °F on the base sensor and radio sensor. Base unit Keep the MIN/MAX button pressed for approx. 2 seconds, in order to change the displayed unit of measurement. Radio sensor 1.
- Page 34 In order to accelerate the data interchange between the weather station and radio sensor, you can keep CHANNEL pressed on the weather station until the display flashes and press the TX button on the appropriate radio sensor. With this, the weather data will be directly transmitted to the base station.
-
Page 35: Cleaning
In the western hemisphere, it is earlier than in Europe and in the eastern hemisphere, it is later. In the diagram, each vertical line represents one our more or one hour less (-). For example, if you intend to set the time for a country that is 7 hours east of your location, you must enter +7 (hours) as a value. -
Page 36: Faults And Rectification
Faults and rectification Fault Possible causes and solution The MSF signal for the time can- - Check the location, see page 16. not be received. - Start the radio reception manu- ally, if necessary, see page 15. - Set the time manually, see page 14. -
Page 37: Technical Data
"Technical data". humidity. - The measured outside temperature is less than 0°C. Technical data Base station: GT-WS-07s / GT-WS-07w GT-WS-06s / GT-WS-06w Batteries: 2 x LR6 (AA) / 1.5 V Measurement range of the temperature 0 °C to +50 °C Measurement precision: max. -
Page 38: Conformity Declaration
Conformity declaration Globaltronics GmbH & Co. KG hereby declares that this radio- controlled weather station complies with the basic requirements and other regulations of Directive 1999/5/EC. You can find the full conformity declaration on the Internet at www.gt-support.de. Disposal Dispose of the packaging in an environmentally appropriate manner. -
Page 39: Warranty Card
Digital Radio-controlled weather station 3 YEAR WARRANTY CARD Name Adress Email TelNo Model No. Location of purchase Warranty card Please send your completed Warranty Card to: Dario London Service Centre PO Box 70 Chislehurst BR7 5YH Hotline - UK: 0800 / 328 6020 Hotline - Ireland: 00800 / 4467 5888 Mail: info@dariolondon.com E44059...
Need help?
Do you have a question about the GT-WS-07s and is the answer not in the manual?
Questions and answers