Table of Contents
Advertisement
Advertisement
Table of Contents

Related Manuals for Stryker CrossFlow


Summary of Contents for Stryker CrossFlow
- Page 1 DRAFT DRAFT CrossFlow™ Integrated Arthroscopy Pump 0450000000...
- Page 2 DRAFT...
-
Page 3: Table Of Contents
Table of Contents Warnings............................3 Operator Profile �������������������������������������������������������������������������������������������������������������������������������������������� 3 Prior to Surgery ��������������������������������������������������������������������������������������������������������������������������������������������� 3 During Surgery ��������������������������������������������������������������������������������������������������������������������������������������������� 4 After Surgery �������������������������������������������������������������������������������������������������������������������������������������������������� 4 Cautions............................. 5 About.Your.Product.......................... 6 Product Description/Intended Use �������������������������������������������������������������������������������������������������������� 6 Indications ������������������������������������������������������������������������������������������������������������������������������������������������������ 7 Contraindications ����������������������������������������������������������������������������������������������������������������������������������������� 7 Package Contents ���������������������������������������������������������������������������������������������������������������������������������������� 7 Part Numbers and Available Accessories* ������������������������������������������������������������������������������������������... - Page 4 Electromagnetic Compatibility �������������������������������������������������������������������������������������������������������������37 Regulatory Information ���������������������������������������������������������������������������������������������������������������������������38 Symbols.and.Terminology......................40 DRAFT EN-2...
-
Page 5: Warnings
1� Federal (USA) law restricts this device to sale by or on the order of a physician� 2� The operator of the CrossFlow™ system should be a qualified health care professional having complete knowledge of the use of this equipment and awareness of the risks associated with arthroscopic DRAFT procedures�... -
Page 6: During Surgery
2� Disconnect the pump from the electrical output when cleaning, servicing, or inspecting fuses� 3� Do not make any internal repairs or adjustments� Units requiring repair should be returned to Stryker� Decontaminate the pump and accessories prior to returning them to Stryker� Stryker may refuse to carry out repairs if the products are contaminated�... -
Page 7: Cautions
3� Do not remove the cassettes while the pump is in use� The pump or the cassette may be damaged� The cassettes can only be removed when the pump is stopped� 4� Stryker does not accept any liability for direct or consequential damages if: •... -
Page 8: About.your.product
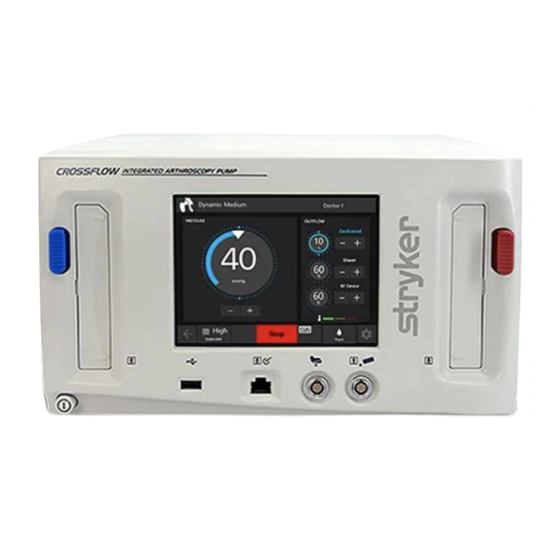
About Your Product Product Description/Intended Use The Stryker CrossFlow Integrated Arthroscopy Pump is a fluid management system� Illustrated below, the system is composed of a pump console with inflow-only and inflow/outflow modes, disposable cassette tubing, a wired hand control, and a wired footswitch� The system integrates with approved resection consoles�... -
Page 9: Indications
(1) User manual DRAFT • (1) Warranty and return policy Part Numbers and Available Accessories* The CrossFlow Integrated Arthroscopy Pump is featured in this manual� Refer to individual manuals for all other products and accessories� Part Number Description 0350220000 Autoclavable Hand Control*... -
Page 10: Front Panel
Front Panel 1� LCD Touchscreen 2� Outflow Cassette Ejection Button DRAFT 3� Outflow Cassette Holder 4� Hand Control Receptacle 5� Footswitch Receptacle 6� Auxiliary Receptacle 7� USB Port 8� Power Button 9� Inflow Cassette Holder 10� Inflow Cassette Ejection Button Rear Panel T10A 250V T3A 250V... -
Page 11: Setup.and.device.configuration
Stryker Endoscopy representative to schedule an in-service after your equipment has arrived� 1� Choose a location for the CrossFlow pump� • Place the pump on a Stryker cart or other sturdy platform near a hospital grade outlet� • Place.the.pump.at.the.same.height.as.the.joint.to.ensure.accurate.pressure.readings. •... - Page 12 Warning When the CrossFlow pump is interconnected with other electrical devices, leakage currents may be additive, resulting in electromagnetic emissions that can interfere with the normal function of electronic medical equipment� To properly control electromagnetic emissions and avoid potential harm to the patient or user, ensure all electrical devices are installed and interconnected according to the requirements of IEC 60601-1-1�...
- Page 13 Do not thread or twist the cable connector for insertion or removal� It is a push/pull connector and may be damaged by twisting it into or out of place� 5� For tubing connection instructions, refer to the CrossFlow Inflow and Outflow Cassette Tubing and the CrossFlow Day-Use Inflow Cassette and Patient-Use Tubing manuals�...
-
Page 14: Operation
Operation Note: Refer to the “Symbols and Terminology” section in this manual for button and icon definitions and commonly used terms� Starting a Procedure To start a procedure, perform the following steps: 1� Power the Pump On and Off 2� Insert the Inflow/Outflow Cassette 3�... - Page 15 Select the User Preference File User preference files can be selected through the CrossFlow Pump interface� Select from “Standard Settings” provided with the pump, or contact your Stryker representative to program your own, including settings for pressure and flow rate and button assignments for the hand control and footswitch�...
- Page 16 1� To scroll up and down the user preference file list, press � 2� Press the name of the desired user preference file to highlight it� In this scenario, “Doctor 1” is highlighted� 3� When the desired user preference file is highlighted, press to confirm the selection and advance to the next screen�...
-
Page 17: During A Procedure
1� Press to remove air from the inflow tubing� The icon indicates that the pump is operating� Note: This step must be performed each time a new Inflow Cassette is inserted into the pump� 2� Once the air has been removed and tubing is completely filled with fluid, close the pinch clamps or stopcock�... - Page 18 Default combination option Knee Stryker 5�8 mm x 140 mm cannula with 4�0 mm scope Shoulder Stryker 5�8 mm x 140 mm cannula with 4�0 mm scope Stryker 5�0 mm x 165 mm cannula (bridge) with 4�0 mm scope Small Stryker 4�0 mm x 75 mm cannula with 2�7 mm scope — None Alternate hardware combination Cannula diameter - scope diameter = x selections x ≤...
- Page 19 3� Select the scope/cannula combination for option ; to scroll up and down the hardware combination list, press � 4� Press the desired hardware combination to highlight it� In this scenario, “5�8 mm x 140 mm cannula with 4�0 mm scope” is highlighted� (Select Low, Medium, or High Flow if the desired hardware combination does not appear on the list�) 5�...
-
Page 20: After A Procedure
1� Press to change to option � A green box will briefly appear displaying the new hardware combination selection� 2� Ensure the correct hardware combination is displayed� If the incorrect hardware combination selection is displayed, or to change the hardware combination selection, follow the instructions in the “Change Hardware Combination Selections”... - Page 21 3� Refer to the CrossFlow Day-Use Inflow Cassette and Patient-Use Tubing and the CrossFlow Inflow and Outflow Cassette Tubing manual on instructions on how to disconnect and discard the tubing� Always maintain a sterile technique� 4� Press the Inflow Cassette Ejection button (blue) and/or the Outflow Cassette Ejection button (red) on the front panel of the pump to eject the cassette(s)�...
-
Page 22: Menu.features
Menu Features Opening and Closing the Main Menu 1� If the pump is running, press stop the pump� 2� Press to open the Main Menu� 3� Press to close the Main Menu� DRAFT Programming the Wash and Clear Functions Settings Note: Adjusting the settings will override the default and user preference file settings�... -
Page 23: Programming The Resection Integration Settings
Wash Function Settings 1� Press to program the settings for the Wash function� 2� Press to adjust the Pressure, Flow, or Duration� In this scenario, the pressure will increase by 50% and the flow will increase by 100% for 30 seconds�... -
Page 24: Programming The Footswitch And Formula Shaver Settings
Shaver Console Settings 1� Press to specify the shaver console: • Press to select the CrossFire console; • Press to select an approved resection console; • Press if no shaver console is in use� In this scenario, the CrossFire console is selected�... - Page 25 • Inflow/Outflow mode: Increases/decreases suction� None • No function� CrossFlow Footswitch 1� Press the CrossFlow button to program settings for the CrossFlow Footswitch� 2� Press the black foot pedal (highlighted with green border) to select its function� 3� Press to scroll up and down the function list�...
-
Page 26: Loading User Preference Files
Crossfire Footswitch 1� Press the Crossfire icon to program settings for the Crossfire Footswitch� 2� Select a button/pedal in the left-hand menu to program it� Note: Only one button or pedal may be assigned a function� 3� Press to scroll up and down the function list�... -
Page 27: Navigating To The Settings Menu
Transferring Files to/from a USB drive 1� Press to upload/download files to/from a USB drive� 2� Connect the USB drive according to the instructions in the “Setup and Device Configuration” section� 3� Press to scroll up and down the file list� 4�... - Page 28 Actual Pressure Display selection menu� 2� Select the desired display icon� The selection will be highlighted with a green box� Accessing the Stryker Settings Menu (For Stryker use only) Only authorized Stryker representatives have access to this menu� 1� Press to open the Stryker Settings Menu�...
-
Page 29: Navigating To The Help Menu
Cassette about to expire (two hours left • Replace the cassette� before expiration)� CAUTION Preventative Maintenance required; the • Contact your Stryker unit has reached its recommended service representative� interval� CAUTION Inflow/Outflow RFID read failure: The • Ensure the Inflow or Outflow Inflow or Outflow RFID tag cannot be Cassette is fully inserted�... - Page 30 • Reboot the system� DRAFT • If the problem persists, contact your Stryker representative or return the console for repair� FAULT The Crossfire console is specified in the • Ensure the console is properly user preference file, but it is improperly or connected to the pump�...
-
Page 31: Troubleshooting
• If the problem persists, contact your Stryker representative or return the console for repair� Neither the pump or The pump is not plugged in, or the • Ensure the pump is plugged in to the approved resection main fuses are out�... - Page 32 • If the problem persists, contact your A hardware fault is detected� fluctuations� Stryker representative, or return the console for repair� The pump stops The pressure is too high� The actual • Open the valve at the outflow tube, the pumping fluid, and pressure exceeds 200 mmHg for...
- Page 33 Reboot the system� is unresponsive or for the user� • If the problem persists, contact your inaccurate� Stryker representative or return the A hardware or software error occurred� console for repair� A user preference Unintentional deletion of a user •...
-
Page 34: Cleaning,.Maintenance,.And.disposal
Cleaning, Maintenance, and Disposal Warning • Do.not.remove.the.cover.of.the.console.as.this.could.cause.electric.shock.and.product.damage. • To avoid electric shock and potentially fatal injury, unplug the pump from the electrical outlet before cleaning� Caution To prevent product damage: • when cleaning the pump, do not spray cleaning liquid directly onto the pump; spray on the cloth before wiping the pump, •... -
Page 35: Perform Annual Inspection
1� Power DRAFT • Power on the pump according to the instructions in “Power the CrossFlow Pump On and Off” section of this manual� The power button will be illuminated by a green LED, indicating the system has powered on�... - Page 36 • Gather the following equipment: • disposable Inflow Cassette tube set • container filled with water • fluid bag (3 L) • Follow the instructions in this manual to power on the pump, insert the Inflow Cassette, select a preference file, and select a 1 m / 39 in joint�...
-
Page 37: Perform Preventive Maintenance And Calibration
When the pump is 95% through the current maintenance period, a “Service Pump Soon” notification will appear on the screen� An authorized Stryker service technician must inspect and service the device according to the maintenance and calibration schedule below to maintain product functionality�... -
Page 38: Technical.specifications
Technical Specifications Equipment Information Size Pump.Dimensions: • 12�528 in� (318�2 mm) width • 7�025 in� (178�4 mm) height • 16�990 in� (431�6 mm) depth Pump.Weight: 24 lbs� (10�9 kg) Hospital.power.cord: (p/n 0105-033-001) 2 m Approved.resection.console.power.cord: (p/n P17275) 2 m Power Input.Voltage: 80–275 V Connection Inlet.Fuse:.10 A, 250 V Frequency 47–63 Hz Power/Current Maximum power consumption: 269 W Consumption Maximum current consumption: 80 V: 3�4 A;... - Page 39 Caution: Portable and mobile RF communications equipment may affect the normal function of the CROSSFLOW INTEGRATED ARTHROSCOPY PUMP� Caution: Do not use cables or accessories other than those provided with the CROSSFLOW INTEGRATED ARTHROSCOPY PUMP, as this may result in increased electromagnetic emissions or decreased immunity to such emissions�...
- Page 40 TV broadcast cannot be predicted theoretically with accuracy� To assess the electromagnetic environment due to fixed RF transmitters, an electromagnetic site survey should be considered� If the measured field strength in the location in which the CROSSFLOW INTEGRATED ARTHROSCOPY PUMP system is used exceeds the applicable RF compliance level above, the CROSSFLOW INTEGRATED ARTHROSCOPY PUMP system should be observed to verify normal operation�...
- Page 41 Technical.file.held.by:.Stryker Endoscopy Place.and.date.of.issue.(of.this.DoC): San Jose, CA USA, DATE Signed.by.or.for.the.manufacturer: Name: Mike Hilldoerfer Title: Associate Director, Regulatory Affairs Hereby, Stryker Endoscopy declares that this Short Range Device is in compliance with the essential requirements and other relevant provisions of Directive 1999/5/EC� EN-39...
- Page 42 Complies with CSA C22�2 No� 601�1, UL 60601-1 Emits RF radiation Equipotential ground plug - connects to potential Stryker Firewire - enables firewire connection equalization conductor� The resulting medical with Stryker firewire devices (Crossfire, iSwitch, electrical system shall follow all applicable IEC SDC3) 60601-1 requirements� Fuse rating...
- Page 43 Serial Number Catalog number Fulfills requirements of the European Medical Non-Sterile Device Directive 93/42/EEC Made in USA Interface Icon Name/Term Description OPEN MAIN MENU Accesses the Main Menu CLOSE MAIN MENU Closes the Main Menu CROSSFIRE Indicates the Crossfire is attached FOOTSWITCH Indicates the footswitch is attached HAND CONTROL...
- Page 44 Selects an approved resection shaver console CROSSFIRE Selects the Stryker Crossfire console APPROVED RESECTION Selects an approved resection console CONSOLE NONE Indicates no RF/shaver console is selected FOOTSWITCH/FORMULA Programs footswitch and hand control options for Crossflow, SHAVER OPTIONS iSwitch, Crossfire, and Formula shaver EN-42...
- Page 45 Icon Name/Term Description CROSSFLOW FOOTSWITCH Programs the settings for the CrossFlow footswitch iSWITCH FOOTSWITCH Programs the settings for the iSwitch footswitch CROSSFIRE FOOTSWITCH Programs the settings for the Crossfire footswitch FORMULA SHAVER� Programs the settings for the Formula Shaver USER PREFERENCE...
- Page 46 DRAFT EN-44...
- Page 47 DRAFT...
- Page 48 Stryker Corporation or its divisions or other corporate affiliated entities own, use or have applied for the following trademarks or service marks: CrossFlow and the Stryker logo. All other trademarks are trademarks of their respective owners or holders� P17330 A...
Need help?
Do you have a question about the CrossFlow and is the answer not in the manual?
Questions and answers