Advertisement
Quick Links
Advertisement

Related Manuals for Almost Heaven Saunas Bluestone Sauna


Summary of Contents for Almost Heaven Saunas Bluestone Sauna
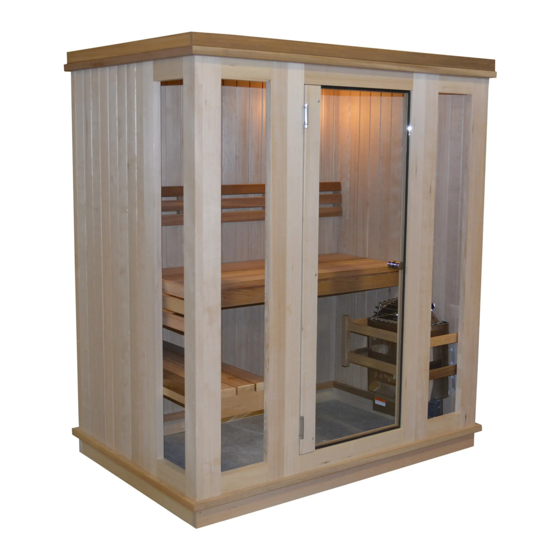
- Page 1 Bluestone Sauna Installation & Owner’s Manual Revised October 2017...
-
Page 2: Electrical Requirements
(Installation on a carpeted surface is not recom- mended.) ASSEMBLY You should use two people for the assembly of the Bluestone Sauna. The wall and roof sections are large and need two people to lift and hold in place during assembly. BASIC TOOLS... - Page 3 1. Connect the 4 FLOOR RISERS 2. Connect the WALL SUPPORT 3. Position and Fasten WALL RAILS with groove facing up SUPPORT RAILS Your existing floor will serve as the floor for your sauna. The pre- The 4 wall support rails are as- Place the assembled wall support fabricated rails and risers will be section on the assembled floor...
- Page 4 5. Attach Wall Section A to Wall Sec- 6. Position WALL SECTION C 4. Position WALL SECTION tion B A & B Position Wall Section C on rear right Using 2” screws, connect Wall Section A Position Wall Sections A & corner of the sauna according to the to Wall Section B using the pre-drilled B in the groove of the rail...
- Page 5 9. Position WINDOW SECTION F Position Window Section F on the right front of the sauna according to the guide on ILLUSTRATION 1. Using 2” screws and pre-drilled holes, fasten Wall Section E to Window Section F. NOTE: Tap sections into place using rubber mallet. Be sure the wall edges and top edges align evenly.
- Page 6 13. Build ROOF SUPPORT 14. Attach ROOF SUPPORT over 15. Position ROOF SECTION, First walls Half Assemble 4 roof support rails by angle-screwing with 2” screws Position the completed Roof Sup- Place one half of the Roof Section through the pre-drilled holes. As- port over the wall sections.
- Page 7 20. Install LOWER BENCH FRAME 18. Attach TRIM 19. Install LOWER BENCH SUPPORT Lay the lower bench frame on Nail Trim to front of Roof Sec- Install the lower bench support to top of the bench supports. Attach tions to cover raw edge the side wall with glass.
-
Page 8: Power Supply
24. Drill Hole for LIGHT CORD 25. Attach LONG 26. Mount POWER SUPPLY BACK REST Use provided screws to posi- The LED lighting comes installed on the back of the Back Rest. Find Use 2” screws and pre tion Power Supply where it is most convenient for you on the cord coming from the light -drilled holes to... -
Page 9: Heater Installation
30. HEATER INSTALLATION Mount the heater as shown in the instructions attached to the heater box. The heat- er should be mounted on Wall Section E, over the vents and 7” from the floor of the sauna. All necessary hardware is supplied with the heater. Drill a hole below and behind the heater to run the wire and/or conduit according to local electrical codes. - Page 10 35. Attach DOOR KNOB Take the two sections of the door knob and insert the thread through the hole in the door. Tighten so that handles are snug to glass. NOTE: Hand tighten only and be sure rubber gasket is between knob and glass.
-
Page 11: Operation
OPERATION After the sauna has been installed, sweep down the inside to remove any sawdust and wood shavings, and then vacuum completely. Using a damp cloth and warm water, wipe down the entire sauna including the benches to remove any remaining dirt, dust and debris. Rinse off the sauna stones and install them in or on the heater in accordance with the heater manufacturer’s instructions.
Need help?
Do you have a question about the Bluestone Sauna and is the answer not in the manual?
Questions and answers