Table of Contents
Advertisement
Advertisement
Table of Contents

Related Manuals for VTech Kidizoom Selfie Cam


Summary of Contents for VTech Kidizoom Selfie Cam
- Page 1 User’s Manual © 2016 VTech All rights reserved Printed in China 91-003260-000...
-
Page 3: Included In This Package
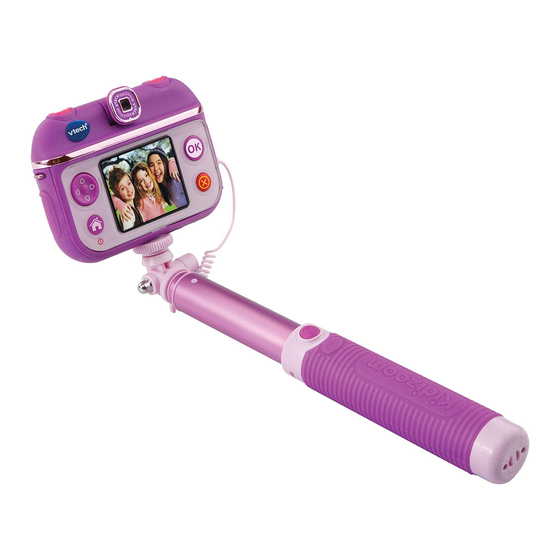
INTRODUCTION Thank you for purchasing the Kidizoom Selfie Cam by VTech ® ® This compact and lightweight camera, with a built-in rechargeable Li-ion polymer battery, is designed to take great photos, selfies, videos, play games and more! With the rotatable camera lens and the included Selfie Stick, your child... - Page 4 PRODUCT LAyOUT AND BUTTONS RoTATABLE CaMera LeNS Video BUttoN CaMera BUttoN MEMoRy CARd SLoT STRAP HooK d-PAd oK BUttoN HoMe (oN/oFF) MiCRo-USB PoRT BUttoN deLete BUttoN MiCropHoNe TRiPod SCREW HoLE MASTER PoWER SWiTCH TRiPod SCREW aNgLe adjUStMeNt arM aNgLe adjUStMeNt SWitCH exteNdaBLe poLe CaptUre BUttoN HaNdLe...
- Page 5 master Power Switch When the switch is set to the oFF position , the battery will be disconnected, the Selfie Cam will not function and the battery will not charge. When the switch is set to the oN position , the battery will be reconnected, the Selfie Cam will function and the battery can be charged.
-
Page 6: Product Specification
Capture Button (Selfie Stick) When the Selfie Cam is connected to the Selfie Stick, press this button to take photos in Camera Mode and to Start/Stop recording videos in Video Mode. Connecting Cable (Selfie Stick) plug this into the Micro-USB port of the Selfie Cam to connect to the Selfie Stick. -
Page 7: Storage Capacity
Rechargeable Li-ion Polymer battery Battery (non-replaceable). Optimum Operating 0-40°C and Charging Temperature NOTE: Keep the rubber cover of the Micro-USB port and Memory Card slot tightly closed when they are not in use. STORAGE CAPACITy 0.3 MP Video in Video in Video in Photos 160X120... -
Page 8: Battery Recharging
NOTE: it is not necessary to move the Master Power Switch to the oFF position in daily use. only move the switch to the oFF position when the Selfie Cam is not in use for an extended period of time. BATTERy RECHARGING NOTE: Adult operation required. -
Page 9: Battery Maintenance
level is low, it is recommended to recharge the battery before further use. When the battery is depleted, the Selfie Cam will not turn on and will need to be recharged. POwER SAvING (AUTOmATIC SHUT OFF) To preserve battery life, the Kidizoom Selfie Cam will automatically ®... - Page 10 Please dispose of the used battery as described in this manual. The battery life varies from battery to battery depending on storage, operating conditions and environment. Disposal of batteries and product The crossed-out wheelie bin symbols on products and batteries, or on their respective packaging, indicates they must not be disposed of in domestic waste as they contain substances that can be damaging to the environment and human health.
-
Page 11: Neck Strap Attachment
3. When the Kidizoom Selfie Cam is mounted securely on the Selfie ® Stick and connected. Press the Capture Button while in Camera or Video Mode to take a photo or to start or stop recording a video. 4. to elongate the Selfie Stick, pull the angle adjusting arm outwards. to retract the Selfie Stick, push the angle adjusting arm inwards. -
Page 12: Memory Card Installation
Step 4: Repeat step 1-3 to attach the other end of the strap to the other bar. mEmORy CARD INSTALLATION Kidizoom Selfie Cam supports the below Memory cards for memory ® expansion. • microSd • microSdHC The microSd Logo and microSdHC logo are trademarks of Sd-3C, LCC. -
Page 13: Take Photos
TO BEGIN USING KIDIzOOm SELFIE CAm ® Make sure that the Master power Switch is in the oN position that the battery has been fully charged before using the Selfie Cam. NOTE: it is not necessary to move the Master Power Switch to the oFF position when used daily. -
Page 14: View Photos Or Videos
Home menu in the Home Menu, you can access all activities on the Kidizoom Selfie Cam. Press the Home ® Button to display the Home Menu, then press Left or Right on the d-pad to select an activity, pressing the oK Button to confirm. -
Page 15: System Requirements
• insert the larger end of the Micro-USB cable into a USB port on the computer. A USB port is usually marked with this symbol: • You will see a removable drive called Vtech 1937 on your computer, please use this to transfer files to and from the Selfie Cam. there is another removable drive called VT SySTEM, which is for the storage of system data only. - Page 16 Monitor Resolution: 1024 x 768 USB Port required PC Software Requirements: Microsoft Windows XP, Windows Vista , Windows 7, Windows 8 or ® ® ® ® ® Windows 10 operating System ® macintosh Hardware Requirements: Macintosh Computer with an intel processor ®...
- Page 17 NOTE: The Self-timer can be set and the photo resolution can be changed in Settings, please refer to the Settings section in this manual for details. Videos Press the Video Button or select the Video icon in the Home Menu to enter Video Mode. •...
- Page 18 make Up Studio in the Make Up Studio, there are two activities. Press Left or Right on the d-pad to select an activity and then press the oK Button begin. NOTE: The Make Up Studio activities only support photos which are taken within the activity (using the face outline).
- Page 19 Here are the Advanced Settings for the different effects: Effect Type Advanced Description Operation Settings Hairstyles Position To move the Use the d-pad position of move the position of the the chosen chosen Hairstyle. Hairstyle. Headwear Size To enlarge Press Up or down on or shrink the the d-pad to enlarge...
- Page 20 2. Beauty Parlour in Beauty Parlour, you can add different Make Up effects to a photo. The effects include Eye Shadow, Blush, Lipstick, Mascara and Party Effect. To start, align your face with the face outline on the screen and press the oK Button to take a photo. or, press Up or down on the d-pad to select a previously taken photo and then press the oK Button to confirm.
- Page 21 Blush Shape To change Press Left or Right on the the shape of d-pad to change the the selected shape. Blush. Adjust To adjust Press Left or Right on the the distance d-pad to decrease between the or increase the distance left and right between the left and right Blush.
-
Page 22: Music Slide Show
music Slide Show in Music Slide Show, you can view all of the fantastic photos you have taken with cool transition effects and background music. • press the oK Button to view the Slide Show Settings Menu to set the following items: Items Options Music 1... - Page 23 Cake master The Cake Master likes to try different ingredients to make special cakes! Help her collect the ingredients she needs and see what a kind of special cake she can make by the end of the game! Control: Move the Selfie Cam to aim at the ingredient, and press the oK Button to collect it.
- Page 24 in Settings, use the d-pad to make a selection and press the oK Button to confirm. press the Home (oN/oFF) Button to exit Settings. You can adjust the following items: Volume : To increase or decrease the volume. Self-timer : to set the Self-timer for taking photos or videos oN or oFF.
-
Page 25: Care And Maintenance
on the screen and on the photos and videos you take when in an indoor environment. NOTE: please leave your Selfie Cam set to the default value unless you are travelling. Date & Time The current date and time can be set here. When in the date & Time Menu, press Up or down on the d-pad to scroll through the options and to select the current day, month, year, hour and minute, as well as... -
Page 26: Troubleshooting
TROUBLESHOOTING go through this section if you experience difficulty in operating Kidizoom Selfie Cam. ® Problem Solution 1. Turn the Master Power Switch oFF for 30 seconds. 2. turn the Master power Switch oN again and then the Selfie press the Home (oN/oFF) Button to turn on the Cam has Selfie Cam. -
Page 27: Technical Support
Kidizoom Selfie Cam, but it will not work with my PC, ® my PC is looking for a driver. i have searched the internet and cannot find a VTech Kidizoom Selfie Cam driver. What can i do? ®... - Page 28 Question 3: Why won't my Kidizoom Selfie Cam turn oN? ® Answer: please make sure the Master power Switch is oN and the battery is charged. Question 4: Why are my pictures sometimes grainy and fuzzy? is there anything i can do to improve the picture quality? Answer: in a poorly lit environment, the frame rate (shutter speed) drops to allow...
-
Page 29: Battery Disposal
Question 8: i am trying to transfer my pictures to my computer. i connected per the instructions (connecting the Micro-USB cable to the Selfie Cam and computer) and the new drive appears. However, no pictures are automatically downloading. is there something i need to do at start-up to get the pictures downloaded and saved? Answer: The picture transfer operation does not start by itself. - Page 30 3. remove the below buttons from the Selfie Cam. 4. Loosen the six screws on the Selfie Cam using a phillips head screwdriver, then remove the cover. 5. the whole Selfie Cam can then be disassembled. pull out the circuit board and turn it around to reveal the battery on the back.
-
Page 31: Important Note
• do not expose the battery to direct sunlight or high temperatures. • do not handle a damaged Li-ion polymer battery. ImPORTANT NOTE: Creating and developing VTech products is accompanied by a ® responsibility that we take very seriously. We make every effort to ensure the accuracy of the information which forms the value of our products. - Page 32 91-003260-000...
Need help?
Do you have a question about the Kidizoom Selfie Cam and is the answer not in the manual?
Questions and answers