Table of Contents
Advertisement
Quick Links
Dear Owner,
in this operating manual you will learn about the
various functions of the PCM (Porsche
Communication Management) and the control
options. Get acquainted with the operation of your
PCM while the vehicle is at rest. In order to take
advantage of its expanded scope of features, your
full concentration is required during this learning
process. In addition, attempting to drive while
learning these functions will draw your attention
away from the road, thus putting yourself and
others at risk of an accident.
On-board literature
Keep the on-board literature in the vehicle at all
times and if you ever come to sell your vehicle,
please hand it over to the new owner.
Suggestions
Do you have any questions, suggestions, or ideas
about your vehicle or the on-board literature?
Please write to us:
Dr. Ing. h.c. F. Porsche AG
Vertrieb Customer Relations
Porschestraße 15-19
71634 Ludwigsburg Germany
Orientation aids in the operating manual
This operating manual contains four orientation
aids to help you quickly locate the information you
require. They are each shown against a yellow
background.
The master table of contents offers you an
overview of the structure of the entire manual.
In the section table of contents you will find
detailed listings of the individual topics.
The index enables you to find the various topics
with the help of keywords.
At the back of the operating manual you will also
find a glossary, where the terms and
abbreviations used are explained.
Equipment
There may be some differences in equipment and
technology with respect to the illustrations and
descriptions due to the ongoing further
development of the systems and the different laws
in individual countries.
The equipment versions shown are not always
included as standard. Some of the functions
described in this operating manual are optional
equipment and may not be available in your PCM.
If this is the case, the relevant menu items will not
be available to you.
WARNING!
For your own protection and longer service life
of your car, please follow all operating
instructions and special warnings. These
special warnings use the alert symbol,
followed by the words Danger, Warning,
Caution, & Notice. These special warnings
contain important messages regarding your
safety and/or the potential damage to your
Porsche. Ignoring them could result in serious
mechanical failure, serious personal injury or
death.
Advertisement
Chapters
Table of Contents

Related Manuals for Porsche PCM3


Summary of Contents for Porsche PCM3
- Page 1 Dr. Ing. h.c. F. Porsche AG safety and/or the potential damage to your Vertrieb Customer Relations Porsche. Ignoring them could result in serious Porschestraße 15-19 mechanical failure, serious personal injury or 71634 Ludwigsburg Germany death.
- Page 2 WKD 952 221 09 04/08 "Dr. Ing. h.c. F. Porsche AG is the owner of numerous trademarks, both registered and unregistered, including without limitation the ® ® ® ® Porsche Crest , Porsche , Boxster , Carrera ® ® ®...
-
Page 3: Table Of Contents
Table of Contents PCM Controls ........5 Phonebook settings Individual vehicle settings (Bluetooth Mobile phone preparation)....63 (only available for sports cars)..... 101 Important information on operation Operating the PCM telephone......64 Rear view camera and road safety ..........6 Text messages (SMS) (only available for the Cayenne) .... - Page 4 Voice Control ........150 Learning about voice control......151 Basic functions of the voice control system........154 Operating examples ........158 Technical Data.........170 Radio frequency ranges....... 171 Tuning steps for automatic station search ......171 Regional codes for Video-DVDs ....171 Glossary ..........172 Index..........175 Table of contents...
-
Page 5: Pcm Controls
PCM Controls Important information on operation and road safety..........6 Introduction to operation........ 7 Operating functions using the touchscreen .......... 7 Operating functions using the right rotary knob ....... 7 Controls and their functions ......8 Operating menus ........11 Operating lists ........... -
Page 6: Important Information On Operation And Road Safety
Injury hazard. Opening the housing or a Serious personal injury or death. The The PCM (Porsche Communication damaged housing represents a hazard due to telephone must not be used near explosives or Management) is the central control unit for the invisible laser radiation. -
Page 7: Introduction To Operation
The following should be noted: We recommend that this work be 2. Press the i button or touch the tab of performed by an authorized Porsche – The display scratches easily. the same name in the header. dealership, as these have trained workshop –... -
Page 8: Controls And Their Functions
Controls and their functions The controls of the PCM are arranged around the display as well as around the CD/DVD slot. A Left rotary knob : Sets the volume (short): Switches on or mutes the device (long): Switches the device on and off a button b button m, n, c, d,... - Page 9 - Left rotary knob - a button Main menu buttons By pressing and holding the left rotary knob By pressing the a button, you open a Under the display are the so-called main menu you switch the device on or off. window where you can set the current audio buttons.
- Page 10 - Back button h - p and o arrow buttons By pressing the End call button k you can: By pressing the Back button h, you can By briefly pressing the arrow buttons you can: – reject an incoming call or execute various functions: –...
-
Page 11: Operating Menus
- Eject button j Operating menus By pressing the j button, you execute the The menu is operated using the touchscreen or following functions depending on the equipment of using the right rotary knob as well as your PCM: the h button. PCM without CD/DVD changer Activating/selecting a menu item –... -
Page 12: Operating Selection Boxes (Checkboxes)
Showing the first letter of the list entries Operating selection boxes (checkboxes) Operating radio buttons You can show the first letter of list entries to make Some menu items have a box. These menu items If a menu item has a circle instead of a box, this is it easier to find your way in long lists. -
Page 13: Operating Input Menus
Arranging letter fields in the input menu In addition to the letter fields, the input menus also provide a number of function fields for changing The letter fields in the input menu can either be the character set displayed and for moving the arranged alphabetically or in accordance with a cursor. -
Page 14: Pcm Basic Functions
PCM Basic functions Setting the volume Muting the device û Briefly press the left rotary knob Changing the volume Switching the PCM on and off û Turn the left rotary knob The active audio source is muted. The mute icon can be seen in the bottom line. -
Page 15: Making Personal Settings
Making personal settings 1. Press the n button. Configuring the PCM display 2. Press the i button or touch the tab of the same name in the header. You can set various units, the date and time, the Selecting the audio source 3. - Page 16 Setting the display format for the date Setting the time Setting daylight saving time 1. Press the d button. 1. Press the d button. 1. Press the d button. 2. Press the i button or touch the tab of 2. Press the i button or touch the tab of 2.
-
Page 17: Making Display Settings
Setting the unit for consumption Setting the layout for the input menu Making display settings keyboard 1. Press the d button. Switching the display off 2. Press the i button or touch the tab of 1. Press the d button. the same name in the header. -
Page 18: Making Sound Settings
Choosing the colors for the map display Choosing the brightness of the display Making sound settings (day/night design) 1. Press the d button. You can define the sound of your PCM for each 1. Press the d button. 2. Press the i button or touch the tab of audio source using the sound settings in the 2. - Page 19 Setting the balance Setting the loudness Surround ® (with Bose sound system) Loudness You set the volume distribution between the left " " increases the sound volume by and right speakers using the Balance setting. increasing the bass. Activating " Surround "...
-
Page 20: Resetting Personal Settings
Linear 1. Press the b button. Displaying the system version ® (with Bose sound system) 2. Press the i button or touch the tab of the same name in the header. This menu item allows you to view the system Selecting "... -
Page 21: Tuner
TUNER Radio ............22 Calling up the main menu for radio mode .......... 22 Tuning to stations ........22 Storing stations on station buttons in the preset memories ......23 Traffic program ......... 24 Making settings for radio mode ....25 Switching RBDS on and off ...... -
Page 22: Radio
Tuning to stations Tuning to stations using the station list The station list contains all the stations that can You have the following options for tuning to a currently be received. It is only available in FM station: mode. – using the station buttons, 1. -
Page 23: Storing Stations On Station Buttons In The Preset Memories
Tuning to stations by scanning Storing stations on station buttons in the preset memories If you activate this function, every station found in the frequency range is played for approx. 5 Setting the preset memory seconds. There are six memory locations available in each 1. -
Page 24: Traffic Program
1. Keep pressing the m button until the Storing via an automatic station search Traffic program desired mode is highlighted. (autostore) 2. Select " Preset memory ". Various FM radio stations broadcast traffic The automatic station search function is only messages in addition to their radio program. -
Page 25: Making Settings For Radio Mode
Setting the Traffic prog. volume Making settings for radio mode Switching RDS radio text on and off The traffic program volume refers to the volume at 1. Keep pressing the m button until which the traffic program announcements are Switching RBDS on and off highlighted. - Page 26 Last stations – : The station list shows the last stations listened to. The last station listened to is shown at the top of the list. – Frequency : The station list is displayed sorted according to the order of the stations in the frequency band.
-
Page 27: Satellite Radio
– Obtain your 8-digit XM Radio ID from your PCM 3. Select " SET XM " (see next chapter) Dr. Ing. h.c. F. Porsche AG is not responsible Radio ID > " ". – Contact XM by calling 1-800-XMRADIO (1-800- for the content offered by the broadcasters. -
Page 28: Setting The Mode In Radio Mode
Tuning to channels Tuning to channels by manually entering the channel number You can tune to the desired channel using 1. Set " " mode. the station buttons, the channel list, a search, 2. Select " Direct tune ". or by entering the channel directly. The input menu is opened. -
Page 29: Storing Channels On The Station Buttons In The Preset Memories
Choosing channels from the channel list and Storing channels on the station buttons Manually storing channels tuning to them in the preset memories 1. Set " " mode. The channel list contains the channels from 2. Tune to the channel. In each of the following preset memories there are various categories that can currently be received. -
Page 30: Searching For Music
Searching for music Selecting categories for the music search Displaying the favorite list 1. Set " " mode. 1. Set " If you have already selected specific categories, " mode. 2. Press the i button or touch the tab the music search will be restricted to channels in 2. -
Page 31: Configuring The Display Of The Icon For Your Favorite Songs
Deleting titles from the favorite list Switching information about the program on and off 1. Set " " mode. 2. Press the i button or touch the tab 1. Set " " mode. of the same name in the header. 2. -
Page 32: Disc
DISC CD-Audio/DVD-Audio/DVD-Video ....33 USB ............42 Loading or ejecting CDs/DVDs ....34 Calling up the main menu for Calling up the main menu for USB mode ..........43 CD/DVD mode ........... 36 Searching for tracks ........43 Selecting a CD/DVD ........36 Track list ...........44 Selecting a track ........ -
Page 33: Cd-Audio/Dvd-Audio/Dvd-Video
CD-Audio/DVD-Audio/DVD-Video Notes on copyright Notes on the media supported In principle, you are only allowed to create copies To avoid problems when playing your MP3 CDs/ of CDs/DVDs for your own private use. The DVDs, please observe the following notes: CAUTION! copyright exceptions do not cover circulation of –... -
Page 34: Loading Or Ejecting Cds/Dvds
AAC-LC * ***) The double D symbol is a legally protected Please contact your authorized Porsche dealer to trademark of Dolby Laboratories. Manufactured (Low Complexity find out how to change the regional code. - Page 35 Loading a disc at PCM with CD/DVD changer Loading all discs at PCM with empty CD/DVD changer Incorrectly inserted CDs/DVDs will not be played. û Press the j button or any magazine To allow for the fastest possible changes, you should load the magazine successively beginning compartment for several seconds.
-
Page 36: Calling Up The Main Menu For Cd/Dvd Mode
Ejecting all discs at PCM with CD/DVD Selecting a CD/DVD Selecting a track (MP3-CD/DVD) changer 1. Keep pressing the n button until the û Press the j button or any magazine If the disc currently playing is an MP3-CD/DVD, the "... -
Page 37: Selecting A Chapter In Video-Dvd Mode
1. Keep pressing the n button until the Selecting a chapter in Video-DVD mode Setting the audio format for Video-DVD " DISC " audio source is highlighted in the 1. Keep pressing the n button until the bottom line. When playing Video-DVDs, only playback of the 2. -
Page 38: Setting Audio Groups (Dvd-Audio)
Setting audio groups (DVD-Audio) Fast forward/reverse Starting/stopping scanning û Press the o or the p button for a few seconds 1. Keep pressing the n button until the If you have activated this function, each track on " DISC " audio source is highlighted in the when a CD/DVD is playing. -
Page 39: Ipod* Mobile Digital Device
It is recommended not to leave an iPod in the vehicle for long periods of time as extreme ambient conditions (temperature, humidity) can occur in vehicles. The iPod charges during use. Calling up the main menu for iPod mode û... -
Page 40: Searching For Tracks
Searching for tracks Track 4. Select the desired artist in the list. – Displays a list of all tracks stored on the iPod. 5. Select " Albums ". 1. Keep pressing the n button until the " iPod " If you have already set a filter (e.g. "Artists"), A list of all the albums by the selected artist audio source is highlighted in the bottom line. -
Page 41: Track List
Track list Fast forward/reverse û Press the o or the p button for a few seconds If you have performed a music search or selected a playlist, the corresponding tracks are displayed when a CD/DVD is playing. in the track list. 1. -
Page 42: Usb
It is recommended not to leave USB devices in the vehicle for long periods of time as extreme ambient conditions (temperature, humidity) can occur in vehicles. Notes on the media supported To avoid problems when playing your USB devices, please observe the following notes: –... -
Page 43: Calling Up The Main Menu For Usb Mode
Calling up the main menu for USB mode Searching for tracks Track – Displays a list of all tracks stored on the USB û Keep pressing the n button until the " 1. Keep pressing the n button until the " "... -
Page 44: Track List
4. Select the desired artist in the list. Track list Fast forward/reverse 5. Select " Albums ". û Press the o or the p button for a few seconds A list of all albums by the selected artist stored The tracks and playlists stored on the USB device are displayed in alphabetical order in the track list. -
Page 45: Starting/Stopping Scanning
Starting/stopping scanning If you have activated this function, each track on the USB device is played for approx. 10 seconds. 1. Keep pressing the n button until the " " audio source is highlighted in the bottom line. 2. Select " Start scan "... -
Page 46: External Audio Source
External audio source Calling up the main menu for the external The external audio source cannot be operated on source the PCM, it can only be operated on the device You can connect an external audio source that is itself. Please consult the operating instructions for û... -
Page 47: Phone
PHONE ® Bluetooth ..........49 Operating the Bluetooth hands-free unit Ringtone settings Prerequisites for the cell phone ....50 (Bluetooth Mobile phone preparation)..... 52 (Bluetooth Mobile phone preparation)..... 60 Hands-free quality........50 Authorizing a cell phone ......52 Setting the ringtone type......60 Interruptions to the connection Having a conversation.........53 Setting the ringtone volume......60... - Page 48 Operating the PCM telephone..... 64 Saving a vCard...........78 Call settings Inserting the SIM card in the PCM ....64 Discarding a vCard ........78 (PCM telephone)........... 89 Entering the PIN ......... 65 Setting call forwarding ........89 Numbers in text messages......78 Having a conversation ........ 65 Displaying the complete text .......79 Switching the "Call waiting"...
-
Page 49: Bluetooth
Bluetooth connection. telephone version in your PCM: û Observe statutory regulations and local On the Internet under http://www.porsche.com – In the case of a PCM with PCM telephone, restrictions when using the telephone. you find a list with compatibles cell phones. -
Page 50: Prerequisites For The Cell Phone
– In the case of a PCM with Bluetooth Mobile Prerequisites for the cell phone Hands-free quality phone preparation, connection takes place using the hands-free profile. Not all cell phones are equally suitable for making The hands-free quality can be impaired by and receiving calls via the Bluetooth interface of When connecting using the hands-free profile, –... -
Page 51: Switching Bluetooth On And Off
Switching Bluetooth on and off Switching Bluetooth on 1. Press the c button. 2. Press the i button or touch the tab of the same name in the header. 3. Select " SET PHONE " > " Bluetooth settings ". 4. -
Page 52: Operating The Bluetooth Hands-Free Unit (Bluetooth Mobile Phone Preparation)
Operating the Bluetooth hands- free unit (Bluetooth Mobile phone preparation) The Bluetooth hands-free unit is operated in much the same way as the PCM telephone. Some functions are not, however, available with the Bluetooth hands-free unit. To find out more, please also refer to the section "Operating the PCM telephone"... -
Page 53: Having A Conversation
Having a conversation With some cell phones, the connection request by the PCM must be explicitly confirmed on the cell phone. This may even There is a hands-free microphone in the steering column trim panel (sports car) or in the roof have to be done a number of times in some control console (Cayenne) of the vehicle. -
Page 54: Ending A Call
- or - (with multi-function steering wheel with - or - (with multi-function steering wheel with telephone function) telephone function) û Press the Answer button on the multi-function û Pressing the End call button on the multi- steering wheel. function steering wheel. - or - (with handset) - or - (with handset) û... -
Page 55: Rejecting A Call
Rejecting a call Using the quick dial (redial) function You can reject an incoming call by: You open the quick dial menu by pressing the Lift receiver button l on the PCM. This menu û Pressing the End call button k on the PCM. contains a list of the last numbers dialed. -
Page 56: Phonebook
Phonebook 5. The list of known devices that are suitable for Displaying the list a transfer is displayed. If the desired device is 1. Press the c button. Displaying the phonebook not there, you can search for further devices. 2. Select " Previous calls ". -
Page 57: List Of Received Calls
Deleting a number from the list of previous 4. Select " Add to number Calling a number from the list of received ". calls The input menu is opened and the number is calls shown in the input field ready for editing. 1. -
Page 58: Sending Dtmf Tones
Sending a message to a number from the list Establishing an additional call of received calls You can establish a further call while there is 1. Press the c button. another call active. 2. Select " Received calls ". 3. Select the desired number. ... -
Page 59: Call Waiting
Call waiting Accepting a waiting call û Select " Answer ". The "Call waiting" function is only available if The waiting call is accepted and activated. The supported by the network provider. previously active call is put on hold. The " Call waiting "... -
Page 60: Ringtone Settings (Bluetooth Mobile Phone Preparation)
Swapping between the calls (call waiting) Ringtone settings Setting the ringtone volume (Bluetooth Mobile phone 1. Select " Swap ". 1. Press the c button. The system swaps to the other call. The preparation) 2. Press the i button or touch the tab of previously active call is put on hold. -
Page 61: Bluetooth Settings (Bluetooth Mobile Phone Preparation)
Bluetooth settings Connecting an authorized Bluetooth device Deleting an authorized Bluetooth device with the PCM from the list (Bluetooth Mobile phone 1. Open the list of authorized Bluetooth devices. preparation) Data devices cannot be connected from the 2. Select the desired device in the list. list of devices;... -
Page 62: Establishing A Connection From The External Bluetooth Device
1. Press the c button. 5. Select the device „PCM“ in the search list of If the list of authorized Bluetooth devices is full 2. Press the i button or touch the tab of (max. 5 cell phones), you must first delete a the cell phone and establish the connection. -
Page 63: Phonebook Settings (Bluetooth Mobile Phone Preparation)
Phonebook settings Setting automatic transfer of the Manually transferring the phonebook phonebook entries (Bluetooth Mobile phone preparation) If the " Auto update " function is switched on, a cell Some cell phones do not support automatic phone's phonebook will be transferred each time transfer of the phonebook If this is the case, you the PCM is connected to the cell phone. -
Page 64: Operating The Pcm Telephone
Operating the PCM telephone The use of twin SIM cards, for example in the cell phone and the internal PCM telephone The PCM telephone is operated in much the same (both cards simultaneously activated), may way as the Bluetooth hands-free unit. To find out result in impairment of the telephone more about this, please refer to the section functions. -
Page 65: Entering The Pin
Entering the PIN Having a conversation Conducting a call using the cordless handset 1. Select " Hands-free " in the call menu to switch As soon as you have switched on the telephone There is a hands-free microphone in the steering to hands-free mode. -
Page 66: Accepting A Call
- or - (with handset) û Press the Answer button on the handset. - or - û Remove the handset from the charging cradle. Accepting a call Ending a call As soon as a call comes in, an appropriate menu You can end an active call by: is temporarily displayed or an appropriate û... -
Page 67: Rejecting A Call
Rejecting a call Using the quick dial (redial) function You can reject an incoming call by: You open the quick dial menu by pressing the Lift receiver button l on the PCM. This menu û Pressing the End call button k on the PCM. contains a list of the last numbers dialed. -
Page 68: Pcm Phonebook
PCM phonebook Creating and storing a phonebook entry Editing a phonebook entry (only with the SIM card inserted) (only with the SIM card inserted) Displaying the phonebook 1. Press the c button. 1. Press the c button. 1. Press the c button. 2. -
Page 69: List Of Previous Calls
Deleting the contents of the SIM card 6. If you choose " via SMS List of previous calls ", you must enter the (only with the SIM card inserted) telephone number of the recipient in the input menu that appears. The Previous calls telephone function 1. -
Page 70: List Of Received Calls
Storing a number from the list of previous Sending a message to a number from the list List of received calls calls in the phonebook of previous calls The "Received calls" telephone function This function is only available when there is a SIM 1. -
Page 71: Sending Dtmf Tones
Storing a number from the list of received Sending a message to a number from the list calls in the phonebook of received calls This function is only available when there is a SIM 1. Press the c button. card inserted. 2. -
Page 72: Establishing An Additional Call
Establishing an additional call Call waiting Accepting a waiting call û Select " Answer ". You can establish a further call while there is The "Call waiting" function is only available if The waiting call is accepted and activated. The another call active. -
Page 73: Call Waiting (Swapping) And Conference
Swapping between the calls (call waiting) Making an emergency call 1. Select " Swap ". 1. Press the c button. The system swaps to the other call. The 2. Select "i". previously active call is put on hold. 3. Select " Emergency call ". -
Page 74: Text Messages (Sms) (With Pcm Telephone Only)
Text messages (SMS) Replying to a text message When a new text message arrives, a closed envelope icon is displayed in the bottom line (with PCM telephone only) regardless of the menu selected. You have the following options: If a flashing envelope icon is displayed in the You can create and receive text messages (SMS) New text –... - Page 75 Creating a reply with new text 6. Edit the text as required using the input menu Replying to a text message using a text and confirm by selecting " ". template 1. Press the c button. The text input menu is closed and the input 2.
-
Page 76: Creating And Sending A New Text Message
Creating and sending a new text message 6. Confirm your entry by selecting " 6. Confirm your entry by selecting " ". ". The text input menu is closed and the input The text input menu is closed and the input You have the following options for creating a text menu for the telephone number is opened. -
Page 77: Forwarding A Text Message
6. Select " Edit template Forwarding a text message Deleting a text message " if applicable and make the desired changes in the text. 1. Press the c button. 1. Press the c button. Otherwise select " Use template " and add any 2. -
Page 78: Reading A Vcard
Reading a vCard Discarding a vCard Storing telephone numbers from a text message 1. Press the c button. 1. Press the c button. (only with the SIM card inserted) 2. Select " Messages ". 2. Select " Messages ". 1. Press the c button. 3. -
Page 79: Displaying The Complete Text
Storing geographical coordinates Creating a template 1. Press the c button. Included in the list of templates are some blank 2. Select " Messages ". entries that you can edit as required. 3. Select " Extract number ". 4. Open the relevant geographical coordinate by 1. -
Page 80: Cordless Handset (With Pcm Telephone Only)
Cordless handset Charging the cordless handset Using a handset when driving is not permitted in all countries. Therefore, please observe the (with PCM telephone only) û Place the receiver in the charging cradle. country-specific laws and regulations. There is a cordless handset available for your General operation PCM. -
Page 81: Accepting A Call
Accepting a call Rejecting a call Temporarily muting the cordless handset microphone û When there is a call incoming, press the right As soon as a call comes in, an appropriate menu is temporarily displayed on the handset display. selection button under the "Reject" menu item. You can switch off (mute) the microphone of the If available, the telephone number is displayed handset during a telephone call. -
Page 82: Call Waiting (Swapping) And Conference
Entering a new telephone number 7. Press the left selection button under the "Options" menu item. 1. Press the left selection button under the 8. Select "Call" using the rocker button. "Options" menu item. 9. Press the left selection button under the 2. -
Page 83: Phonebook
Phonebook 4. Select "Call" using the rocker button and press the left selection button under the "Selection" If your cell phone is connected to the PCM using menu item. the SIM Access Profile, the data from the - or - telephone memory and from the SIM card will be Press the Answer button. - Page 84 Editing a phonebook entry Deleting a phonebook entry The letters on the keypad are active while you are entering the name. (only with the SIM card inserted) 1. Open the phonebook. This means you can enter the letters a, b, and c, 1.
-
Page 85: Text Messages (Sms)
Text messages (SMS) Replying to/forwarding a text message 13.Press the left selection button under the "Selection" menu item. 1. Press the left selection button under the Some menu items are not available before the The telephone number of the sender of the text "Menu"... - Page 86 13.Select the desired list ("Phonebook", Deleting a text message If you wish to insert the text from a template, select the "Discard template" menu item, "Previous calls", and "Received calls") using 1. Press the left selection button under the highlight the desired template using the the rocker button.
-
Page 87: Settings
– "Lighting": Under this menu item you can enter a value for the display illumination of the handset. – "Ringtone": Under this menu item you can set the volume and the profile (ascending volume) for the ringtone of the handset. –... -
Page 88: Telephone Settings (Pcm Telephone)
Telephone settings Setting ringtones Setting the ringtone volume (PCM telephone) 1. Press the c button. Setting the ringtone type 2. Press the i button or touch the tab of 1. Press the c button. the same name in the header. Switching the PCM telephone on and off 2. -
Page 89: Call Settings (Pcm Telephone)
4. Select one of the two available menu items: Displaying the IMEI Call settings Automatic – (PCM telephone) The IMEI (International Mobile Equipment Identity) The PCM automatically selects the cell is a serial number that permits unique phone network of the SIM card that is logged Setting call forwarding identification of the hardware in mobile radio equipment. -
Page 90: Switching The "Call Waiting" Function On And Off
4. Select one of the following settings for the call Select "Switch on Checking the status of the call diversion ". diversion: The input menu is opened. 1. Select the desired type of call diversion. 6. Enter the desired telephone number for the call –... -
Page 91: Switching The "Redial" Function On And Off
4. Select one of the following options: Setting transfer of your own number Setting automatic call answering Switch on " to activate the function. – Select " Send own number Auto. answer If the " " function is activated, If the " "... -
Page 92: Bluetooth Settings (Pcm Telephone)
Bluetooth settings Connecting an authorized Bluetooth device Renaming an authorized Bluetooth device with the PCM (PCM telephone) 1. Open the list of authorized Bluetooth devices. 2. Select the desired device in the list. Data devices cannot be connected from the 3. -
Page 93: Adding A New Bluetooth Device
Adding a new Bluetooth device Finding the cordless handset With some cell phones, the connection request by the PCM must be explicitly In order that your Bluetooth device can be found confirmed on the cell phone. This may even This function starts the search for the cordless by the PCM, please ensure that the Bluetooth handset. -
Page 94: Sim Settings (Pcm Telephone)
SIM settings 6. Enter and confirm the PIN once more. With some SIM cards you can not switch off If the two new PINs match you will see the the PIN prompt. (PCM telephone) message " PIN has been changed ". -
Page 95: Settings For Messages And Data (Pcm Telephone)
Since the PCM uses the fixed parameters 3. Select " SET PHONE " SIM card, the phonebook entries in the telephone "UserID: PCM3" and "Pass: 0000" for this > " Messages/data " memory, and/or the vCards stored in the PCM... -
Page 96: Transferring The Phonebook
Setting automatic transfer of the phonebook Transferring the phonebook Auto update If the " " function is switched on, a cell This setting transfers the phonebook of the phone's phonebook will be transferred each time connected cell phone once more into the PCM. the PCM is connected to the cell phone. -
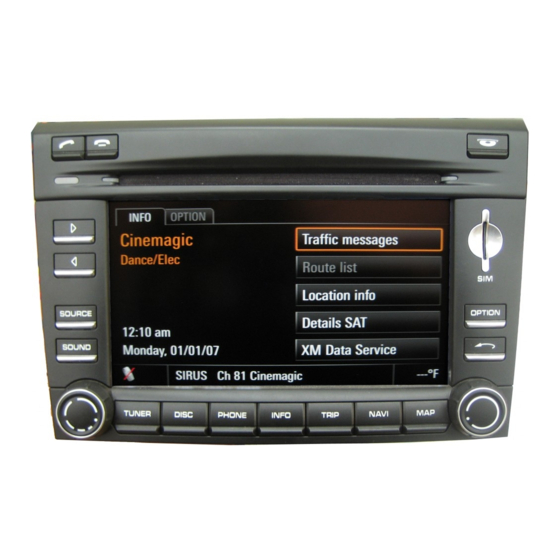
Page 97: Info
INFO Information ..........98 Displaying traffic messages (XM NavTraffic) .......... 98 Displaying sections of the route ....100 Displaying information about the location ..........100 Displaying detailed information about the active audio source ....100 Individual vehicle settings (only available for sports cars)....101 Setting options for locking the doors.. -
Page 98: Information
Displaying traffic messages You can display the current traffic messages in a (XM NavTraffic) list. The following types of traffic messages are differentiated: XM Satellite Radio broadcast traffic messages as Incidents a part of their program. The PCM evaluates and displays this information. - Page 99 Accident hazard Accident hazard on a section of the current, personal route Route section blocked Section of the current, personal route blocked 1. Press the d button. 4. You can change the map scale if necessary by Information 2. Select " Traffic messages ".
-
Page 100: Displaying Sections Of The Route
Displaying sections of the route Displaying information about the location Displaying detailed information about the active audio source If you have started the route guidance component This function displays the precise data for your of your navigation system, a list containing all current location. -
Page 101: Individual Vehicle Settings (Only Available For Sports Cars)
Individual vehicle settings Setting automatic locking of the doors Setting light options (only available for sports cars) Autolock In the " " menu you can choose whether Setting the fade-out time the doors are to be locked automatically after In the PCM menu you have the option to store switching on the ignition or after driving off (as You can set a fade-out time of between 10 and different settings for your vehicle for up to three... -
Page 102: Choosing The Options For Setting The Air Conditioning
Setting the orientation light Daytime Run. Lights Choosing the options for setting the air The " " setting can only be changed when the vehicle is stationary or moving conditioning The so-called orientation light serves to help at walking speed. passengers enter the vehicle safely. -
Page 103: Setting Wiper Options
Setting wiper options Assigning the screen button on the multi- function steering wheel You can choose whether you wish to switch on your vehicle's windscreen wipers yourself or You have the option to assign the screen whether they are to be controlled automatically. button on the multi-function steering wheel of your vehicle with a PCM function of your choice. -
Page 104: Rear View Camera (Only Available For The Cayenne)
Extending and retracting the rear view camera manually DANGER! 1. Press the d button. Injury hazard. The rear view camera only 2. Press the i button or touch the tab of serves to assist the driver. It does not replace the same name in the header. -
Page 105: Picture Settings For The Rear View Camera
1. Press the d button. Picture settings for the rear view camera Setting the Contrast 2. Press the i button or touch the tab of 1. Press the d button. Setting the Brightness the same name in the header. 2. Press the i button or touch the tab of 3. -
Page 106: Trip
TRIP Trip computer (trip data display) ....107 The Sport display Setting the display group ......107 (only available for sports cars) ....115 Setting the contents of the Starting recording ........115 personal display ........107 Stopping recording........116 Resetting trip data........107 Continuing recording ........116 Logbook ........... -
Page 107: Trip Computer (Trip Data Display)
Personal trip data Setting the contents of the personal – The trip data can be individually compiled in display four data fields. You can configure the contents of the individual – Sport display data fields for the " Personal trip data "... -
Page 108: Logbook
Logbook Activating/deactivating the logbook The trips are recorded even if the PCM is in standby mode. reminder The logbook automatically records all the trips made by the vehicle and stores them together with If you have activated the " Reminder "... -
Page 109: Setting The Standard Trip For The Logbook
Setting the standard trip for the logbook Editing data from the current trip Creating a new driver 1. Press the e button. Standard trip You can use the " " function to choose You can change the different pieces of data 2. - Page 110 Creating a new trip destination Creating a new trip purpose Creating a new contact person 1. Press the e button. 1. Press the e button. 1. Press the e button. 2. Press the i button or touch the tab of 2.
-
Page 111: Continuing Recording From The Last Trip
Continuing recording from the last trip Storing a refueling stop 4. Select a trip to open a detailed view of it. You can switch between the detailed views for If you have completed a trip with the logbook You can store any refueling stops during the trip the individual trips by selecting the symbols activated, you can resume the previous trip the currently being recorded by selecting "... - Page 112 3. Select " SET TRIP" Deleting a list entry Assigning the current key to a driver in the if applicable (if your vehicle is equipped with the Sport Chrono Package driver list You can delete each individual entry in a list. Plus).
-
Page 113: Transferring The Logbook Data
Deleting an existing key assignment Transferring the logbook data Transferring data via the USB interface 4. Select " to USB You can delete an existing key assignment once ". Depending on the equipment in your PCM, you can more. The data is transferred provided there is a ®... -
Page 114: Deleting Trips
Deleting trips already transferred The name of the file where the transferred logbook data is stored is made up of the 5. Select " Transferred trips ". abbreviation "FB", the date (YYMMDD), and the 6. Confirm by selecting " ". -
Page 115: The Sport Display (Only Available For Sports Cars)
The Sport display The following information can be recorded and displayed for each driven lap: (only available for sports cars) – the fastest lap time and in comparison the The Sport display is part of the Sport Chrono current lap time, Package Plus that also includes a stopwatch and –... -
Page 116: Stopping Recording
Lap details Continuing recording The first recorded lap is used as the reference lap if you have not loaded an existing You see the lap details in the right half of the reference lap. You are returned to the Sport display the next time display. -
Page 117: Evaluating A Recording
Implausible (divergent) laps are shown in You can scroll forward and backward in the evaluation by: gray. û Touching the symbols Implausible laps are shown in gray. Laps are on the regarded as implausible if their distance deviates display. significantly (more than 15%) from the reference - or - lap. -
Page 118: Deleting A Recording
Deleting a recording Deleting a lap Storing a lap as the reference lap Continue Delete 1. Press the e button. You cannot delete a recording while the " " You cannot delete the last lap using the " function can be selected in the on-board "... -
Page 119: Defining The Reference Lap
Defining the reference lap Resetting the defined reference lap Deleting the reference lap 1. Press the e button. 1. Press the e button. If no reference lap is defined in advance, the first lap in a recording is automatically used as the 2. - Page 120 4. Select the desired recording. Transferring data via the ® 5. Select " Transfer data ". Bluetooth interface The list is opened again. You can now choose Please note that the radio connection whether you wish to transfer an individual between the two devices must be activated recording only or all recordings.
-
Page 121: Navi
NAVI General operation ........122 Editing the address of a destination ...129 Stopovers (tour)......... 136 Navigation safety instructions....123 Entering/editing a telephone number Displaying destinations......136 Unverified areas in the database....123 for a destination Entering stopovers ........136 Setting the volume of the Reorganizing the stopovers .......137 in the destination memory ......129 navigation announcement...... -
Page 122: General Operation
General operation – After the vehicle on-board voltage has been interrupted (e.g. for changing the vehicle WARNING! With its use of visual and acoustic driving battery), it can take up to 15 minutes or more Accident hazard. The navigation system recommendations, the PCM navigation system depending on the reception conditions for the serves only to assist the driver and provide a... -
Page 123: Navigation Safety Instructions
Use your Porsche Navigation system at your own risk. Porsche is under no obligation to provide you WARNING! with any support, error correction, updates, and/ Accident hazard. The navigation system or enhancements to the system. serves only to assist the driver and provide a Please note that the system is designed suggestion for the route of the journey. -
Page 124: Entering An Address
3. Select " Guidance volume ". data is stored on the hard drive is opened. be obtained from your authorized Porsche 4. Make the desired setting by selecting the 3. Select the desired country in the list. dealer. two symbols... -
Page 125: Starting And Stopping Route Guidance
Entering the town/zip code Entering an intersection Starting and stopping route guidance 1. Press the f button. You can enter the town either by means of the town name or by means of the zip code. 2. Select " Enter address "... -
Page 126: List Of Previous Destinations
Starting route guidance with route List of previous destinations alternatives activated This list automatically stores the previous 100 If you have activated route alternatives in the destinations for which you started route guidance. navigation settings menu, the " Start route Points of interest are indicated by icons. -
Page 127: Displaying The Location Of A Destination
Displaying the location of a destination Deleting a destination Storing a destination in the personal destination memory 1. Press the f button. 1. Press the f button. 2. Select " Previous destinations ". 2. Select " Previous destinations ". Storing of destinations in the list of previous The list of previous destinations is opened. -
Page 128: Personal Destination Memory
Calling the destination Personal destination memory Stopovers (tour) To find out more, please refer to the You can call points of interest for which a In your personal destination memory you can section "Stopovers (tour)" on telephone number has been stored in the store 100 destination entries as well as 15 off- page 136. -
Page 129: Entering An Address For Route Guidance From The List
Storing an address by entering it Entering an address for route guidance Editing the address of a destination from the list 5. Select " Enter address ". 1. Press the f button. 6. Select " Country " if necessary and select the 1. -
Page 130: Editing The Destination Name
1. Press the f button. Calling the destination Sending a destination 2. Select " Stored destinations ". The personal destination memory is opened. You can store a telephone number for destinations You can send individual destinations from the 3. Select the desired destination. held in the personal destination memory. -
Page 131: Points Of Interest
Sending a destination via the Deleting a destination Points of interest ® Bluetooth interface 1. Press the f button. Points of interest are gas stations, parking Please note that the radio connection 2. Select " Stored destinations ". structures, restaurants, hotels, or hospitals, for between the two devices must be activated The personal destination memory is opened. -
Page 132: Searching For Points Of Interest
5. You can also restrict the search area, if Free location input If you chose " " as the If there are fewer than five points of interest required, after selecting " Search radius ": search area, the list is displayed in stored for the selected category and search alphabetical order. -
Page 133: Changing Options For Route Guidance
Changing options for route You can also view the details for a traffic message or destination flag shown on the guidance display by touching them. The options for route guidance are also available to you in the map display. Starting navigation to the point of interest Setting a detour 1. - Page 134 3. Select " Route options 4. Switch from one part of the route section to " > " Detour " the next by selecting the two symbols > " Route sections ". or by turning the right rotary knob 5. Select " Detour The list of route sections is displayed.
-
Page 135: Canceling A Block
Canceling a block 4. Activate or deactivate the desired route option Avoiding a stretch of road by selecting it. Avoid You cancel all previously set detours by selecting Selecting " " allows you to set restrictions for – Short route "... -
Page 136: Stopovers (Tour)
Stopovers (tour) Displaying destinations From the destination memory 1. Press the f button. 1. Press the f button. You can enter up to four stopovers during an 2. Press the i button or touch the tab of active navigation session and arrange them in any 2. -
Page 137: Reorganizing The Stopovers
Deleting stopovers 1. Press the f button. 2. Press the i button or touch the tab of the same name in the header. 3. Select " Stopovers " > " Delete ". The destination list is opened. Deleting a destination from the list 4. -
Page 138: Destination Input Using Geographical Coordinates
Destination input using geographical coordinates If you know the geographical coordinates for a destination, you can use them for destination input. 1. Press the f button. 2. Press the i button or touch the tab of the same name in the header. 3. -
Page 139: Off-Road Navigation
Off-road navigation Display during off-road navigation Determination of the vehicle position during off-road navigation The following information is displayed during an Off-road navigation allows you to navigate in non- active off-road navigation session: The vehicle position is determined with the aid of digitized areas (no digital map data available for a GPS antenna and a receiver in the navigation this area on the hard drive). -
Page 140: Safety Notice For Off-Road Navigation
Landmark navigation In the off-road navigation only single destinations are stored in the list of previous Within the framework of landmark navigation you destinations. Lists of landmarks are stored in the personal destination memory. – enter a destination by entering an address (>... -
Page 141: Recording A Trip Section (Trace)
Additionally, a compass is displayed at the top left to aid orientation. When a landmark is reached, the system outputs the message "Landmark XX reached". Recording a trip section (trace) With off-road navigation you can record a section of a trip, even in undigitized areas. You do this by setting navigation points. - Page 142 Starting recording Ending trace recording Setting the grid for setting the navigation points 1. When off-road navigation is activated, press 1. Press the g button while recording is the g button. underway. You can set the intervals at which the so-called 2.
-
Page 143: Tracing A Route
1. When off-road navigation is switched on, press 5. Confirm the safety notice with " Activate „off- – From current position, trace forwards: the f button. You are directed to the closest point in the road“ " if applicable to activate off-road 2. -
Page 144: Storing
Storing 1. Press the f button. 2. Press the i button or touch the tab of This menu item allows you to store both a the same name in the header. destination and your current position. 3. Select " Store ". -
Page 145: Map
Map display ..........146 Changing the scale of the map....146 Moving the map........147 Setting the intersection zoom ....147 Setting the display of the total route..147 Setting autozoom ........147 Setting the map to a n ortherly orientation ........147 Displaying the Destination town/Location info.... -
Page 146: Map Display
Map display – Red colored line Estimated average speed on red colored You call up the map display of the navigation street sections below 10 mph. system by pressing the g button. – Yellow colored line Your vehicle is shown in the map display as a Estimated average speed on yellow colored triangular arrow. -
Page 147: Moving The Map
Moving the map Setting the display of the total route Setting the map to a northerly orientation You can move the map section shown on the If you have activated this function, the total route If you have activated the "North orientation" display as required. -
Page 148: Displaying The Destination Town/Location Info
Displaying the Destination town/Location 3. Select " Route list Setting the display layout ". info The sections of your route are listed and displayed. You have four options for dividing the display while When route guidance is active, selecting the route guidance is active: The section you are currently driving on is at "... -
Page 149: Compiling Map Contents
Switching between different layouts 3. Select " SET MAP 4. Select the desired point of interest category. " û If you choose the " > " Map view ". The list containing the associated With guidance " layout, you The following map display criteria are then subcategories is displayed. -
Page 150: Voice Control
Voice Control Learning about voice control....... 151 Introduction to operation......151 Speech intelligibility ........152 Symbols in sample dialogs......152 Commands ..........153 Voice entries..........154 Basic functions of the voice control system........154 Activating voice control......154 Deactivating voice control ......155 Setting the volume ........ -
Page 151: Learning About Voice Control
û Press any button on the PCM. Learning about voice control How voice control works The PCM then executes the function The voice control system recognizes commands Please refer to the notes on operation and corresponding to the pressed button. or numerical sequences regardless of the road safety on page 6. -
Page 152: Speech Intelligibility
Speech intelligibility Symbols in sample dialogs WARNING! To make it easier for your voice control system to A number of the voice commands initiate dialogs Accident hazard. Since stressful situations understand your commands, please note the between you and the voice control system. A few can cause your voice to change, it may happen following points: of these dialogs are presented in the operating... -
Page 153: Commands
Commands Global commands for the voice-controlled main – input street functions: – input intersection The commands supported by the voice control – go home – Tuner, Radio system are divided into two categories: – go to office – Disc, CD –... -
Page 154: Basic Functions Of The Voice Control System
Voice entries You can assign so-called voice entries for entries in the phonebook as well as for destinations in your personal destination memory. These voice entries are intended to make it easier for you to call up people or places with difficult to understand (e.g. -
Page 155: Deactivating Voice Control
Setting the volume Setting the language You can change the volume of the voice control The voice control system recognizes various system announcements to compensate for languages. When you change the language, it changes in the ambient noise during the journey, affects the voice input by the user, the voice for example. -
Page 156: Performing Voice Adaptation
Quick dialog Starting/canceling voice adaptation – " " If you switch on this function, the PCM 1. Press the d button. outputs certain announcements in an 2. Press the i button or touch the tab of abridged form. This does not change the the same name in the header. -
Page 157: Using The Help Function
Deleting voice adaptation – "help voice control" command: This command interactively guides you to the 1. Press the d button. help you need using the available help topics 2. Press the i button or touch the tab of the same name in the header. help areas. -
Page 158: Operating Examples
- or - Operating examples Operating example for radio mode û Say the "Line number" command, directly Calling up radio mode and switching The voice control system is designed so that you followed by the row number to the right of the can say each menu item shown on the display. - Page 159 Tuning to stored FM stations Tuning to stored AM stations Example for entering the frequency 98.4 MHz in the FM waveband: You can either say the name of a stored station You can say the memory location of a stored û...
- Page 160 Station search Starting/stopping the scan function Tuning to stations from the station list You start the search in the FM or AM waveband If you activate this function, every station found in The station list is available in the FM waveband and using the "next station"...
-
Page 161: Operating Example For Cd/Dvd Mode
Operating example for CD/DVD mode You can also tune to a station from the station "Line number 3". list directly without calling up the list first. You "Line 3". Calling up CD/DVD mode do this by saying the "Station" command, The PCM plays the corresponding track. -
Page 162: Operating Example For Telephone Mode
Choosing a disc from the disc list Repeating a track Operating example for telephone mode The disc list contains all available CDs/DVDs. When this function is activated, the current track or the current chapter (Video-DVD mode) is û Activate voice control. WARNING! repeated. - Page 163 Calling up telephone mode "Ok". û Activate voice control. "Checking the PIN". The PCM switches to telephone mode if the Beep entered PIN is correct. "Telephone". "Telephone". Entering a telephone number The PCM switches to telephone mode. The digits "zero" to "nine" as well as the following If you have not yet entered the PIN, the PCM words are permitted when entering the digits: now prompts you to do so.
- Page 164 Calling a phonebook entry If you are saying the telephone number in blocks, "Seven One Zero". you can delete the last block using the û Scroll in the list if necessary using the "scroll "Seven One Zero". "Correction" command. The PCM then repeats the down"...
- Page 165 Assigning a voice entry for an entry in the If you are saying the name of a phonebook Example for option 2: entry, please note the following: phonebook û Activate voice control. û Say the name as normal, do not spell it You can store voice entries for entries in your Beep out.
-
Page 166: Operating Example For Navigation Mode
List of received calls Operating example for navigation mode "Mr. Smith". The "Received calls" menu provides you with "The pronunciation Mr. Smith has been stored." Calling up navigation mode access to a list of the calls you have recently The voice entry has been stored for the entry û... - Page 167 Entering a destination from the list of "USA". "Yes". previous destinations or from the personal "USA". "Please say the street number one digit at a destination memory "Please say the town". time". The "Previous destinations" menu provides you Beep Beep with access to previous destinations for which you "San Francisco".
- Page 168 û Scroll in the list if necessary using the "scroll – You can store traces in the personal Example for option 2: destination memory. When doing so, the down" and "scroll up" commands until you see û Activate voice control. PCM suggests a name.
- Page 169 Below you will see an example for entering a point "Line number 5". "Line number 3". of interest in the vicinity of the vehicle. "Line 5". "Line 3. û Activate voice control. Would you like to start route guidance?". The subcategory list is displayed. Beep "Yes".
-
Page 170: Technical Data
Technical Data Radio frequency ranges......171 Tuning steps for automatic station search ......171 Regional codes for Video-DVDs ....171 Technical Data... -
Page 171: Radio Frequency Ranges
Radio frequency ranges Regional codes for Video-DVDs USW (FM): 87.5 - 108 MHz Code 1: USA, Canada (manual tuning in 100 KHz increments) Code 2: Japan, Europe, South Africa Code 3: South East Asia MW (AM): 531 - 1602 KHz (manual tuning in 1 KHz increments) Code 4: Australia, New Zealand, Pacific... -
Page 172: Glossary
Glossary 5.1 (Surround Sound 5.1) Dolby Digital (also ATSC A/52 and Dolby AC-3) IMEI (International Mobile Equipment Identity) Surround Sound 5.1 refers to multi-channel Dolby Digital is a multi-channel sound system The IMEI is a serial number that permits unique sound systems with five main channels and a from Dolby that is used in cinema, on laser identification of the hardware in mobile radio... - Page 173 Multi-session RBDS (Radio Broadcast Data System) Touchscreen A method of data recording for CDs or DVDs. RBDS is a technique for the transmission of A touchscreen is a computer screen with areas Data is written to the disc in a number of inaudible additional information in the FM that can be touched to control the program flow.
- Page 174 vCard A vCard is an electronic business card. It is a file containing information on a person or company. Like a business card, the vCard text can contain text elements for the characteristic data as well as graphical and multimedia elements. WMA (Windows Media Audio) WMA is a compression standard developed by Microsoft for lossy compression and decoding...
-
Page 175: Index
Index Numerics CD/DVD ........36 calling up the main menu ............... 172 ............. 10 back button ........36 ejecting all CDs/DVDs ..............23 Best FM ejecting CDs/DVDs individually ....34 Best FM preset memory ..........23 fast forward/reverse ........38 Bluetooth®... - Page 176 switching on/off ..........80 deleting trips ............114 editing an address (personal destination memory) ..129 text messages (SMS) ........85 destination input using ejecting a CD ............11 ....110 ......... 138 ............11 creating a contact person (logbook) geographical coordinates ejecting a DVD ......
- Page 177 list of previous destinations ........126 renaming a contact person ......112 list of received calls ........... 57 renaming a driver ...........112 hang up button ............10 ....58 .......112 adding to a number from the list renaming a trip destination ........53 having a conversation .....
- Page 178 .............. 34 sending a destination from the MP3-CD ..............36 personal destination memory as a vCard ... 130 PBAP (Phone Book Access Profile) ......173 ........103 ..........133 multi-function steering wheel setting a detour ............173 .... 124 multi-session setting the volume of the announcement ............
- Page 179 restoring factory settings ...........20 daylight saving time ..........16 restoring vehicle handover settings ......20 daytime running lights ........102 radio ............... 22 ............9 ............15 right rotary knob display ............... 25 ............ 60 ..........18 ringtone type display colors ..........22 setting the mode ..........
- Page 180 time zone ............16 setting the date ............15 shuffle function treble ............18 setting the daytime running lights ......102 CD/DVD ............38 ........17 ......16 .............. 41 unit for consumption setting the display format for the date iPod ..........
- Page 181 setting the SDV ..........19 storing setting the treble ..........18 coordinates (vehicle position) ......79 telephone ..............13 ......144 space destination (off-road navigation) ........53 accepting a call ..........115 Sport Chrono package destination from the list of ........91 automatic call answering ............
- Page 182 text message (SMS) ..........74 tuning calling telephone numbers ......... 78 station (radio) ..........22 Vanity numbers ............173 .......... 79 ............22 creating a template tuning to AM ..............174 vCard .... 76 ............22 creating and sending a new text message tuning to FM ............
- Page 183 Federal Communications Commission (FCC) Compliance Statement - United States This device complies with part 15 of the FCC Rules. Operation is subject to the following two conditions: 1 This device may not cause harmful interference, and 2 the device must accept any interference received, including interference that may cause undesired operation. Changes or modifications not expressly approved by the party responsible for compliance could void the user's authority to operate the equipment.
- Page 184 Bluetooth qualification QDID: B013738 QDID: B013739 QDID: B014095 sports car Cayenne Cordless handset Information on the laser equipment This laser product is classified as a class 1 laser product in accordance with the national/international standards DIN EN 60825-1 : 2003-10 and DHHS Rules 21 CFR Subchapter J to the date of manufacture.
Need help?
Do you have a question about the PCM3 and is the answer not in the manual?
Questions and answers