Table of Contents
Advertisement
Advertisement
Table of Contents

Related Manuals for Wansview Q3


Summary of Contents for Wansview Q3
- Page 1 Wansview HD IP Camera Q3(720P)/Q3S(1080P) User Manual Revised 15th August 2017...
-
Page 3: Table Of Contents
1.2 Features........................7 1.3 Uses..........................8 1.4 Specifications......................8 1.5 System Requirements....................9 2. Camera Management with Smartphones/Tablets............9 2.1 Wansview App for iOS and Android................10 2.2 Live Streaming......................12 2.3 Local Picture and Record..................14 2.4 SD/TF Record and Playback..................15 2.5 Alarm Setting......................15 2.6 Advanced Settings....................17 2.6.1 Wi-Fi Setting....................17... - Page 4 5.5 Local Setting.......................46 5.6 Scheduled Recording..................46 5.7 Playback......................47 5.7.1 Playback Local Record................47 5.7.2 SD Card Record..................47 5.8 Lock........................47 6.MAC Software Access....................48 6.1 About wansview....................48 6.2 Operational Requirments...................48 6.3 wansview Installation..................48 Operation....................48 wansview 7. FAQ..........................49 7.1 Compatibility Setting for Internet Explorer............49 7.2 Unable to view the camera when using mode 2 on Chrome 58.......49...
-
Page 5: Welcome
Or scanning the QR code to enter our Youtube channel. Important Security Warning In order to keep your Wansview camera secure and prevent unauthorized access, please make sure to follow the steps below: 1. The camera has always the latest firmware installed. If we update the firmware, we upload it on www.wansview.com/Service/download/... - Page 6 Before installation, please open the package and check to ensure that all of the components are included. Contact us if anything is broken or missing in the package. 8. Battery Drainage and Data Consumption Please remember to exit the app after use, to prevent battery drainage and data consumption. 9. Compliance FCC, CE, ROHS www.wansview.com...
-
Page 7: Features And Specifications
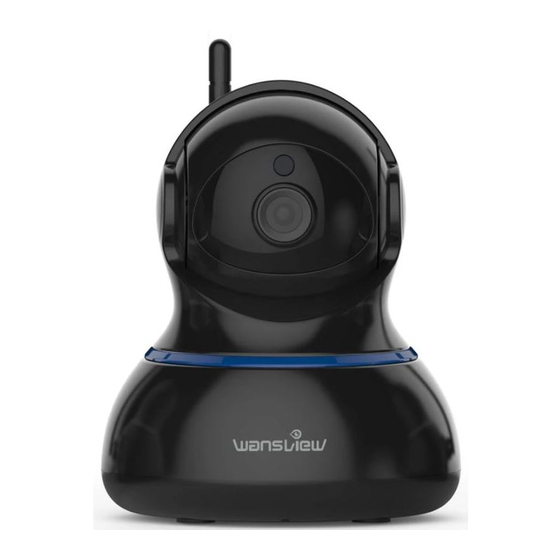
1.1 Product Profile Front View The Wansview Full HD IP Camera comes with 4 PCS IR LED, a CMOS Sensor, Wi-Fi Antenna, and built-in Speaker and Microphone. It supports up to 128 GB SD cards. The camera also has a Pan and Tilt function, with 350°... -
Page 8: Uses
1.3 Uses •Home Security •Business Security •Entryway Monitoring •Baby Monitoring •Pet Monitoring •Elderly Parents 1.4 Specifications www.wansview.com... -
Page 9: System Requirements
IR Leds and open the outdoor lights. The Wansview Camera is a P2P camera as long as the camera is connected to the internet. Users can view the camera from smartphones/tablets or PC, wherever they are using cellular data or Wi-Fi connections. -
Page 10: Wansview App For Ios And Android
2.1 Wansview App for iOS and Android Go to the App Store and install the “Wansview” app. Install the antenna and connect the camera to the power source with the provided adapter. Users can connect cameras by Ethernet RJ-45 cables or through Wi-Fi network. - Page 11 Wi-Fi Set Up • Verify your smart device (iOS or Android) is connected with 2.4G wifi. • Launch the Wansview app, Click to access Add Camera page and select “Add cameras via WiFi Configuration Guide” • Scan the QR code on the back of the camera, and name the camera. Then “Next”...
-
Page 12: Live Streaming
Each camera can be accessed by up to 4 users at the same time. The administrator can setup 3 different level of access: administrator, operator and viewer. Viewing Camera on a Single Window Tap cameras to view the live videos by added cameras www.wansview.com... - Page 13 Click on cameras on the list to add the view on the main screen. 2. Tap to hide cameras’ list 3. Tap to exit multiple windows mode 4. Press to play camera. Tap again to stop the video. www.wansview.com...
-
Page 14: Local Picture And Record
Share pictures and records To share pictures and records follow the steps indicated in the screenshots. Save records to phone and delete records Select the videos recorded, click to save videos in the mobile phone. Click to delete videos. www.wansview.com... -
Page 15: Sd/Tf Record And Playback
Please note that motion detection doesn’t work through windows. In this case we recommend to connect an external motion sensor out of the window using the IO alarm port. Access to “Alarm Setting” to set Alarm Deployment, Alarm Action and Time Deployment. www.wansview.com... - Page 16 Speaker Linkage: When an alarm is detected the speaker will act as a siren for the chosen length (5-30sec). Time Deployment Users can set time and day of the week where the alarm function is active. Pink means the time is armed, while blank means the time is disarmed. www.wansview.com...
-
Page 17: Advanced Settings
3 level of access to the camera: -Administrator: Full access rights -Operator: Can operate the camera, but not access to advanced settings -Viewer: Only can view camera. No Pictures or Recordings. Note: password shall be no longer than 20 characters www.wansview.com... -
Page 18: Time Setting
Enable the SD card recording, to record constantly. For example, if record time set at 2 minutes, the camera will record every 2 minutes Users can set the Recording bitrate (Resolution): 1: 1920x1080 pixels 2: 640x360 pixels 3: 320x180 pixels www.wansview.com... -
Page 19: Misc Setting
2.6.6 OSD (On Screen Display) Setting Click "OSD Setting" to set: -Overlay time: camera time in live streaming, recording and pictures -Overlay name: camera name in live streaming, recording and pictures 2.6.7 Volume Setting User can adjust the volume for the Listen and Talk www.wansview.com... -
Page 20: Ac Frequency
The camera IP address will also change. 2.6.10 About Camera Here you can check the camera information, such as Firemware, P2P version, IP address and MAC address Remember to exit the app after use, to prevent battery drainage and data consumption www.wansview.com... -
Page 21: Web Access
Note: If you use Google Chrome or Firefox you need to install the IE tab: -Firefox > Add-ons > Extensions. Search for IE Tab and install. -Chrome > More Tools > Extensions. Search for IE Tab and install. www.wansview.com... -
Page 22: View Video- Mode 2 - Limited Camera Management
Use the control panel to pan and tilt your camera’s head. Click to move camera’s head horizontally or vertically. Stop camera movement and it will go to the initial position. Set up to 8 camera preset spots, as explained above in the App Section. www.wansview.com... -
Page 23: Playback Video
Click "Search" to list the video files of the selected day. Click listed files to play back. Download files on PC with the download button. 3.4 Set Up 3.4.1 System System > Status Data about the current Camera Status System > Time Setting Users can choose to sync time to the PC or to a NTP server. www.wansview.com... - Page 24 System > Other Settings Turn off Led indicators at your choice. System > Multiple Settings Add up Cameras for multiple 4 view. Get their IP and Port, Input User and Password. Name them. www.wansview.com...
-
Page 25: Network
In System About users can check the latest camera’s firmware which can be downloaded at www.wansview.com. 3.4.2 Network These functions are meant to be managed by technical specialist except for FTP Server Settings and SMTP Settings. Contact our friendly customer service for specific technical needs. - Page 26 Network > UPNP setting If the user wants to view the camera through the internet, the router and camera UPNP port forwarding function need to be turned on. Before auto port mapping, please ensure your router supports UPNP and has been enabled. www.wansview.com...
- Page 27 Enter Onvif Setting. The user can start up and calibrate Onvif functions. The default setting for Onvif calibration is on. Note:NVR devices of some manufacturers do not support camera access with Onvif calibration. Our device supports Onvif versions 2.5 and below. www.wansview.com...
- Page 28 Receiver Address #1: These fields allow the user to enter the receiver email address which will receive any emails pertaining to alert and alarm emails. Mail subject: This field allows the user to define the subject line of the email. Mail content: This field allows the user to define the mail content. www.wansview.com...
-
Page 29: Video And Audio
Here you can adjust Microphone and Speaker volume Video and Audio > Image Setting Here you can adjust the image parameters brightness, contrast, saturation and hue. You can also flip and mirror the video image when tick the options. www.wansview.com... -
Page 30: Security
To modify /add /delete administrator operator and viewer can be set in this page. (add up to 8 viewers and set rights in total). Reminder: After the operation, click Save. Then click Refresh so that the edited content will be displayed on the web page. www.wansview.com... -
Page 31: Alarm - Motion And Audio Detection
(motion sensor or push button). We recommend the Instar IN-500 PIR Sensor as external motion sensor. The external sensor can be always open or always close. Please check your alarm device setting in the user guide. www.wansview.com... - Page 32 Please note that motion detection doesn’t work through windows. In this case we recommend to connect an external motion sensor out of the window using the IO alarm port. Alarm > Audio Detection (Baby Monitor) Alarm > Alarm Action www.wansview.com...
- Page 33 Trigger indipendently: The alarm will be triggered for any kind of active alarm event (Motion/ Voice/IO). Trigger jointly: The alarm will be triggered for multiple detection at the same time (Motion/ Voice/IO). Alarm > Armed Time By default alarm is armed 24h/7 days. Users can choose specific days and time ranges. www.wansview.com...
-
Page 34: Storage
SD card. Set the time span of each recording. Choose the resolution/bit rate. Reminder: The system default is automatic overwriting for the SD card video. If the storage space is full, the new video will automatically overwrite the earliest video file. www.wansview.com... -
Page 35: Log
4.RTSP Mode: select TCP 5.Test 6.Click OK 7.In the following mask, click finish 8.The camera is online User: your user Password: your password IP: your camera’s IP (get it from the app) Port: your camera’s port (get it from the app www.wansview.com... - Page 36 Click next Input User and Password Follow the wizard Add Camera by RSTP In camera setup, choose: Camera Type: network IP Camera Manufacturer: Wansview Click Next Select Camera Type: other IP camera Protocol: RSTP IP address: RSTP port: 554 Stream Path: live/ch0 Input user and password Click Next.
-
Page 37: Pc Client Softwar
2) Manually input the camera information. Tips: DID number can be checked from stickers on the back of the camera. You can check the DID from Wansview app If you have already added the camera on the mobile phone “wansview” app. 3) Hit “Add”. -
Page 38: Play/Stop Video
5.2 Play/Stop Video 5.2.1 Play Video When the camera is connected, double-click the camera or right-click and choose “Play” to play the video. 5.2.2 Stop Video Click to stop the video or right-click the camera and choose “Stop” www.wansview.com... -
Page 39: Video Interface
5.3.1 Edit Device Right-click the camera info and select”Edit Device”, here can change the Device Name and Group; and edit the username and password if input wrong or changed; delete the device or Save the parameters you have edited. www.wansview.com... -
Page 40: Advanced Settings
Tips: Administrator: All settings can be edited Operator: Can operate all the icons (such as listen, talk, flip/mirror) on the live video page. Visitor: Can only watch live video. www.wansview.com... -
Page 41: Wifi Setting
1080p(720p), 480p and 240p. the record length can be set 2-15 minutes User can record video to SD card. Before recording, please kindly make sure you have inserted a SD card, and format it. www.wansview.com... -
Page 42: Other Setting
Power frequencies include: 50HZ(220V voltage selects 50HZ), 60HZ(110V voltage selects 60HZ), 60HZ used in Japan, Canada 4) Maintenance User can reboot and reset (restore) the camera. Tips: To reset the camera, the camera will restore to factory setting. www.wansview.com... -
Page 43: Alarm Setting
User can choose the sensitivity from low, middle and high. The high sensitivity will be easy to get alarm. I/O Detection and Temperature Detection are disabled in this model. 5.3.3.2 Audio Detection www.wansview.com... -
Page 44: Linkage Alarm
User Name: Input FTP user name. Password: Input FTP password. Path: Specify a folder for storing video and pictures, for example: ./Q3 alarm Note: If you want to save the alarm picture and video to FTP, you must build an FTP sever, then create an FTP account with a password (not an anonymous account) on your FTP server and FTP account must have create and delete file rights. -
Page 45: Alarm Time
Tips: The Edge is not supported, please use Internet Explorer or Firefox or Chrome. 5.4 Multi-View User can monitor multiple cameras at the same time, 4-screen, 9-screen, M(6, 8,16, 25, 36) and full screen can be set up according to different demands www.wansview.com... -
Page 46: Local Setting
5: Apply: Click “Apply”, a * will appear in front of the Record plan, it means the scheduled recording is working. icon will be shown on live video screen, it means the camera is recording automatically) www.wansview.com... -
Page 47: Playback
Scheduled Recording, and “arc” for alarm Recording) 5) Double-click the recorded video name, video will be broadcasted. 5.8 Lock Lock the screen if you don’t want to operate it or prevent others to operate the camera.The default lock password is 123456. www.wansview.com... -
Page 48: Mac Software Access
6. Mac Software Access 6.1 About wansview wansview is an IP centralized monitoring software provided by the SmartCloud IP Camera centralized monitoring software manufacturer. It supports monitoring, intercom, video recording, alarm detection and other functions on IP cameras in a LAN and internet environment. -
Page 49: Faq
2. Enter chrome://settings/content to chrome to 3. Exit the chrome and open again. Enable “Allow website to run Flash” as below. Tips: The chrome may prompt “The flash player is not the latest version”, please update the flash player to the latest version. www.wansview.com... -
Page 50: Install Ie Tab For Chrome 43
Here is how to install an IE tab for Chrome: 1. Visit https://chrome.google.com/webstore/search/IE%20tab.hl=en to go to the Chrome web store to download and install an IE tab. 2. Open Chrome, right-click on a blank place; choose the IE Tab option-- click Open in IE Tab www.wansview.com... -
Page 51: Install Ie Tab For Firefox 42
Here is how to install an IE Tab for Firefox: 1. Please visit https://addons.mozilla.org/en-US/firefox/addon/ie-tab/ to download the IE Tab for Firefox. 2. Open Firefox, right click and choose "View Page in IE Tab". Then you can view live stream on camera. www.wansview.com... -
Page 52: Port Forwarding
Second, please log on to router 1, find port forwarding, then add the Router 1 IP and camera’s Port number. Note: Because each brand of router is different, port forwarding methods may be different, please consult the user manual of your router to carry out port forwarding. www.wansview.com... - Page 53 Technical Support We hope your Wansview IP Camera is enjoyable and easy to set up and use. You may have some additional questions or concerns that are not clarified in this user manual. Note: This user manual is for reference only. Slight differences may be found in the user interface.
-
Page 54: Warranty
Warranty Policy All products sold by Wansview are covered by 12 months warranty. Wansview endeavours to provide customer highest satisfactory. Should a customer receives any product which is faulty or dead on arrival please contact us first. Our technician will then examine the faulty product and process the warranty claim from there. - Page 56 www.wansview.com...
Need help?
Do you have a question about the Q3 and is the answer not in the manual?
Questions and answers